前回の記事では、開発者が意図しないメッセージをどう扱うかという課題に対し、例外処理やグローバルコマンドの利用法紹介しました。
ただしユーザーが送ってくるメッセージに対してハードコードされた文字列でしか対応できないため、今回は自然言語処理を使います。
LUIS (Language Understanding Intelligent Service)
LUIS は Microsoft の自然言語解析サービスで、入力された自然言語から「意図(インテント)」と「キーワード(エンティティ)」を取得します。まずは LUIS アプリケーションを作ります。ここでは以下のインテントとエンティティを追加します。
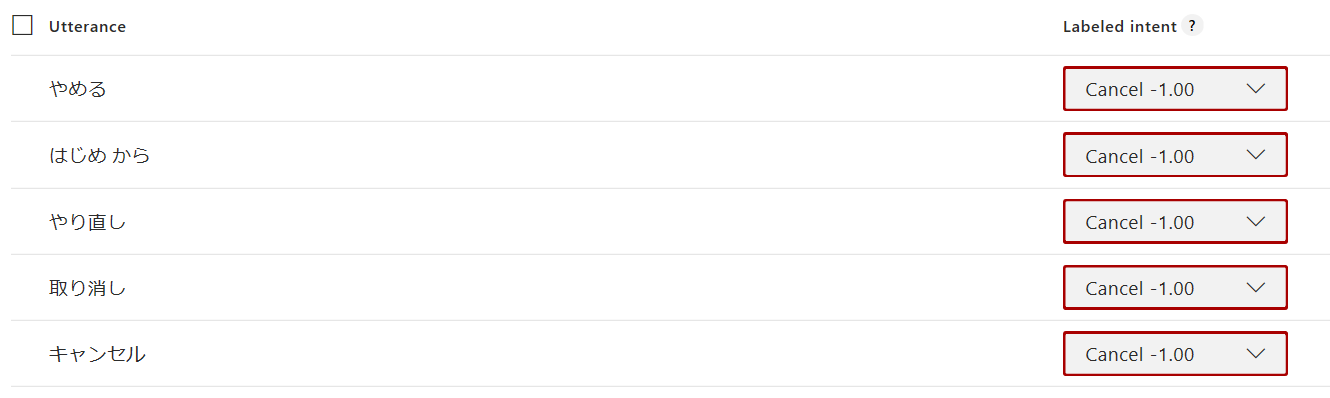
- Cancel : キャンセルに対応
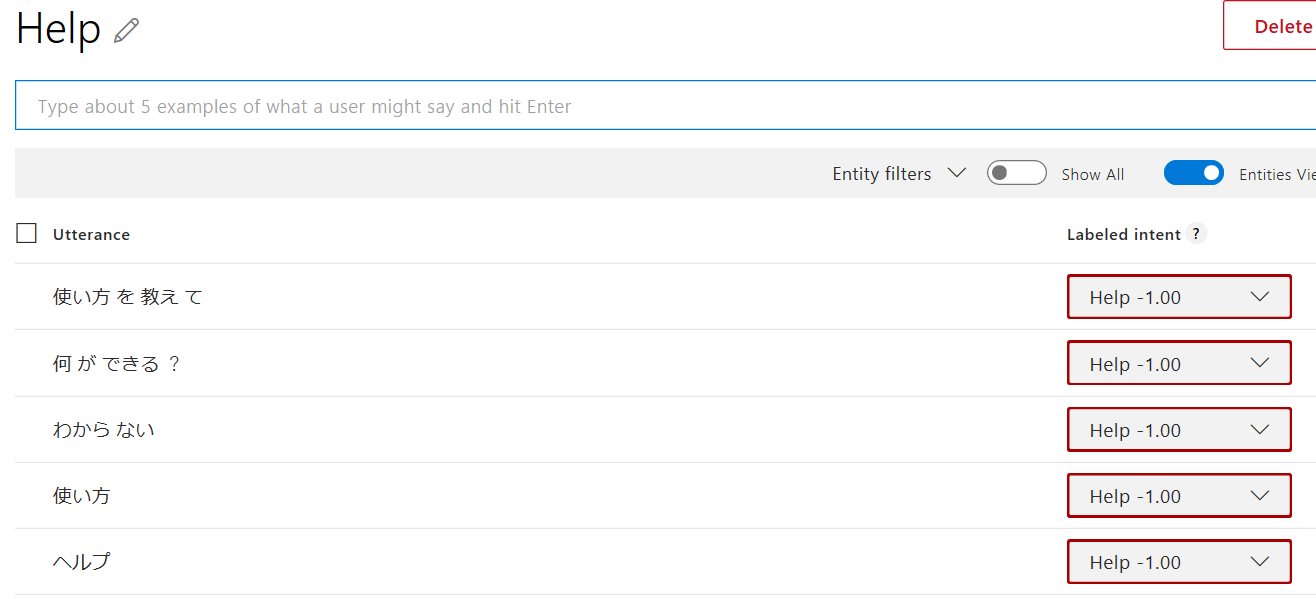
- Help : ヘルプに対応
- Weather : 天気確認用
- Profile : プロファイル変更用
1. https://www.luis.ai にアクセスし Login/Sign up をクリックして Microsoft アカウントでログイン。
2. Create new app をクリック。
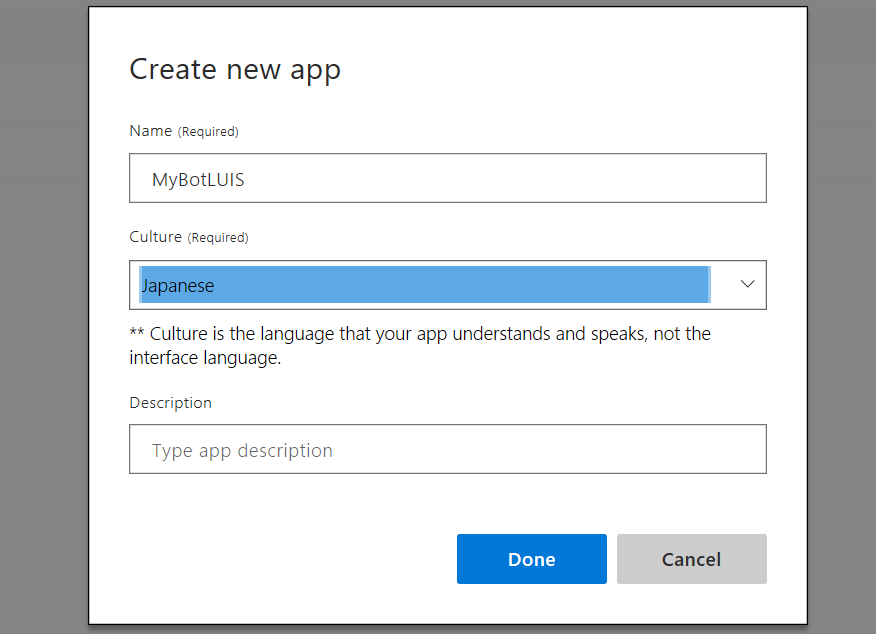
3. 名前を入力後、Culture より Japanese を選択して「Done」をクリック。
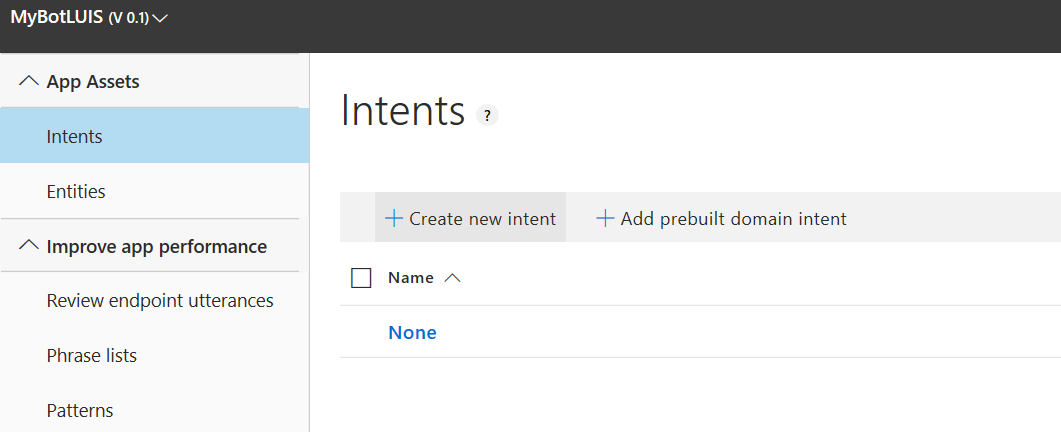
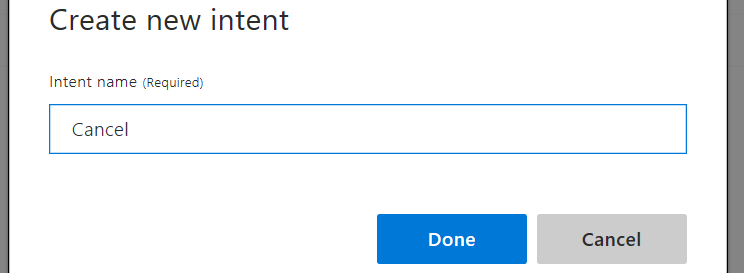
4. Create new intent をクリック。
5. 名前に Cnacel と入力して Done をクリック。
6. 例文を 5 つ程追加。
7. 同様に Help インテントを追加。
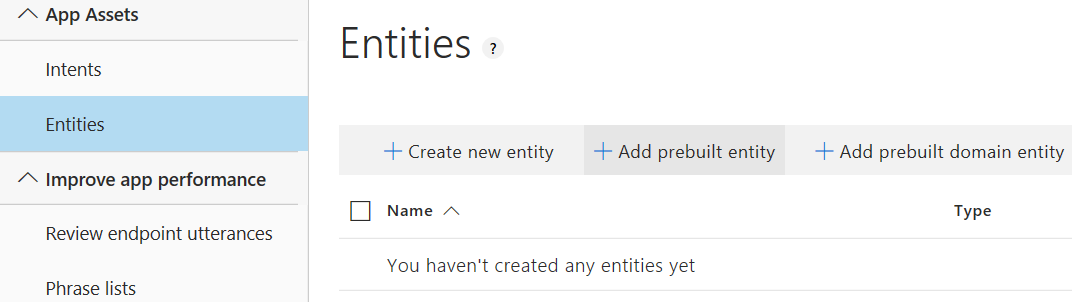
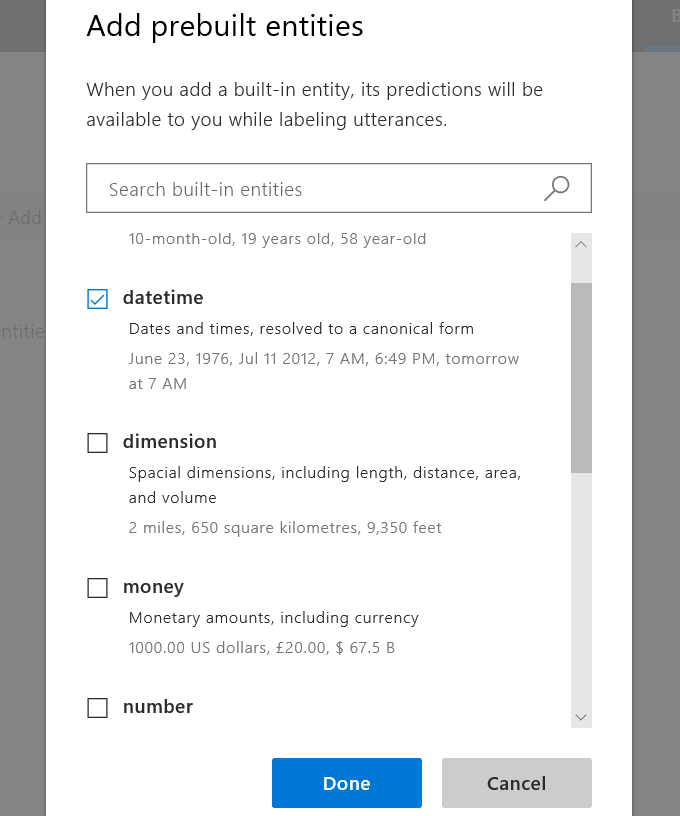
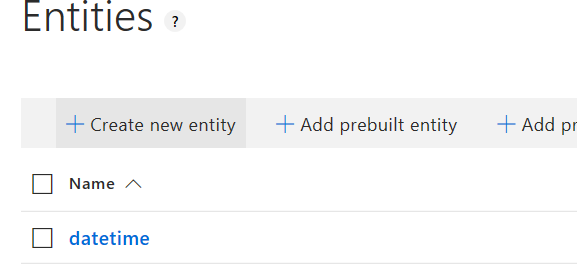
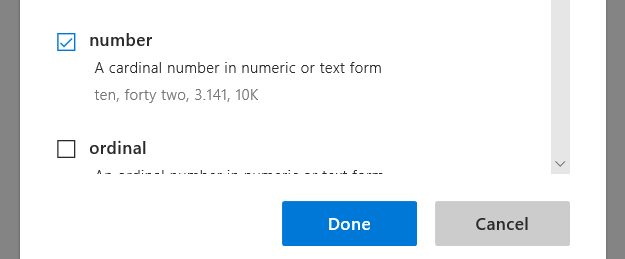
8. 次に Weather インテントを追加するが、先にエンティティを登録。Entities を選択して Add prebuilt entity をクリック。
9. datetime を選択して、Done をクリック。
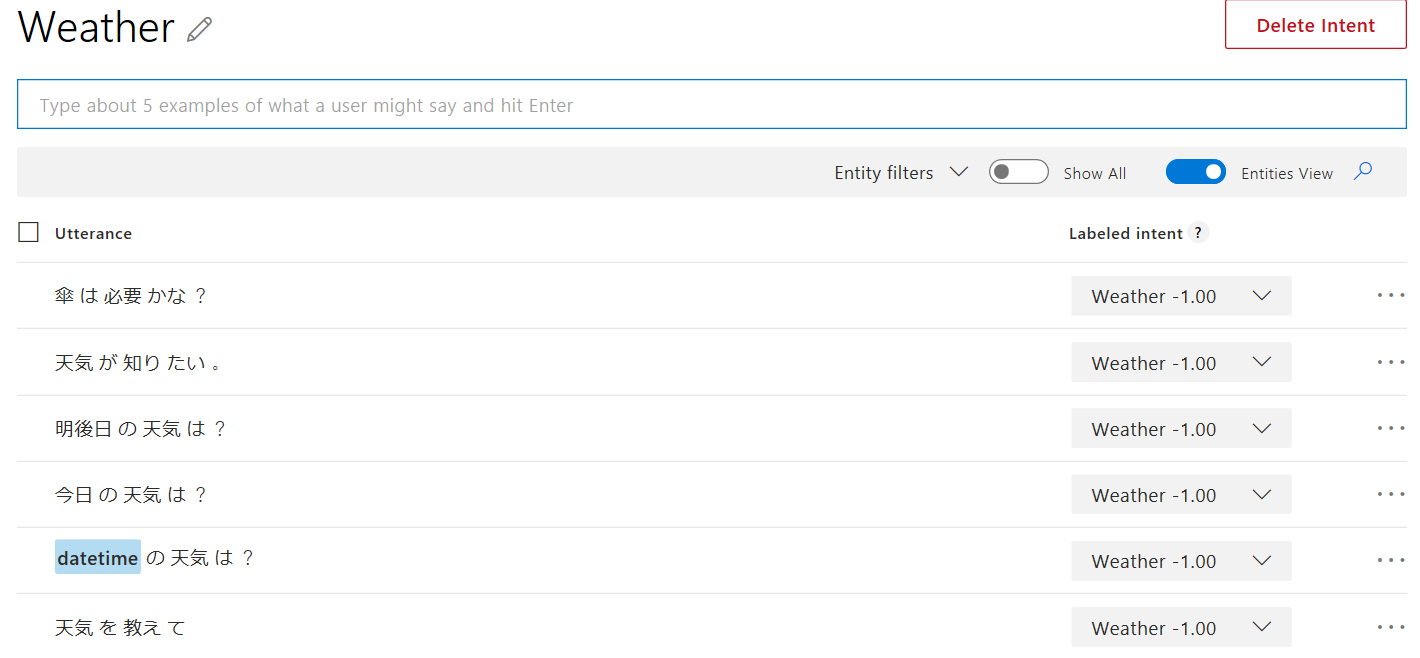
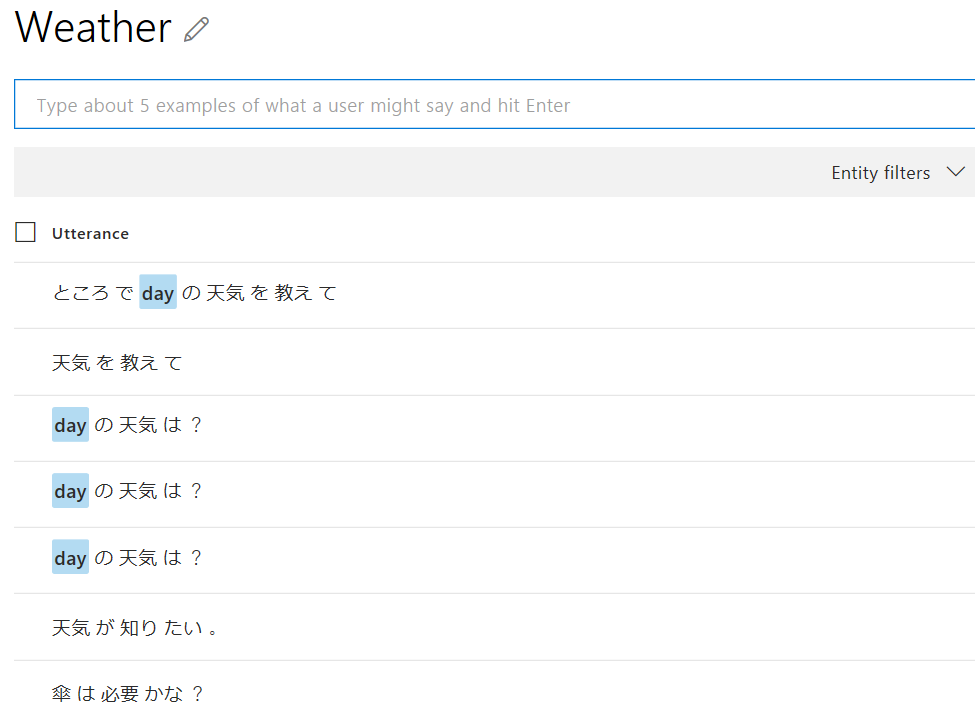
10. Intents を選択して、Create new intent より Weather を追加。例文をいくつか追加。尚、[datetime] となっている箇所は自動で日付と認識されたもの。(ここでは "明日" が認識された模様)
11. 画面右上の Train ボタンをクリックして学習を実行。

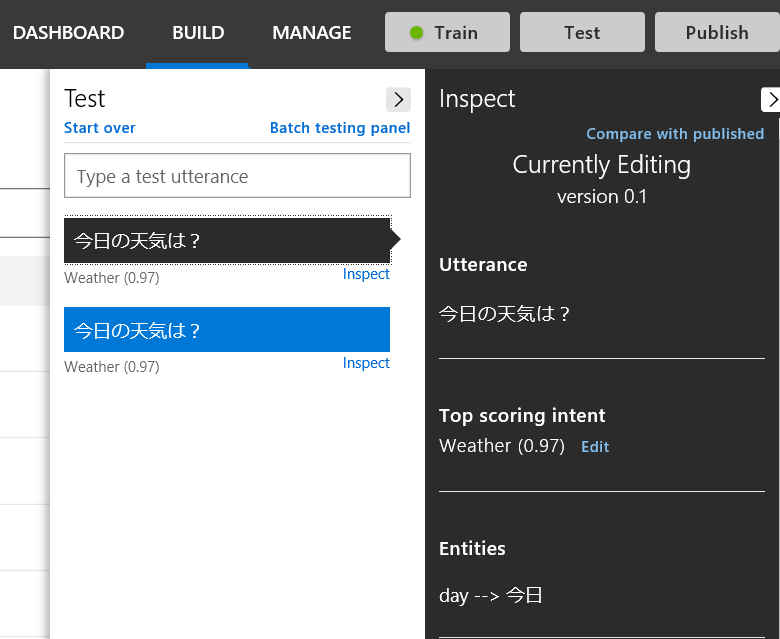
12. 学習完了後、Test をクリック。いくつか文章をテスト。
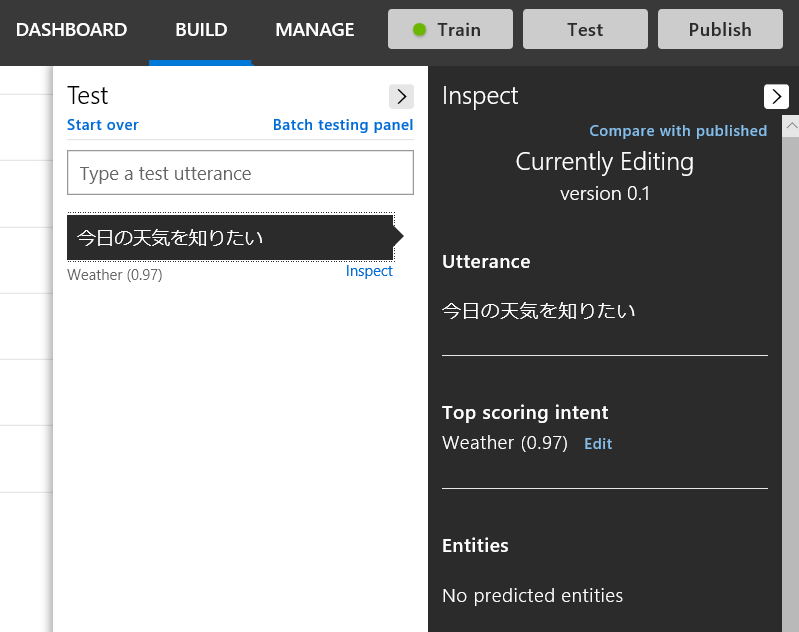
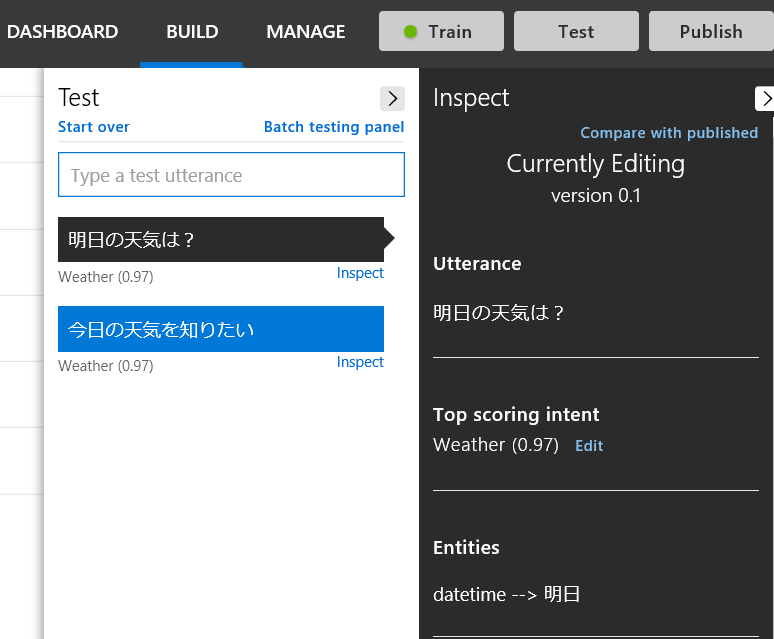
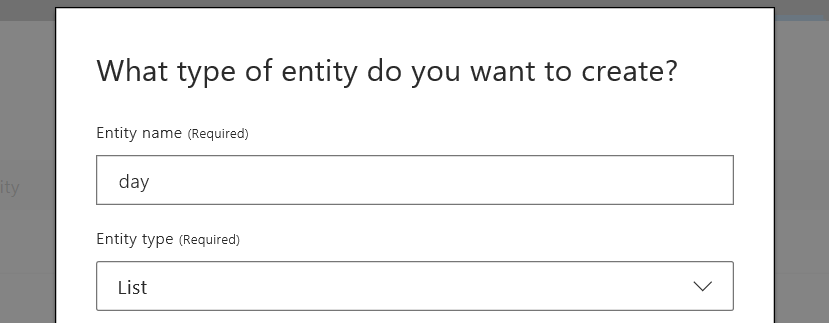
13. やはり「今日」がうまく認識されないため、自分のエンティティを作成。Entities より Create new entity をクリック。
14. 名前に day と入力して、種類より List 選択して Done をクリック。
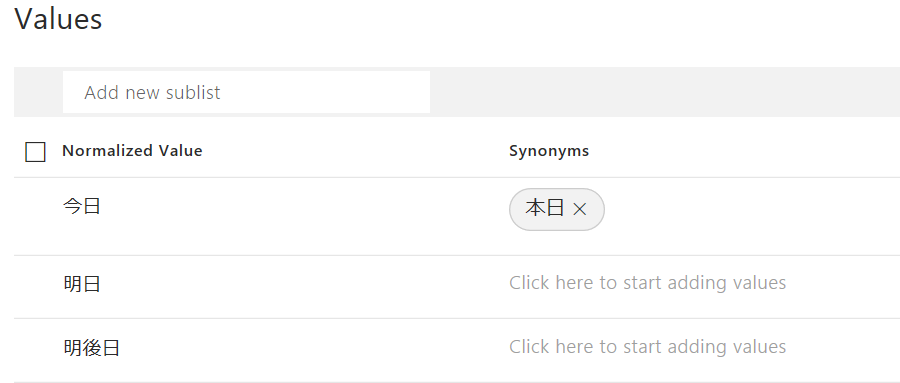
15. 値として「今日」「明日」「明後日」を追加。必要に応じて類義語も定義。
16. Intents より Weather を開いて、自動的に day が反映されていることを確認。
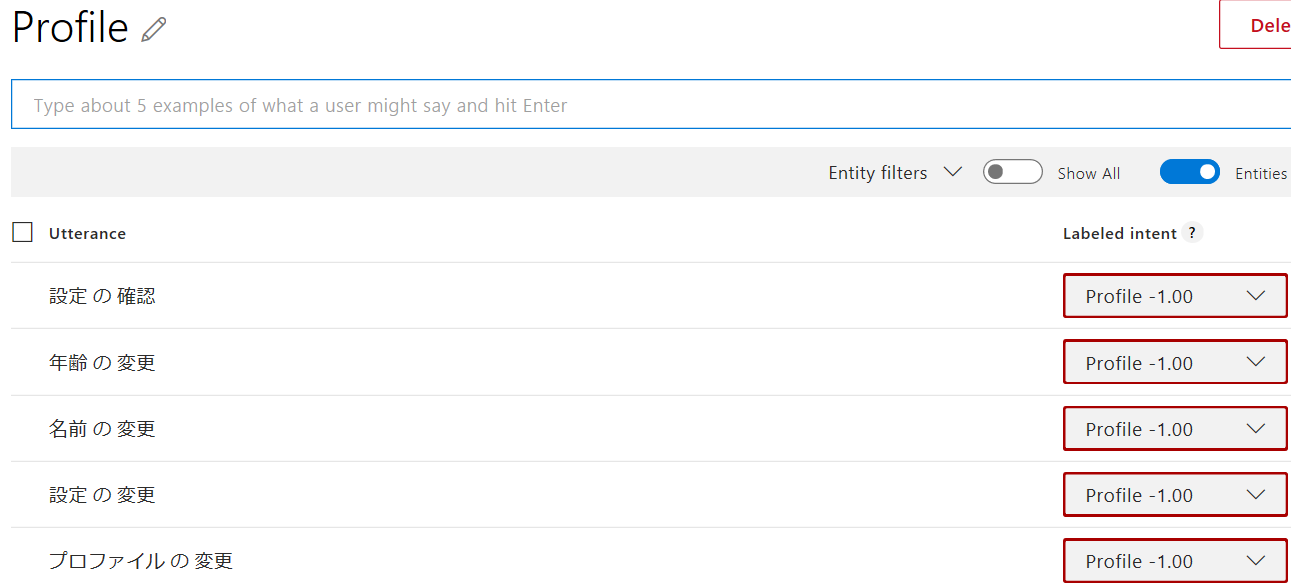
17. Intents に Profile インテントを登録。例題をいくつか登録。
18. 再度 Train をクリックし、Test を実行。Entity が認識されていることを確認。
19. Publish をクリック。Environment で Production を選択して Publish をクリック。
20. Manage を選択後、Keys and Endpoints をクリックして Endpoint を確認。後ほど Authoring Key も使うのでメモ。

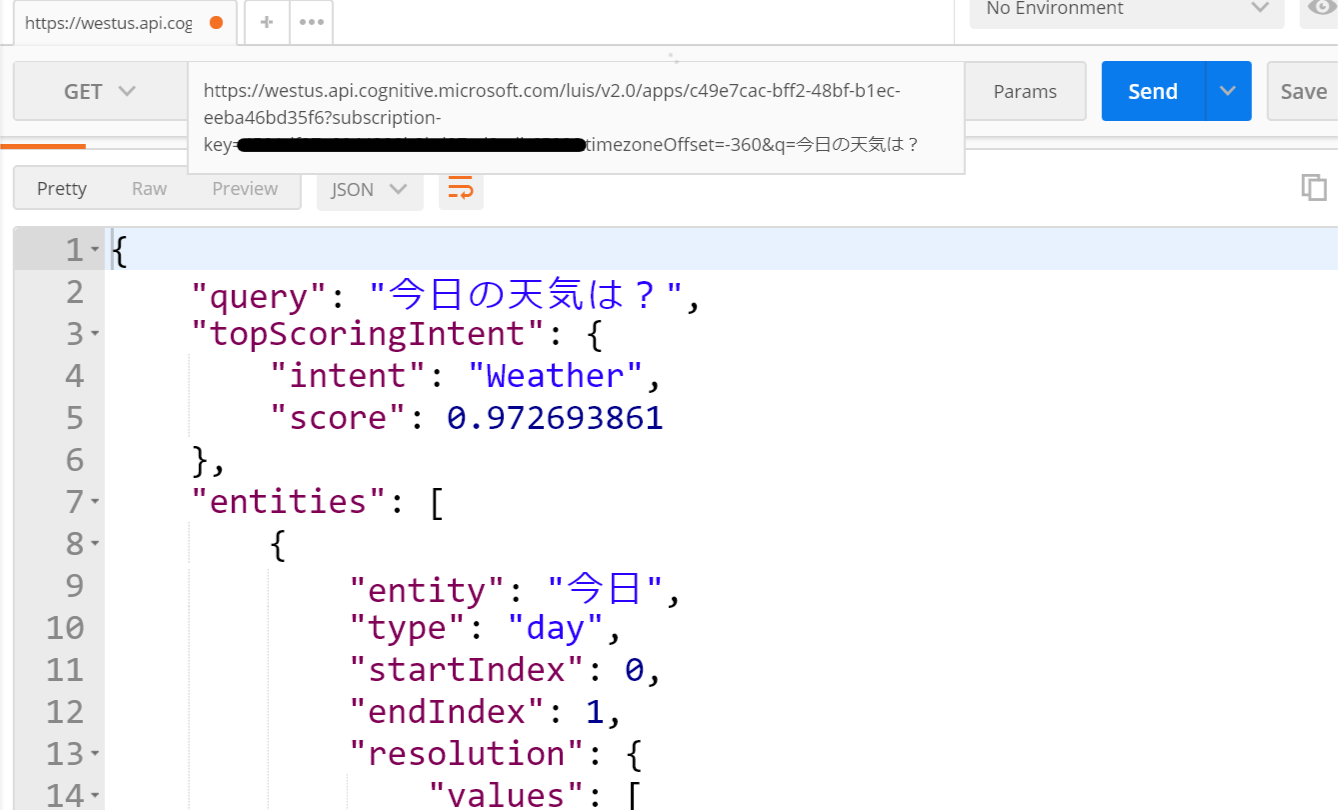
21. Postman などで Endpoint に対してテストを実行。
LUIS をボットに追加
構成ファイルの更新
作成した LUIS アプリの情報をボットに追加します。構成ファイルである .bot ファイルに情報を追加しますが、簡単に行えるようにツールを使います。
1. luis および msbot CLI をインストール。
npm install luis-apis msbot
2. 以下コマンドをプログラムのルートで実行して、.bot に設定を保存。
- LUIS App ID および Authorization Key は LUIS アプリの Manage ページより確認可能。
- luis get コマンドは LUIS アプリの情報を取得している
- --msbot パラメーターは結果を msbot である扱える JSON 形式に変換
- msbot connect luis は受け取った情報を LUIS の接続として書き込む
luis get application --appId <LUIS App ID> --authoringKey <LUIS Authorization Key> --msbot | msbot connect luis --stdin
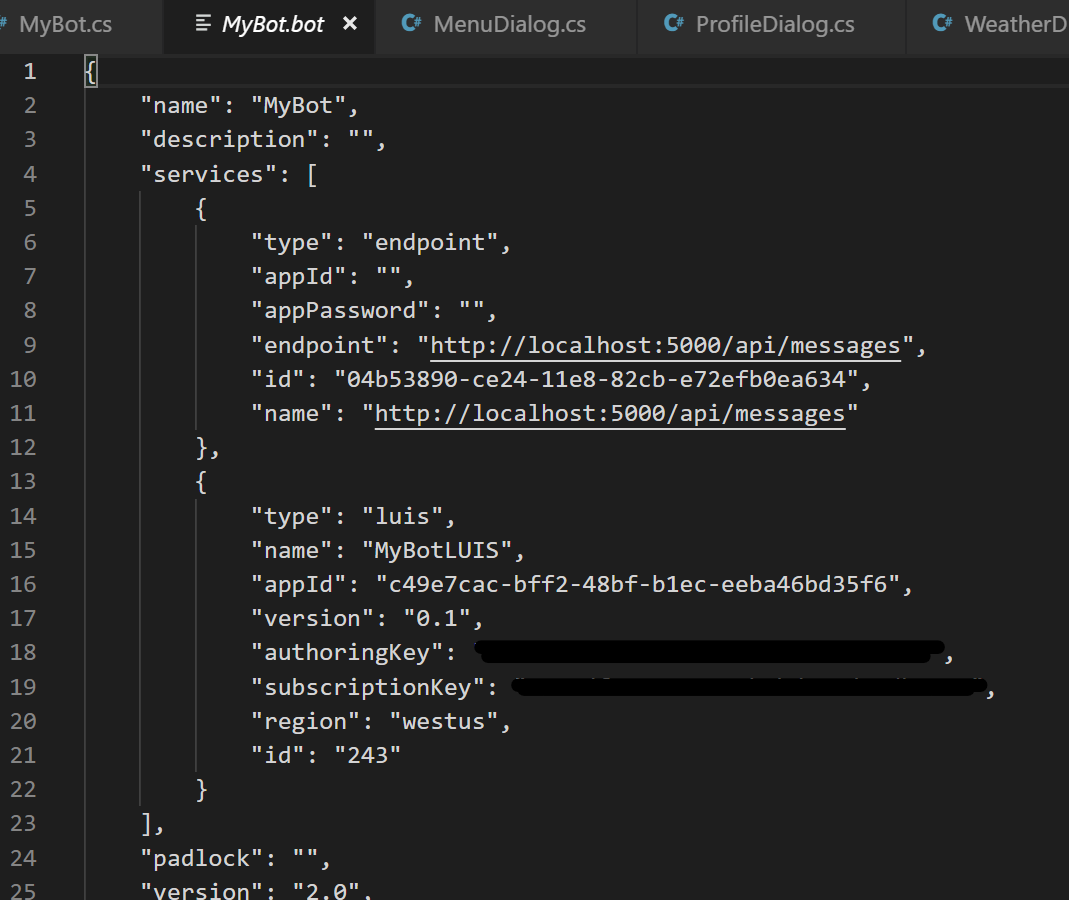
3. コマンド実行後、MyBot.bot に LUIS の項目があることを確認。
コードの追加
次に LUIS にユーザーの入力を渡して解析するようにします。
1. 以下のコマンドで Microsoft.Bot.Builder.AI.Luis と Microsoft.Bot.Configuration パッケージを追加。
dotnet add package Microsoft.Bot.Builder.AI.Luis
dotnet add package Microsoft.Bot.Configuration
dotnet restore
2. まず applications.json に構成ファイルのパスを追加。
{
  "Logging": {
    "LogLevel": {
      "Default": "Warning"
    }
  },
  "AllowedHosts": "*",
  "botFilePath": "./MyBot.bot"
}
3. 次に Startup.cs で構成ファイルの読込みと LuisRecognizer の登録。LuisRecognizer は自然言語処理をする際に利用するため、 IoC に登録。また登録は IRecognizer インターフェースを利用。
using System;
using System.Linq;
using Microsoft.AspNetCore.Builder;
using Microsoft.AspNetCore.Hosting;
using Microsoft.Bot.Builder;
using Microsoft.Bot.Builder.AI.Luis;
using Microsoft.Bot.Builder.Dialogs;
using Microsoft.Bot.Builder.Integration;
using Microsoft.Bot.Builder.Integration.AspNet.Core;
using Microsoft.Bot.Configuration;
using Microsoft.Extensions.Configuration;
using Microsoft.Extensions.DependencyInjection;
using Microsoft.Extensions.Options;

namespace myfirstbot
{
    public class Startup
    {
        public Startup(IConfiguration configuration)
        {
            Configuration = configuration;
        }

        public IConfiguration Configuration { get; }

        // This method gets called by the runtime. Use this method to add services to the container.
        public void ConfigureServices(IServiceCollection services)
        {
            var secretKey = Configuration.GetSection("botFileSecret")?.Value;
            var botFilePath = Configuration.GetSection("botFilePath")?.Value;

            // 構成ファイルの読込み
            var botConfig = BotConfiguration.Load(botFilePath ?? @".\BotConfiguration.bot", secretKey);
            // 構成ファイルより LuisService を取得
            var luisService = (LuisService) botConfig.Services.Where(x=>x.Type == "luis").First();
            // 構成情報より LuisApplication を作成
            var luisApp = new LuisApplication(luisService.AppId, luisService.AuthoringKey, luisService.GetEndpoint());
            var luisRecognizer = new LuisRecognizer(luisApp);
            services.AddSingleton<IRecognizer>(sp => luisRecognizer);

            services.AddSingleton(sp => botConfig ?? throw new InvalidOperationException($"The .bot config file could not be loaded. ({botConfig})"));

            services.AddBot<MyBot>(options =>
            {
                options.Middleware.Add(new MyLoggingMiddleware());
                options.Middleware.Add(new MyMiddleware());

                // ストレージとしてインメモリを利用
                IStorage dataStore = new MemoryStorage();
                var userState = new UserState(dataStore);
                var conversationState = new ConversationState(dataStore);
                options.State.Add(userState);
                options.State.Add(conversationState);
            });

            // MyStateAccessors を IoC に登録
            services.AddSingleton(sp =>
            {
                // AddBot で登録した options を取得。
                var options = sp.GetRequiredService<IOptions<BotFrameworkOptions>>().Value;
                if (options == null)
                {
                    throw new InvalidOperationException("BotFrameworkOptions を事前に構成してください。");
                }
                var userState = options.State.OfType<UserState>().FirstOrDefault();
                if (userState == null)
                {
                    throw new InvalidOperationException("UserState を事前に定義してください。");
                }

                var conversationState = options.State.OfType<ConversationState>().FirstOrDefault();
                if (conversationState == null)
                {
                    throw new InvalidOperationException("ConversationState を事前に定義してください。");
                }

                var accessors = new MyStateAccessors(userState, conversationState)
                {
                    // DialogState を作成
                    ConversationDialogState = conversationState.CreateProperty<DialogState>("DialogState"),
                    // UserProfile を作成
                    UserProfile = userState.CreateProperty<UserProfile>("UserProfile")
                };

                return accessors;
            });
        }

        // This method gets called by the runtime. Use this method to configure the HTTP request pipeline.
        public void Configure(IApplicationBuilder app, IHostingEnvironment env)
        {
            app.UseBotFramework();
        }
    }
}
4. MyBot.cs で登録された LuisRecognizer を利用。
- 結果によって分岐
- WeatherDialog を DialogSet に追加
- Intent : Weather でエンティティがあれば BeginDialogAsync に初期値を渡す
using System;
using System.Linq;
using System.Threading;
using System.Threading.Tasks;
using Microsoft.Bot.Builder;
using Microsoft.Bot.Builder.AI.Luis;
using Microsoft.Bot.Builder.Dialogs;
using Microsoft.Bot.Schema;
public class MyBot : IBot
{
    private MyStateAccessors accessors;
    private IRecognizer luisRecognizer;
    private DialogSet dialogs;
    // DI で MyStateAccessors および luisRecognizer は自動解決
    public MyBot(MyStateAccessors accessors, IRecognizer luisRecognizer)
    {
        this.accessors = accessors;
        this.luisRecognizer = luisRecognizer;
        this.dialogs = new DialogSet(accessors.ConversationDialogState);

        // コンポーネントダイアログを追加
        dialogs.Add(new ProfileDialog(accessors));
        dialogs.Add(new MenuDialog());
        dialogs.Add(new WeatherDialog());
    }

    public async Task OnTurnAsync(ITurnContext turnContext, CancellationToken cancellationToken = default(CancellationToken))
    {
        // DialogSet からコンテキストを作成
        var dialogContext = await dialogs.CreateContextAsync(turnContext, cancellationToken);

        // ユーザーからメッセージが来た場合
        if (turnContext.Activity.Type == ActivityTypes.Message)
        {
            var luisResult = await luisRecognizer.RecognizeAsync(turnContext, cancellationToken);
            var topIntent = luisResult?.GetTopScoringIntent();
            if (topIntent != null && topIntent.HasValue)
            {
                if (topIntent.Value.intent == "Cancel")
                {
                    // Cancel any dialog on the stack.
                    await turnContext.SendActivityAsync("キャンセルします", cancellationToken: cancellationToken);
                    await dialogContext.CancelAllDialogsAsync(cancellationToken);
                    await dialogContext.BeginDialogAsync(nameof(MenuDialog), null, cancellationToken);
                }
                else if (topIntent.Value.intent == "Profile")
                {
                    await dialogContext.BeginDialogAsync(nameof(ProfileDialog), null, cancellationToken);
                }
                else if (topIntent.Value.intent == "Weather")
                {
                    var day = luisResult.Entities["day"] == null?null:luisResult.Entities["day"][0][0].ToString();
                    await dialogContext.BeginDialogAsync(nameof(WeatherDialog), day , cancellationToken);
                }
                else
                {
                    // ヘルプの場合は使い方を言って、そのまま処理継続
                    if (topIntent.Value.intent == "Help")
                    {
                        await turnContext.SendActivityAsync("天気と予定が確認できます。", cancellationToken: cancellationToken);
                    }
                    // まず ContinueDialogAsync を実行して既存のダイアログがあれば継続実行。
                    var results = await dialogContext.ContinueDialogAsync(cancellationToken);

                    // DialogTurnStatus が Complete または Empty の場合、メニューへ。
                    if (results.Status == DialogTurnStatus.Complete || results.Status == DialogTurnStatus.Empty)
                    {
                        var userProfile = await accessors.UserProfile.GetAsync(turnContext, () => new UserProfile(), cancellationToken);
                        await turnContext.SendActivityAsync(MessageFactory.Text($"ようこそ '{userProfile.Name}' さん!"));
                        // メニューの表示
                        await dialogContext.BeginDialogAsync(nameof(MenuDialog), null, cancellationToken);
                    }
                }
            }

            // ユーザーに応答できなかった場合
            if (!turnContext.Responded)
            {
                await turnContext.SendActivityAsync("わかりませんでした。全てキャンセルします。", cancellationToken: cancellationToken);
                await dialogContext.CancelAllDialogsAsync(cancellationToken);
                await dialogContext.BeginDialogAsync(nameof(MenuDialog), null, cancellationToken);
            }
        }
        // ユーザーとボットが会話に参加した
        else if (turnContext.Activity.Type == ActivityTypes.ConversationUpdate)
        {

            // turnContext より Activity を取得
            var activity = turnContext.Activity.AsConversationUpdateActivity();
            // ユーザーの参加に対してだけ、プロファイルダイアログを開始
            if (activity.MembersAdded.Any(member => member.Id != activity.Recipient.Id))
            {
                var userProfile = await accessors.UserProfile.GetAsync(turnContext, () => new UserProfile(), cancellationToken);
                if (userProfile == null || string.IsNullOrEmpty(userProfile.Name))
                {
                    await turnContext.SendActivityAsync("ようこそ MyBot へ!");
                    await dialogContext.BeginDialogAsync(nameof(ProfileDialog), null, cancellationToken);
                }
                else
                {
                    await turnContext.SendActivityAsync(MessageFactory.Text($"ようこそ '{userProfile.Name}' さん!"));
                    // メニューの表示
                    await dialogContext.BeginDialogAsync(nameof(MenuDialog), null, cancellationToken);
                }
            }
        }

        // 最後に現在の UserProfile と DialogState を保存
        await accessors.UserState.SaveChangesAsync(turnContext, false, cancellationToken);
        await accessors.ConversationState.SaveChangesAsync(turnContext, false, cancellationToken);
    }
}
5. Weather.cs で LUIS で取得した Entity を使います。
- 渡された変数は WaterfallStepContext に保持
using System;
using System.Collections.Generic;
using System.Threading;
using System.Threading.Tasks;
using Microsoft.Bot.Builder;
using Microsoft.Bot.Builder.Dialogs;
using Microsoft.Bot.Builder.Dialogs.Choices;

public class WeatherDialog : ComponentDialog
{
    private static IList<Choice> choices = ChoiceFactory.ToChoices(new List<string>() { "今日", "明日", "明後日" });
    public WeatherDialog() : base(nameof(WeatherDialog))
    {
        // ウォーターフォールのステップを定義。処理順にメソッドを追加。
        var waterfallSteps = new WaterfallStep[]
        {
            AskDateAsync,
            ShowWeatherAsync,
        };

        // ウォーターフォールダイアログと各種プロンプトを追加
        AddDialog(new WaterfallDialog("weather", waterfallSteps));
        AddDialog(new ChoicePrompt("choice"));
    }

    private static async Task<DialogTurnResult> AskDateAsync(WaterfallStepContext stepContext, CancellationToken cancellationToken)
    {
        if (stepContext.Options != null && !string.IsNullOrEmpty(stepContext.Options.ToString()))
        {
            return await stepContext.NextAsync(new FoundChoice(){ Value = stepContext.Options.ToString()});
        }
        else
        {
            // Choice プロンプトでメニューを表示
            return await stepContext.PromptAsync(
                "choice",
                new PromptOptions
                {
                    Prompt = MessageFactory.Text("いつの天気を知りたいですか?"),
                    Choices = choices,
                },
                cancellationToken);
        }
    }

    private static async Task<DialogTurnResult> ShowWeatherAsync(WaterfallStepContext stepContext, CancellationToken cancellationToken)
    {
        var choice = (FoundChoice)stepContext.Result;
        await stepContext.Context.SendActivityAsync($"{choice.Value}の天気は晴れです");
        return await stepContext.EndDialogAsync(true, cancellationToken);
    }
}
LUIS を避ける処理
ここまでで、LUIS とボットを連動させることが出来ましたが、いくつか問題が残っています。
- 間違ったインテントが返る
- LUIS を呼びたくない場合
間違ったインテントが返る
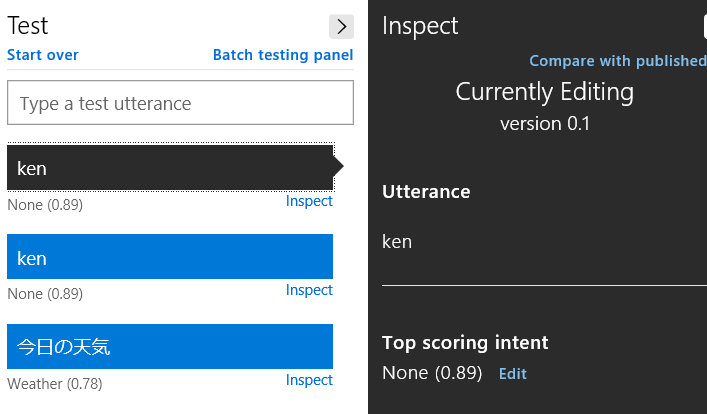
LUIS の精度は例題の数できまります。挙動がおかしい場合はより多くの例題を入れて精度を上げます。上記ボットのテスト中も、「Ken」を入力したら、キャンセルと認識されました。
1. LUIS アプリより BUILD の Review endpoint utterances を表示。
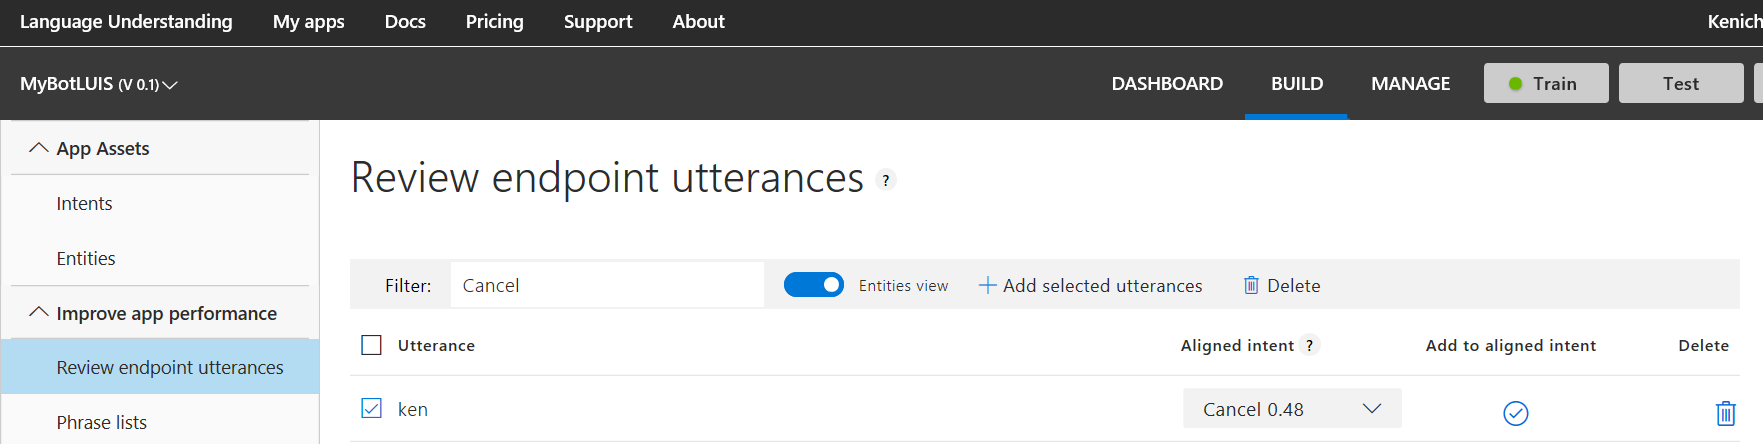
2. ここにはユーザーが入力した値が入る。ここでは「Ken」がキャンセルインテントとして認識されているため、None に紐づけて、Add to aligned intent をクリック。

3. 再学習してテスト。精度が向上したことを確認。
LUIS を呼びたくない場合
開発者が用意したメニューをユーザー選択した場合など、LUIS に対して確認をしたくない場合があります。
その場合は LUIS を呼び出す前に、ユーザー入力が期待したものか確認するロジックを追加するといいでしょう。
ここでは既に分かっている、数字や Yes、No などの応答を None に紐づけることで対応してみます。
1. LUIS アプリより Entities を選択。「Add prebuilt entity」をクリック。
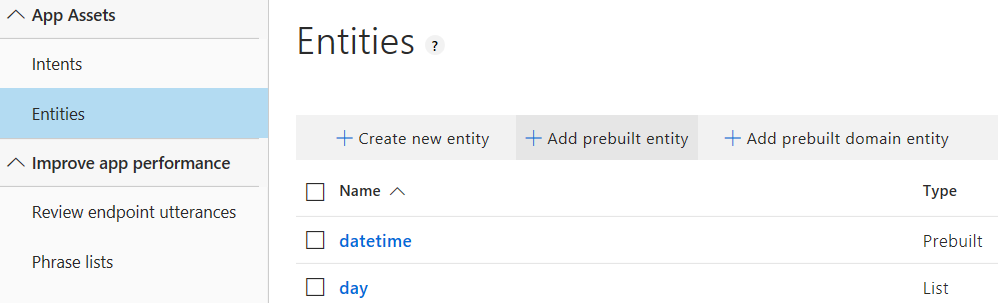
2. number を選択して「Done」をクリック。
3. Intents より None を選択して、yes, no, 1, 42 を追加。数字は number に自動変換される。
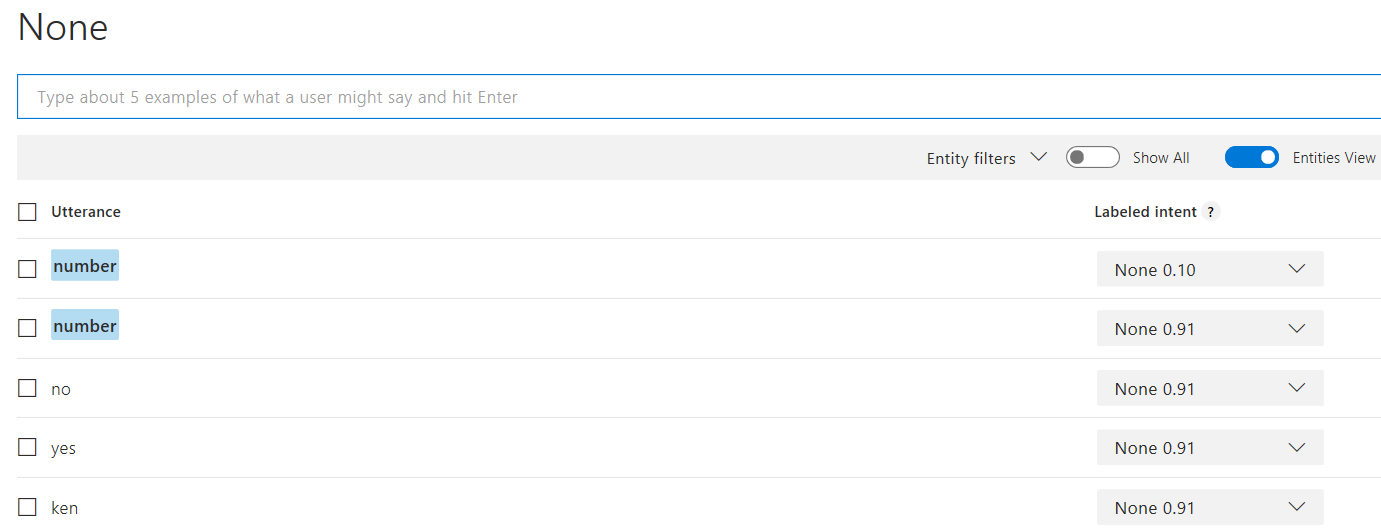
4. Train を実行してから Publish を実行。
まとめ
LUIS を使うと非常に簡単に自然言語処理ができる反面、ユーザーが Choice を選択した場合など、LUIS で解析する必要がない場合もあります。極力無駄に LUIS を呼ばないように実装をしてください。
次回は、今のところ放置になっている ScheduleDialog を実装するために、まず認証を見ていきます。