今回は Bot からアダプティブカードを送る方法を見ていきます。
アダプティブカード
より柔軟なインタラクティブカードを開発者が利用できるように考案されたもので、Bot だけでなく、Windows アプリや Outlook でも使えます。
天気ダイアログのアダプティブカード化
天気はアダプティブカードを使うと分かりやすくなるため、今回は WeatherDialog にアダプティブカードを実装します。
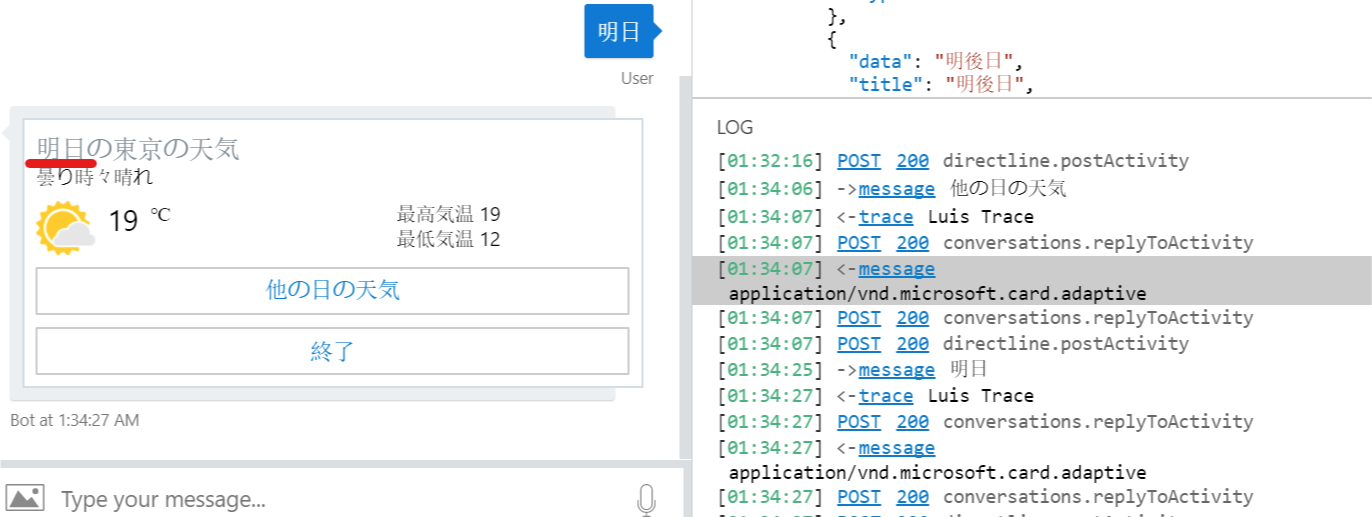
- 今日の天気の表示とアクションの選択肢を表示
- アクションによってダイアログの終了か別の日を選択
- 明日か明後日の天気を選択
- 指定した日の天気を表示し処理をループ
1. AdaptiveJsons フォルダを作成して、天気を表示するための Weather.json を追加。

2. 以下 JSON を張り付け。
- Action.Submit でボタンクリック時にテキストを送る
{
    "$schema": "http://adaptivecards.io/schemas/adaptive-card.json",
    "type": "AdaptiveCard",
    "version": "1.0",
    "body": [
        {
            "type": "TextBlock",
            "text": "{0}の東京の天気",
            "size": "large",
            "isSubtle": true
        },
        {
            "type": "TextBlock",
            "text": "曇り時々晴れ",
            "spacing": "none"
        },
        {
            "type": "ColumnSet",
            "columns": [
                {
                    "type": "Column",
                    "width": "auto",
                    "items": [
                        {
                            "type": "Image",
                            "url": "http://messagecardplayground.azurewebsites.net/assets/Mostly%20Cloudy-Square.png",
                            "size": "small"
                        }
                    ]
                },
                {
                    "type": "Column",
                    "width": "auto",
                    "items": [
                        {
                            "type": "TextBlock",
                            "text": "19",
                            "size": "extraLarge",
                            "spacing": "none"
                        }
                    ]
                },
                {
                    "type": "Column",
                    "width": "stretch",
                    "items": [
                        {
                            "type": "TextBlock",
                            "text": "℃",
                            "weight": "bolder",
                            "spacing": "small"
                        }
                    ]
                },
                {
                    "type": "Column",
                    "width": "stretch",
                    "items": [
                        {
                            "type": "TextBlock",
                            "text": "最高気温 19",
                            "horizontalAlignment": "left"
                        },
                        {
                            "type": "TextBlock",
                            "text": "最低気温 12",
                            "horizontalAlignment": "left",
                            "spacing": "none"
                        }
                    ]
                }
            ]
        }
    ],
    "actions": [
        {
            "type": "Action.Submit",
            "title": "他の日の天気",
            "data": "他の日の天気"
        },
        {
            "type": "Action.Submit",
            "title": "終了",
            "data":  "終了"
        }
    ]
}
3. 同様に他の日の選択肢を WeatherDateChoice.json として追加。
{
    "$schema": "http://adaptivecards.io/schemas/adaptive-card.json",
    "type": "AdaptiveCard",
    "version": "1.0",
    "speak": "いつの天気を調べますか?",
    "actions": [
        {
            "type": "Action.Submit",
            "title": "明日",
            "data": "明日"
        },
        {
            "type": "Action.Submit",
            "title": "明後日",
            "data":  "明後日"
        }
    ]
}
4. WeatherDialog.cs を以下の様に変更。
using System.Collections.Generic;
using System.IO;
using System.Threading;
using System.Threading.Tasks;
using Microsoft.Bot.Builder.Dialogs;
using Microsoft.Bot.Schema;
using Newtonsoft.Json;

public class WeatherDialog : ComponentDialog
{
    // 既定で今日の天気を表示
    private string date = "今日";
    public WeatherDialog() : base(nameof(WeatherDialog))
    {
        // ウォーターフォールのステップを定義。処理順にメソッドを追加。
        var waterfallSteps = new WaterfallStep[]
        {
            ShowWeatherAsync,
            CheckUserInputAsync,
            CheckDateAsync,
        };

        // ウォーターフォールダイアログと各種プロンプトを追加
        AddDialog(new WaterfallDialog("weather", waterfallSteps));
        AddDialog(new TextPrompt("date"));
    }

    private async Task<DialogTurnResult> ShowWeatherAsync(WaterfallStepContext stepContext, CancellationToken cancellationToken)
    {
        // アダプティブカードの定義を JSON ファイルより読込み、対象日を変更
        var adaptiveCardJson = File.ReadAllText("./AdaptiveJsons/Weather.json").Replace("{0}", date);
        var adaptiveCardAttachment = new Attachment()
        {
            ContentType = "application/vnd.microsoft.card.adaptive",
            Content = JsonConvert.DeserializeObject(adaptiveCardJson),
        };

        // 返信をコンテキストより作成
        var reply = stepContext.Context.Activity.CreateReply();
        reply.Attachments = new List<Attachment>() { adaptiveCardAttachment };

        // 戻り値は文字型のため、TextPrompt ダイアログを使って送信
        return await stepContext.PromptAsync("date", new PromptOptions
        {
            Prompt = reply
        },
        cancellationToken: cancellationToken);
    }

    private async Task<DialogTurnResult> CheckUserInputAsync(WaterfallStepContext stepContext, CancellationToken cancellationToken)
    {
        var input = stepContext.Result.ToString();

        if (input == "終了")
            return await stepContext.EndDialogAsync();

        // 他の日を選択するようにアダプティブカードを作成
        var adaptiveCardJson = File.ReadAllText("./AdaptiveJsons/WeatherDateChoice.json");
        var adaptiveCardAttachment = new Attachment()
        {
            ContentType = "application/vnd.microsoft.card.adaptive",
            Content = JsonConvert.DeserializeObject(adaptiveCardJson),
        };

        var reply = stepContext.Context.Activity.CreateReply();
        reply.Attachments = new List<Attachment>() { adaptiveCardAttachment };

        // 戻り値は文字型のため、TextPrompt ダイアログを使って送信
        return await stepContext.PromptAsync("date", new PromptOptions
        {
            Prompt = reply
        },
        cancellationToken: cancellationToken);
    }

    private async Task<DialogTurnResult> CheckDateAsync(WaterfallStepContext stepContext, CancellationToken cancellationToken)
    {
        // 結果を date に指定してダイアログを再利用
        date = stepContext.Result.ToString();
        return await stepContext.ReplaceDialogAsync("weather");
    }
}
5. 必要に応じて LUIS を更新。
テスト
1. F5 キーを押下してデバッグ開始。「天気を確認」を実行すると今日の天気が出ることを確認。

2. 「他の日の天気」をクリックすると選択肢が出ることを確認。
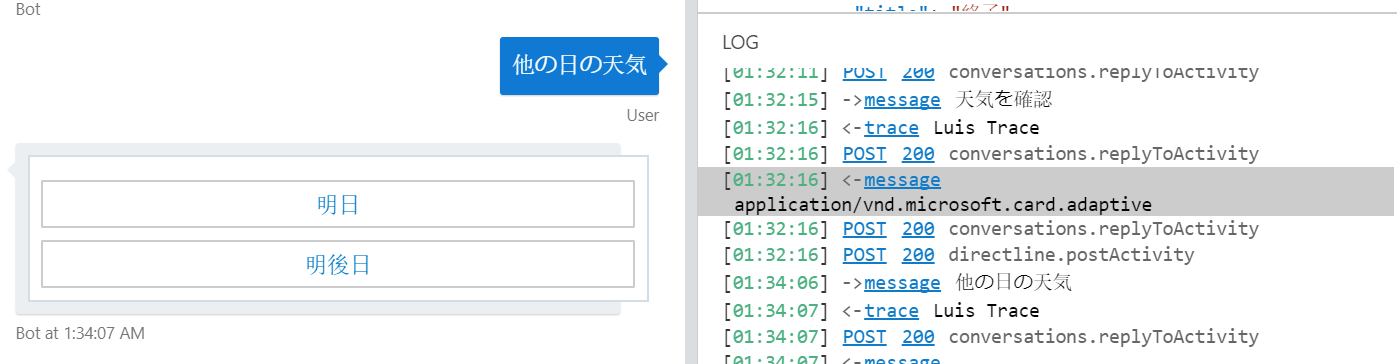
3. 選択した日の天気が出ることを確認。
アダプティブカードでより複雑な値を扱う
アダプティブカードは単純な文字列だけなく、構造化されたデータを扱うこともできます。この場合 TurnContext では Text に値はなく、Value に値がくるため、処理を工夫する必要があります。
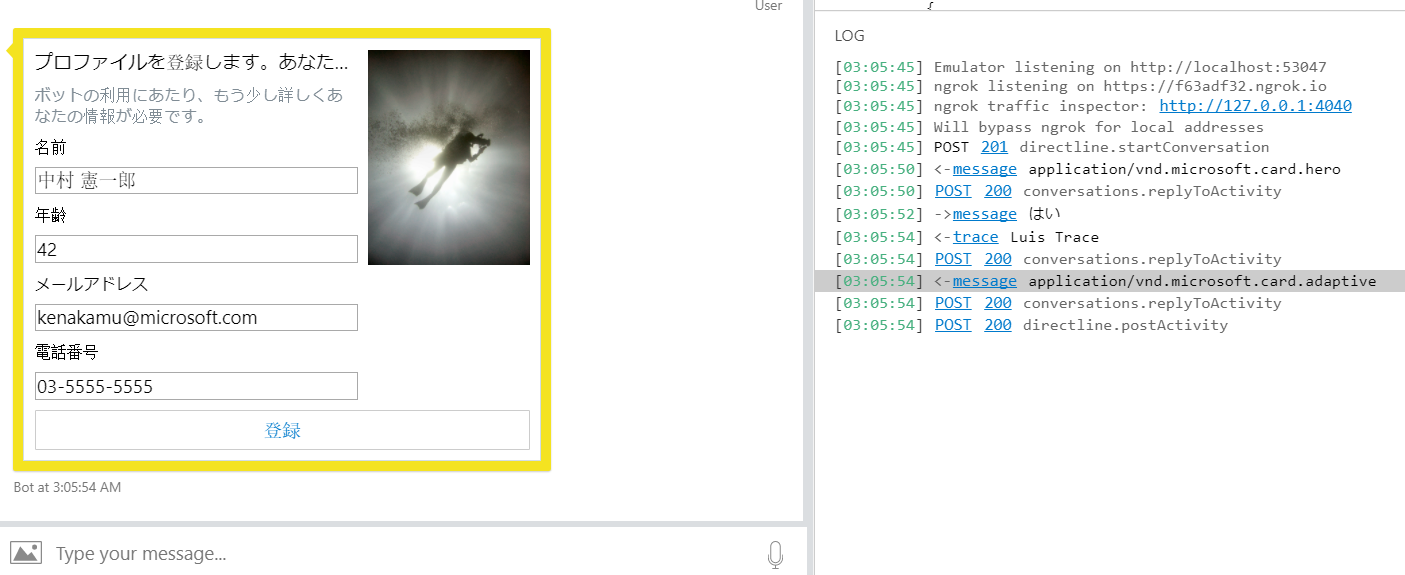
ここでは初めのプロファイル収集の高度化を行います。
1. AdaptiveJsons フォルダに Profile.json を追加し、以下のコードを追加。
{
    "$schema": "http://adaptivecards.io/schemas/adaptive-card.json",
    "type": "AdaptiveCard",
    "version": "1.0",
    "body": [
        {
            "type": "ColumnSet",
            "columns": [
                {
                    "type": "Column",
                    "width": 2,
                    "items": [
                        {
                            "type": "TextBlock",
                            "text": "プロファイルを登録します。あなたのことを教えてください。",
                            "weight": "bolder",
                            "size": "medium"
                        },
                        {
                            "type": "TextBlock",
                            "text": "ボットの利用にあたり、もう少し詳しくあなたの情報が必要です。",
                            "isSubtle": true,
                            "wrap": true
                        },
                        {
                            "type": "TextBlock",
                            "text": "名前",
                            "wrap": true
                        },
                        {
                            "type": "Input.Text",
                            "id": "name",
                            "placeholder": "姓名"
                        },
                        {
                            "type": "TextBlock",
                            "text": "年齢",
                            "wrap": true
                        },
                        {
                            "type": "Input.Number",
                            "id": "age",
                            "placeholder": "0"
                        },
                        {
                            "type": "TextBlock",
                            "text": "メールアドレス",
                            "wrap": true
                        },
                        {
                            "type": "Input.Text",
                            "id": "email",
                            "placeholder": "youremail@example.com",
                            "style": "email"
                        },
                        {
                            "type": "TextBlock",
                            "text": "電話番号"
                        },
                        {
                            "type": "Input.Text",
                            "id": "phone",
                            "placeholder": "(xx)-xxxx-xxxx",
                            "style": "tel"
                        }
                    ]
                },
                {
                    "type": "Column",
                    "width": 1,
                    "items": [
                        {
                            "type": "Image",
                            "url": "https://upload.wikimedia.org/wikipedia/commons/b/b2/Diver_Silhouette%2C_Great_Barrier_Reef.jpg",
                            "size": "auto"
                        }
                    ]
                }
            ]
        }
    ],
    "actions": [
        {
            "type": "Action.Submit",
            "title": "登録"
        }
    ]
}
2. 値を格納するためのモデルを追加。Models フォルダの UserProfile.cs にメールアドレスと電話番号を追加。
public class UserProfile
{
    public string Name { get; set; }
    public int Age { get; set; }
    public string Email { get; set; }
    public string Phone { get; set; }
}
3. Validators フォルダに AdaptiveCardResponseValidators.cs を追加して以下のコードを追加。
using System.Threading;
using System.Threading.Tasks;
using Microsoft.Bot.Builder.Dialogs;
using Newtonsoft.Json;

public static class AdaptiveCardResponseValidators
{
    public static Task<bool> ValidateInput(PromptValidatorContext<string> promptContext, CancellationToken cancellationToken)
    {
        // 文字は返ってこないため Succeeded の場合は false
        if (promptContext.Recognized.Succeeded)
        {
            return Task.FromResult(false);
        }

        // オプションの検証プロパティから NumberRange を取得。
        NumberRange range = promptContext.Options.Validations is NumberRange ?
            (NumberRange)promptContext.Options.Validations :
            new NumberRange() { MinValue = 0, MaxValue = 120 };

        var input = JsonConvert.DeserializeObject<UserProfile>(promptContext.Context.Activity.Value.ToString());
        // 検証する場合、ここで検証
        // 0 より小さいか 120 より大きい場合は False
        if (input.Age < range.MinValue || input.Age > range.MaxValue)
        {
            promptContext.Context.SendActivityAsync("年齢は 1 以上 120 未満で入れてください。");
            return Task.FromResult(false);
        }
        return Task.FromResult(true);
    }
}
4. ProfileDialog.cs を以下の様に変更。
using System.Collections.Generic;
using System.IO;
using System.Threading;
using System.Threading.Tasks;
using Microsoft.Bot.Builder;
using Microsoft.Bot.Builder.Dialogs;
using Microsoft.Bot.Schema;
using Newtonsoft.Json;

public class ProfileDialog : ComponentDialog
{
    private MyStateAccessors accessors;
    public ProfileDialog(MyStateAccessors accessors) : base(nameof(ProfileDialog))
    {
        this.accessors = accessors;

        // ウォーターフォールのステップを定義。処理順にメソッドを追加。
        var waterfallSteps = new WaterfallStep[]
        {
            //AdaptiveAsync,
            ProfileStepAsync,
            SummaryStepAsync,
        };
        // ウォーターフォールダイアログと各種プロンプトを追加
        AddDialog(new WaterfallDialog("profile", waterfallSteps));
        AddDialog(new TextPrompt("adaptive", AdaptiveCardResponseValidators.ValidateInput));
    }

    private async Task<DialogTurnResult> ProfileStepAsync(WaterfallStepContext stepContext, CancellationToken cancellationToken)
    {
        var adaptiveCardJson = File.ReadAllText("./AdaptiveJsons/Profile.json");
        var adaptiveCardAttachment = new Attachment()
        {
            ContentType = "application/vnd.microsoft.card.adaptive",
            Content = JsonConvert.DeserializeObject(adaptiveCardJson),
        };

        // 返信をコンテキストより作成
        var reply = stepContext.Context.Activity.CreateReply();
        reply.Attachments = new List<Attachment>() { adaptiveCardAttachment };

        // 戻り値は複雑な型だが一旦 TextPrompt ダイアログを使って送信
        return await stepContext.PromptAsync("adaptive", new PromptOptions
        {
            Prompt = reply,
            Validations = new NumberRange() { MinValue = 0, MaxValue = 120 }
        },
        cancellationToken: cancellationToken);
    }

    private async Task<DialogTurnResult> SummaryStepAsync(WaterfallStepContext stepContext, CancellationToken cancellationToken)
    {
        var userProfile = await accessors.UserProfile.GetAsync(stepContext.Context, () => new UserProfile(), cancellationToken);

        var input = JsonConvert.DeserializeObject<UserProfile>(stepContext.Context.Activity.Value.ToString());

        await stepContext.Context.SendActivityAsync(MessageFactory.Text("プロファイルを保存します。"));
        // 必要に応じて入れる値を確認したり変更したりする。
        userProfile.Name = input.Name;
        userProfile.Age = input.Age;
        userProfile.Email = input.Email;
        userProfile.Phone = input.Phone;

        // プロファイルの保存
        await accessors.UserProfile.SetAsync(stepContext.Context, userProfile, cancellationToken);
        return await stepContext.EndDialogAsync(cancellationToken: cancellationToken);
    }
}
5. MyBot.cs の OnTurnAsync で入力にテキストがない場合はアダプティブカードの返信とみなす処理を添付ファイルチェックの他分岐として追加。
if (turnContext.Activity.Attachments != null)
{
    // 添付ファイルを取得
    ....
}
else if(string.IsNullOrEmpty(turnContext.Activity.Text))
{
    // Text がないためダイアログをそのまま継続
    await dialogContext.ContinueDialogAsync(cancellationToken);
}
6. F5 キーを押下して動作を確認。プロファイル登録を聞かれたら「はい」を選択し、情報を入力したら「登録」をクリック。
7. プロファイルが保存された画面が出ることを確認。

8.「Restart conversation」をクリックして情報が登録されていることを確認。

9. 範囲外の年齢を入れた場合の処理も確認。
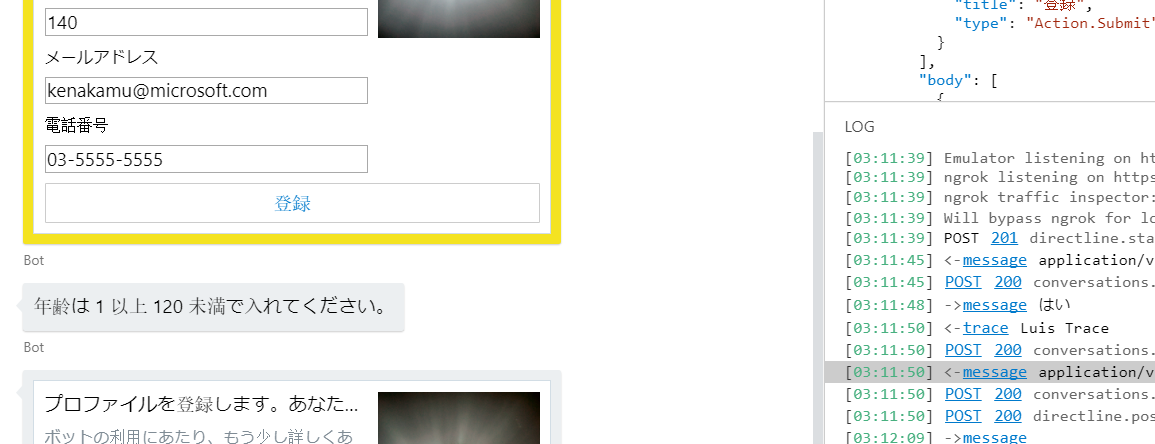
まとめ
今回はアダプティブカード送信の基本を確認しました。次回はより高度な使い方を紹介します。