概要
SVGを表示するために D3js を利用したいのだが、JSコード上で動的に操作するデータに対応するSVGツリーの構築方法が特徴的だったので実験してみた。
JS 上でデータ配列を操作したときに、データ配列の各要素に対応する DOM element を追加、更新、削除する。(最終的には SVG の要素の操作が目的だが、ここではシンプルに HTML DOM 要素を用いて実験した)
実験内容は、Codepen で実行することができる。
構成
- D3js (ver4)
既存 DOM element 集合を見つける: selectAll()
これは jQuery と基本的には同じ考え方。selectAll() で指定した条件を満たす DOM element 集合が手に入る。
<ul id="list">
  <li>initial element 0</li>
  <li>initial element 1</li>
</ul>
に対して
d3.select("#list").selectAll("li");
を実行すると、以下のような selection が構築される。

既存 DOM element と data を対応させる: data()
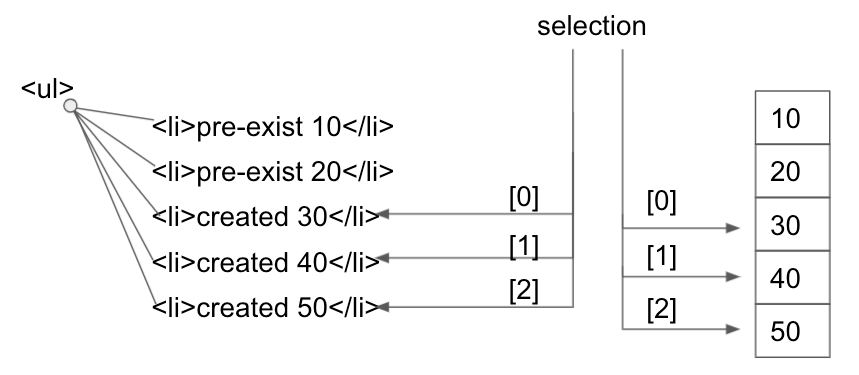
selection が指す DOM element 配列にデータ配列を対応させるためには、data() を利用する。まずシンプルに以下のように記述すると、DOM element 配列とデータ配列の要素が配列要素順に従って対応する。この場合、データ配列の要素数の方が多いので、対応する DOM element が存在しないデータ配列要素が残る。
d3.select("#list").selectAll("li")
  .data([10, 20, 30, 40, 50]);

この selection に含まれる各 DOM element の内容を更新するには、text() などの DOM element を操作するメソッドを利用する。
以下の例では、selection に含まれる各 DOM element (<li> element) のテキストを、対応するデータを利用して更新している。
d3.select("#list").selectAll("li")
   .data([10, 20, 30, 40, 50])
   .text(function(d) {
       return "This is pre-existing element and the value is " + d;
     });
新規 DOM element を data に対応して作成する:enter(), append()
先の例では、データ配列の方が要素数が多く、後半3つのデータに対しては DOM element が存在しなかった。ここでは、それらのデータに対して新規の DOM element を挿入する。
enter() は、selection が指すデータ配列の要素のうち対応する DOM element がないものに対して、仮の DOM element (placeholder) を作り、それらを指す新しい selection を返す。
d3.select("#list").selectAll("li")
   .data([10, 20, 30, 40, 50])
   .text(function(d) {
       return "This is pre-existing element and the value is " + d;
     })
   .enter();

そして、これらの placeholder を指す selection に対して append() を適用すると新規 DOM element を挿入することができる。
d3.select("#list").selectAll("li")
   .data([10, 20, 30, 40, 50])
   .text(function(d) {
       return "This is pre-existing element and the value is " + d;
     })
   .enter()
   .append("li")
   .text(function(d) {
       return "This is dynamically created element and the value is " + d;
     });

配列末尾の DOM element を削除する:exit(), remove()
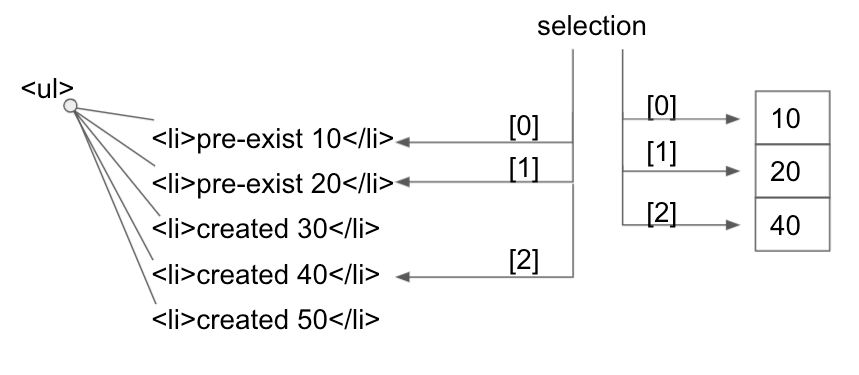
ここで、もう一度 selectAll() を実行すると、5つの <li> が見つかる。さらに要素3つのデータ配列を data() で対応させてみる。
d3.select("#list").selectAll("li")
   .data([10, 20, 40]);

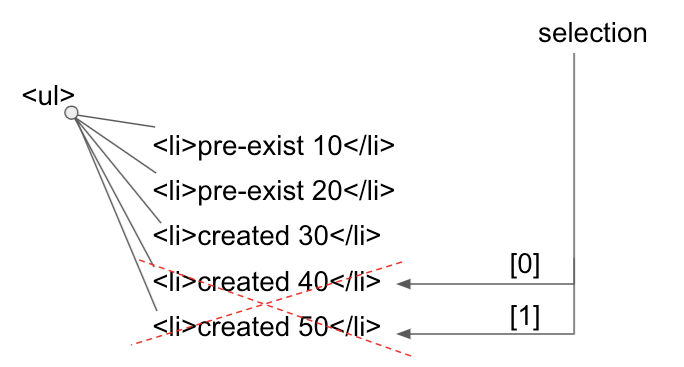
exit() は、enter() の逆にあたり、対応するデータが存在しない DOM element 群をさす selection を作成する。
そして remove() は、selection が指す DOM element を削除する。
ここで注意が必要なのは、DOM element 配列とデータ配列の対応は配列要素の順番で決まっていること。データ配列の中から3つ目の要素("30") を削除したからと言って、対応する(と人間が思っている)<li> 要素 ("This is dynamically created element and the value is 30")が削除されるわけではない。
d3.select("#list").selectAll("li")
   .data([10, 20, 40])
   .exit()
   .remove();

データに対応する DOM element を削除する:attr(), data()
データに対応する DOM element を削除するためには、そもそも「対応」を記憶しておく必要がある。そのため、attr() を利用する。
d3.select("#list").selectAll("li")
   .data([10, 20, 30, 40, 50])
   .text(function(d) {
       return "This is pre-existing element and the value is " + d;
     })
   .attr('id', function(d) {
     return d;
   })
   .enter()
   .append("li")
   .text(function(d) {
       return "This is dynamically created element and the value is " + d;
     })
   .attr('id', function(d) {
     return d;
   });
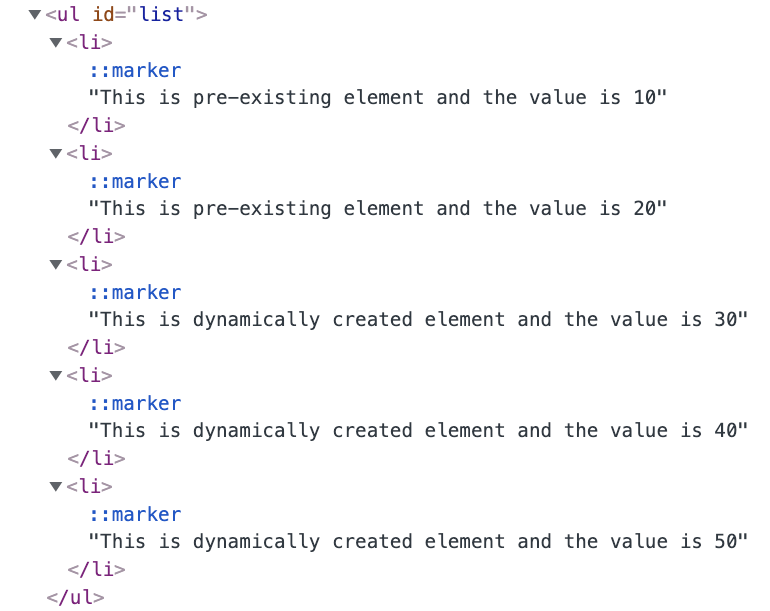
画面上の見た目は変わらないが、DOM ツリーをみると各 <li> 要素に id 属性がついていることがわかる。
この状態で対応関係を定義する関数を第2引数に指定してdata()を呼び出すと、配列の要素順序とは関係なく意図したとおりのデータと DOM element の対応関係をもった selection が構築できる。
この第2引数の関数は以下のように利用され、DOM element およびデータ配列要素それぞれに対してキー値が算出される。このキー値が同じ DOM element とデータ配列要素が対応するものと考えられる。
- DOM element に対して:
-
function(d)の引数dは null -
thisはこの DOM element
-
- データ配列要素に対して:
-
function(d)の引数dはこのデータ配列要素 -
thisは親となる DOM element。今の例では <ul>
-
d3.selectAll("li")
  .data([10, 20, 40],
        function(d) {
            return d ? d : this.id;
        })

この selection に対して exit(), remove() を適用すれば、意図したとおりの削除("30" に対応する DOM element の削除)が行える。
d3.selectAll("li")
  .data([10, 20, 40],
        function(d) {
            return d ? d : this.id;
        })
  .exit()
  .remove()


