はじめに
この記事はUnity Advent Calendar 2017の12/13の記事です。
前日は@Takaaki_Ichijoさんの『Unityでフレンドとアイテム交換とかする機能をサーバーレスで作る その1』でした。
自分は10月から今月末までを目処にScriptableObjectについてまとめており、
今回はScriptableObjectをマスターデータとして扱う際の基本的な使い方と自分の活用法について書きます。
過去記事
1 ScriptTemplateでScripableObjectのための環境構築
2 ScriptableObjectを設定ファイルとして扱う
3. ScriptableObjectをマスターデータとして扱う
マスターデータは一般的に不変なデータ(頻繁に更新されないもの)を指します。
ゲームではシナリオのデータなどが当てはまります。
# 最近はバージョンアップによってマスターデータが頻繁に更新される場合も多いですが..!
自分はシナリオ・アイテム・モンスターデータをScriptableObjectとして管理しています。
マスターデータをScriptableObjectにすると以下のようなメリットがあります。
- Inspectorで閲覧・編集できる → 開発者以外も編集可
- Assetなので新規作成やコピーが容易 → モックやテストデータの差し替えがしやすい
- AssetなのでBundle化が可能 → いざという時にデータを外出しできる
3.1 基本的な使い方
3.1.1 サンプルコード
以下、ScriptableObjectでモンスターとアイテムを扱うコードの例です。
注意点として、"name", "hideFlags"というフィールドはすでに定義されているため、
名前を扱う場合はitemNameなどの別名にするかnew修飾子をつけてnameを再定義する必要があります。
ScriptableObject
https://docs.unity3d.com/ScriptReference/ScriptableObject.html
public class MasterItemModel : ScriptableObject
{
	public new string name;
	public Sprite thumbnail;
}
public class MasterMonsterModel : ScriptableObject
{
	public new string name;
	public Sprite thumbnail;

	public int hp;
	public int attack;

	//3.2.2にて後述
	public List<DropItemModel> dropItems;
}
3.1.2 フィールドについて
intやstringはもちろん、TextureやVector3やPrefabなど様々な形式のフィールドを扱うことが出来ます。
厳密にはUnityのInspectorで扱えるフィールドと同等なので以下となります。
スクリプトシリアライゼーション
https://docs.unity3d.com/jp/540/Manual/script-Serialization.html
- publicか [SerializeField] 属性を持つ
- staticではないこと
- constではないこと
- readonlyではないこと
- シリアライズができるフィールドタイプ であること (以下を参照)
- [Serializable] 属性を持つカスタム非抽象クラス
- [Serializable] 属性を持つカスタム構造体(Unity4.5 から追加)
- UnityEngine.Object から派生したオブジェクトの参照
- プリミティブ型(int, float, double, bool, string, etc.)
- シリアライズできるフィールドタイプの配列
- シリアライズできるフィールドタイプのList<T>
上記ドキュメントの抜粋ですが下記はサポートしていません。
- カスタムクラスのnull
- カスタムクラスのポリモーフィズム (‘UnityEngine.Object’ への参照は正しく動作します)
3.1.3 派生クラスについて
アイテムで装備品によってフィールド自体を変えたい場合があります。
例えばアイテムを武器と鎧に分けたい場合、
以下のように派生クラスもScriptableObjectとして扱われます。
public class MasterWeaponModel : MasterItemModel
{
	public enum WeaponType
	{
		SWORD = 0,
		LANCE = 1,
		AXE = 2,
		BOW = 3,
	}
	public WeaponType weaponType;
	public int attack;
}
public class MasterArmorModel : MasterItemModel
{
	public int defense;
}
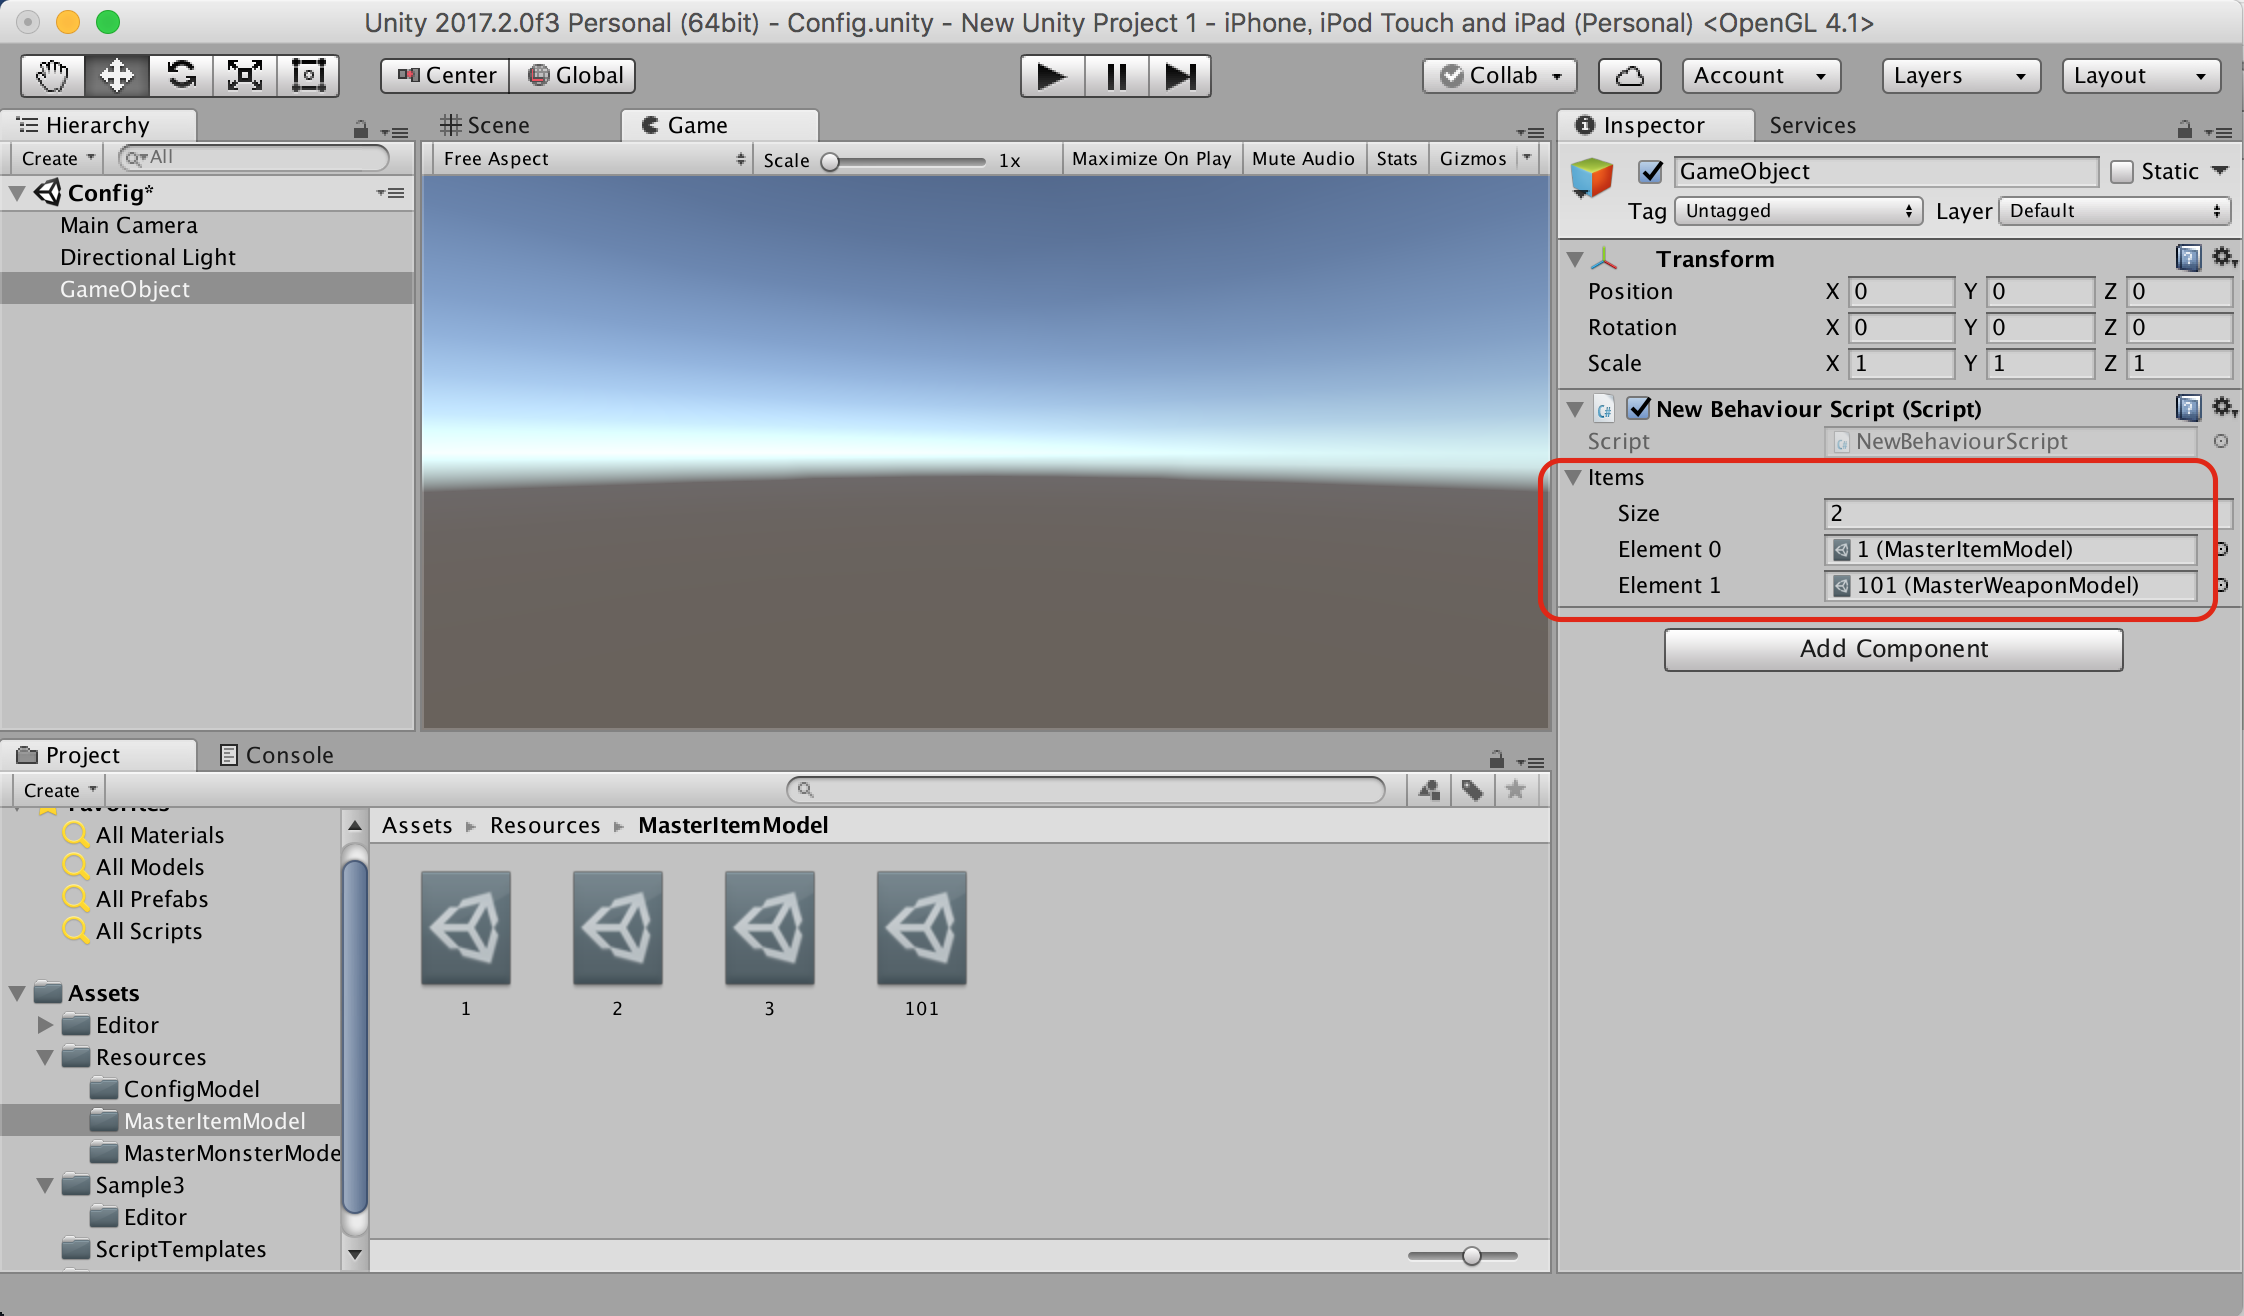
呼び出し側では子(MasterWeaponModel)は親(MasterItemModel)のフィールドにアタッチできます。
ダウンキャストして使用します。
//適当な呼び出しサンプル
public class NewBehaviourScript : MonoBehaviour
{
	public List<MasterItemModel> items;

	void Start()
	{
		MasterWeaponModel w = items[1] as MasterWeaponModel;
		if (w != null) {
			Debug.Log(w.attack);
		}
	}
}
3.2 自分の活用法
3.1では基本的な使い方を書きました。
次は自分の活用法を数点書いていきます。
3.2.1 ResourcesフォルダをKey-Value Storeとして使用する
AssetはResourcesフォルダ下に置くとResources.Loadで読み込みできるため、
ItemIdなどのKeyをAsset名にして以下のコードのように読み込んでいます。
	public static MasterItemModel Load(int itemId)
	{
		MasterItemModel model = Resources.Load<MasterItemModel>("MasterItemModel/" + itemId);
		if (model == null) {
			//例外処理
		}
		return model;
	}

戦闘終了時のモンスターデータなど、MasterDataは不要になるタイミングがあります。
Resourcesフォルダを使用する場合は、
Assetが不要になるタイミングで以下を呼び出すことでAssetを開放しています。
Resources.UnloadUnusedAssets();
3.2.2 ScriptableObjectを列挙型のように指定する拡張
3.2.2.1 ScriptableObjectへの参照どうするか問題
モンスターデータとアイテムデータをScriptableObjectにしている場合に、
モンスターがアイテムを落とす仕様を追加したとします。
この時、ScriptableObjectを参照する必要があるのですが、
マスターデータにおいては通常の方法だとデメリットを感じました。まずは通常の方法を記載します。
【ScriptableObjectで指定する場合】
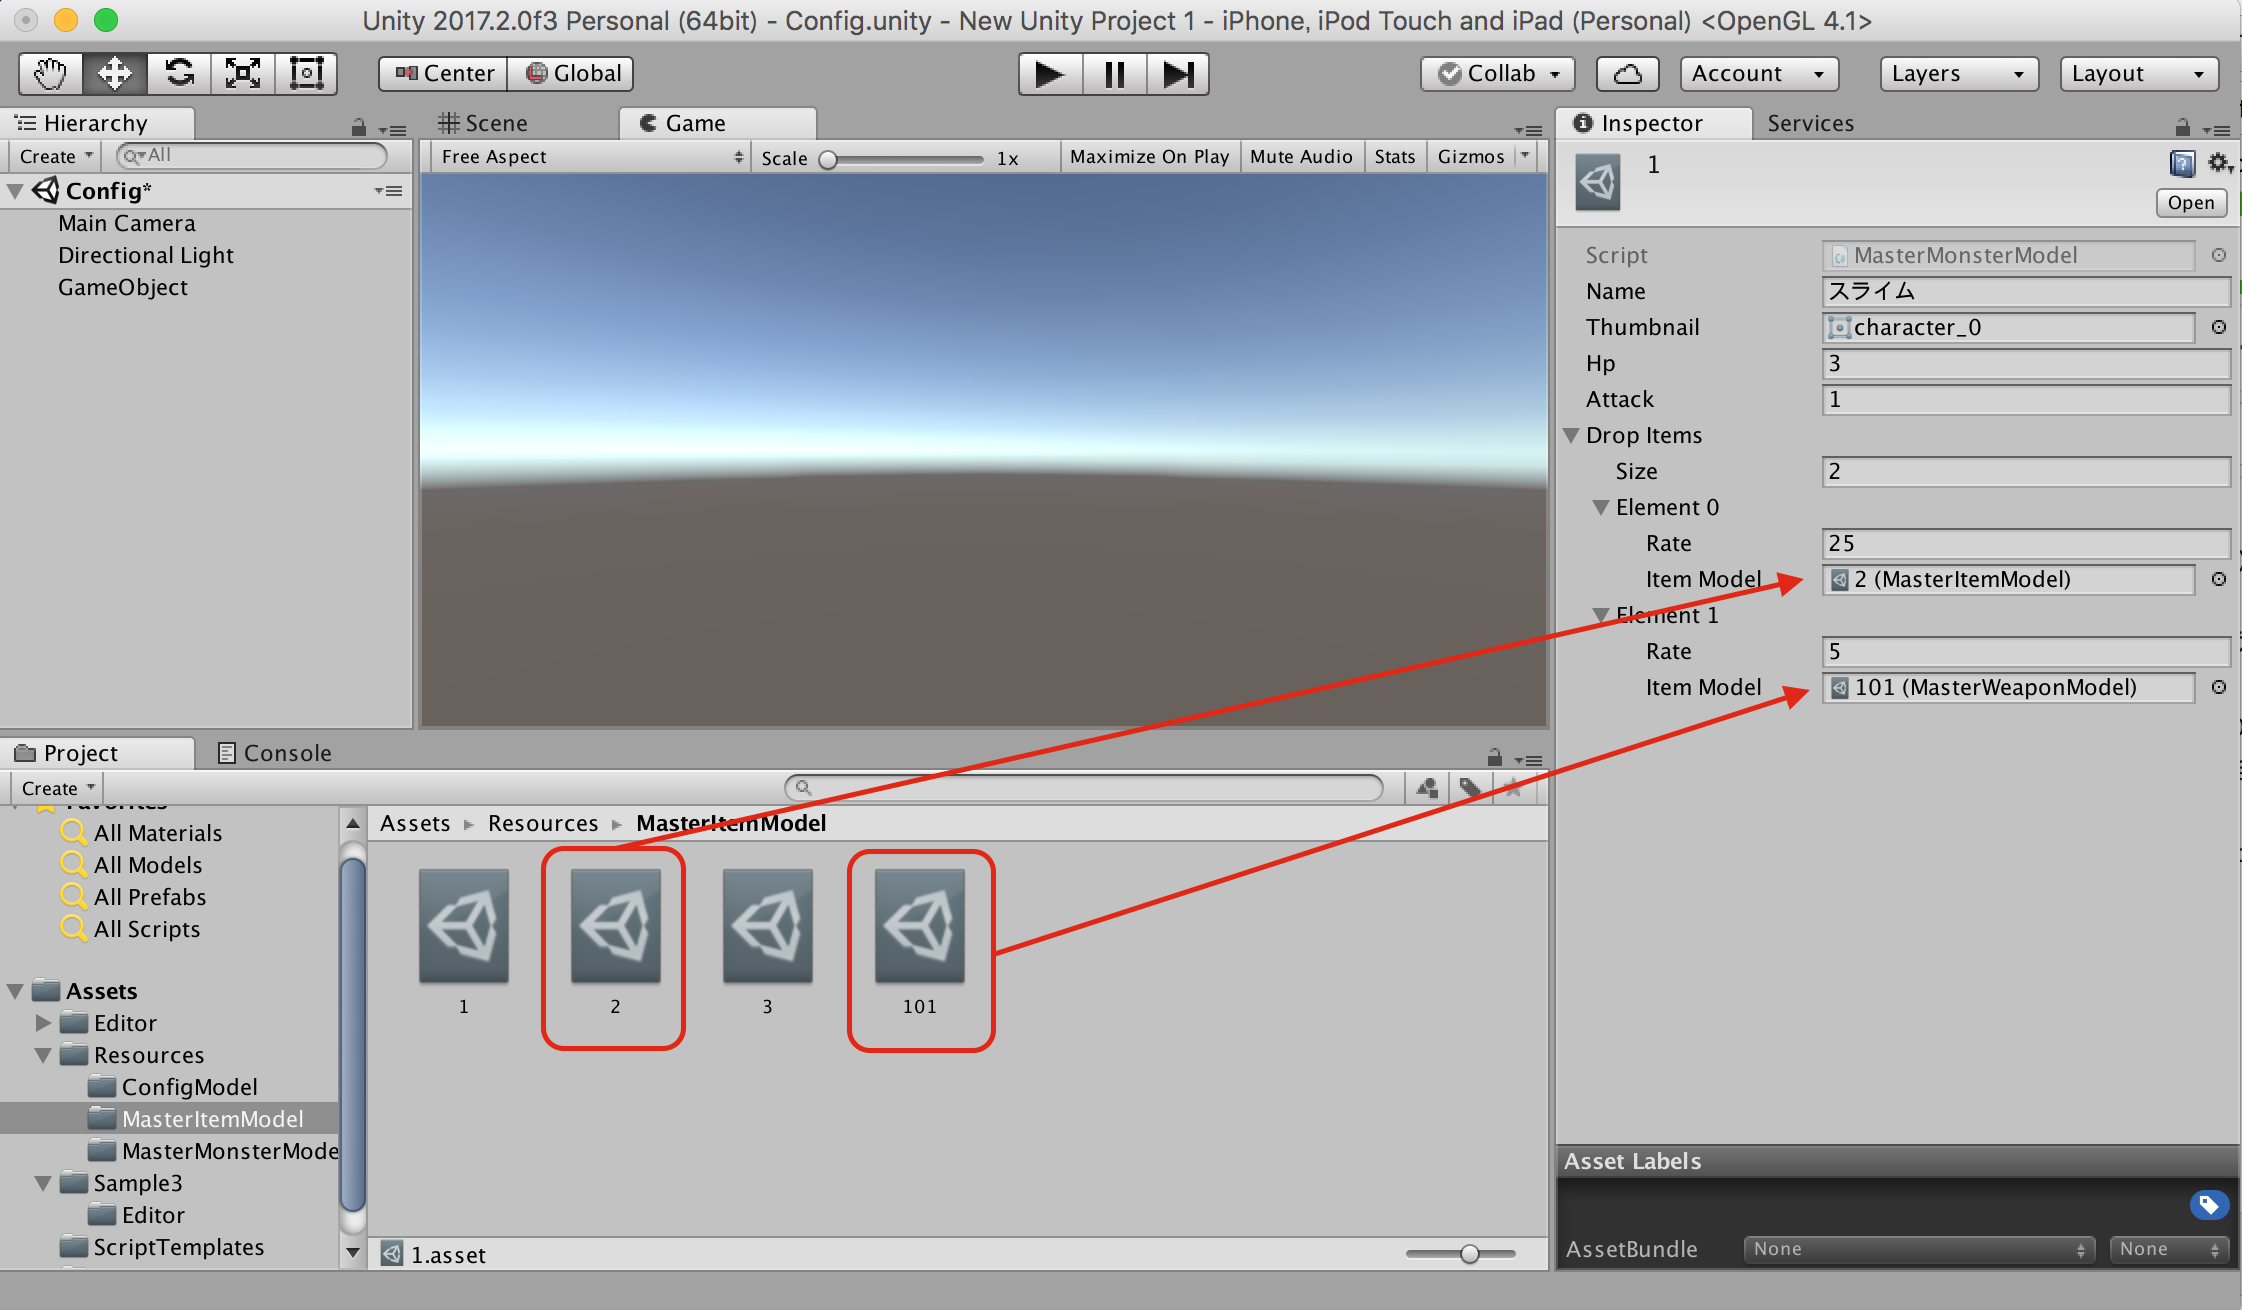
以下のようにScriptableObjectを直接指定する場合、アイテムのScriptableObjectをドラッグ&ドロップします。
対象のマスターデータが少ないのであれば問題ないのですが、
大量のデータを扱う場合はどのデータかわからなくなるというデメリットがあります。
あと手が痛くなります。
[System.Serializable]
public class DropItemModel
{
	public int rate;
	public MasterItemModel itemModel; //ScriptableObjectで指定
}
↓ScriptableObjectはドラッグ&ドロップで指定

【intやstringで指定する場合】
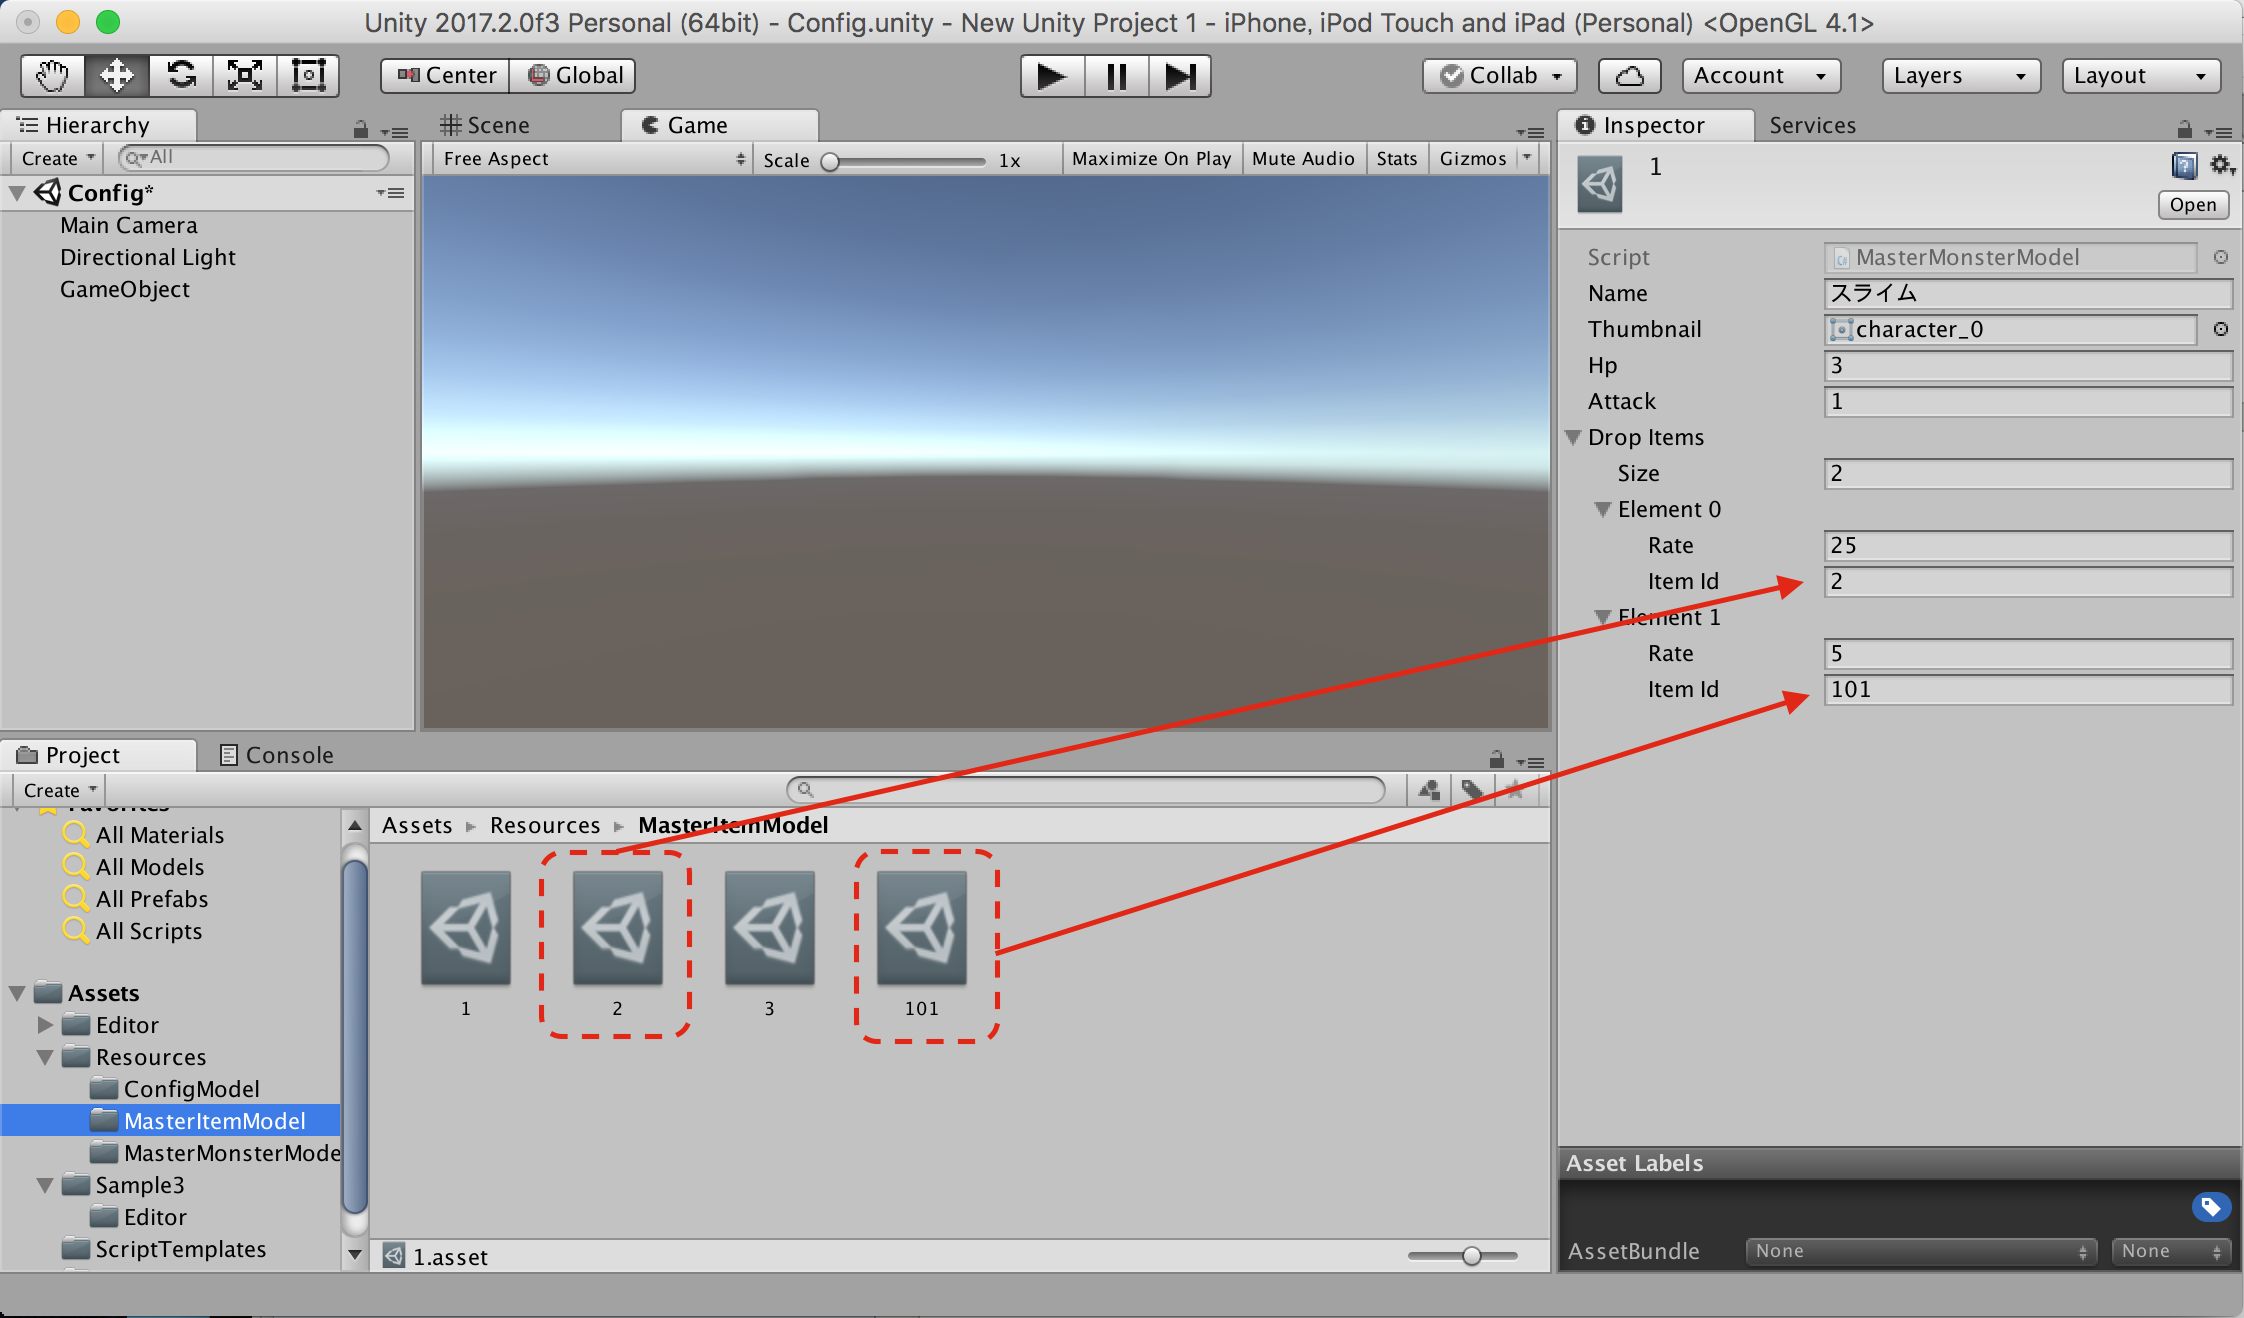
3.2.1のResources.Loadを使えば、以下のようにいったんidなどで指定することが出来ます。
こちらは入力が楽ですが、入力制限がないため
idが歯抜けの場合に正しく動作するかわからないデメリットがあります。
[System.Serializable]
public class DropItemModel
{
	public int rate;
	public int itemId; //intで指定
}
3.2.2.2 PropertyAttributeで列挙型のように指定
上のScriptableObject参照の「指定が面倒」「入力制限がない」問題を解決するため、属性を自作して解決しています。
既存の変更点はフィールドに1行属性を追加するのみです。
[System.Serializable]
public class DropItemModel
{
	public int rate;

	[ItemIdAttribute]  //追加: ただのintではなくItemIdのint!
	public int itemId;
}
自作属性のItemIdAttribute.csと、
Editor描画用のItemIdAttributeDrawer.cs を追加します。
using UnityEngine;

public class ItemIdAttribute : PropertyAttribute
{
    //属性の引数はここに書くが今回は引数なし
    public ItemIdAttribute()
    {
    }
}
using UnityEngine;
using UnityEditor;
using System.Collections.Generic;
using System.Text.RegularExpressions;

[CustomPropertyDrawer(typeof(ItemIdAttribute))]
public class ItemIdAttributeDrawer : PropertyDrawer
{
	private ItemIdAttribute itemIdAttribute
	{
		get {
			return (ItemIdAttribute)attribute;
		}
	}
	private bool isInitialized = false;
	private int[] itemIds = null;
	private string[] itemLabels = null;

	public override void OnGUI(Rect position, SerializedProperty property, GUIContent label)
	{
		//初期化
		if (!isInitialized) {
			Dictionary<int, string> items = GetItemModelLabels();
			itemIds = new int[items.Count];
			itemLabels = new string[items.Count];
			items.Keys.CopyTo(itemIds, 0);
			items.Values.CopyTo(itemLabels, 0);

			isInitialized = true;
		}
		property.intValue = EditorGUI.IntPopup(position, label.text, property.intValue, itemLabels, itemIds);
	}

	public static Dictionary<int, string> GetItemModelLabels()
	{
		Dictionary<int, string> result = new Dictionary<int, string>();

		string[] guids = AssetDatabase.FindAssets(string.Format("t:{0}", "MasterItemModel"));
		if (guids.Length == 0) {
			return result;
		}
		foreach (string guid in guids) {
			string assetPath = AssetDatabase.GUIDToAssetPath(guid);
			MasterItemModel model = AssetDatabase.LoadAssetAtPath<MasterItemModel>(assetPath);

			//フォルダによるしぼりこみ
			Match match = Regex.Match(assetPath, string.Format("Assets/Resources/{0}/(.*?).asset", "MasterItemModel"));
			foreach(Group g in match.Groups) {
				if (g.Index == 0) {
					continue;
				}
				int targetId = 0;
				if (int.TryParse(g.Value, out targetId)) {
					//表示項目を"ID: アイテム名"にしている
					result[targetId] = string.Format("{0}: {1}", targetId, model.name);
				}
			}
		}
		return result;
	}
}
上記にコードを載せましたが、おおまかには以下の内容です。
- AssetDatabase.FindAssetsで、プロジェクト内の指定ScriptableObjectをすべて取得
- 表示項目を整形
- EditorGUI.IntPopupで入力・表示を行う
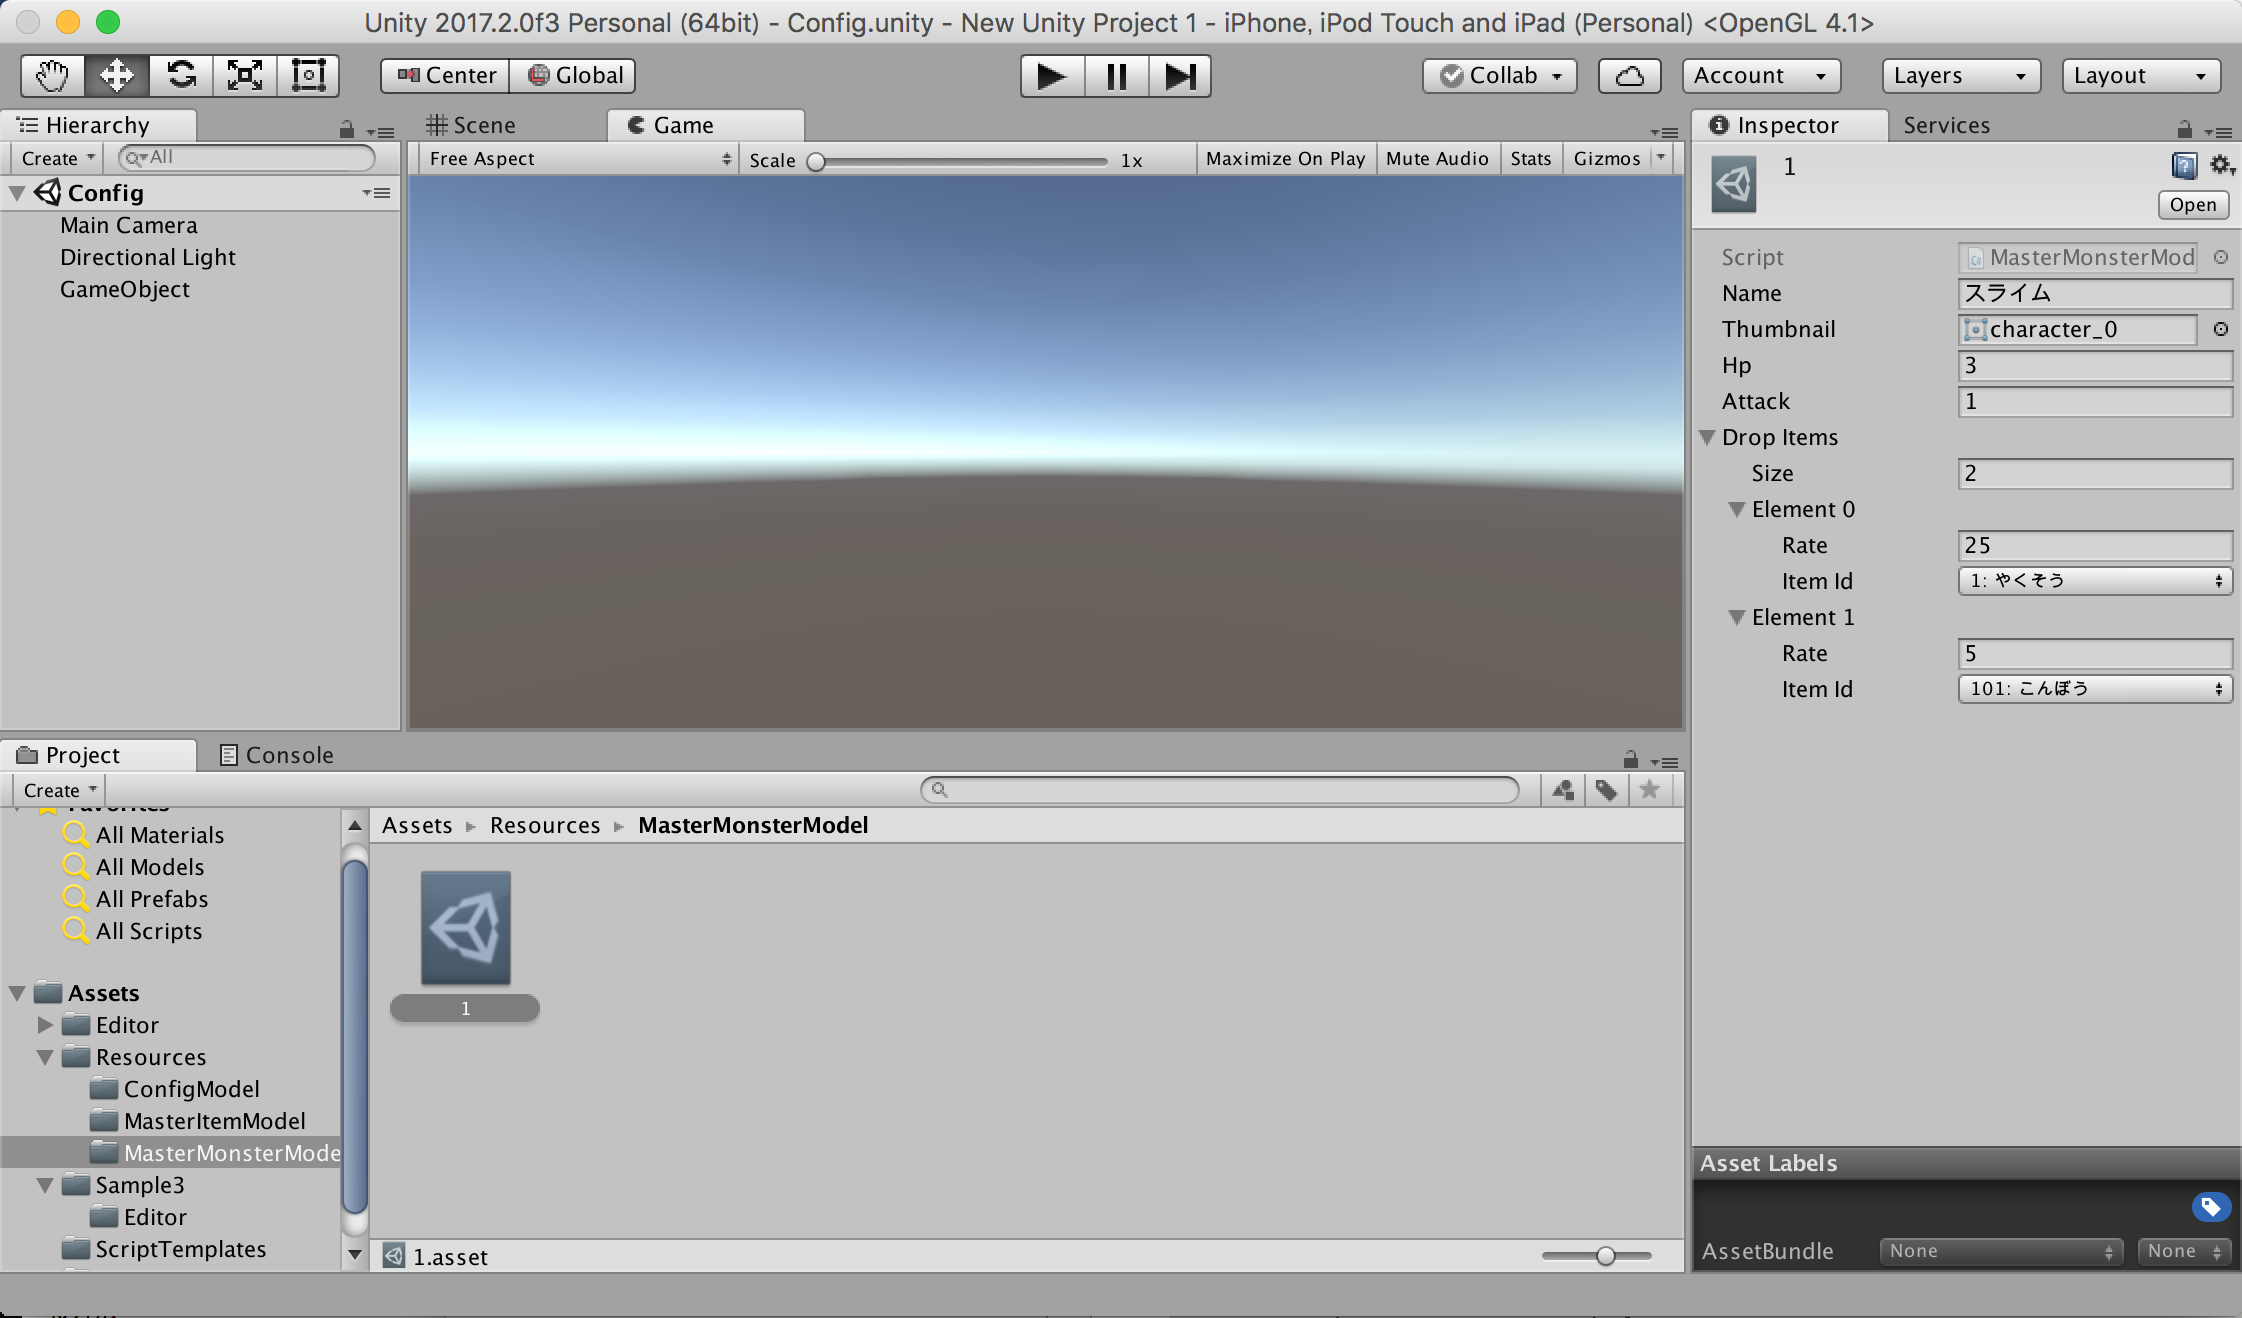
実装すると以下画面のようになります。
ドラッグ&ドロップ不要で入力ミスがないため、
自分はこのEditor拡張で直接入力の場合のマスターデータ編集がかなり速くなりました。

3.2.3 別ツールで編集したものをScriptableObjectに変換する
ScriptableObjectはAssetなので「一覧が見えにくい」「まとめて編集が困難」「破壊されやすい」というデメリットを感じました。
このためシナリオや文章データはGoogle SpreadSheetで編集してUnityに出力して使用しています。
取得したデータをScriptableObjectに変換するのは以下の手順となります。
- ScriptableObject.CreateInstanceでインスタンス生成
- 1のインスタンスにデータを格納
- AssetDatabase.CreateAssetでAsset生成
	// (データ取得部分は省略. json, csv, xmlなど)

	//1. ScriptableObject.CreateInstanceでインスタンス生成
	ScenarioModel scenarioModel = ScriptableObject.CreateInstance<ScenarioModel>();

	//2. データを格納
	scenarioModel.page = ..
	scenarioModel.message = ..

	//3. AssetDatabase.CreateAssetでAsset生成
	string outputPath = string.Format("Assets/Resources/ScenarioModel/{0}.asset", scenarioId);
	AssetDatabase.CreateAsset(scenarioModel, outputPath);
参考にしました
自分だけのPropertyDrawerを作ろう!
https://qiita.com/kyusyukeigo/items/8be4cdef97496a68a39d
テラシュールブログ / プロジェクト内のScriptableObjectを見つける方法
http://tsubakit1.hateblo.jp/entry/2016/03/08/231929
あしたは
@seibeさんの『GameObjectを生成しないで2D描画』です!


