自分に対する備忘録という目的で記事を投稿させていただきます。
(試験的に限定共有ではなく本投稿させていただきます)
vueバージョン:vue2.5.16
使用するAPI:OpenWeatherMap
参考文献
この記事は以下の情報を参考にして執筆しました。
https://www.tam-tam.co.jp/tipsnote/html_css/post16405.html
初期状態
index.htmlとmain.jsを用意
またOpenWeatherMapを用いるにはAPIキーが必要になるためあらかじめ登録を済ませてAPIキーを参照できるようにすること
index.html
<html lang="ja">
  <head>
    <meta charset="utf-8">
    <title>WeatherApp</title>
  </head>
  <body>
    <div id="app">
      {{ message }}
    </div>
    <script src="https://cdn.jsdelivr.net/npm/vue@2.5.16/dist/vue.js"></script>
    <script src="https://unpkg.com/axios/dist/axios.min.js"></script>
    <script src="main.js"></script>
  </body>
</html>
main.js
var app = new Vue({
  el: '#app',
  data: {
    message: "Hello Vue.js!"
  },
})
htmlファイルを開き、"Hello Vue.js!"と表示されればひとまずOK
APIからデータを取得する
mounted:...でページが読み込まれた時の記述を追加する
main.js
var app = new Vue({
  el: '#app',
  data: {
    message: "Hello Vue.js!"
  },
+ mounted: function(){
+   axios.get(`https://api.openweathermap.org/data/2.5/weather?q=${"Tokyo"},jp&units=metric&appid=APIキー`)
+   .then(function(response){
+     console.log(response)
+   })
+   .catch(function(error){
+     console.log(error)
+   })
+ },
})
axios.getのところでAPIを叩く
q=Tokyo,q=Osakaのように書くことで気象情報を取り出す場所を指定することができる。
今回は後から変数を用いるので変数展開で書く。
"appid="の後にAPIキーを記述すること。
htmlファイルを開きconsole画面を見ると現在の気象情報データをとってこれているはず。

data/name:場所
data/weather[0]/main:現在の天気
が格納されているのでこれらを画面に表示するようにする
天気を表示させる
main.js
var app = new Vue({
  el: '#app',
  data: {
+   city: null,
+   condition:null,
  },
  mounted: function(){
    axios.get(`https://api.openweathermap.org/data/2.5/weather?q=${"Tokyo"},jp&units=metric&appid=APIキー`)
    .then(function(response){
+     this.city = response.data.name
+     this.condition = response.data.weather[0].main
+   }.bind(this))
    .catch(function(error){
      console.log(error)
    })
  },
})
index.html
<html lang="ja">
  <head>
    <meta charset="utf-8">
    <title>WeatherApp</title>
  </head>
  <body>
    <div id="app">
+     <div class="weather_info">
+       <p class="weather_city">{{ city }}</p>
+       <p class="weather_condition">{{ condition }}</p>
+     </div>
    </div>
    <script src="https://cdn.jsdelivr.net/npm/vue@2.5.16/dist/vue.js"></script>
    <script src="https://unpkg.com/axios/dist/axios.min.js"></script>
    <script src="main.js"></script>
  </body>
</html>
これでindex.htmlを開くと場所名(Tokyo)と現在の天気が表示されている筈。
さらにここから現在の気温を表示させてみる。
(気温は先ほどのconsole画面の中のdata/main/tempに格納されている)
main.js
var app = new Vue({
  el: '#app',
  data: {
    city: null,
+   temp: null,
    condition:null,
  },
  mounted: function(){
    axios.get(`https://api.openweathermap.org/data/2.5/weather?q=${"Tokyo"},jp&units=metric&appid=APIキー`)
    .then(function(response){
      this.city = response.data.name
      this.condition = response.data.weather[0].main
+     this.temp = response.data.main.temp
    }.bind(this))
    .catch(function(error){
      console.log(error)
    })
  },
+ filters: {
+   roundUp(value){
+     return Math.ceil(value)
+   }
+ }
})
index.html
<html lang="ja">
<head>
<meta charset="utf-8">
<title>WeatherApp</title>
</head>
<body>
<div id="app">
<div class="weather_info">
<p class="weather_city">{{ city }}</p>
<p class="weather_condition">{{ condition }}</p>
+ <p class="weather_temp">{{ temp | roundUp }}°C</p>
</div>
</div>
<script src="https://cdn.jsdelivr.net/npm/vue@2.5.16/dist/vue.js"></script>
<script src="https://unpkg.com/axios/dist/axios.min.js"></script>
<script src="main.js"></script>
</body>
</html>
気温は少数も含まれているので
今回はfiltersオプションを用いて小数点切り上げして出力するようにしている。
これでindex.htmlを開くと以下のように表示される

気象データの場所を選択できるようにする
今の状態だとTokyoの気象情報しか持ってこれないので
場所を選択できるようにしてみる。
main.js
var app = new Vue({
  el: '#app',
  data: {
    city: null,
    temp: null,
    condition:null,
+   selectedCity: '',
  },
+ methods:{
+   select: function() {
      axios.get(`https://api.openweathermap.org/data/2.5/weather?q=${this.selectedCity},jp&units=metric&appid=APIキー`)
      .then(function(response){
        this.city = response.data.name
        this.temp = response.data.main.temp
        this.condition = response.data.weather[0].main
      }.bind(this))
      .catch(function(error){
        console.log(error)
      })
    }
  },
  filters: {
    roundUp(value){
      return Math.ceil(value)
    }
  }
})
index.html
<html lang="ja">
<head>
<meta charset="utf-8">
<title>WeatherApp</title>
</head>
<body>
<div id="app">
<div class="weather_info">
<p class="weather_city">{{ city }}</p>
<p class="weather_condition">{{ condition }}</p>
<p class="weather_temp">{{ temp | roundUp }}°C</p>
</div>
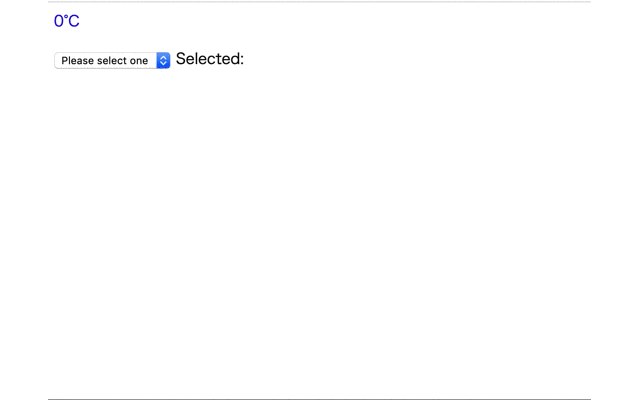
+ <select v-model="selectedCity" v-on:change="select">
+ <option disabled value="">Please select one</option>
+ <option>Tokyo</option>
+ <option>Osaka</option>
+ <option>Yokohama</option>
+ <option>Sapporo</option>
+ </select>
+ <span>Selected: {{ selectedCity }}</span>
</div>
<script src="https://cdn.jsdelivr.net/npm/vue@2.5.16/dist/vue.js"></script>
<script src="https://unpkg.com/axios/dist/axios.min.js"></script>
<script src="main.js"></script>
</body>
</html>
v-model="selectedCity"
でselectedCityの値を双方向データバインディングさせる。
axios.get...の中の変数展開でselectedCityを指定しているので、このselectedCityの値が気象情報を取得する場所となる。
v-on:change="select"と書かれている通り、選択ボックスをクリックするとAPIを叩くようになっている。
index.htmlを開くとこのように動く筈。