Puttyで公開鍵証明書を使ったログインを設定した後、ユーザー名の入力を求められることなくログインする方法です。
手順
- Putty最新版のダウンロード
- Puttyのインストール
- Putty設定画面から、公開鍵ログインする設定を保存
- Puttyに「公開鍵ログインする設定」と「ユーザー」を指定して実行するバッチファイルを作成
公開鍵ログインする設定
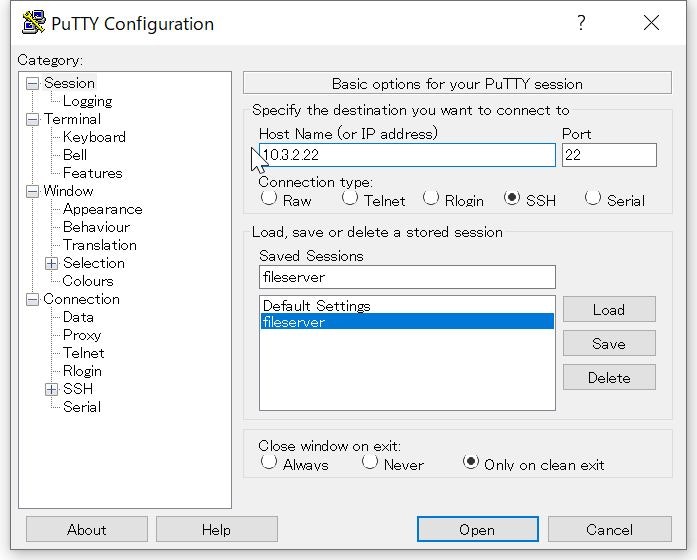
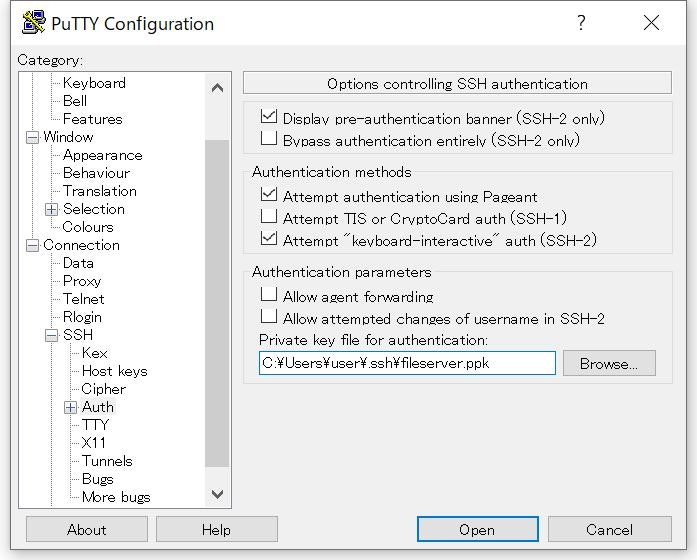
以下画面の通りPuttyの設定を作成して保存。
Puttyに「公開鍵ログインする設定」と「ユーザー」を指定して実行するバッチファイルを作成
以下ファイルを「fileserver.bat」等のファイル名で保存。
※usernameは、適宜変更してください。例えば「test」ユーザーなどです。
cd "C:\Program Files\PuTTY\"
start /B putty.exe -load fileserver -l username
上記batファイルのポイントは、start /Bでputtyを呼び出すことで、
putty起動後にdos窓が残らないようにしている点です。
おまけ(Linuxサーバでの公開鍵ログイン設定方法)
Linux側で公開鍵ログインする為の設定方法です。
自動ログインさせたいユーザーで実施してください。
※ rootユーザー以外の一般ユーザーで実施してください。
ここでは、サンプルとして、testユーザーで実施しています。
# .sshディレクトリに移動(なければ作成)
cd ~/.ssh

# 公開鍵、秘密鍵のペアを作成
ssh-keygen -t rsa -b 2048 -f `hostname`

# 作成されたファイルを確認
ls -la `hostname`*
# -rw------- 1 test test 1823 Feb 16 13:11 fileserver
# -rw-r--r-- 1 test test  397 Feb 16 13:11 fileserver.pub

# .pubをsuthorized_keysに追記
cat `hostname`.pub >> authorized_keys
chmod 0600 authorized_keys

# 秘密鍵を表示>Puttyインストールフォルダにあるputtygen.exeで読み込ませ、ppkファイルで保存
cat `hostname`

# 秘密鍵と、authorized_keysに転記済み公開鍵を削除
rm `hostname`
rm `hostname`.pub

# ファイルの削除確認
ls -la `hostname`*
ls: cannot access 'fileserver*': No such file or directory
test@fileserver:~/.ssh$
最後に
以前はPuttyを起動後に、保存しておいた設定をダブルクリックしてログイン時にユーザー名を入力してログインしていました。しかし、上記のバッチファイルを作成し、タスクバーにピン止めしておくことで、よく使うサーバにはすぐにログイン出来るようになりました。

