0. はじめに
kazumakishimoto(@kazuma_dev)です!
AWS EC2へのSSHログインユーザー追加方法をまとめました。
0-1. 本記事の対象者
- メンターさん
- メンティーさん
- チーム開発メンバー
0-2. 全体の流れ
1.EC2へSSHログイン
2.オーナー設定
3.開発メンバー設定
4.補足
Reference
0-3. 事前準備
- EC2インスタンスやセキュリティグループ作成済み(CloudFormation)
ec2.yml
AWSTemplateFormatVersion: 2010-09-09

Parameters:
  VpcCidrBlock:
    Type: String
    Default: 172.18.0.0/16
  PublicSubnetCidrBlock:
    Type: String
    Default: 172.18.3.0/24
  PrivateSubnet01CidrBlock:
    Type: String
    Default: 172.18.6.0/24
  PrivateSubnet02CidrBlock:
    Type: String
    Default: 172.18.7.0/24
  Ec2ImageId:
#    Type: AWS::SSM::Parameter::Value<String>
#    Default: /aws/service/ami-amazon-linux-latest/amzn2-ami-hvm-x86_64-gp2
    Type: String
    Default: ami-0f310fced6141e627
  Ec2InstanceType:
    Type: String
    Default: t2.micro
  Ec2KeyName:
    Type: String
    Default: hoge #変更箇所

Resources:
  VPC:
    Type: AWS::EC2::VPC
    Properties:
      CidrBlock: !Ref VpcCidrBlock
      Tags:
        -
          Key: Name
          Value: !Ref AWS::StackName
  PublicSubnet:
    Type: AWS::EC2::Subnet
    Properties:
      CidrBlock: !Ref PublicSubnetCidrBlock
      MapPublicIpOnLaunch: true
      VpcId: !Ref VPC
      AvailabilityZone: ap-northeast-1a
      Tags:
        - Key: Name
          Value: !Sub ${AWS::StackName}-public-subnet
  PrivateSubnet01:
    Type: AWS::EC2::Subnet
    Properties:
      CidrBlock: !Ref PrivateSubnet01CidrBlock
      MapPublicIpOnLaunch: false
      VpcId: !Ref VPC
      AvailabilityZone: ap-northeast-1a
      Tags:
        - Key: Name
          Value: !Sub ${AWS::StackName}-private-subnet-01
  PrivateSubnet02:
    Type: AWS::EC2::Subnet
    Properties:
      CidrBlock: !Ref PrivateSubnet02CidrBlock
      MapPublicIpOnLaunch: false
      VpcId: !Ref VPC
      AvailabilityZone: ap-northeast-1c
      Tags:
        - Key: Name
          Value: !Sub ${AWS::StackName}-private-subnet-02
  DBSubnetGroup:
    Type: AWS::RDS::DBSubnetGroup
    Properties:
      DBSubnetGroupDescription: !Ref AWS::StackName
      DBSubnetGroupName: !Ref AWS::StackName
      SubnetIds:
        - !Ref PrivateSubnet01
        - !Ref PrivateSubnet02
  InternetGateway:
    Type: AWS::EC2::InternetGateway
    Properties:
      Tags:
        - Key: Name
          Value: !Ref AWS::StackName
  AttachInternetGateway:
    Type: AWS::EC2::VPCGatewayAttachment
    Properties:
      InternetGatewayId : !Ref InternetGateway
      VpcId: !Ref VPC
  RouteTableForPublicSubnet:
    Type: AWS::EC2::RouteTable
    Properties:
      VpcId: !Ref VPC
      Tags:
        - Key: Name
          Value: !Sub ${AWS::StackName}-rt-for-public-subnet
  RouteForPublicSubnet:
    Type: AWS::EC2::Route
    Properties:
      RouteTableId: !Ref RouteTableForPublicSubnet
      DestinationCidrBlock: 0.0.0.0/0
      GatewayId: !Ref InternetGateway
  AssocciateRouteTableForPublicSubnet:
    Type: AWS::EC2::SubnetRouteTableAssociation
    Properties:
      RouteTableId: !Ref RouteTableForPublicSubnet
      SubnetId: !Ref PublicSubnet
  SecurityGroupForPublicServer:
    Type: AWS::EC2::SecurityGroup
    Properties:
      GroupName: !Sub ${AWS::StackName}-sg-for-public-server
      GroupDescription: !Sub ${AWS::StackName}-sg-for-public-server
      VpcId: !Ref VPC
      SecurityGroupIngress:
        - IpProtocol: tcp
          FromPort: 22
          ToPort: 22
          CidrIp: 0.0.0.0/0
        - IpProtocol: tcp
          FromPort: 80
          ToPort: 80
          CidrIp: 0.0.0.0/0
        - IpProtocol: tcp
          FromPort: 443
          ToPort: 443
          CidrIp: 0.0.0.0/0
      Tags:
        - Key: Name
          Value: !Sub ${AWS::StackName}-sg-for-public-server
  PublicServer:
    Type: AWS::EC2::Instance
    Properties:
      ImageId: !Ref Ec2ImageId
      InstanceType: !Ref Ec2InstanceType
      KeyName: !Ref Ec2KeyName
      #      SubnetId: !Ref PublicSubnet
      #      SecurityGroupIds:
      #        - !Ref SecurityGroupForPublicServer
      NetworkInterfaces:
        - SubnetId: !Ref PublicSubnet # Network interfaces and an instance-level subnet ID may not be specified on the same request
          GroupSet:
            - !Ref SecurityGroupForPublicServer # Network interfaces and an instance-level security groups may not be specified on the same request
          AssociatePublicIpAddress: true
          DeviceIndex : 0 # Property DeviceIndex cannot be empty.
      Tags:
        - Key: Name
          Value: !Sub ${AWS::StackName}-ec2
  ElasticIpForPublicServer:
    Type: AWS::EC2::EIP
    Properties:
      InstanceId: !Ref PublicServer
  SecurityGroupForPrivateServer:
    Type: AWS::EC2::SecurityGroup
    Properties:
      GroupName: !Sub ${AWS::StackName}-sg-for-private-server
      GroupDescription: !Sub ${AWS::StackName}-sg-for-private-server
      VpcId: !Ref VPC
      SecurityGroupIngress:
        - IpProtocol: tcp
          FromPort: 22
          ToPort: 22
          SourceSecurityGroupId: !Ref SecurityGroupForPublicServer
        - IpProtocol: tcp
          FromPort: 3306
          ToPort: 3306
          SourceSecurityGroupId: !Ref SecurityGroupForPublicServer
      Tags:
        - Key: Name
          Value: !Sub ${AWS::StackName}-sg-for-private-server
1. EC2へSSHログイン
- ※EC2へ接続するキーペアが存在していれば実施不要
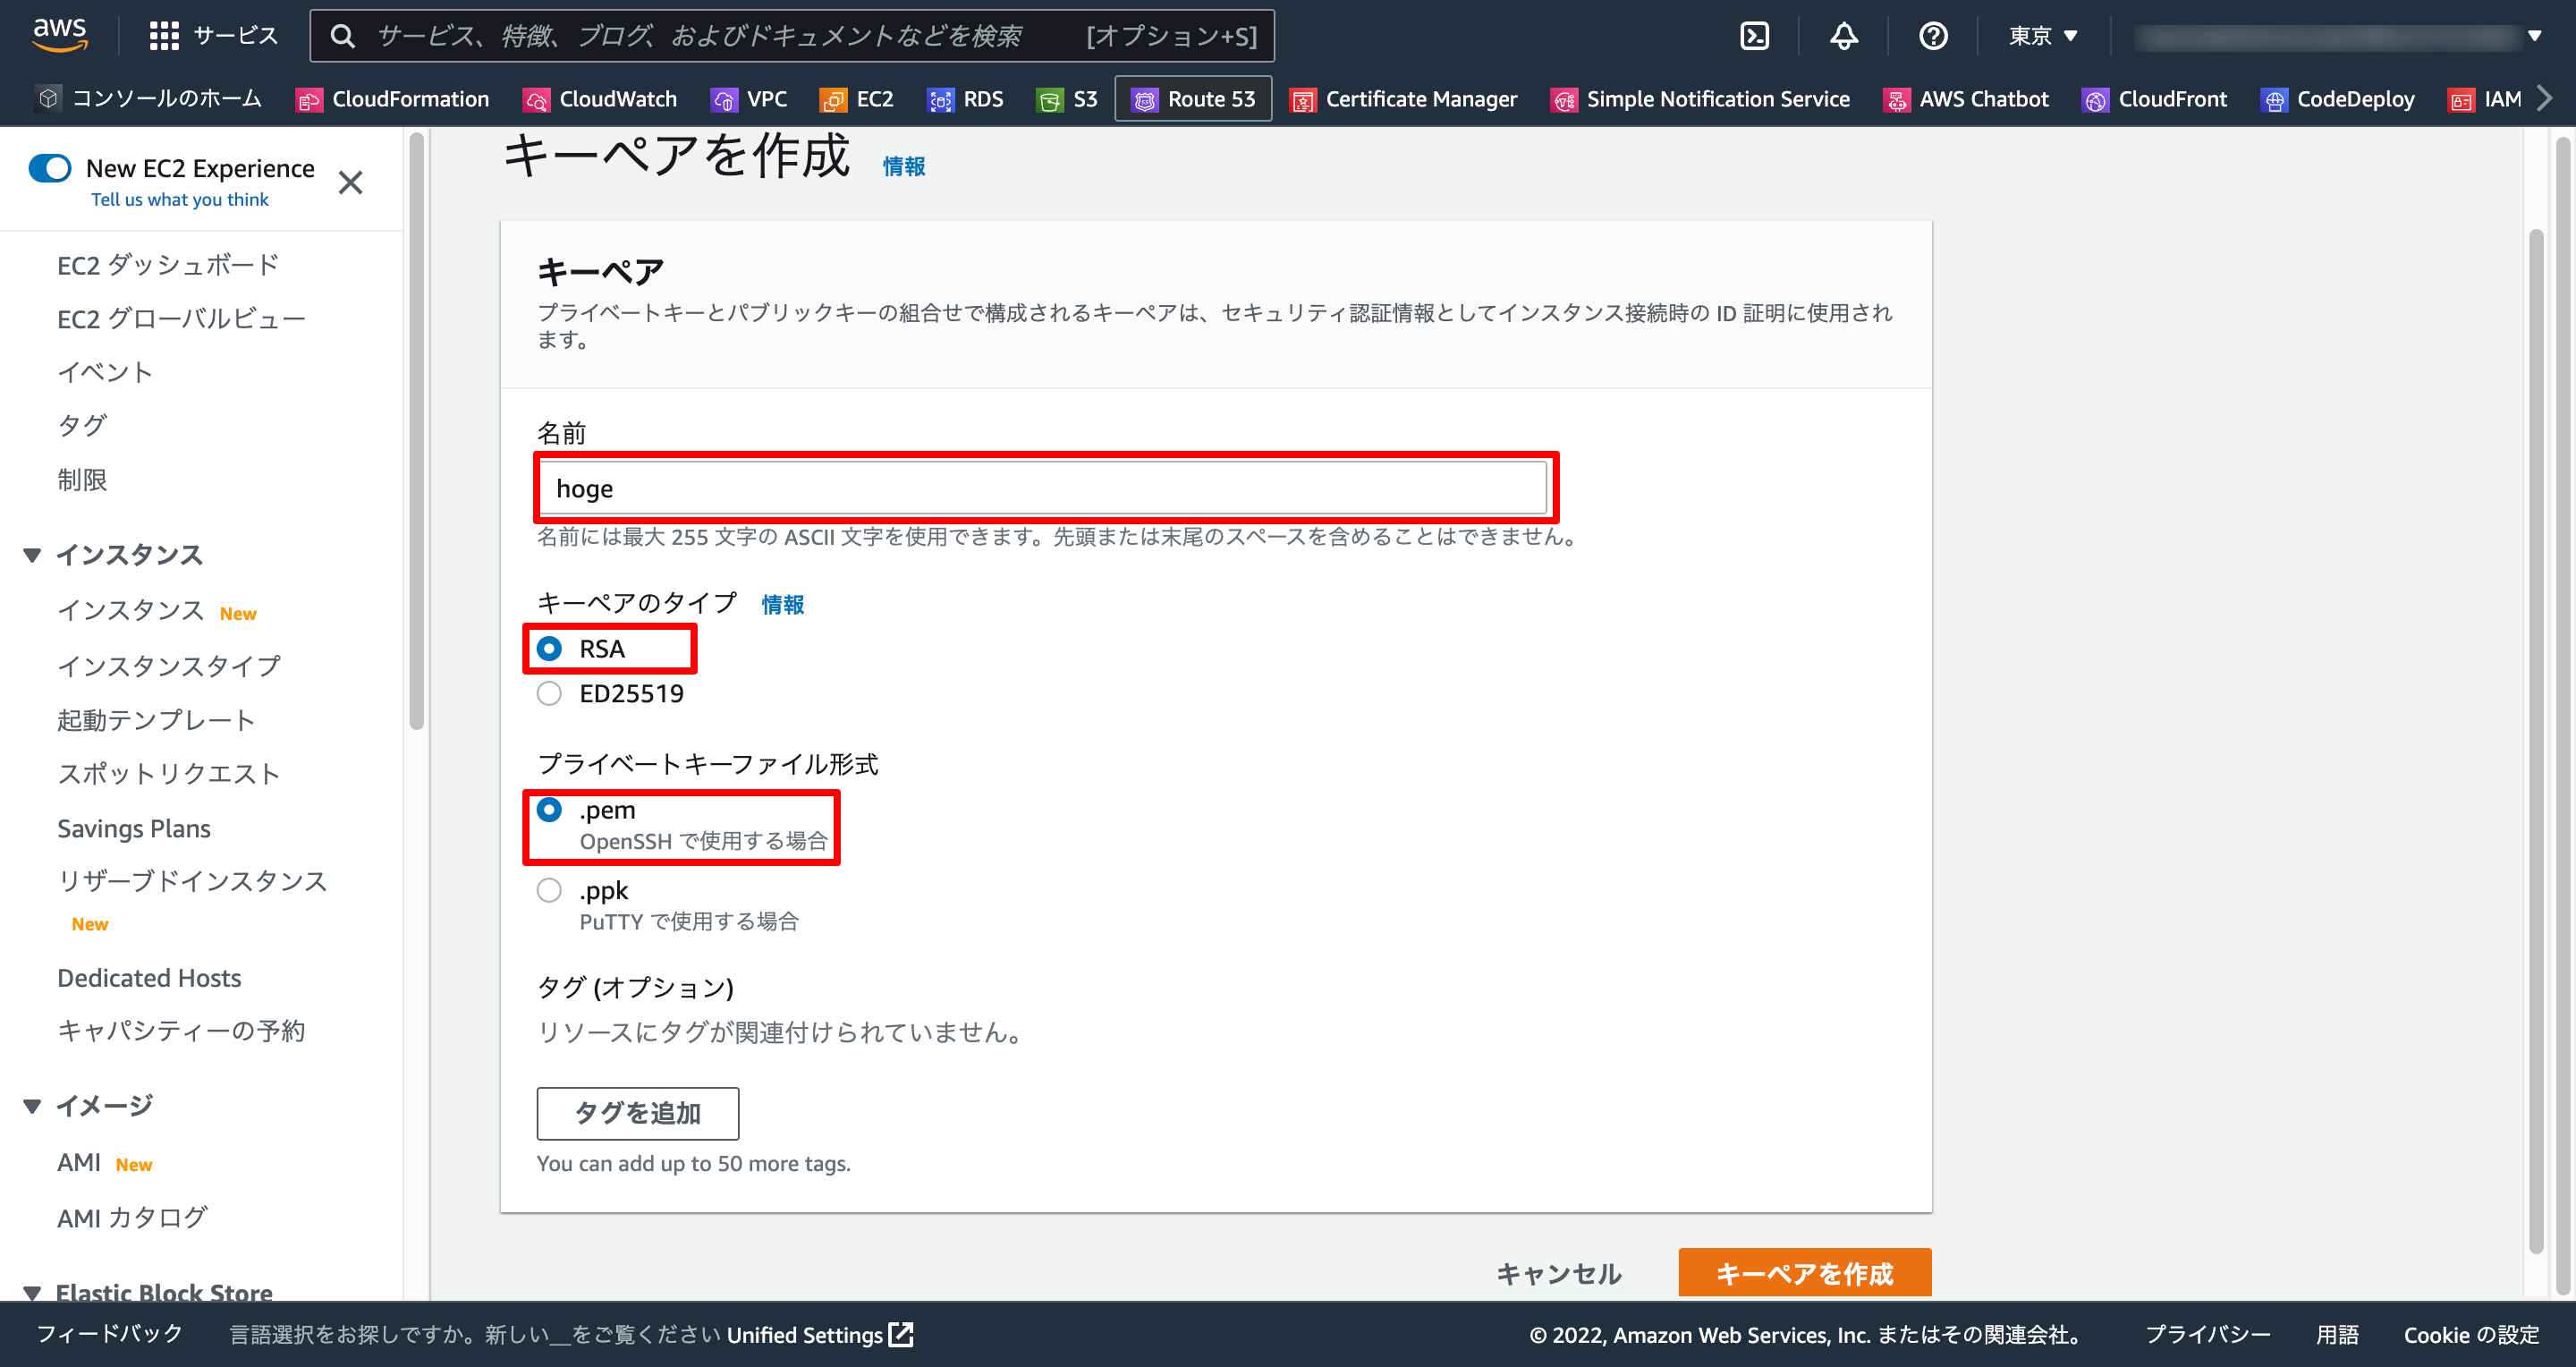
1-1. キーペア作成
- 東京リージョンであるか確認
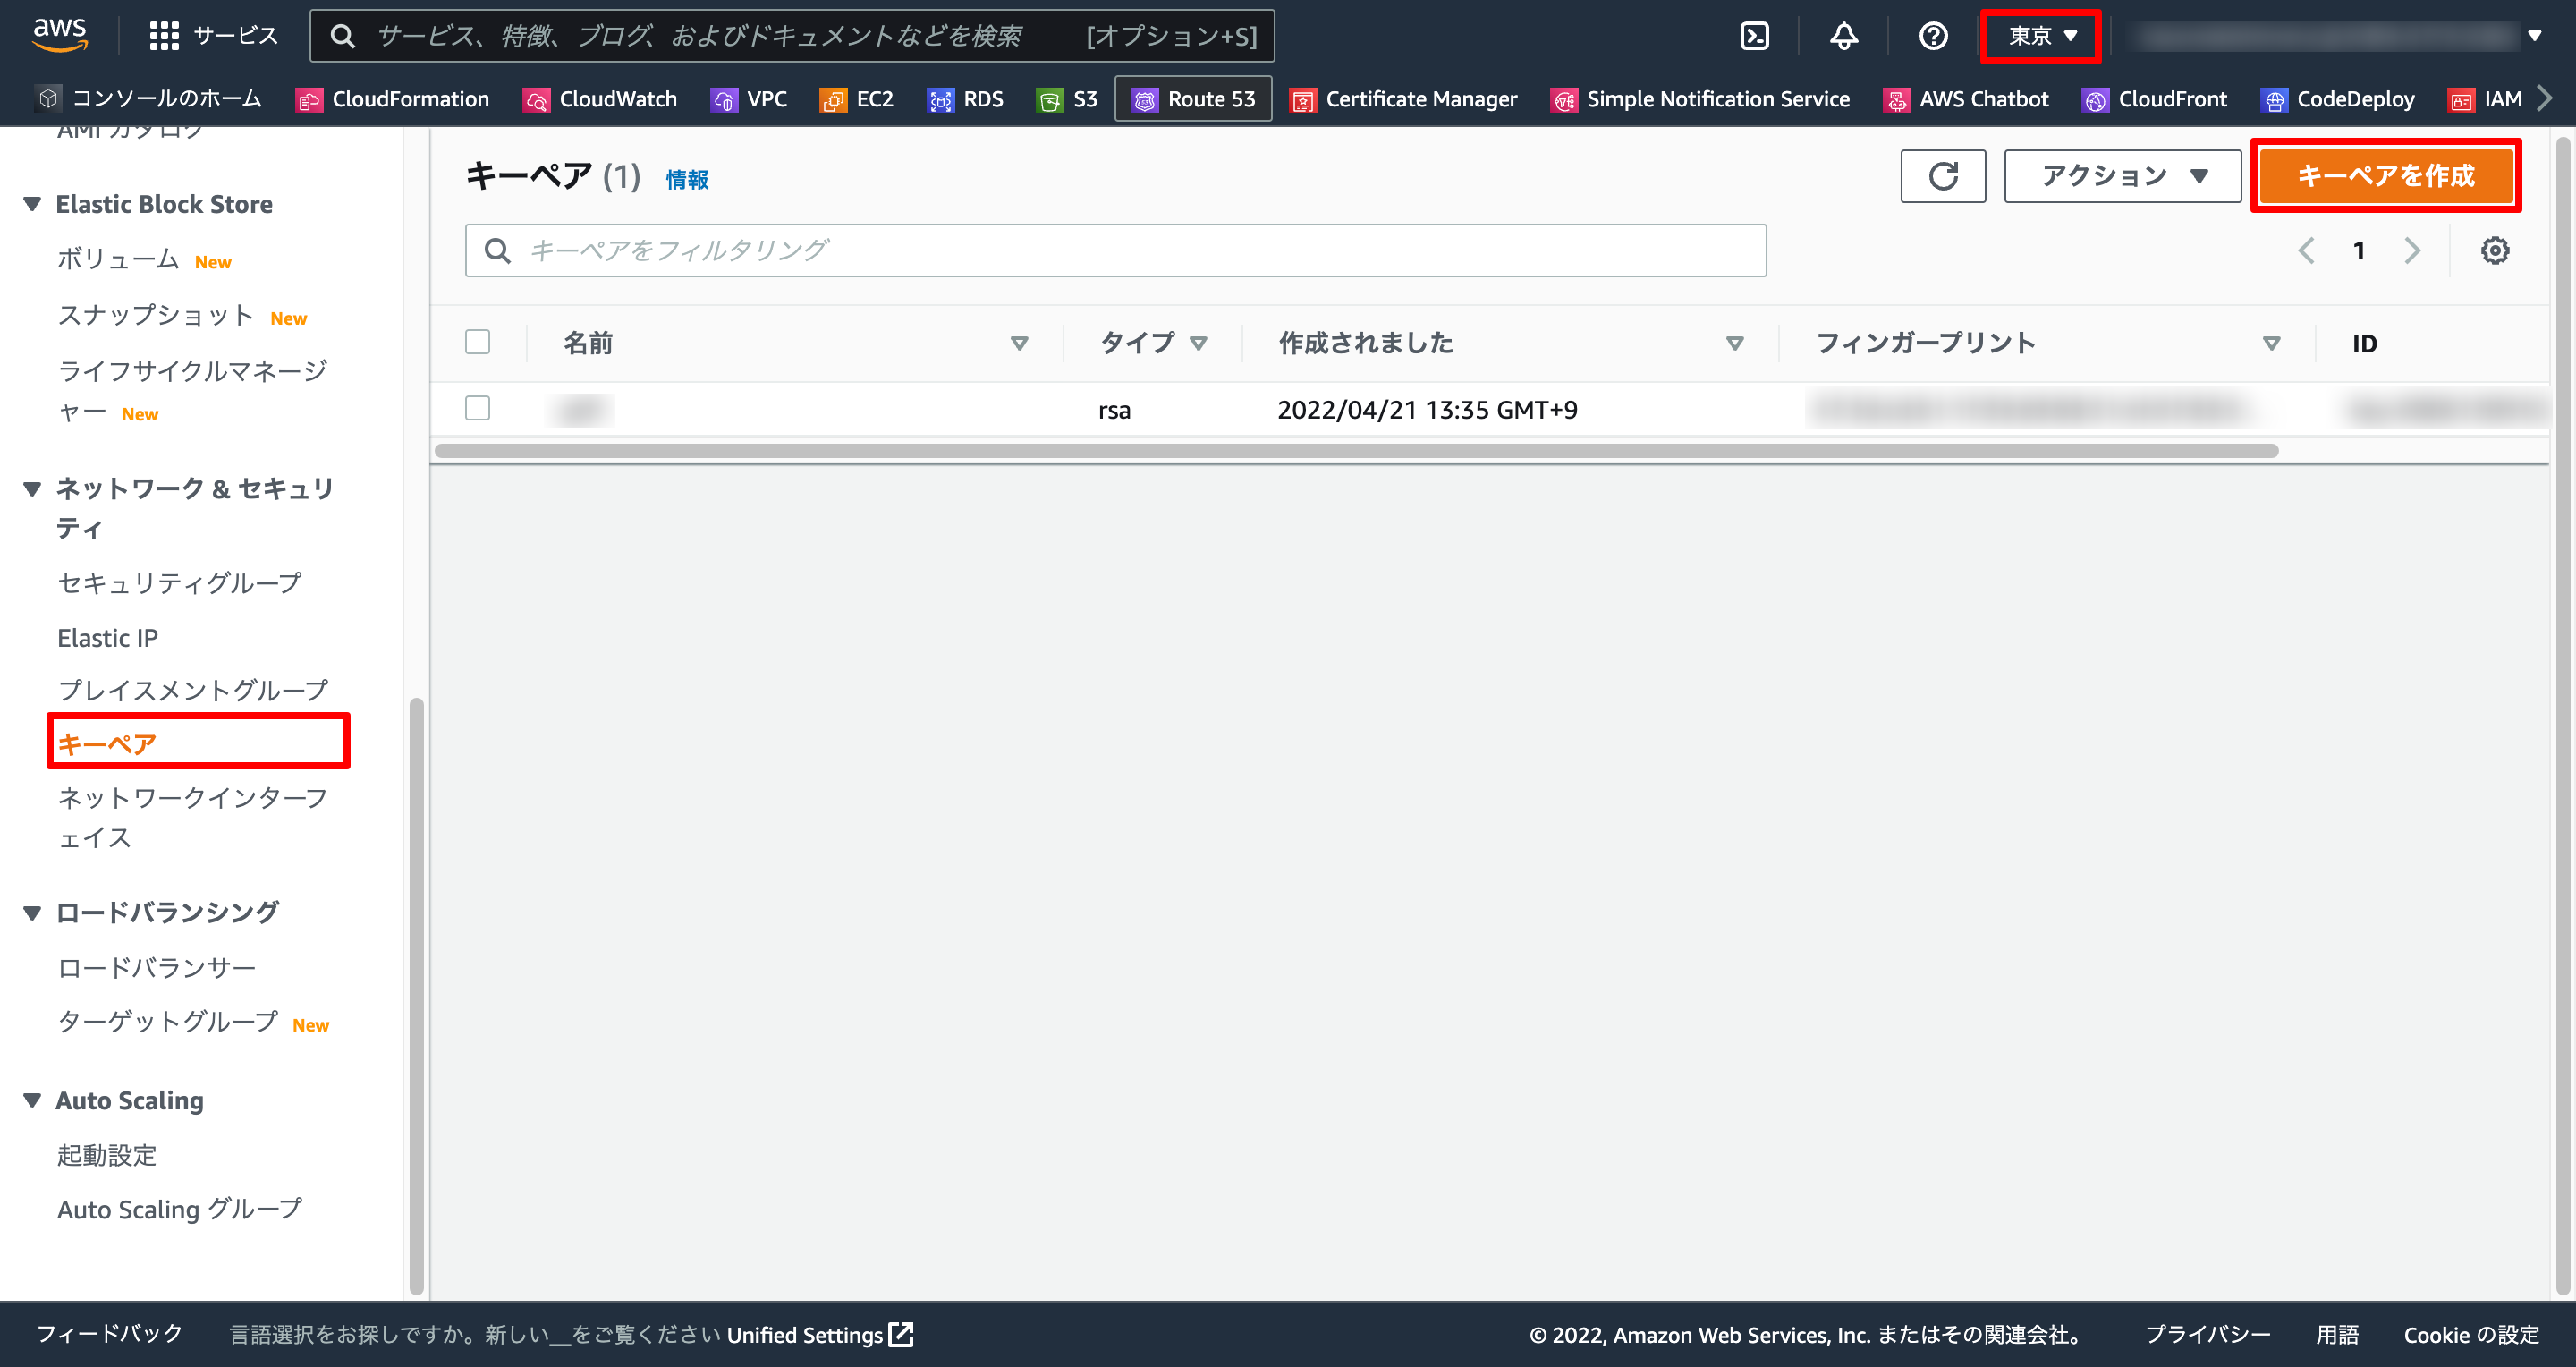
- 秘密鍵がローカルにダウンロードされる
1-2. 秘密鍵ディレクトリ移動
-
~/.sshディレクトリがなければ作成
$ mkdir ~/.ssh
$ cd ~/Downloads
$ mv hoge.pem ~/.ssh
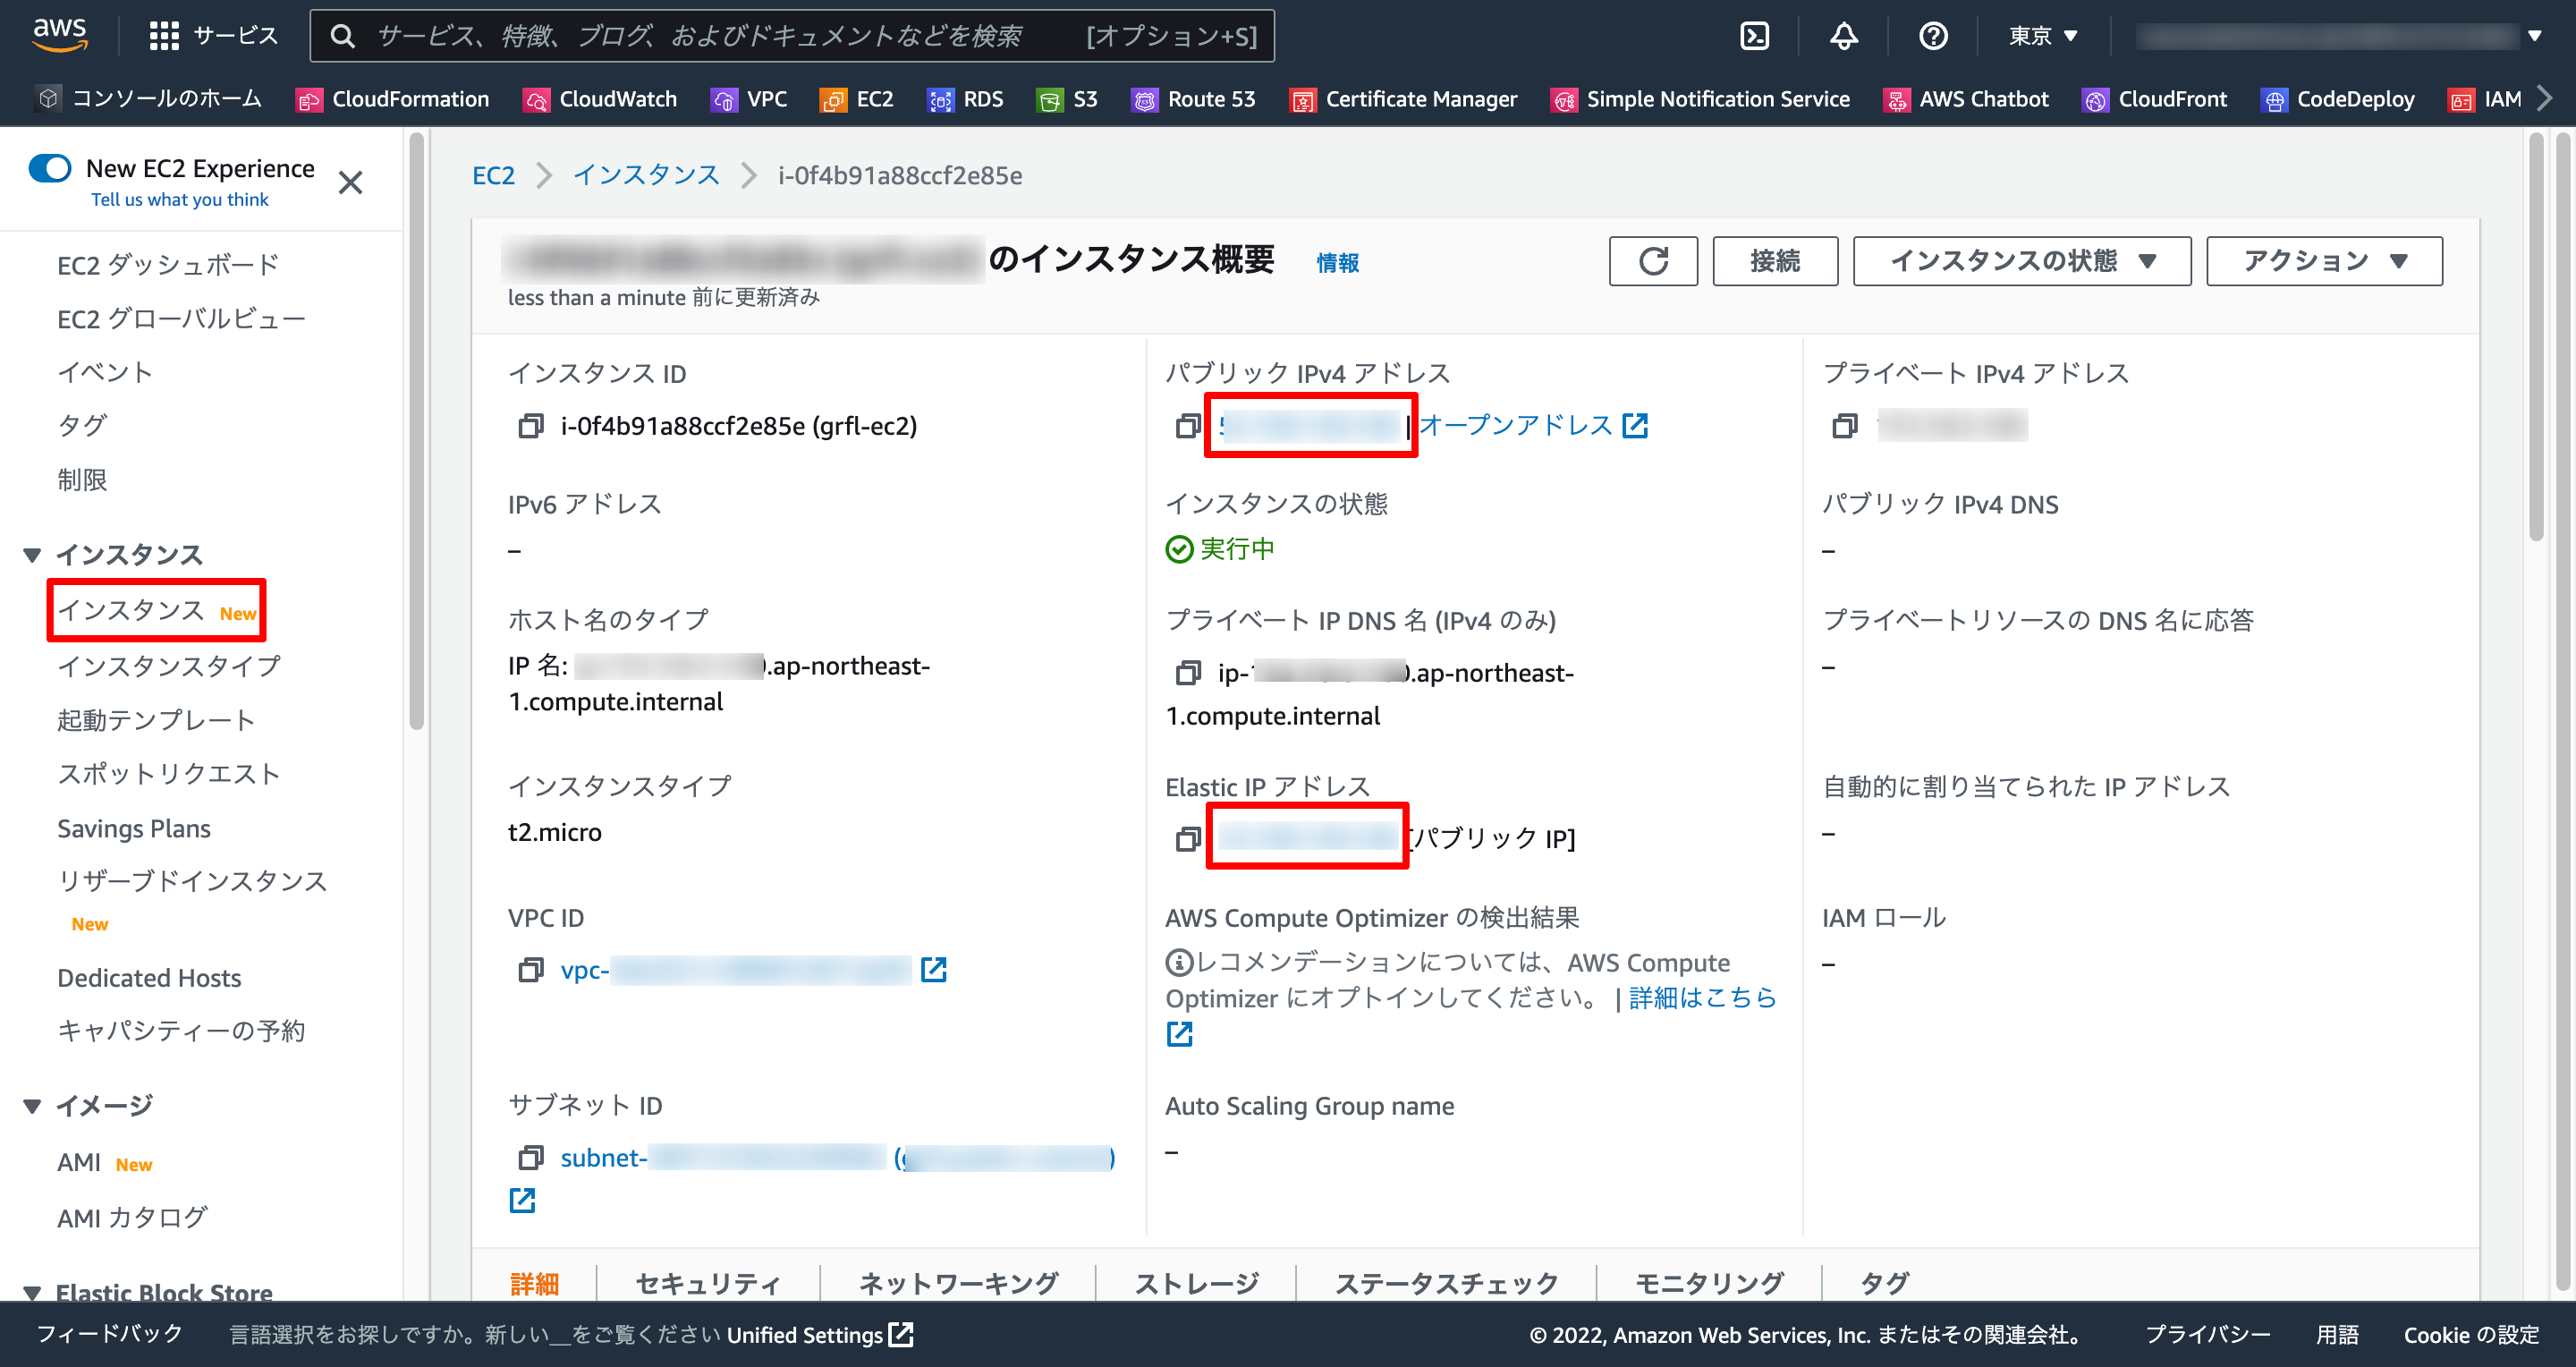
1-3. パブリックIPアドレス確認
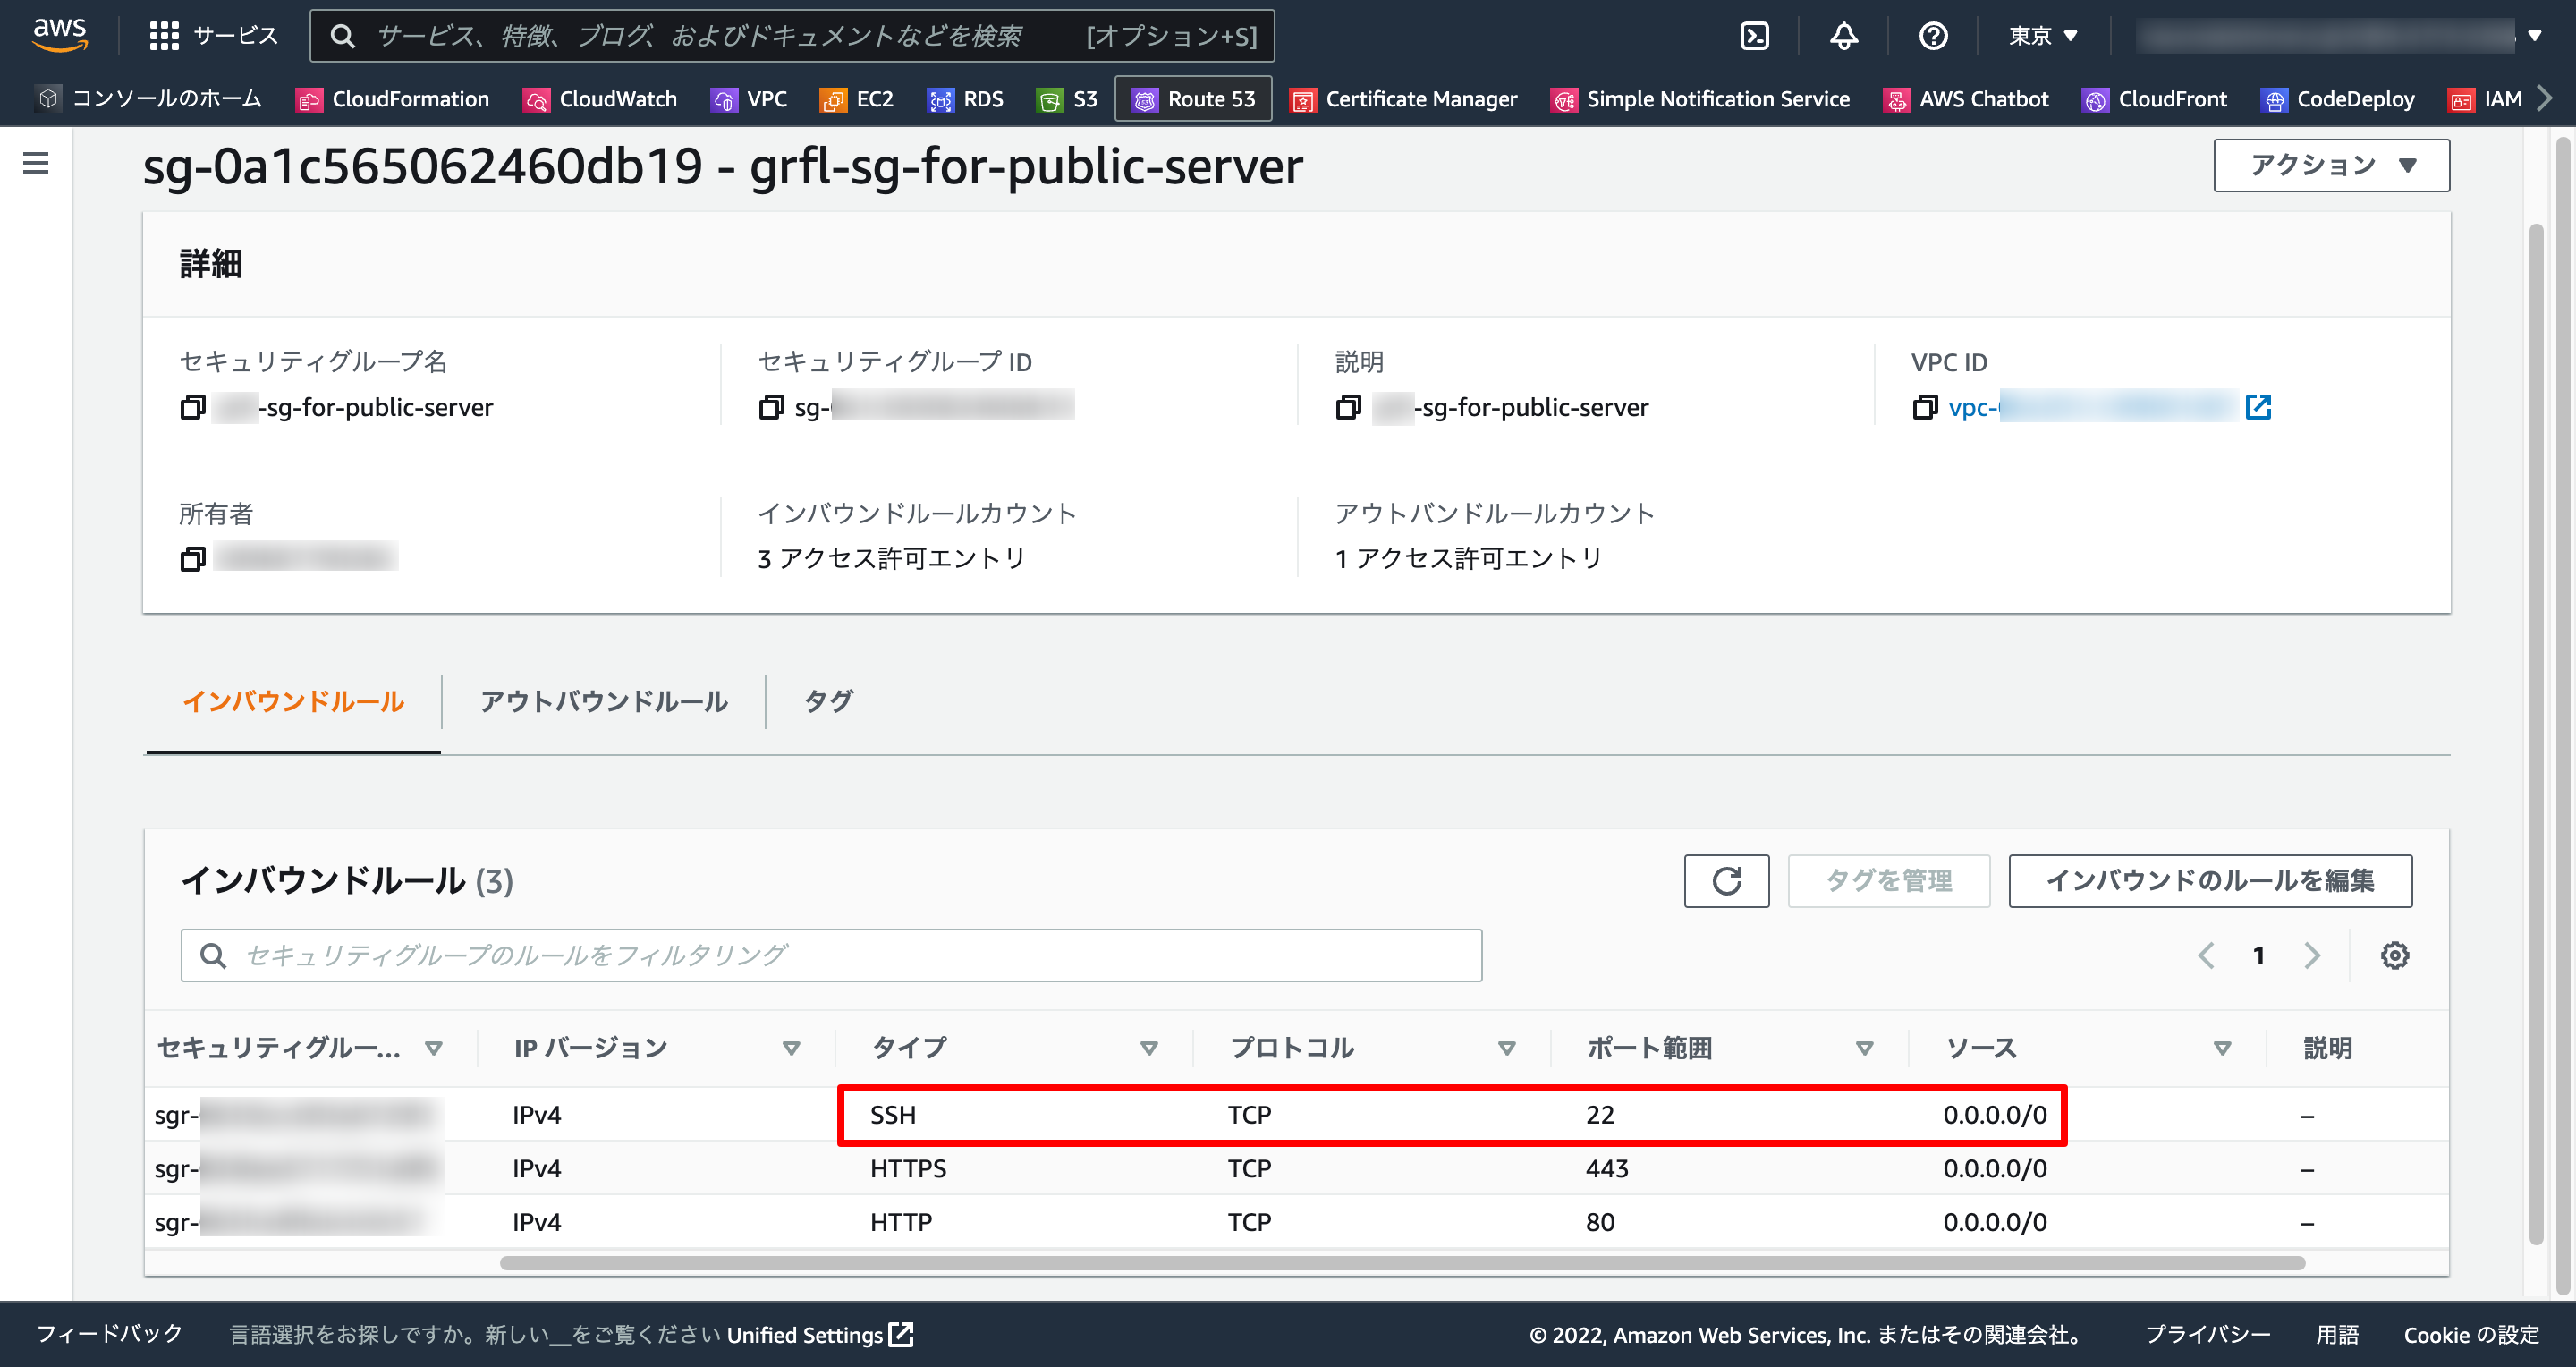
1-4. セキュリティグループ確認
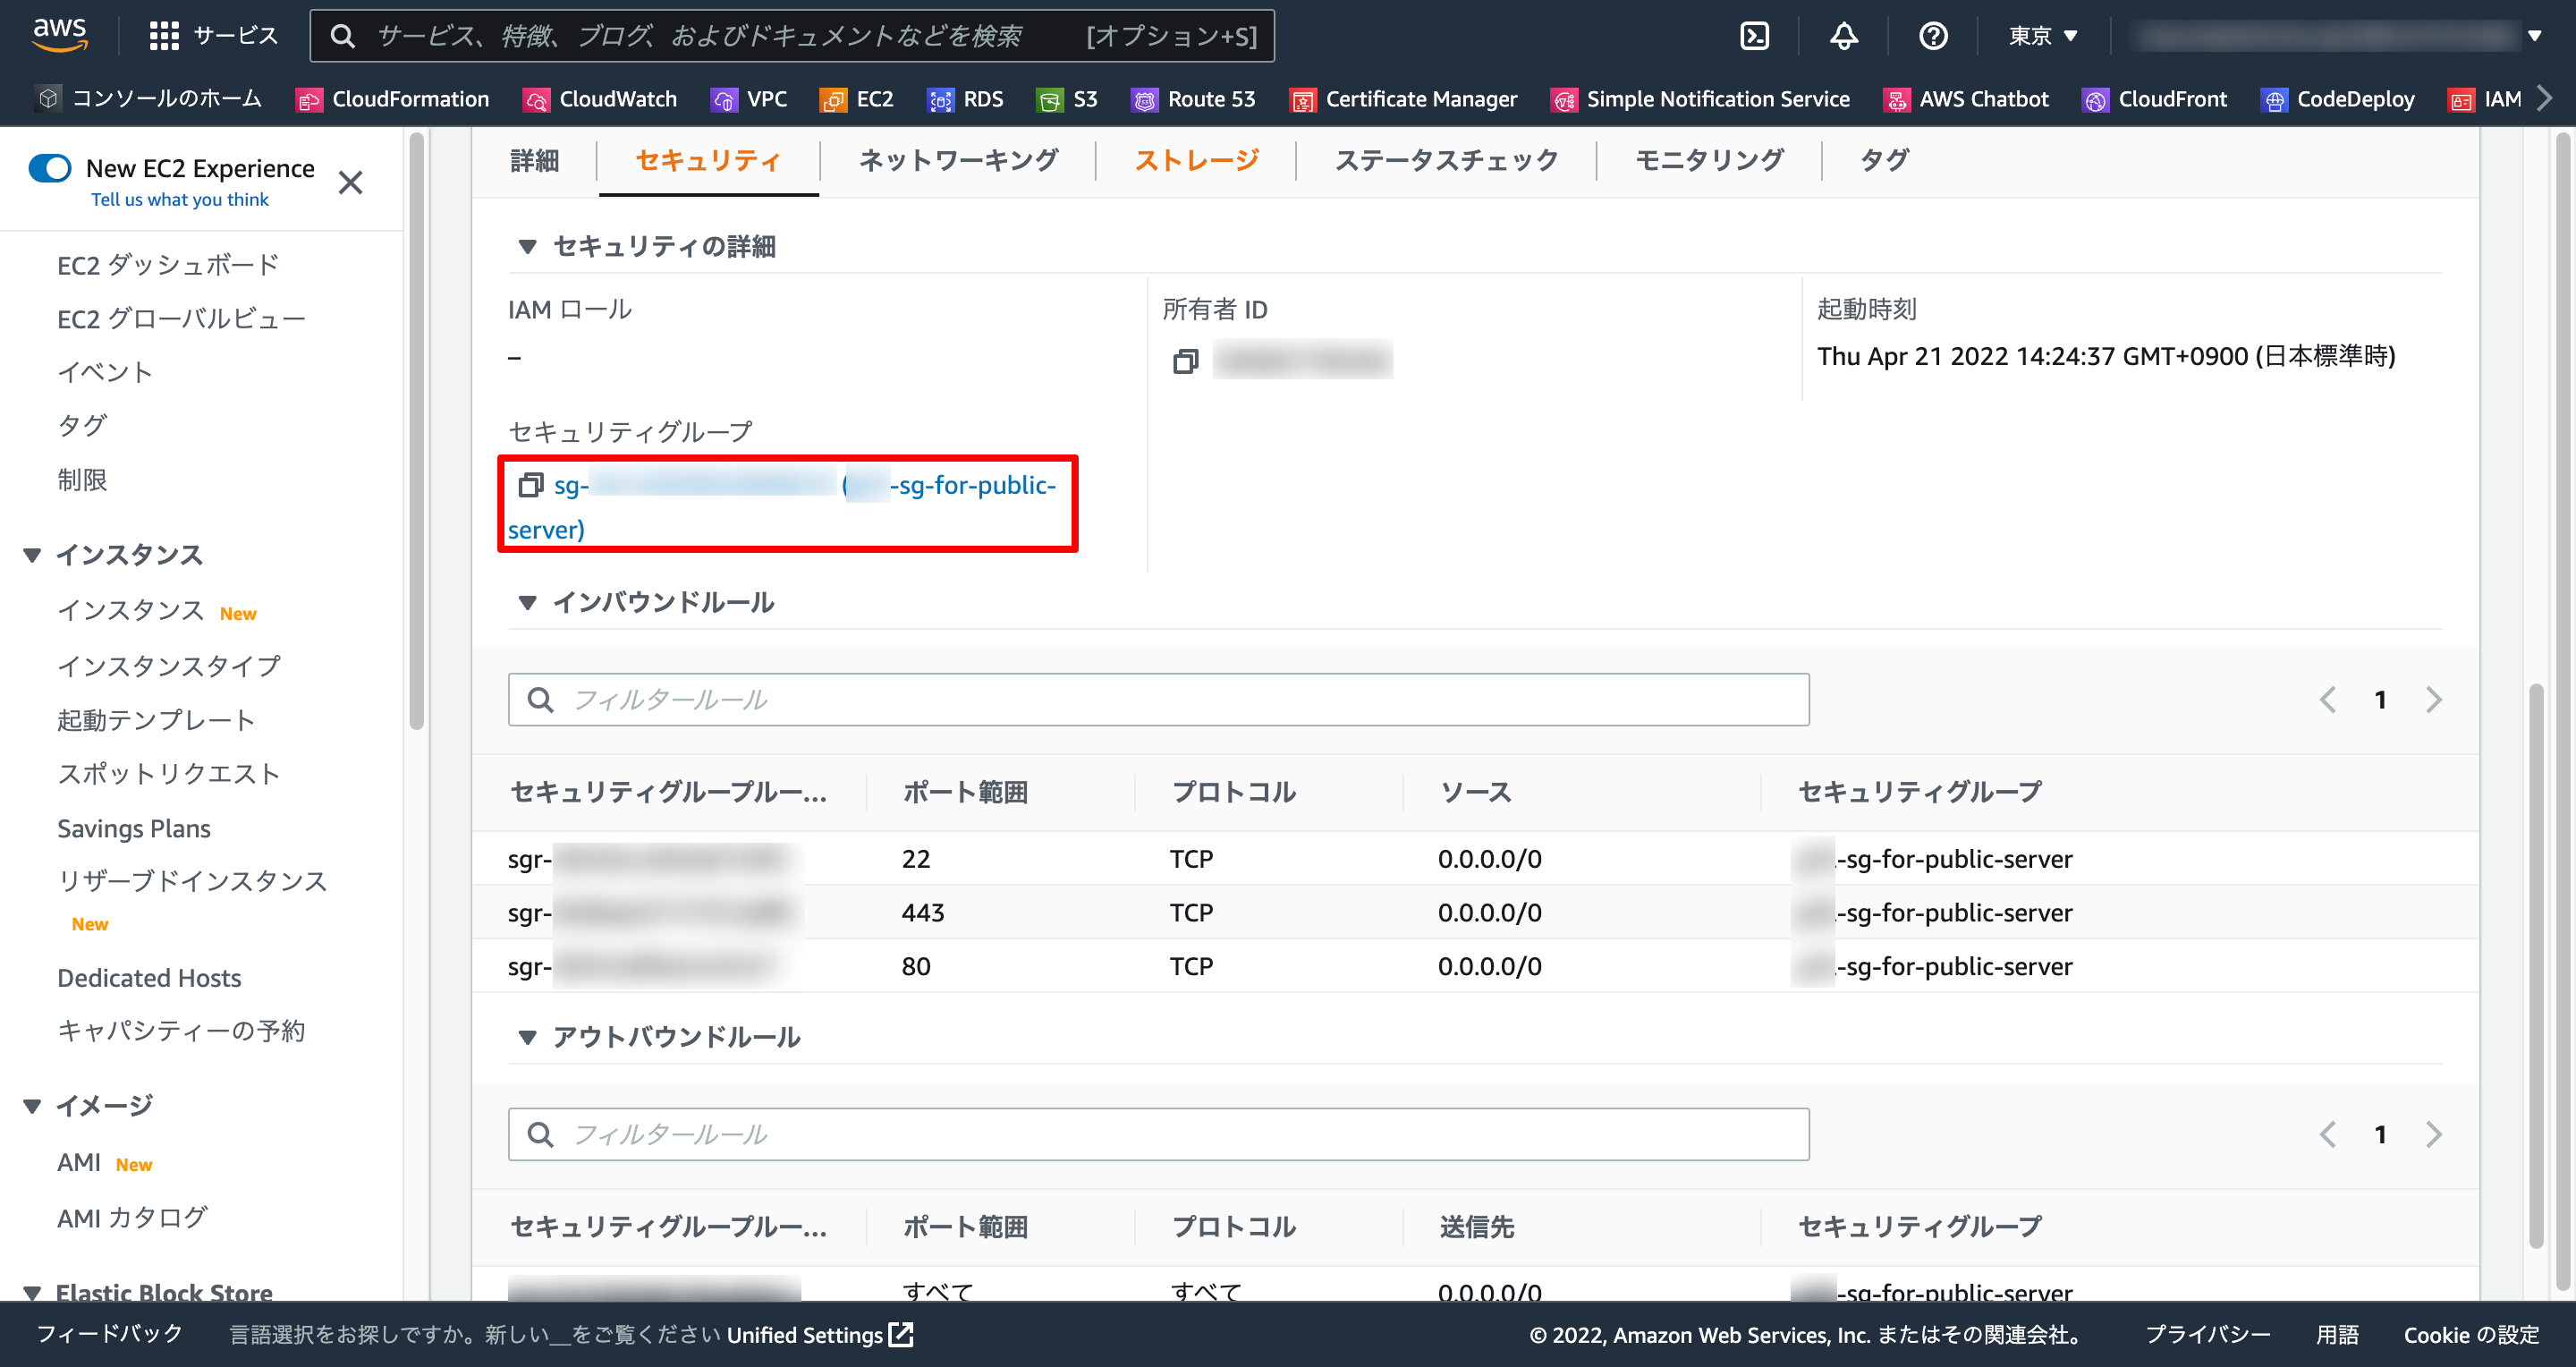
-
0.0.0.0/0からのSSH接続が許可されているので、全てのIPアドレスからのSSH接続が可能
1-5. 秘密鍵権限変更
$ chmod 700 ~/.ssh
$ chmod 600 ~/.ssh/hoge.pem
1-6. sshログイン
$ ssh ec2-user@xx.xxx.xxx.xxx(EC2パブリックIP) -i ~/.ssh/hoge.pem
2. オーナー設定
2-1. UMASK設定
- 作成するユーザーディレクトリに、他のユーザーも入れるように権限を
700→755に変更
ec2-user
$ sudo vi /etc/login.defs
# 略
# The permission mask is initialized to this value. If not specified,
# the permission mask will be initialized to 022.
UMASK           022 #==========この行を変更(077を022に変更)
# 略
2-2. ユーザー追加
root
$ sudo su -
# useradd hoge
# passwd hoge
2-3. sudo権限付与
- ※必要に応じて
root
# usermod -G wheel hoge
# visudo
/wheel

// 略
## Allows people in group wheel to run all commands
%wheel        ALL=(ALL)       ALL

## Same thing without a password
%wheel  ALL=(ALL)       NOPASSWD: ALL
// 略

:wq
- 下記方法でも可能
root
# echo "hoge ALL=(ALL) NOPASSWD:ALL" >> /etc/sudoers.d/90-cloud-init-users
2-4. authorized_keys作成
hoge
# su hoge
$ mkdir .ssh
$ chmod 700 .ssh
$ touch .ssh/authorized_keys
$ chmod 600 .ssh/authorized_keys
2-5. キーペア作成
hoge
$ ssh-keygen -t rsa
Enter×3
$ cd ~/.ssh
$ ls
id_rsa  id_rsa.pub
2-6. 公開鍵の登録
hoge
$ cat id_rsa.pub >> authorized_keys
$ rm id_rsa.pub
$ chmod 600 authorized_keys
2-7. 権限変更
hoge
$ chmod 757 ~/.ssh
$ chmod 757 ~/.ssh/id_rsa
2-8. 秘密鍵ダウンロード
local
$ exit
$ scp -i ~/.ssh/hoge.pem ec2-user@xx.xxx.xxx.xxx(EC2パブリックIP):/home/hoge/.ssh/id_rsa ~/.ssh
$ cd ~/.ssh
$ mv -i id_rsa hoge-developer.pem
$ chmod 600 hoge-developer.pem
2-9. 権限変更を戻す
hoge
$ ssh ec2-user@xx.xxx.xxx.xxx(EC2パブリックIP) -i ~/.ssh/hoge.pem
$ sudo su - hoge
$ chmod 700 ~/.ssh
$ cd ~/.ssh
$ rm id_rsa
2-10. SSHログイン
local
$ exit
$ cd ~/.ssh
$ mv id_rsa hoge-developer.pem
$ chmod 600 hoge-developer.pem
$ ssh hoge@xx.xxx.xxx.xxx(EC2パブリックIP) -i ~/.ssh/hoge-developer.pem
3. 開発メンバー設定
- 下記を開発メンバー(メンターさん)へ連絡
【ID】hoge
【PW】hoge
【IP】xx.xxx.xxx.xxx(EC2パブリックIP)
【pem】hoge-developer(添付資料)
- 開発メンバー(メンターさん)にしてもらうこと
local
$ mv (pem保存先のパス)/hoge-developer.pem ~/.ssh
$ chmod 600 ~/.ssh/hoge-developer.pem
$ ssh hoge@xx.xxx.xxx.xxx(EC2パブリックIP) -i ~/.ssh/hoge-developer.pem
4. 補足
- ユーザーが不要になったら削除
root
$ ssh ec2-user@xx.xxx.xxx.xxx(EC2パブリックIP) -i ~/.ssh/hoge.pem
$ sudo su -
$ userdel -r hoge
reference