今回は、実際のアプリケーション開発を意識して、Spring Seucirtyが提供しているデフォルト動作をカスタマイズする方法をいくつか紹介していきたいと思います。
シリーズ
- 第1回:Spring Security 5でサポートされるOAuth 2.0 LoginをSpring Bootで使ってみる
- 第2回:Spring Security 5でサポートされるOAuth 2.0 Loginの処理の流れを(大まかに)理解する
- 第3回:Spring Security 5でサポートされたOAuth 2.0 Loginの処理の流れを(深く)理解する
動作検証バージョン
- Spring Boot 2.0.0.M7
- Spring Security 5.0.0.RELESAE
カスタマイズポイント
本エントリで紹介するカスタマイズポイントは以下の5つです。本エントリで紹介するのは、Spring Securityが提供しているカスタマイズポイントの中の一部なので、カスタマイズポイントの全量が知りたい方は、Spring Securityのリファレンス(OAuth 2.0 Login — Advanced Configuration)をご覧ください。
認証プロバイダの追加
デモアプリケーションでは、認証プロバイダとしてGitHubのみをサポートしていましたが、実際には複数の認証プロバイダを同時に利用することの方が多いと思います。ここでは、GitHubに加えて「Spring Securityがデフォルト値を提供しているGoogle」と「Spring Securityがデフォルト値を提供していないYahoo! Japan」を認証プロバイダとして扱う方法を紹介します。
NOTE:
Yahoo! JapanのID連携機能ではスコープとして
addressをサポートしていますが、住所情報が必要になるケースはあまりないのかな〜と思うため、あえて対象スコープから外してあります。クライアントアプリから住所情報にアクセスする必要がある場合は、スコープにaddressを指定するだけです。
Spring Bootアプリ編
Spring Bootを利用する場合は、application.propertiesまたはapplication.ymlを使用してサポートする認証プロバイダを追加することができます。
# ...
# Settings for Google
spring.security.oauth2.client.registration.google.clientId={your google client id}
spring.security.oauth2.client.registration.google.clientSecret={your google client secret}

# Settings for Yahoo! Japan
spring.security.oauth2.client.registration.yahoo.clientId={your yahoo client id}
spring.security.oauth2.client.registration.yahoo.clientSecret={your yahoo client secret}
spring.security.oauth2.client.registration.yahoo.authorizationGrantType=authorization_code
spring.security.oauth2.client.registration.yahoo.redirectUriTemplate={baseUrl}/login/oauth2/code/{registrationId}
spring.security.oauth2.client.registration.yahoo.scope=openid,profile,email
spring.security.oauth2.client.registration.yahoo.clientName=Yahoo! Japan
spring.security.oauth2.client.provider.yahoo.authorizationUri=https://auth.login.yahoo.co.jp/yconnect/v2/authorization
spring.security.oauth2.client.provider.yahoo.tokenUri=https://auth.login.yahoo.co.jp/yconnect/v2/token
spring.security.oauth2.client.provider.yahoo.jwkSetUri=https://auth.login.yahoo.co.jp/yconnect/v2/jwks
spring.security.oauth2.client.provider.yahoo.userInfoUri=https://userinfo.yahooapis.jp/yconnect/v2/attribute
# ...
spring:
  security:
    oauth2:
      client:
        registration:
          github:
            clientId: {your github client id}
            clientSecret: {your github client secret}
          google:
            clientId: {your google client id}
            clientSecret: {your google client secret}
          yahoo:
            clientId: {your yahoo client id}
            clientSecret: {your yahoo client secret}
            redirectUriTemplate: '{baseUrl}/login/oauth2/code/{registrationId}'
            authorizationGrantType: authorization_code
            scope:
              - openid
              - profile
              - email
            clientName: Yahoo! Japan
        provider:
          yahoo:
            authorizationUri: https://auth.login.yahoo.co.jp/yconnect/v2/authorization
            tokenUri: https://auth.login.yahoo.co.jp/yconnect/v2/token
            jwkSetUri: https://auth.login.yahoo.co.jp/yconnect/v2/jwks
            userInfoUri: https://userinfo.yahooapis.jp/yconnect/v2/attribute
WARNING:
ここでは利用していませんが、(Spring Boot 2.0.0.M7の時点では)
spring.security.oauth2.client.provider.{registrationId}.userNameAttributeに指定した値がSpring SecurityのBean定義に反映されない不具合があり、Spring Boot 2.0.0.RC1でこの不具合が修正される予定です。
非Spring Bootアプリ編
Spring Bootを利用しない場合は、WebSecurityConfigurerAdapterを継承したConfigurationクラスを作成し、ClientRegistrationRepositoryのBean定義を行います。
依存ライブラリの追加
非Spring BootアプリでOAuth 2.0 Login機能を利用する場合は、Spring Security提供の「spring-security-oauth2-client」 「spring-security-oauth2-jose」「spring-security-config」とJackson提供の「jackson-databind」を依存ライブラリとして追加する必要があります。
<!-- Spring Security -->
<dependency>
  <groupId>org.springframework.security</groupId>
  <artifactId>spring-security-oauth2-client</artifactId>
  <version>5.0.0.RELEASE</version>
</dependency>

<dependency>
  <groupId>org.springframework.security</groupId>
  <artifactId>spring-security-oauth2-jose</artifactId>
  <version>5.0.0.RELEASE</version>
</dependency>

<dependency>
  <groupId>org.springframework.security</groupId>
  <artifactId>spring-security-config</artifactId>
  <version>5.0.0.RELEASE</version>
</dependency>

<!-- Jackson -->
<!-- Nimbus OAuth 2.0 SDKの中で利用している -->
<dependency>
  <groupId>com.fasterxml.jackson.core</groupId>
  <artifactId>jackson-databind</artifactId>
  <version>2.9.2</version>
</dependency>
OAuth 2.0 Login機能を有効化するためのBean定義
サポートする認証プロバイダはClientRegistrationRepositoryの中で定義しますが、そもそもOAuth 2.0 Login機能を利用できるようにBean定義しておく必要があります。
NOTE:
Spring Security 5.0の時点ではXMLネームスペースのサポートはありませんが、今のところSpring Security 5.1でサポートされる計画になっています。
package com.example;

import org.springframework.security.config.annotation.web.builders.HttpSecurity;
import org.springframework.security.config.annotation.web.configuration.EnableWebSecurity;
import org.springframework.security.config.annotation.web.configuration.WebSecurityConfigurerAdapter;

@EnableWebSecurity
public class SecurityConfig extends WebSecurityConfigurerAdapter {

  @Override
  protected void configure(HttpSecurity http) throws Exception {
    http.authorizeRequests()
        .anyRequest().authenticated()
        .and()
        .oauth2Login(); // OAuth 2.0 Login機能を有効化
  }

}
サポートする認証プロバイダのBean定義
Spring Securityが提供しているInMemoryClientRegistrationRepositoryを使用して、サポートする認証プロバイダをBean定義します。
package com.example;

import org.springframework.context.annotation.Bean;
import org.springframework.security.config.annotation.web.builders.HttpSecurity;
import org.springframework.security.config.annotation.web.configuration.EnableWebSecurity;
import org.springframework.security.config.annotation.web.configuration.WebSecurityConfigurerAdapter;
import org.springframework.security.config.oauth2.client.CommonOAuth2Provider;
import org.springframework.security.oauth2.client.registration.ClientRegistration;
import org.springframework.security.oauth2.client.registration.ClientRegistrationRepository;
import org.springframework.security.oauth2.client.registration.InMemoryClientRegistrationRepository;
import org.springframework.security.oauth2.core.AuthorizationGrantType;

@EnableWebSecurity
public class SecurityConfig extends WebSecurityConfigurerAdapter {

  @Override
  protected void configure(HttpSecurity http) throws Exception {
    http.authorizeRequests()
        .anyRequest().authenticated()
        .and()
        .oauth2Login();
  }

  @Bean // 認証プロバイダのBean定義
  ClientRegistrationRepository clientRegistrationRepository() {
    return new InMemoryClientRegistrationRepository(
        CommonOAuth2Provider.GITHUB.getBuilder("github")
            .clientId("{your github client id}")
            .clientSecret("{your github client secret}")
            .build()
        ,
        CommonOAuth2Provider.GOOGLE.getBuilder("google")
            .clientId("{your google client id}")
            .clientSecret("{your github client secret}")
            .build()
        ,
        ClientRegistration.withRegistrationId("yahoo")
            .clientId("{your yahoo client id}")
            .clientSecret("{your yahoo client secret}")
            .authorizationGrantType(AuthorizationGrantType.AUTHORIZATION_CODE)
            .redirectUriTemplate("{baseUrl}/login/oauth2/code/{registrationId}")
            .scope("openid", "profile", "email")
            .clientName("Yahoo! Japan")
            .authorizationUri("https://auth.login.yahoo.co.jp/yconnect/v2/authorization")
            .tokenUri("https://auth.login.yahoo.co.jp/yconnect/v2/token")
            .jwkSetUri("https://auth.login.yahoo.co.jp/yconnect/v2/jwks")
            .userInfoUri("https://userinfo.yahooapis.jp/yconnect/v2/attribute")
            .build()
    );
  }

}
ユーザ情報へアクセスする際のスコープ変更
Spring Securityは、「Google」「GitHub」「Facebook」「Okta」からエンドユーザ(リソースオーナ)の情報へアクセスする際に指定するスコープに対して、以下のデフォルト値を設けています。
| 認証プロバイダ | タイプ | デフォルトのスコープ |
|---|---|---|
| OIDC 1.0 | openid, profile, email, address, phone | |
| GitHub | OAuth 2.0 | user |
| OAuth 2.0 | public_profile, email | |
| Okta | OIDC 1.0 | openid, profile, email, address, phone |
ここでまず注目したいのは、GitHubだけ書き込み権限があるスコープ(user)がデフォルト値になっている点です。GitHub以外は(おそらく)読み取り専用のスコープなので、「GitHubも読み取り専用のスコープ(read:user)をデフォルト値にするPR」を提出中ですが、どのように扱われるかわかりません。
また、 作成するアプリケーションによっては、住所(address)や電話番号(phone)を扱う必要がないケースも多いと思うので、ここでは認可要求時のスコープを変更する方法を紹介します。
NOTE:
Spring Security 5.0.0.RELEASEでは、Google用のデフォルトスコープに
addressとphoneが含まれていますが、「Google提供のGuideの中で定義しているOpenID Connect時に扱えるスコープ」にaddressとphoneが含まれていないので、「Google用のデフォルトスコープからaddressとphoneを削除するPR」を提出してみました。こちらもどのように扱われるかまだわかりません。
Spring Bootアプリ編
Spring Bootを利用する場合は、application.propertiesまたはapplication.ymlを使用してスコープを変更することができます。
# ...
# Settings for GitHub
spring.security.oauth2.client.registration.github.clientId={your github client id}
spring.security.oauth2.client.registration.github.clientSecret={your github client secret}
+spring.security.oauth2.client.registration.github.scope=read:user
# ...
spring:
  security:
    oauth2:
      client:
        registration:
          github:
            clientId: {your github client id}
            clientSecret: {your github client secret}
+           scope:
+             - read:user
非Spring Bootアプリ編
Spring Bootを利用しない場合は、InMemoryClientRegistrationRepositoryのBean定義を行う際にスコープを変更することができます。
CommonOAuth2Provider.GITHUB.getBuilder("github")
    .clientId("{your github client id}")
    .clientSecret("{your github client secret}")
+   .scope("read:user")
    .build()
独自認証とOAuth 2.0 Login機能の併用
独自認証(たとえばフォーム認証)とOAuth 2.0 Login機能を併用したいケースがあると思います。例えば・・・もともと独自認証で利用者の認証を行っていたけど、「利用者の利便性向上(→利用者を増やす)」や「認証情報を自システムで管理することへのリスク軽減」などを理由に「OAuth 2.0 Login機能」を採用するケースが考えられます。
Spring Bootアプリ編
独自認証(たとえばフォーム認証)とOAuth 2.0 Login機能を併用する場合は、WebSecurityConfigurerAdapterを継承したConfigurationクラスを作成し、Spring SecurityのBean定義を行う必要があります。
package com.example.demooauth2login;

import org.springframework.context.annotation.Configuration;
import org.springframework.security.config.annotation.web.builders.HttpSecurity;
import org.springframework.security.config.annotation.web.configuration.WebSecurityConfigurerAdapter;

@Configuration
public class SecurityConfig extends WebSecurityConfigurerAdapter {

  @Override
  protected void configure(HttpSecurity http) throws Exception {
    http
        .authorizeRequests()
        .anyRequest().authenticated()
        .and()
        .oauth2Login()
        .and()
        .formLogin(); // フォーム認証を有効化
  }

}
この状態でSpring Bootアプリを起動すると、以下のように「フォーム認証用のログインフォーム」と「OAuth 2.0 Login機能を利用するためのリンク」が表示されます。
フォーム認証を行う際は、「User:」欄に「user」を、「Password:」欄に「Spring Boot起動時にログに出力されているパスワード」を入力してください。
...
2017-12-03 15:44:12.658 DEBUG 7286 --- [           main] eGlobalAuthenticationAutowiredConfigurer : Eagerly initializing {org.springframework.boot.autoconfigure.security.WebSecurityEnablerConfiguration=org.springframework.boot.autoconfigure.security.WebSecurityEnablerConfiguration$$EnhancerBySpringCGLIB$$5f1156f5@4b0bd001}
2017-12-03 15:44:12.665  INFO 7286 --- [           main] b.a.s.AuthenticationManagerConfiguration :

Using default security password: 811518cf-c546-4884-a43c-1d4f8c444ae6

2017-12-03 15:44:13.149 DEBUG 7286 --- [           main] edFilterInvocationSecurityMetadataSource : Adding web access control expression 'authenticated', for org.springframework.security.web.util.matcher.AnyRequestMatcher@1
...
ちなみに・・・フォーム認証時に参照するユーザ情報は、以下のようにUserDetailsServiceのBeanを定義すればSpring Securityが自動検出してくれます。ここではインメモリ実装用のBean定義例を紹介しますが、JDBC実装、LDAP実装などが用意されており、ユーザ情報を取得するロジックを独自実装することもできます。
@Bean
public UserDetailsService userDetailsService() {
  User.UserBuilder userBuilder = User.withDefaultPasswordEncoder();
  InMemoryUserDetailsManager manager = new InMemoryUserDetailsManager();
  manager.createUser(userBuilder.username("user").password("password").roles("USER").build());
  manager.createUser(userBuilder.username("admin").password("password").roles("USER", "ADMIN").build());
  return manager;
}
NOTE:
デモアプリケーションでフォーム認証を行うと・・・残念ながらシステムエラーになってしまいます。これは、
DemoControllerの実装がOAuth 2.0 Login機能だけを使う前提の実装になっているためです。かなりやっつけ(実際にはマネしてほしくない)ですが、DemoControllerを以下のように修正すると「フォーム認証」と「OAuth 2.0 Login機能」を併用することができます。
package com.example.demooauth2login;

import org.springframework.http.HttpHeaders;
import org.springframework.http.RequestEntity;
import org.springframework.security.core.Authentication;
import org.springframework.security.oauth2.client.OAuth2AuthorizedClient;
import org.springframework.security.oauth2.client.OAuth2AuthorizedClientService;
import org.springframework.security.oauth2.client.authentication.OAuth2AuthenticationToken;
import org.springframework.stereotype.Controller;
import org.springframework.ui.Model;
import org.springframework.web.bind.annotation.GetMapping;
import org.springframework.web.client.RestOperations;
import org.springframework.web.client.RestTemplate;

import java.net.URI;
import java.util.Map;

@Controller
public class DemoController {

  private final RestOperations restOperations = new RestTemplate();
  private final OAuth2AuthorizedClientService authorizedClientService;

  public DemoController(OAuth2AuthorizedClientService authorizedClientService) {
    this.authorizedClientService = authorizedClientService;
  }

  @GetMapping("/")
  public String index(Authentication authentication, Model model) {
    if (OAuth2AuthenticationToken.class.isInstance(authentication)) {
      model.addAttribute("authorizedClient",
          this.getAuthorizedClient(OAuth2AuthenticationToken.class.cast(authentication)));
    }
    return "index";
  }

  @GetMapping("/attributes")
  public String userAttributeAtLogin(Authentication authentication, Model model) {
    if (OAuth2AuthenticationToken.class.isInstance(authentication)) {
      model.addAttribute("attributes",
          OAuth2AuthenticationToken.class.cast(authentication).getPrincipal().getAttributes());
    }
    return "userinfo";
  }

  @GetMapping("/attributes/latest")
  public String userLatestAttribute(Authentication authentication, Model model) {
    if (OAuth2AuthenticationToken.class.isInstance(authentication)) {
      OAuth2AuthorizedClient authorizedClient =
          this.getAuthorizedClient(OAuth2AuthenticationToken.class.cast(authentication));
      String userInfoUri = authorizedClient.getClientRegistration().getProviderDetails().getUserInfoEndpoint().getUri();
      RequestEntity<Void> requestEntity = RequestEntity.get(URI.create(userInfoUri))
          .header(HttpHeaders.AUTHORIZATION, "Bearer " + authorizedClient.getAccessToken().getTokenValue())
          .build();
      model.addAttribute("attributes", restOperations.exchange(requestEntity, Map.class).getBody());
    }
    return "userinfo";
  }

  private OAuth2AuthorizedClient getAuthorizedClient(OAuth2AuthenticationToken authentication) {
    return this.authorizedClientService.loadAuthorizedClient(
        authentication.getAuthorizedClientRegistrationId(), authentication.getName());
  }

}
<!DOCTYPE html>
<html xmlns="http://www.w3.org/1999/xhtml" xmlns:th="http://www.thymeleaf.org"
xmlns:sec="http://www.thymeleaf.org/thymeleaf-extras-springsecurity4">
<head>
<title>Demo Application OAuth 2.0 Login with Spring Security 5</title>
<meta charset="utf-8"/>
</head>
<body>
<div style="float: right" th:fragment="logout" sec:authorize="isAuthenticated()">
<div style="float:left">
<span style="font-weight:bold">User Id:</span>
<span sec:authentication="name">1000000</span>
<span th:if="${isOAuthLogin}">
<span style="font-weight:bold">User Name:</span>
<span sec:authentication="principal.attributes['name']">Taro Yamada</span>
</span>
</div>
<div style="float:none"> </div>
<div style="float:right">
<form action="#" th:action="@{/logout}" method="post">
<input type="submit" value="Logout"/>
</form>
</div>
</div>
<h1>Welcome Demo Application OAuth 2.0 Login with Spring Security 5 !!</h1>
<div th:if="${isOAuthLogin}">
You are successfully logged in via the OAuth 2.0 Client
-<span style="font-weight:bold" th:text="${authorizedClient.clientRegistration.clientName}">Demo Client</span>-
</div>
<div> </div>
<div>
<ul>
<li>
<a href="/templates/userinfo.html" th:href="@{/attributes}">Display User Attributes at login</a>
</li>
<li>
<a href="/templates/userinfo.html" th:href="@{/attributes/latest}">Display latest User Attributes</a>
</li>
</ul>
</div>
</body>
</html>
非Spring Bootアプリ編
基本的にはSpring Bootアプリと同じですが、Spring Bootとは違ってUserDetailsServiceのBean定義を必ず行う必要があります。
@EnableWebSecurity
public class SecurityConfig extends WebSecurityConfigurerAdapter {

  @Override
  protected void configure(HttpSecurity http) throws Exception {
    http.authorizeRequests()
        .anyRequest().authenticated()
        .and()
        .oauth2Login()
        .and()
        .formLogin(); // フォーム認証の有効化
  }

  // ...

  // UserDetailsServiceをBean定義するとフォームから受け取った「ユーザ名」と「パスワード」を使用して認証を行う
  // DaoAuthenticationProviderがSpring Securityに登録される
  @Bean
  public UserDetailsService userDetailsService() {
    User.UserBuilder userBuilder = User.withDefaultPasswordEncoder();
    InMemoryUserDetailsManager manager = new InMemoryUserDetailsManager();
    manager.createUser(userBuilder.username("user").password("password").roles("USER").build());
    manager.createUser(userBuilder.username("admin").password("password").roles("USER", "ADMIN").build());
    return manager;
  }

}
ログイン画面のカスタマイズ
Spring Securityはデフォルトのログイン画面を提供していますが、この画面を実アプリで使うことは「100%ない」と言っても過言ではないでしょう!!ということで、ログイン画面をカスタマイズする方法も紹介しておきましょう。
ログイン画面の作成
まず、Bootstrapを使用してほんのすこしだけリッチなログイン画面を作成します。なお、フォーム認証とOAuth 2.0 Login機能を併用する前提のログイン画面を作る際の実装例になります。(+サンプルはSpring Bootベースですが、非Spring Bootアプリでも基本的には同じことをすればOKです)
<!DOCTYPE html>
<html xmlns="http://www.w3.org/1999/xhtml" xmlns:th="http://www.thymeleaf.org">
<head>
  <title>Login with Spring Security 5 !!</title>
  <meta charset="utf-8"/>
  <link rel="stylesheet" href="https://maxcdn.bootstrapcdn.com/bootstrap/4.0.0-beta.2/css/bootstrap.min.css"
        integrity="sha384-PsH8R72JQ3SOdhVi3uxftmaW6Vc51MKb0q5P2rRUpPvrszuE4W1povHYgTpBfshb" crossorigin="anonymous">
</head>
<body onload="document.loginForm.username.focus();" style="background-color: cornsilk;">
<div class="container">

  <h1>Login Page with Spring Security 5 !!</h1>

  <h3>Login with Username and Password</h3>

  <!-- 認証エラー時のメッセージを表示するエリア -->
  <div class="alert alert-danger alert-dismissible fade show" role="alert"
       th:if="${param.error} and ${session['SPRING_SECURITY_LAST_EXCEPTION'] != null}">
    <span th:text="${session['SPRING_SECURITY_LAST_EXCEPTION'].message}">Bad Credential!</span>
  </div>

  <!-- 認証フォームを表示するエリア -->
  <form name="loginForm" th:action="@{/login}" method="post">
    <div class="form-group">
      <label for="username">User ID</label>
      <input type="username" class="form-control" id="username" name="username">
    </div>
    <div class="form-group">
      <label for="password">Password</label>
      <input type="password" class="form-control" id="password" name="password">
    </div>
    <button type="submit" class="btn btn-primary">Login</button>
  </form>

  <hr>

  <h3>Login with OAuth 2.0/OIDC 1.0</h3>
  <!-- OAuth 2.0 Login用のリンクを表示するエリア -->
  <table>
    <tr th:each="clientRegistration : ${@clientRegistrationRepository}">
      <td><a class="btn btn-primary btn-lg btn-block"
             th:href="@{/oauth2/authorization/{id}(id=${clientRegistration.registrationId})}"
             th:text="|Sign in with ${clientRegistration.clientName}|">Sign in with GitHub</a></td>
    </tr>
  </table>

</div>
</body>
</html>
デモアプリケーションで使用しているInMemoryClientRegistrationRepositoryはIterableを実装しているため、InMemoryClientRegistrationRepositoryの中で管理しているClientRegistrationリストに対して、Thymeleafの「th:each」を利用して繰り返し処理を行うことができます。
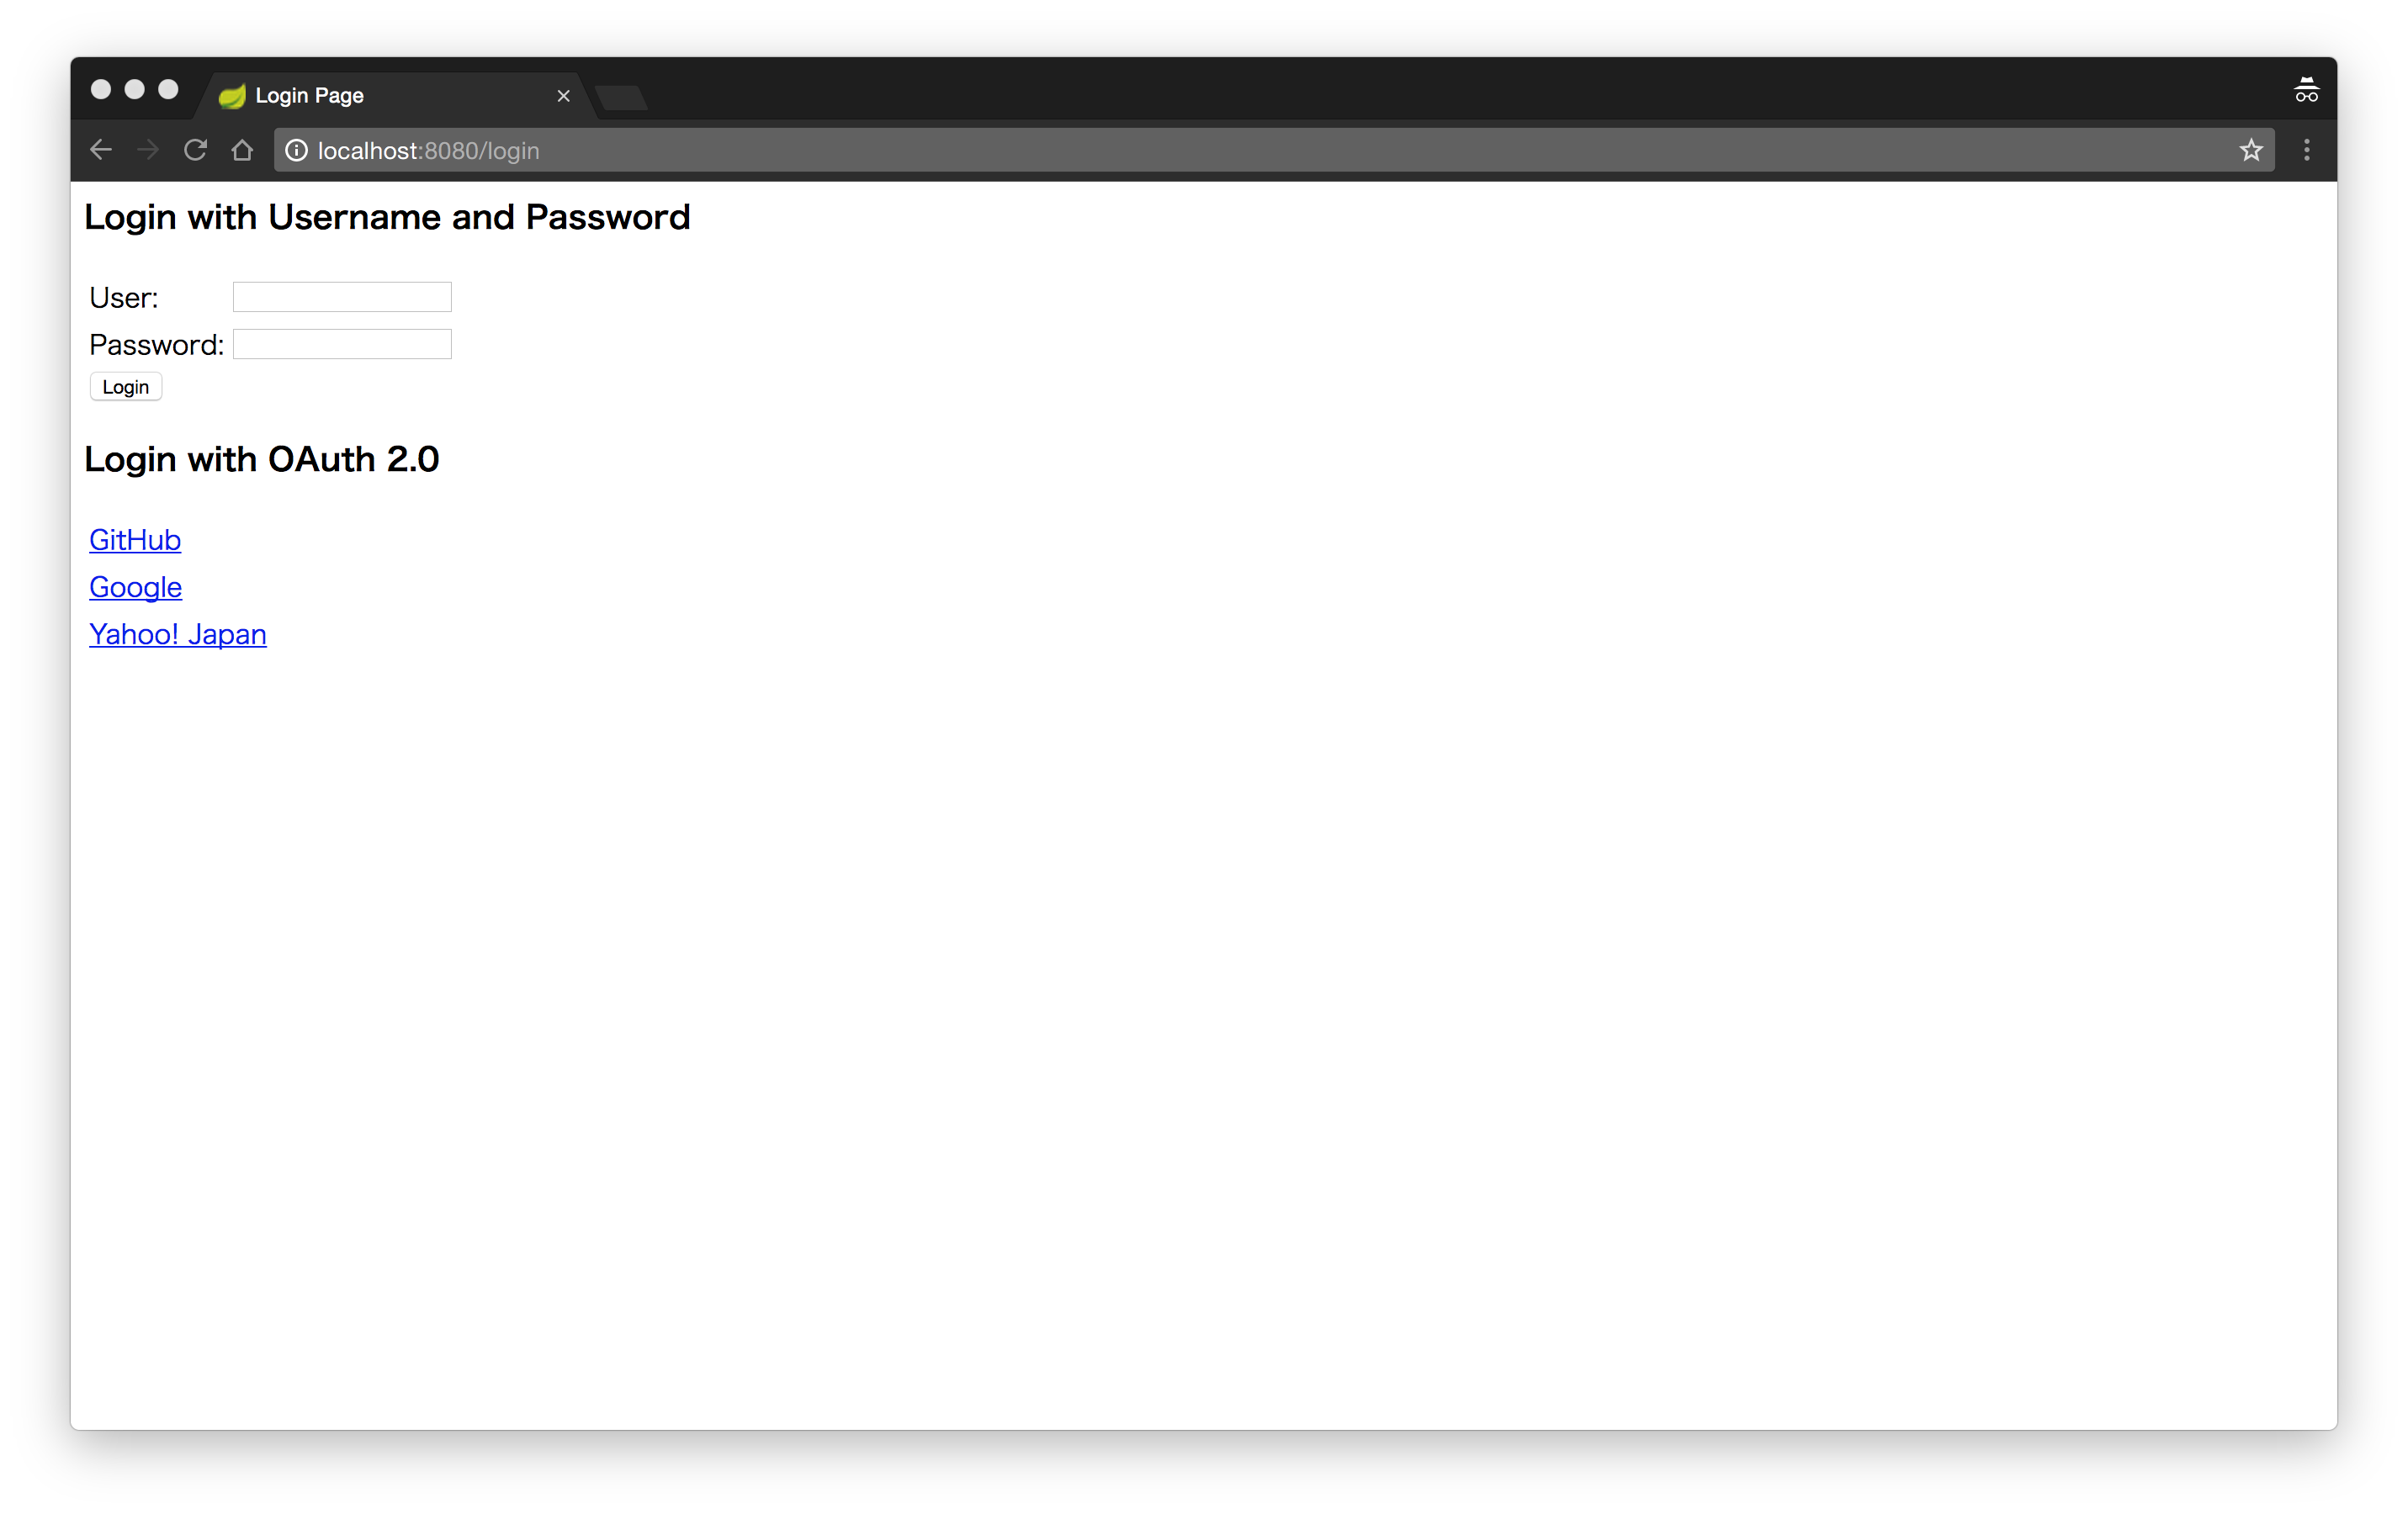
上記HTMLから生成される画面は、以下のような画面になります。

NOTE:
プロバイダの認証・認可画面へ遷移するためのリンク(ボタン)の配置方法ついては、各プロバイダが提供しているガイドラインを一読の上、プロバイダが定めるルールに従うようにしましょう!!(上記画面はあくまでサンプルなので、ガイドラインに従っていない点を補足しておきます)
ログイン画面を表示するエンドポイントの作成
つぎに、Spring MVCのControllerを作成してログイン表示要求を処理するエンドポイント(/login)を用意します。
package com.example.demooauth2login;

import org.springframework.stereotype.Controller;
import org.springframework.web.bind.annotation.GetMapping;

@Controller
public class LoginController {

  @GetMapping("/login")
  public String viewLoginPage() {
    return "loginForm";
  }

}
ログイン画面の表示処理をSpring MVCのエンドポイントへ委譲
さいごに、Spring SecurityのBean定義を変更し、ログイン画面表示要求をSpring MVCのControllerで処理するようにします。
@Override
protected void configure(HttpSecurity http) throws Exception {
  http.authorizeRequests()
      .anyRequest().authenticated()
      .and()
      // ログアウト完了後にログイン画面を正しく表示するために必要(permitAllするのがポイント)
      .logout().permitAll()
      .and()
      .oauth2Login()
      // ログイン画面を表示するためのパスを指定(permitAllするのもポイント)
      .loginPage("/login").permitAll()
      .and()
      .formLogin()
      // ログイン画面を表示するためのパスを指定(permitAllするのもポイント)
      .loginPage("/login").permitAll();
}
権限情報のカスタマイズ
Spring Securityが提供しているデフォルト実装では、OAuth 2.0 Login機能でログインしたユーザは「ROLE_USER」の権限が与えられますが、ユーザの属性値などを参照して権限情報を生成したい場合は、GrantedAuthoritiesMapperを使用することができます。
@Override
protected void configure(HttpSecurity http) throws Exception {
  http
      .authorizeRequests()
      // GrantedAuthoritiesMapperの中で生成した権限を参照するアクセスポリシーを設定してみる
      .antMatchers("/developer", "/developer/**").hasRole("DEVELOPER")
      .anyRequest().authenticated()
      .and()
      .logout().permitAll()
      .and()
      .oauth2Login()
      .loginPage("/login").permitAll()
      .userInfoEndpoint()
      // GrantedAuthoritiesMapperを適用する
      .userAuthoritiesMapper(this.oauth2UserAuthoritiesMapper())
      .and()
      .and()
      .formLogin()
      .loginPage("/login").permitAll();
}

// 要件に合わせてGrantedAuthoritiesMapperを実装する
private GrantedAuthoritiesMapper oauth2UserAuthoritiesMapper() {
  // インタフェース的には複数件受け取ることができるが、実際には権限情報(ROLE_USER)の1件のみが渡される
  return authorities -> {
    List<GrantedAuthority> mappedAuthorities = new ArrayList<>();
    for (GrantedAuthority authority : authorities) {
      // オリジナルの権限情報は引き継ぐ
      mappedAuthorities.add(authority);
      if (OAuth2UserAuthority.class.isInstance(authority)) {
        // OAuth 2.0 Login機能でログインしたユーザに与える権限情報(ROLE_OAUTH_USER)を追加
        mappedAuthorities.add(new SimpleGrantedAuthority("ROLE_OAUTH_USER"));
        OAuth2UserAuthority oauth2UserAuthority = OAuth2UserAuthority.class.cast(authority);
        if (Map.class.isInstance(oauth2UserAuthority.getAttributes().get("plan")) &&
            "developer".equals(Map.class.cast(oauth2UserAuthority.getAttributes().get("plan")).get("name"))) {
          // GitHubの有料プランアカウントでログインしたユーザに与える権限情報(ROLE_DEVELOPER)を追加
          mappedAuthorities.add(new SimpleGrantedAuthority("ROLE_DEVELOPER"));
        }
      }
    }
    return mappedAuthorities;
  };
}
Viewの中からGrantedAuthoritiesMapperの中で生成した権限を参照するようにしてみます。
<!DOCTYPE html>
<html xmlns="http://www.w3.org/1999/xhtml" xmlns:th="http://www.thymeleaf.org"
xmlns:sec="http://www.thymeleaf.org/thymeleaf-extras-springsecurity4">
<head>
<title>Demo Application OAuth 2.0 Login with Spring Security 5</title>
<meta charset="utf-8"/>
</head>
<body>
<div style="float: right" th:fragment="logout" sec:authorize="isAuthenticated()">
<div style="float:left">
<span style="font-weight:bold">User Id:</span>
<span sec:authentication="name">1000000</span>
<!-- 権限情報としてROLE_OAUTH_USERをもつユーザのみ表示 -->
<span sec:authorize="hasRole('OAUTH_USER')">
<span style="font-weight:bold">User Name:</span>
<span sec:authentication="principal.attributes['name']">Taro Yamada</span>
</span>
</div>
<div style="float:none"> </div>
<div style="float:right">
<form action="#" th:action="@{/logout}" method="post">
<input type="submit" value="Logout"/>
</form>
</div>
</div>
<h1>Welcome Demo Application OAuth 2.0 Login with Spring Security 5 !!</h1>
<!-- 権限情報としてROLE_OAUTH_USERをもつユーザのみ表示 -->
<div sec:authorize="hasRole('OAUTH_USER')">
You are successfully logged in via the OAuth 2.0 Client
-<span style="font-weight:bold" th:text="${authorizedClient.clientRegistration.clientName}">Demo Client</span>-
</div>
<div> </div>
<div>
<ul>
<li>
<a href="/templates/userinfo.html" th:href="@{/attributes}">Display User Attributes at login</a>
</li>
<li>
<a href="/templates/userinfo.html" th:href="@{/attributes/latest}">Display latest User Attributes</a>
</li>
<!-- 権限情報としてROLE_DEVELOPERをもつユーザのみ表示(=GitHubの有料プランアカウントでログインした時だけ表示される) -->
<li sec:authorize-url="/developer/menu">
<a href="/templates/developer.html" th:href="@{/developer/menu}">Developer Menu</a>
</li>
</ul>
</div>
</body>
</html>
更なるカスタマイズ
本エントリで紹介したカスタマイズ方法で実現できない要件がある場合は、Spring Securityのリファレンス(OAuth 2.0 Login — Advanced Configuration)をご覧ください。本エントリで紹介している内容も一部含まれていますが、デフォルト動作をカスタマイズするための設定方法の全量を確認することができます。
まとめ
「Spring Security 5.0でサポートされたOAuth 2.0 Login」関連のエントリは今回で終了するつもりですが、Spring Security 5.1でリソースサーバのサポートなどの新機能の追加が計画されており、Spring Security 5のOAuth対応は今後も注目していきたいと思います!!