概要
前々からAWS Amplifyが気になっており、GWにまとまった時間が取れたので実践してみたところ、驚くほど簡単かつ素早く開発できたのでメモ書き。
今回はちょっとしたSNS風っぽいアプリを作ってみました。
完成イメージ

何をもってSNSアプリとするかは意見が分かれるかもしれませんが、ここではとりあえず
- 認証機能(サインアップ、サインイン、サインアウト)
- 投稿機能(Post、Comment)
- 画像アップロード機能
といったどこにでもあるような簡易的な機能を実装していきます。
これらがあればユーザー間で最低限のコミニュケーションは取れるであろうという想定のもとです。
使用技術

- React
- TypeScript
- AWS Amplify
なお、Amplifyの設定などについては「Amplify CLI」というツールを使います。インストール方法や初期設定についてはググれば他にたくさん記事が出てくるのでそちらを参照していただければと思います。
参照記事: Amplify CLI をインストールしてユーザーを設定する手順
※本記事ではすでにAmplify CLIのインストール初期設定が済んでいる前提で話を進めます。
実装
Amplify CLIの準備ができたらアプリケーション側の実装に入ります。
Reactアプリを作成
何はともあれまずは「create-react-app」コマンドでReactアプリを作成。
$ npx create-react-app react-amplify-sns --template typescript
$ cd react-amplify-sns
不要なファイルを削除
この辺についてはお好みですが、デフォルトで生成されたファイルの中にはこの先使う事の無いものがいくつか含まれているので削除しておきます。
$ rm src/App.css src/App.test.tsx src/logo.svg src/reportWebVitals.ts src/setupTests.ts
↑に伴い、以下の2ファイルを変更してください。
import React from "react"
import ReactDOM from "react-dom"
import "./index.css"
import App from "./App"

ReactDOM.render(
  <React.StrictMode>
    <App />
  </React.StrictMode>,
  document.getElementById("root")
)
import React from "react"

const App: React.FC = () => {
  return (
    <h1>Hello World!</h1>
  )
}

export default App
ここで一旦、動作確認してみましょう。
$ yarn start

localhost:3000 にアクセスして「Hello World!」と返ってくればOKです。
Amplifyを導入
ここからAmplify CLIの出番です。
$ amplify init
「amplify init」コマンドを実行すると初期設定のために対話形式で色々な質問をされるので回答していきます。
? Enter a name for the project reactamplifysns // プロジェクト名を入力(任意)
? Enter a name for the environment dev // 環境名を入力(今回は「dev」)
? Choose your default editor: (Use arrow keys)
❯ Visual Studio Code
  Android Studio
  Xcode (Mac OS only)
  Atom Editor
  Sublime Text
  IntelliJ IDEA
  Vim (via Terminal, Mac OS only)

// エディタを指定(任意)
? Choose the type of app that you're building (Use arrow keys)
  android
  flutter
  ios
❯ javascript

// どんなタイプのアプリケーションか選択(今回は「javascript」)
? What javascript framework are you using (Use arrow keys)
  angular
  ember
  ionic
❯ react
  react-native
  vue
  none

// どのフレームワークを使うか(今回は「react」)
? Source Directory Path:  src
? Distribution Directory Path: build
? Build Command:  npm run-script build
? Start Command: npm run-script start

// この辺は全てデフォルトのまま入力
? Select the authentication method you want to use: (Use arrow keys)
❯ AWS profile
  AWS access keys

// プロファイル(「.aws/config」「.aws/credentials」に記載されているユーザー情報を使うか、アクセスキー・シークレットアクセスキーを直接打ち込んで使うか、どちらかを選択。(今回はプロファイル)
参照記事: AWS プロファイルの設定方法
すると初期化が始まるので、終わるまで待ちましょう。(数分かかる場合もあり)
Adding backend environment dev to AWS Amplify Console app: *********
⠙ Initializing project in the cloud...

...省略...

✔ Successfully created initial AWS cloud resources for deployments.
✔ Initialized provider successfully.
Initialized your environment successfully.

Your project has been successfully initialized and connected to the cloud!

Some next steps:
"amplify status" will show you what you've added already and if it's locally configured or deployed
"amplify add <category>" will allow you to add features like user login or a backend API
"amplify push" will build all your local backend resources and provision it in the cloud
"amplify console" to open the Amplify Console and view your project status
"amplify publish" will build all your local backend and frontend resources (if you have hosting category added) and provision it in the cloud

Pro tip:
Try "amplify add api" to create a backend API and then "amplify publish" to deploy everything
こんな感じで「Successfully」と返ってくれば成功です。
react-amplify-sns
├── amplify
│   ├── backend
│   │   ├── amplify-meta.json
│   │   ├── backend-config.json
│   │   └── tags.json
│   ├── cli.json
│   ├── README.md
│   └── team-provider-info.json
├── package.json
├── public
│   ├── favicon.ico
│   ├── index.html
│   ├── logo192.png
│   ├── logo512.png
│   ├── manifest.json
│   └── robots.txt
├── src
│   ├── App.tsx
│   ├── aws-exports.js
│   ├── index.css
│   ├── index.tsx
│   └── react-app-env.d.ts
├── .gitignore
├── package.json
├── README.md
├── tsconfig.json
└── yarn.lock
ルートディレクトリ直下に「amplify」、srcディレクトリ内に「aws-exports.js」がそれぞれ自動生成されている事を確認してください。
/* eslint-disable */
// WARNING: DO NOT EDIT. This file is automatically generated by AWS Amplify. It will be overwritten.

const awsmobile = {
    "aws_project_region": "ap-northeast-1"
}


export default awsmobile
なお、「aws-exports.js」にはAWSの各リソースを使用するための重要な情報(ユーザープールID、GraphQLエンドポイント、S3バケット名など)が随時書き込まれていくため、取り扱いには注意しましょう。
うっかりGitHubなどにアップしてしまうと面倒な事になります。
認証機能を作成
Amplifyの導入が終わったので、まずは認証機能(サインアップ・サインイン・サインアウト)を作成していきましょう。
$ amplify add auth
参照記事: Authentication with Amplify
初期化の際と同様、「amplify add auth」を実行すると設定のための質問をいくつかされるのでそれぞれ回答していきます。
Using service: Cognito, provided by: awscloudformation

 The current configured provider is Amazon Cognito.

 Do you want to use the default authentication and security configuration?
❯ Default configuration
  Default configuration with Social Provider (Federation)
  Manual configuration
  I want to learn more.

// とりあえず「Default configuration」でOK
Warning: you will not be able to edit these selections.
 How do you want users to be able to sign in? (Use arrow keys)
❯ Username
  Email
  Phone Number
  Email or Phone Number
  I want to learn more.

// サインイン(時に使用する値を選択(今回は「Username」)
Do you want to configure advanced settings? (Use arrow keys)
❯ No, I am done.
  Yes, I want to make some additional changes.

// より詳細な設定を行うかどうか(今回はもうこれで十分なので「No」)
ここまで入力すると、認証用の各AWSリソースを作成するためのファイルが自動で生成され始めます。
Successfully added auth resource reactamplifysns******** locally

Some next steps:
"amplify push" will build all your local backend resources and provision it in the cloud
"amplify publish" will build all your local backend and frontend resources (if you have hosting category added) and provision it in the cloud
準備が完了したら、「amplify push」コマンドで適用。
✔ Successfully pulled backend environment dev from the cloud.

Current Environment: dev

| Category | Resource name           | Operation | Provider plugin   |
| -------- | ----------------------- | --------- | ----------------- |
| Auth     | reactamplifysns******** | Create    | awscloudformation |
? Are you sure you want to continue? (Y/n)

...省略...

⠼ Updating resources in the cloud. This may take a few minutes...⠋ Uploading fil✔
All resources are updated in the cloud
大体2〜3分でリソースの作成が終わると思います。

AWSコンソール画面から「Cognito」へと進み、ユーザープールが作成されていればOK。
$ yarn add aws-amplify @aws-amplify/ui-react
ここからはReactアプリ側の実装に入ります。上記コマンドを実行してAmplify用のライブラリをインストールした後、「./src/App.tsx」を次のように編集します。
import React from "react"

import Amplify from "aws-amplify"
import { AmplifyAuthenticator, AmplifySignUp, AmplifySignOut } from "@aws-amplify/ui-react"
import awsconfig from "./aws-exports"

Amplify.configure(awsconfig)

const App: React.FC = () => {
  return (
    <AmplifyAuthenticator>
      <AmplifySignUp
        slot="sign-up"
        formFields={[
          { type: "username" },
          { type: "email" },
          { type: "password" }
        ]}
      >
      </AmplifySignUp>
      <h1>You have successfully signed in</h1>
      <AmplifySignOut />
    </AmplifyAuthenticator>
  )
}

export default App
この状態で localhost:3000 にアクセスすると、良い感じのサインアップ・サインイン画面が表示されるはず。
サインアップ

サインイン

試しにユーザー作成してみましょう。

デフォルトの設定だとサインアップ時に認証コードが発行されるようになっているので、メールアドレス宛に届いたものを入力します。

認証に成功するとこんな感じの画面に移行されるでしょう。(逆にサインインするまでこのページへ飛ぶ事はできなくなりました。)
念のため、サインアウトできるかどうかも確認しておいてください。

Cognitoのユーザープールからもユーザーが作成された事を確認できます。
これでひとまず認証機能の作成は完了です。
Material-UIを導入
一区切りついたので、この辺でUIを整える用のライブラリとして「Material-UI」を導入しておきましょう。
$ yarn add @material-ui/core@next @material-ui/icons@next @material-ui/lab@next @material-ui/styled-engine @emotion/react @emotion/styled react-router-dom @types/react-router-dom
ついこの間、最新バージョンであるv5が発表されたので今回はそちらを試してみます。(ライブラリ名の後に「@next」を付けると最新版がインストールできるみたいです。)
$ mkdir src/components
$ mkdir src/components/layouts
$ touch src/components/layouts/Header.tsx
$ touch src/components/layouts/Wrapper.tsx
import React, { useContext } from "react"
import { Link } from "react-router-dom"

import { makeStyles, Theme } from "@material-ui/core/styles"
import AppBar from "@material-ui/core/AppBar"
import Toolbar from "@material-ui/core/Toolbar"
import Typography from "@material-ui/core/Typography"
import Button from "@material-ui/core/Button"
import IconButton from "@material-ui/core/IconButton"
import MenuIcon from "@material-ui/icons/Menu"

import { Auth } from "aws-amplify"

import { UserContext } from "../../App"

const useStyles = makeStyles((theme: Theme) => ({
  iconButton: {
    marginRight: theme.spacing(2),
  },
  title: {
    flexGrow: 1,
    textDecoration: "none",
    color: "inherit"
  }
}))

const Header: React.FC = () => {
  const { setCurrentUser } = useContext(UserContext)

  const classes = useStyles()

  // サインアウトボタンを設置
  const signout = () => {
    Auth.signOut().catch((err: any) => console.log(err))
    setCurrentUser(undefined)
  }

  return (
    <>
      <AppBar position="static">
        <Toolbar>
          <IconButton
            edge="start"
            className={classes.iconButton}
            color="inherit"
          >
            <MenuIcon />
          </IconButton>
          <Typography
            component={Link}
            to="/"
            variant="h6"
            className={classes.title}
          >
            Sample
          </Typography>
          <Button
            onClick={signout}
            color="inherit"
          >
            Sign Out
          </Button>
        </Toolbar>
      </AppBar>
    </>
  )
}

export default Header
import React from "react"

import { Container, Grid } from "@material-ui/core"
import { makeStyles } from "@material-ui/core/styles"

import Header from "./Header"

const useStyles = makeStyles(() => ({
  container: {
    margin: "3rem 0 4rem"
  }
}))

type WrapperProps = {
  children: React.ReactElement
}

const Wrapper: React.FC<WrapperProps> = ({ children }) => {
  const classes = useStyles()

  return (
    <>
      <header>
        <Header />
      </header>
      <main>
        <Container maxWidth="lg" className={classes.container}>
          <Grid container direction="row" justifyContent="center">
            <Grid item>
              {children}
            </Grid>
          </Grid>
        </Container>
      </main>
    </>
  )
}

export default Wrapper
import React, { useState, useEffect, createContext } from "react"
import { BrowserRouter as Router } from "react-router-dom"

import Amplify, { Auth } from "aws-amplify"
import { AmplifyAuthenticator, AmplifySignUp } from "@aws-amplify/ui-react"
import {AuthState, onAuthUIStateChange} from "@aws-amplify/ui-components"
import awsconfig from "./aws-exports"

import Wrapper from "./components/layouts/Wrapper"

// Cognitoで作成したユーザー情報
type User = {
  id: string,
  username: string,
  attributes: {
    email: string
    sub: string // いわゆるUID的なもの(一意の識別子)
  }
}

// 認証済みユーザーの情報はグローバルで取り扱いたいのでContextを使用
export const UserContext = createContext({} as {
  userInfo: User | undefined
  setCurrentUser: React.Dispatch<React.SetStateAction<object | undefined>>
})

Amplify.configure(awsconfig)

const App: React.FC = () => {
  const [authState, setAuthState] = useState<AuthState>()
  const [currentUser, setCurrentUser] = useState<object | undefined>()
  const [userInfo, setUserInfo] = useState<User>()

  const getUserInfo = async () => {
    const currentUserInfo = await Auth.currentUserInfo()
    setUserInfo(currentUserInfo)
  }

  useEffect(() => {
    return onAuthUIStateChange((nextAuthState, authData) => {
      setAuthState(nextAuthState)
      setCurrentUser(authData)
    })
  }, [])

  useEffect(() => {
    getUserInfo()
  }, [])

  // 未認証のユーザーはサインインページへ飛ばされるようにする
  return authState === AuthState.SignedIn && currentUser ? (
    <Router>
      <UserContext.Provider value={{ userInfo, setCurrentUser }}>
        <Wrapper>
          <h1>You have successfully signed in</h1>
        </Wrapper>
      </UserContext.Provider>
    </Router>
  ) : (
    <AmplifyAuthenticator>
      <AmplifySignUp
        slot="sign-up"
        formFields={[
          { type: "username" },
          { type: "email" },
          { type: "password" }
        ]}
      >
      </AmplifySignUp>
    </AmplifyAuthenticator>
  )
}

export default App

先ほどよりもだいぶ良い感じの見た目になりましたね。
各種API(Post、Comment)とデータベースを作成
ここからはバックエンド部分の作成に入ります。今回は投稿(Post)およびコメント(Comment)の取得・作成・削除ができるようにするところを目標としましょう。
$ amplify add api
参照記事: Create the GraphQL API
例の如く対話形式での質問が始まるのでそれぞれ回答していきます。
? Please select from one of the below mentioned services: (Use arrow keys)
❯ GraphQL
  REST

// GraphQLとREST、どちらの形式でAPIを作成するか(今回は「GraphQL」)
? Provide API name: reactamplifysns

// API名(任意)
? Choose the default authorization type for the API
  API key
❯ Amazon Cognito User Pool
  IAM
  OpenID Connect

// APIを使用するユーザーの認証方法(今回は「Amazon Cognito User Pool」)
? Do you want to configure advanced settings for the GraphQL API (Use arrow keys
)
❯ No, I am done.
  Yes, I want to make some additional changes.

// デフォルトの設定で十分なので「No」
? Do you have an annotated GraphQL schema? No

// 「No」
? Choose a schema template:
  Single object with fields (e.g., “Todo” with ID, name, description)
❯ One-to-many relationship (e.g., “Blogs” with “Posts” and “Comments”)
  Objects with fine-grained access control (e.g., a project management app with
owner-based authorization)

// PostとCommentの関係は1対多なので「One-to-many relationship」を選択
The following types do not have '@auth' enabled. Consider using @auth with @model
	 - Blog
	 - Post
	 - Comment
Learn more about @auth here: https://docs.amplify.aws/cli/graphql-transformer/auth


GraphQL schema compiled successfully.

Edit your schema at /Users/kazama_t/Workspace2/react-amplify-sns/amplify/backend/api/reactamplifysns/schema.graphql or place .graphql files in a directory at /Users/kazama_t/Workspace2/react-amplify-sns/amplify/backend/api/reactamplifysns/schema
? Do you want to edit the schema now? (y/N) N

// 後で編集するので「N」
すると「./amplify/backend/api//schema.graphql」というファイルが自動生成されるので、次のように書き換えてください。
type Post
  @model
  @key(
    name: "SortByCreatedAt"
    fields: ["status", "createdAt"]
    queryField: "listPostsSortedByCreatedAt"
  ) {
  id: ID!
  content: String!
  owner: String!
  image: String
  status: PostStatus!
  comments: [Comment] @connection(keyName: "byPost", fields: ["id"])
  createdAt: AWSDateTime
}

enum PostStatus {
  published
  unpublished
}

type Comment
  @model
  @key(
    name: "byPost",
    fields: ["postId", "content"]
  ) {
  id: ID!
  postId: ID!
  content: String!
  owner: String!
  post: Post @connection(fields: ["postId"])
}
「@connection」を付けるといわゆるリレーション的なものが張れるみたいです。
参照記事: https://docs.amplify.aws/cli/graphql-transformer/connection
また、どうやらAmplifyで自動されたクエリ(listPosts)だとデータを作成日時の順で取得できないみたいあので、「listPostsSortedByCreatedAt」というクエリを手動で追加しました。
参照記事: Amplify&GraphQLでデータを取得するときにソートするために
$ amplify push
「amplify push」を実行します。
✔ Successfully pulled backend environment dev from the cloud.

Current Environment: dev

| Category | Resource name           | Operation | Provider plugin   |
| -------- | ----------------------- | --------- | ----------------- |
| Api      | reactamplifysns         | Create    | awscloudformation |
| Auth     | reactamplifysns******** | No Change | awscloudformation |
? Are you sure you want to continue? Yes

// 特に問題無ければ「Yes」
? Do you want to generate code for your newly created GraphQL API Yes
? Choose the code generation language target
  javascript
❯ typescript
  flow

// 今回はTypeScriptを使用しているので「typescript」
? Enter the file name pattern of graphql queries, mutations and subscriptions sr
c/graphql/**/*.ts

// デフォルトのまま回答でOK
Do you want to generate/update all possible GraphQL operations - queries, muta
tions and subscriptions Yes

// GraphQlを実行するためのコードを自動生成しても良いかどうか(「Yes」でOK)
? Enter maximum statement depth [increase from default if your schema is deeply
nested] 2

// ネストの深さ(今回は「2」)
? Enter the file name for the generated code src/types/index.ts

// 自動生成される型定義ファイルの名前(今回は「src/types/index.ts」)
ここまで入力するとAWSリソース(AppSync、DynamoDBなど)の作成が始まるので2〜3分ほど待ちましょう。
⠧ Updating resources in the cloud. This may take a few minutes...

...省略...

✔ Generated GraphQL operations successfully and saved at src/graphql
✔ Code generated successfully and saved in file src/types/index.ts
⠴ Updating resources in the cloud. This may take a few minutes...⠋ Uploading fil✔ All resources are updated in the cloud

GraphQL endpoint: https://************.appsync-api.ap-northeast-1.amazonaws.com/graphql
こんな感じのメッセージが表示されれば成功です。
├── src
│   ├── App.tsx
│   ├── aws-exports.js
│   ├── components
│   │   └── layouts
│   │       ├── Header.tsx
│   │       └── Wrapper.tsx
│   ├── graphql
│   │   ├── mutations.ts
│   │   ├── queries.ts
│   │   ├── schema.json
│   │   └── subscriptions.ts
│   ├── index.css
│   ├── index.tsx
│   ├── react-app-env.d.ts
│   └── types
|       └── index.ts
新たに「graphql」「types」というディレクトリが作られているのも確認してください。
- mutations.ts
- 作成・更新・削除系のクエリ
- queries.ts
- 取得系のクエリ
- subscriptions.ts
- 購読系(データ情報変更の受け取り)のクエリ
基本的には自動生成されたものを使用すれば事足りますが、今回実装する内容においては一部書き足し・修正が必要なのでそれぞれ変更してください。
// listPostsSortedByCreatedAtを以下のように修正

export const listPostsSortedByCreatedAt = /* GraphQL */ `
  query ListPostsSortedByCreatedAt(
    $status: PostStatus
    $createdAt: ModelStringKeyConditionInput
    $sortDirection: ModelSortDirection
    $filter: ModelPostFilterInput
    $limit: Int
    $nextToken: String
  ) {
    listPostsSortedByCreatedAt(
      status: $status
      createdAt: $createdAt
      sortDirection: $sortDirection
      filter: $filter
      limit: $limit
      nextToken: $nextToken
    ) {
      items {
        id
        content
        owner
        image
        status
        comments {
          items {
            id
            postId
            content
            owner
          }
          nextToken
        }
        likes {
          items {
            id
            postId
            owner
          }
          nextToken
        }
        createdAt
        updatedAt
      }
      nextToken
    }
  }
`;
// Postの型定義を以下のように変更

export type Post = {
  __typename: "Post",
  id?: string,
  content?: string,
  owner?: string,
  image?: string | null,
  status?: PostStatus,
  comments?: ModelCommentConnection | null, // nullを許容
  createdAt?: string | null,
  updatedAt?: string
}

// Commentの型定義を以下のように変更

export type Comment = {
  __typename: "Comment",
  id?: string,
  postId?: string,
  content?: string,
  owner?: string,
  post?: Post | null, // nullを許容
  createdAt?: string,
  updatedAt?: string,
}

// CreatePostInputの型定義を以下のように変更

export type CreatePostInput = {
  id?: string | null,
  content: string,
  owner: string | undefined, // undefinedを許容
  image?: string | null,
  status: PostStatus,
  createdAt?: string | null,
}

// CreateCommentInputの型定義を以下のように変更

export type CreateCommentInput = {
  id?: string | null,
  postId: string | undefined, // undefinedを許容
  content: string,
  owner: string | undefined, // undefinedを許容
}

// ...省略...

// 以下の型定義を追記

export type User = {
  id: string,
  username: string,
  attributes: {
    email: string
    sub: string
  }
}

export type OnCreatePostSubscriptionData = {
  value: {
    data: OnCreatePostSubscription
  }
}

export type OnDeletePostSubscriptionData = {
  value: {
    data: OnDeletePostSubscription
  }
}

export type OnCreateCommentSubscriptionData = {
  value: {
    data: OnCreateCommentSubscription
  }
}

export type OnDeleteCommentSubscriptionData = {
  value: {
    data: OnDeleteCommentSubscription
  }
}
一通りの準備ができたので、投稿(Post)とコメント(Comment)ができるように実装していきます。
$ mkdir src/components/post
$ touch src/components/post/PostList.tsx
$ touch src/components/post/PostItem.tsx
$ touch src/components/post/PostForm.tsx
$ touch src/components/post/CommentItem.tsx
$ touch src/components/post/CommentForm.tsx
import React, { useEffect, useState } from "react"

import API, { graphqlOperation } from "@aws-amplify/api"

import { makeStyles, Theme } from "@material-ui/core/styles"
import Box from "@material-ui/core/Box"
import Button from "@material-ui/core/Button"
import RotateRightIcon from "@material-ui/icons/RotateRight"
import AutorenewIcon from "@material-ui/icons/Autorenew"

import PostForm from "./PostForm"
import PostItem from "./PostItem"

import { listPostsSortedByCreatedAt } from "../../graphql/queries"
import { onCreatePost, onDeletePost } from "../../graphql/subscriptions"

import {
  Post,
  ListPostsSortedByCreatedAtQuery,
  OnCreatePostSubscriptionData,
  OnDeletePostSubscriptionData
} from "../../types/index"

const useStyles = makeStyles((theme: Theme) => ({
  box: {
    marginTop: "2rem",
    width: 320
  }
}))

const PostList: React.FC = () => {
  const classes = useStyles()

  const [loading, setLoading] = useState<boolean>(false)
  const [posts, setPosts] = useState<Post[]>([])
  const [nextToken, setNextToken] = useState<string | null | undefined>(null)

  const getPosts = async () => {
    const result = await API.graphql({
      query: listPostsSortedByCreatedAt,
      variables: {
        status: "published",
        sortDirection: "DESC",
        limit: 5, // 一度のリクエストで取得可能な件数(この辺はお好みで)
        nextToken: nextToken
      }
    })

    if ("data" in result && result.data) {
      const data = result.data as ListPostsSortedByCreatedAtQuery
      if (data.listPostsSortedByCreatedAt) {
        setPosts(data.listPostsSortedByCreatedAt.items as Post[])
        setNextToken(data.listPostsSortedByCreatedAt.nextToken)
      }
    }
  }

  // 追加で投稿(Post)を取得するための関数(ページネーション)
  const loadMore = async () => {
    setLoading(true)

    const result = await API.graphql({
      query: listPostsSortedByCreatedAt,
      variables: {
        status: "published",
        sortDirection: "DESC",
        limit: 5,
        nextToken: nextToken
      }
    })

    if ("data" in result && result.data) {
      const data = result.data as ListPostsSortedByCreatedAtQuery
      if (data.listPostsSortedByCreatedAt) {
        const items = data.listPostsSortedByCreatedAt.items as Post[]
        setPosts((prev) => [...prev, ...items])
        setNextToken(data.listPostsSortedByCreatedAt.nextToken)
      }
    }

    setLoading(false)
  }

  // subscribe = データ変更情報をリアルタイムで取得・反映
  const subscribeCreatedPost = () => {
    const client = API.graphql(graphqlOperation(onCreatePost))

    if ("subscribe" in client) {
      client.subscribe({
        next: ({ value: { data } }: OnCreatePostSubscriptionData) => {
          if (data.onCreatePost) {
            const createdPost: Post = data.onCreatePost
            setPosts((prev) => [createdPost, ...prev])
          }
        }
      })
    }
  }

  const subscribeDeletedPost = () => {
    const client = API.graphql(graphqlOperation(onDeletePost))

    if ("subscribe" in client) {
      client.subscribe({
        next: ({ value: { data } }: OnDeletePostSubscriptionData) => {
          if (data.onDeletePost) {
            const deletedPost: Post = data.onDeletePost
            setPosts((prev) => prev.filter(post => post.id !== deletedPost.id))
          }
        }
      })
    }
  }

  useEffect(() => {
    getPosts()
    subscribeCreatedPost()
    subscribeDeletedPost()
  }, [])

  return (
    <>
      <PostForm />
      { posts?.map((post: Post) => {
        return (
          <PostItem
            key={post.id}
            post={post}
          />
        )}
      )}
      { nextToken !== null ?
        <Box
          className={classes.box}
          textAlign="center"
        >
          <Button
            variant="outlined"
            color="primary"
            size="small"
            startIcon={loading ? <RotateRightIcon /> : <AutorenewIcon />}
            onClick={loadMore}
          >
            { loading ? "Now loading..." : "Load More..." }
          </Button>
        </Box> : null
      }
    </>
  )
}

export default PostList
- nextToken: ページネーションのために利用する値
参照記事: GraphQL pagination
この値がnullでない限りは次のページがあるという判断になるみたいです。今回はそれを利用してページネーション的な機能を実装しました。

import React, { useState, useEffect, useContext } from "react"

import { makeStyles, Theme } from "@material-ui/core/styles"
import clsx from "clsx"
import Card from "@material-ui/core/Card"
import CardHeader from "@material-ui/core/CardHeader"
import CardMedia from "@material-ui/core/CardMedia"
import CardContent from "@material-ui/core/CardContent"
import CardActions from "@material-ui/core/CardActions"
import Avatar from "@material-ui/core/Avatar"
import IconButton from "@material-ui/core/IconButton"
import Typography from "@material-ui/core/Typography"
import FavoriteBorderIcon from "@material-ui/icons/FavoriteBorder"
import FavoriteIcon from "@material-ui/icons/Favorite"
import ShareIcon from "@material-ui/icons/Share"
import DeleteOutlineOutlinedIcon from "@material-ui/icons/DeleteOutlineOutlined"
import ExpandMoreIcon from "@material-ui/icons/ExpandMore"
import Collapse from "@material-ui/core/Collapse"

import API, { graphqlOperation } from "@aws-amplify/api"
import { deletePost } from "../../graphql/mutations"

import { UserContext } from "../../App"
import {
  Post,
  Comment,
  OnCreateCommentSubscriptionData,
  OnDeleteCommentSubscriptionData
} from "../../types/index"

import { onCreateComment, onDeleteComment } from "../../graphql/subscriptions"

import CommentForm from "./CommentForm"
import CommentItem from "./CommentItem"

const useStyles = makeStyles((theme: Theme) => ({
  card: {
    width: 320,
    marginTop: "2rem",
    transition: "all 0.3s",
    "&:hover": {
      boxShadow:
        "1px 0px 20px -1px rgba(0,0,0,0.2), 0px 0px 20px 5px rgba(0,0,0,0.14), 0px 1px 10px 0px rgba(0,0,0,0.12)",
      transform: "translateY(-3px)"
    }
  },
  deleteBtn: {
    marginLeft: "auto"
  },
  expandBtn: {
    marginLeft: "auto"
  },
  expand: {
    transform: "rotate(0deg)",
    marginLeft: "auto",
    transition: theme.transitions.create("transform", {
      duration: theme.transitions.duration.shortest
    })
  },
  expandOpen: {
    transform: "rotate(180deg)"
  }
}))

type PostItemProps = {
  post: Post
}

const PostItem: React.FC<PostItemProps> = ({ post }) => {
  const { userInfo } = useContext(UserContext)

  const classes = useStyles()

  const [likes, setLikes] = useState<boolean>(false)
  const [comments, setComments] = useState<(Comment | null)[] | null | undefined>([])
  const [expanded, setExpanded] = useState(false)

  const handleDeletePost = async (id: string | undefined) => {
    if (!id) return

    try {
      await API.graphql(graphqlOperation(deletePost, { input: { id: id } }))
    } catch (err: any) {
      console.log(err)
    }
  }

  const getComments = () => {
    setComments(post.comments?.items)
  }

  const subscribeCreatedComment = () => {
    const client = API.graphql(graphqlOperation(onCreateComment))

    if ("subscribe" in client) {
      client.subscribe({
        next: ({ value: { data } }: OnCreateCommentSubscriptionData) => {
          if (data.onCreateComment) {
            const createdComment: Comment = data.onCreateComment
            setComments((prev) => prev?.length? [createdComment, ...prev] : [createdComment, ...[]])
          }
        }
      })
    }
  }

  const subscribeDeletedComment = () => {
    const client = API.graphql(graphqlOperation(onDeleteComment))

    if ("subscribe" in client) {
      client.subscribe({
        next: ({ value: { data } }: OnDeleteCommentSubscriptionData) => {
          if (data.onDeleteComment) {
            const deletedComment: Comment = data.onDeleteComment
            setComments((prev) => prev?.filter((comment) => comment?.id !== deletedComment.id))
          }
        }
      })
    }
  }

  useEffect(() => {
    getComments()
    subscribeCreatedComment()
    subscribeDeletedComment()
  }, [])

  return (
    <>
      <Card className={classes.card}>
        <CardHeader
          avatar={
            <Avatar>
              U
            </Avatar>
          }
          // 投稿主と認証済みユーザーが一致する場合に削除ボタンを表示
          action={post.owner === userInfo?.attributes.sub ?
            <div className={classes.deleteBtn}>
              <IconButton
                onClick={() => handleDeletePost(post.id)}
              >
                <DeleteOutlineOutlinedIcon />
              </IconButton>
            </div> : null
          }
          title={userInfo?.username}
        />
        { post.image ?
          <CardMedia
            component="img"
            src={post.image}
            alt="post-img"
          /> : null
        }
        <CardContent>
          <Typography variant="body2" color="textSecondary" component="span">
            { post.content?.split("\n").map((content: string, index: number) => {
                return (
                  <p key={index}>{content}</p>
                )
              })
            }
          </Typography>
        </CardContent>
        <CardActions disableSpacing>
          {
            likes ?
              <IconButton onClick={() => setLikes(false)}>
                <FavoriteIcon />
              </IconButton>
                :
              <IconButton onClick={(e) => setLikes(true)}>
                <FavoriteBorderIcon />
              </IconButton>
          }
          <IconButton>
            <ShareIcon />
          </IconButton>
          <div className={classes.expandBtn}>
            <IconButton
              className={clsx(classes.expand, {
                [classes.expandOpen]: expanded,
              })}
              onClick={() => setExpanded(!expanded)}
              aria-expanded={expanded}
              aria-label="show more"
            >
              <ExpandMoreIcon />
            </IconButton>
          </div>
        </CardActions>
        <Collapse in={expanded} timeout="auto" unmountOnExit>
          <CardContent>
            <CommentForm
              postId={post?.id}
            />
            { comments?.map((comment) => {
              return (
                <CommentItem
                  key={comment?.id}
                  comment={comment}
                />
              )}
            )}
          </CardContent>
        </Collapse>
      </Card>
    </>
  )
}

export default PostItem
import React, { useState, useContext } from "react"

import { makeStyles, Theme } from "@material-ui/core/styles"
import TextField from "@material-ui/core/TextField"
import Button from "@material-ui/core/Button"
import CreateIcon from "@material-ui/icons/Create"

import API, { graphqlOperation } from "@aws-amplify/api"
import { createPost } from "../../graphql/mutations"
import { CreatePostInput, PostStatus } from "../../types/index"

import { UserContext } from "../../App"

const useStyles = makeStyles((theme: Theme) => ({
  form: {
    display: "flex",
    flexWrap: "wrap",
    width: 320
  },
  inputFileBtn: {
    marginTop: "10px"
  },
  submitBtn: {
    marginTop: "10px",
    marginLeft: "auto"
  },
  box: {
    margin: "2rem 0 4rem",
    width: 320
  },
  preview: {
    width: "100%"
  }
}))

const PostForm: React.FC = () => {
  const { userInfo } = useContext(UserContext)

  const classes = useStyles()

  const [content, setContent] = useState<string>("")

  const handleCreatePost = async (e: React.FormEvent<HTMLFormElement>) => {
    e.preventDefault()

    if (!content) return

    const data: CreatePostInput = {
      content: content,
      owner: userInfo?.attributes.sub,
      status: PostStatus.published
    }

    try {
      await API.graphql(graphqlOperation(createPost, { input: data }))
      setContent("")
    } catch (err: any) {
      console.log(err)
    }
  }

  return (
    <>
      <form className={classes.form} noValidate onSubmit={handleCreatePost}>
        <TextField
          placeholder="Hello World!"
          variant="outlined"
          multiline
          fullWidth
          rows="4"
          value={content}
          onChange={(e: React.ChangeEvent<HTMLInputElement>) => {
            setContent(e.target.value)
          }}
        />
        <div className={classes.submitBtn}>
          <Button
            type="submit"
            variant="contained"
            size="large"
            color="inherit"
            disabled={!content || content.length > 140}
            startIcon={<CreateIcon />}
            className={classes.submitBtn}
          >
            Post
          </Button>
        </div>
      </form>
    </>
  )
}

export default PostForm
import React, { useContext } from "react"

import { makeStyles, Theme } from "@material-ui/core/styles"
import Card from "@material-ui/core/Card"
import CardHeader from "@material-ui/core/CardHeader"
import CardContent from "@material-ui/core/CardContent"
import Avatar from "@material-ui/core/Avatar"
import IconButton from "@material-ui/core/IconButton"
import Typography from "@material-ui/core/Typography"
import DeleteOutlineOutlinedIcon from "@material-ui/icons/DeleteOutlineOutlined"

import API, { graphqlOperation } from "@aws-amplify/api"
import { deleteComment } from "../../graphql/mutations"

import { UserContext } from "../../App"
import { Comment } from "../../types/index"

const useStyles = makeStyles((theme: Theme) => ({
  card: {
    width: "100%",
    marginTop: "2rem",
    transition: "all 0.3s",
    "&:hover": {
      boxShadow:
        "1px 0px 20px -1px rgba(0,0,0,0.2), 0px 0px 20px 5px rgba(0,0,0,0.14), 0px 1px 10px 0px rgba(0,0,0,0.12)",
      transform: "translateY(-3px)"
    }
  },
  delete: {
    marginLeft: "auto"
  }
}))

type CommentItemProps = {
  comment: Comment | null
}

const CommentItem: React.FC<CommentItemProps> = ({ comment }) => {
  const { userInfo } = useContext(UserContext)

  const classes = useStyles()

  const handleDeleteComment = async (id: string | undefined) => {
    if (!id) return

    try {
      await API.graphql(graphqlOperation(deleteComment, { input: { id: id } }))
    } catch (err: any) {
      console.log(err)
    }
  }

  return (
    <>
      <Card className={classes.card}>
        <CardHeader
          avatar={
            <Avatar>
              U
            </Avatar>
          }
          action={comment?.owner === userInfo?.attributes.sub ?
            <div className={classes.delete}>
              <IconButton
                onClick={() => handleDeleteComment(comment?.id)}
              >
                <DeleteOutlineOutlinedIcon />
              </IconButton>
            </div> : null
          }
          title={userInfo?.username}
        />
        <CardContent>
          <Typography variant="body2" color="textSecondary" component="span">
            { comment?.content?.split("\n").map((content: string, index: number) => {
                return (
                  <p key={index}>{content}</p>
                )
              })
            }
          </Typography>
        </CardContent>
      </Card>
    </>
  )
}

export default CommentItem
import React, { useState, useContext } from "react"

import { makeStyles, Theme } from "@material-ui/core/styles"
import TextField from "@material-ui/core/TextField"
import Button from "@material-ui/core/Button"
import SmsOutlinedIcon from "@material-ui/icons/SmsOutlined"

import API, { graphqlOperation } from "@aws-amplify/api"
import { createComment } from "../../graphql/mutations"
import { CreateCommentInput } from "../../types/index"

import { UserContext } from "../../App"


const useStyles = makeStyles((theme: Theme) => ({
  form: {
    display: "flex",
    flexWrap: "wrap",
    width: "100%"
  },
  submitBtn: {
    marginTop: "10px",
    marginLeft: "auto"
  }
}))

type CommentFormProps = {
  postId: string | undefined
}

const CommentForm: React.FC<CommentFormProps> = ({ postId }) => {
  const { userInfo } = useContext(UserContext)

  const classes = useStyles()

  const [content, setContent] = useState<string>("")

  const handleCreateComment = async (e: React.FormEvent<HTMLFormElement>) => {
    e.preventDefault()

    if (!content) return

    const data: CreateCommentInput = {
      postId: postId,
      content: content,
      owner: userInfo?.attributes.sub
    }

    try {
      await API.graphql(graphqlOperation(createComment, { input: data }))
      setContent("")
    } catch (err: any) {
      console.log(err)
    }
  }

  return (
    <>
      <form className={classes.form} noValidate onSubmit={handleCreateComment}>
        <TextField
          placeholder="Hello World!"
          variant="outlined"
          multiline
          fullWidth
          rows="4"
          value={content}
          onChange={(e: React.ChangeEvent<HTMLInputElement>) => {
            setContent(e.target.value)
          }}
        />
        <div className={classes.submitBtn}>
          <Button
            type="submit"
            variant="contained"
            size="large"
            color="inherit"
            disabled={!content || content.length > 140}
            startIcon={<SmsOutlinedIcon />}
            className={classes.submitBtn}
          >
            Comment
          </Button>
        </div>
      </form>
    </>
  )
}

export default CommentForm
import React, { useState, useEffect, createContext } from "react"
import { BrowserRouter as Router, Switch, Route } from "react-router-dom"

import Amplify, { Auth } from "aws-amplify"
import { AmplifyAuthenticator, AmplifySignUp } from "@aws-amplify/ui-react"
import awsconfig from "./aws-exports"

import Wrapper from "./components/layouts/Wrapper"
import PostList from "./components/post/PostList"

import { User } from "./types/index"

export const UserContext = createContext({} as {
  currentUser: User | undefined
  setCurrentUser: React.Dispatch<React.SetStateAction<User | undefined>>
})

Amplify.configure(awsconfig)

const App: React.FC = () => {
  const [currentUser, setCurrentUser] = useState<User>()

  const getCurrentUser = async () => {
    const currentUserInfo = await Auth.currentUserInfo()
    setCurrentUser(currentUserInfo)
  }

  useEffect(() => {
    getCurrentUser()
  }, [])

  return (
    <AmplifyAuthenticator>
      <AmplifySignUp
        slot="sign-up"
        formFields={[
          { type: "username" },
          { type: "email" },
          { type: "password" }
        ]}
      >
      </AmplifySignUp>
      <Router>
        <UserContext.Provider value={{ currentUser, setCurrentUser }}>
          <Wrapper>
            <Switch>
              <Route exact path="/" component={PostList} />
            </Switch>
          </Wrapper>
        </UserContext.Provider>
      </Router>
    </AmplifyAuthenticator>
  )
}

export default App
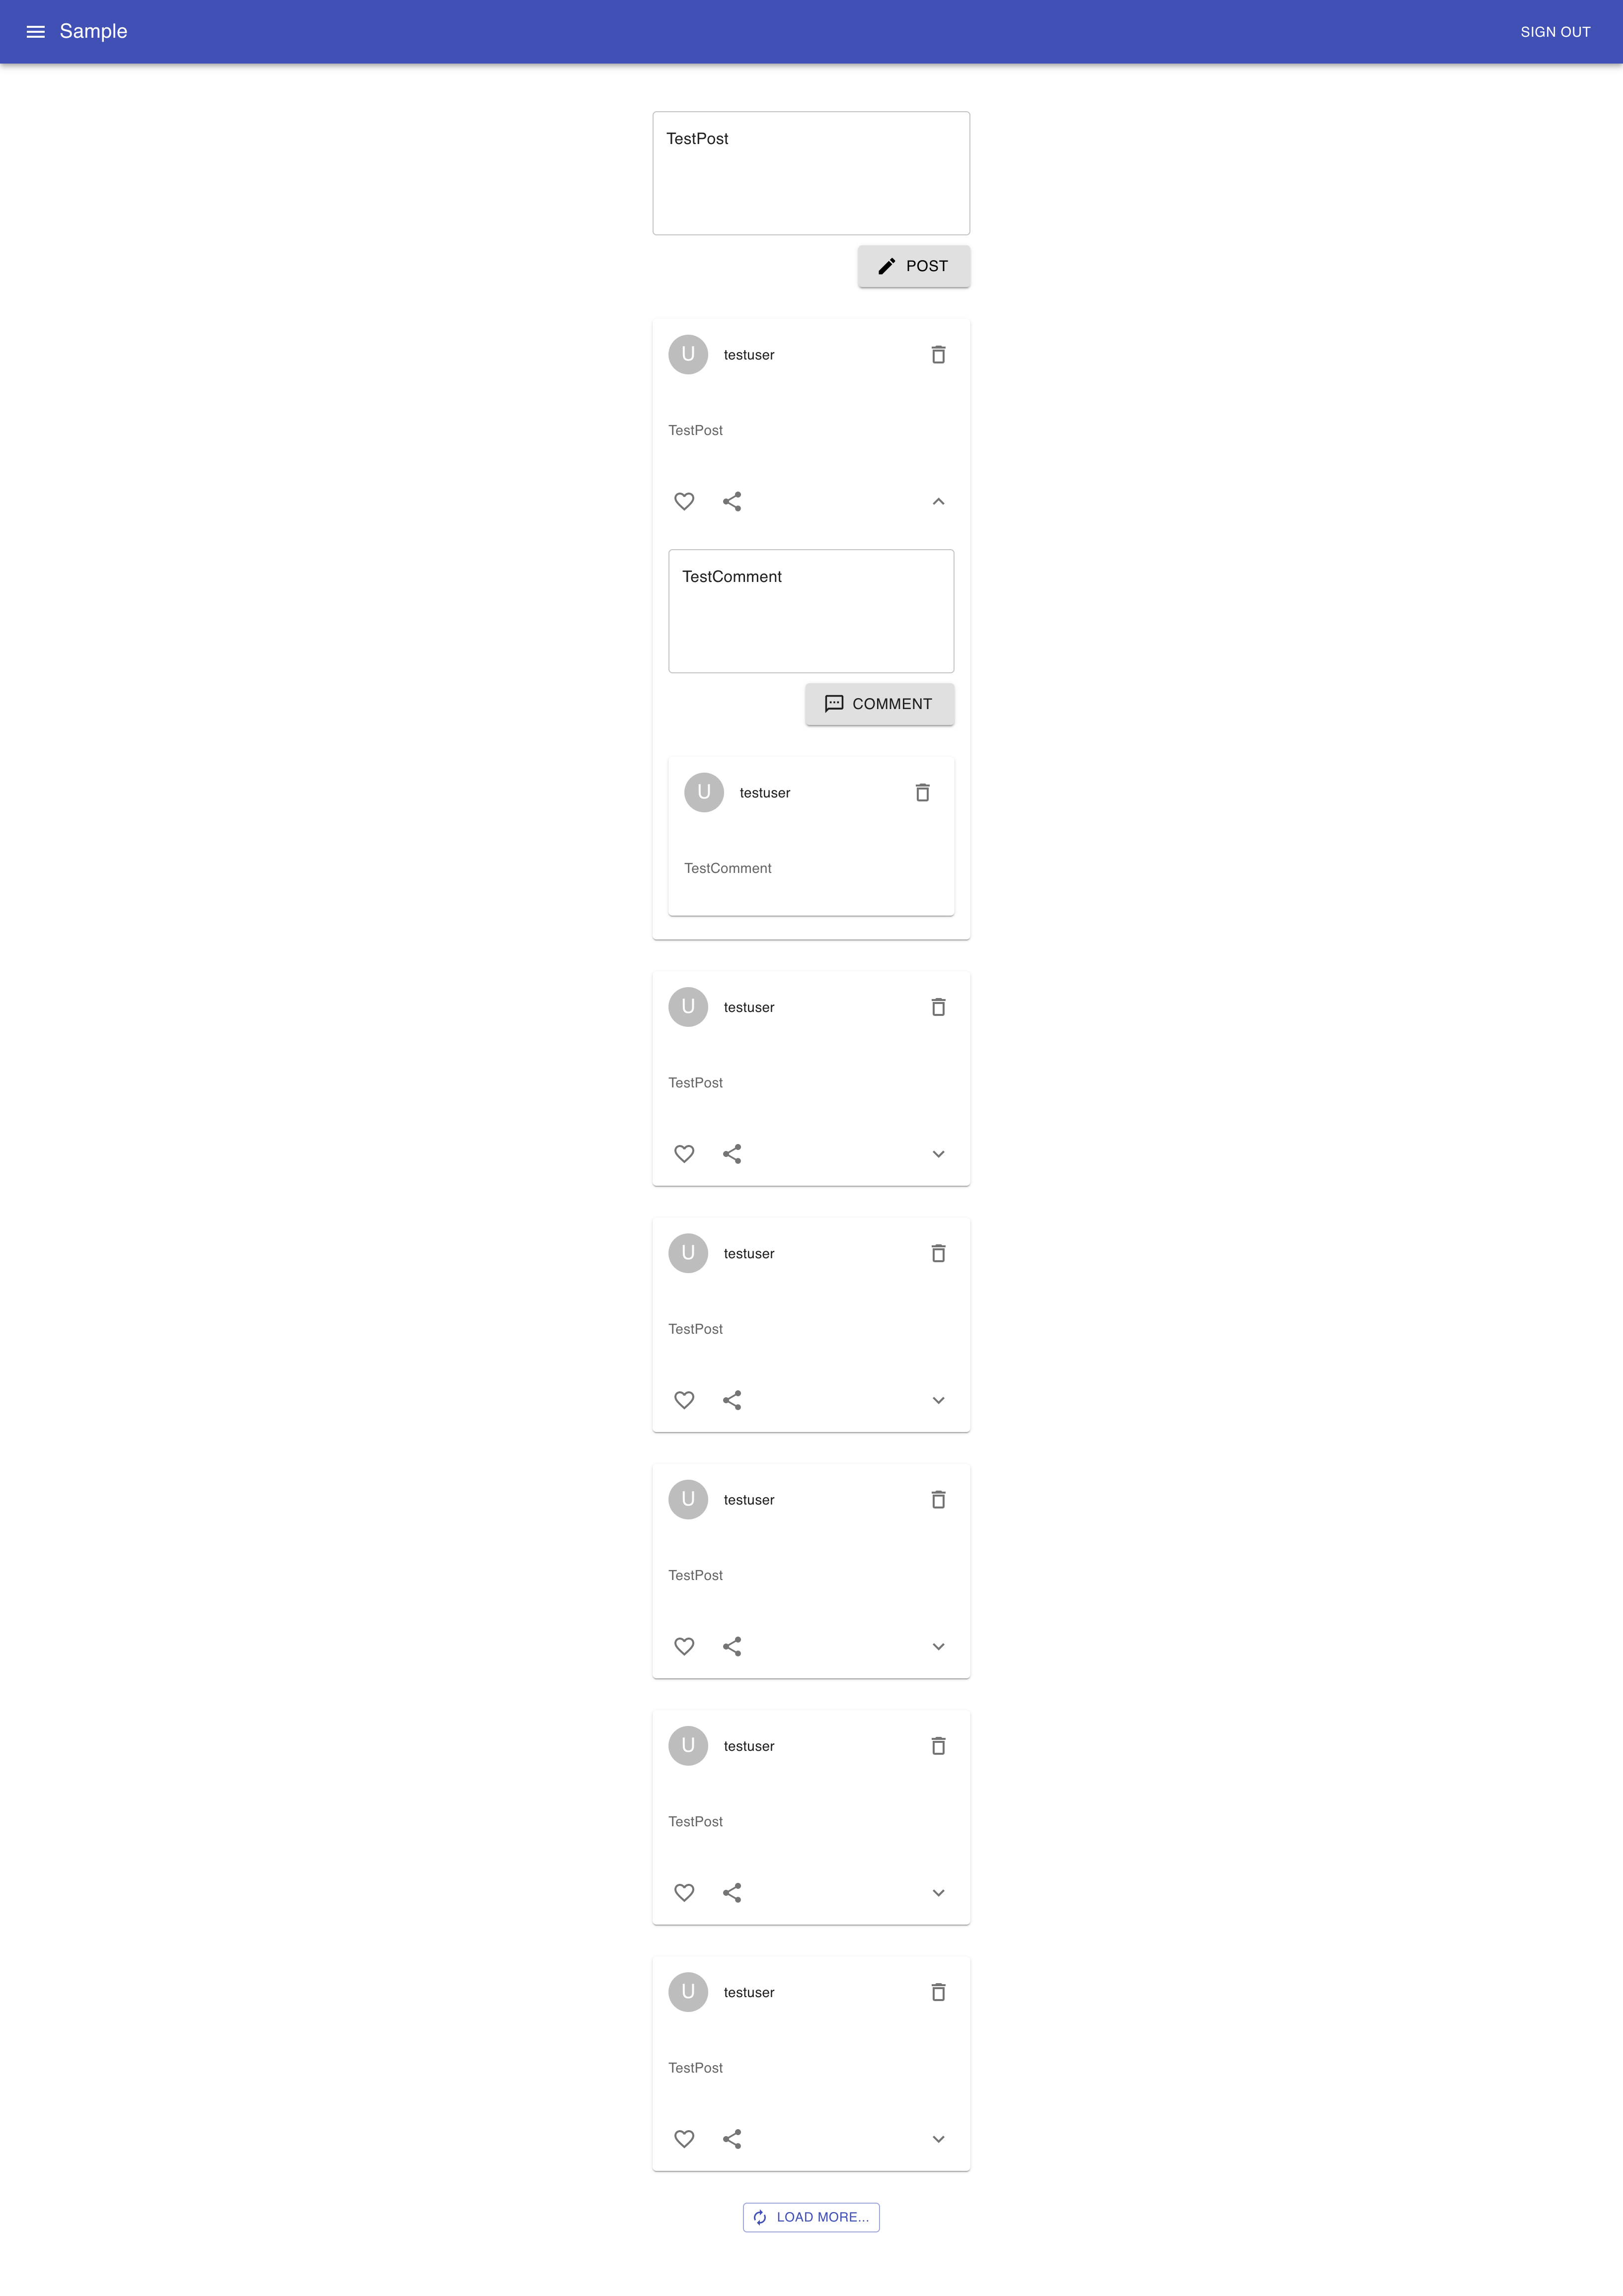
現段階だとこんな感じになっていればOKです。
- 投稿(Post)が作成・削除できるかどうか
- コメント(Comment)が作成・削除できるかどうか
を確認してください。
画像アップロード機能を作成
特に問題無ければ最後に画像アップロード機能を追加していきます。
$ amplify add storage
参照記事: Storage with Amplify
おなじみの対話形式で質問が始まるので回答していってください。
? Please select from one of the below mentioned services: (Use arrow keys)
❯ Content (Images, audio, video, etc.)
  NoSQL Database

// 画像などをアップロードしたいので「Content」
? Please provide a friendly name for your resource that will be used to label th
is category in the project: reactamplifysnsstorage

// Storageに付けるラベル名(任意)
? Please provide bucket name: reactamplifysnss3

// S3バケット名(任意)
? Who should have access: (Use arrow keys)
❯ Auth users only
  Auth and guest users

// 利用できるユーザー(認証済みのユーザーのみに絞りたいので「Auth users only 」)
? What kind of access do you want for Authenticated users? (Press <space> to sel
ect, <a> to toggle all, <i> to invert selection)
❯◉ create/update
 ◉ read
 ◉ delete

// 認証済みのユーザーが実行可能なアクション(「a」キーを押すと全て選択可能なのでそうする)
? Do you want to add a Lambda Trigger for your S3 Bucket? No

// Lambdaトリガーを付与するかどうか(今回はLmabdaを使用しないので「No」)
Successfully added resource reactamplifysnsstorage locally

If a user is part of a user pool group, run "amplify update storage" to enable IAM group policies for CRUD operations
Some next steps:
"amplify push" builds all of your local backend resources and provisions them in the cloud
"amplify publish" builds all of your local backend and front-end resources (if you added hosting category) and provisions them in the cloud
こんな感じのメッセージが返ってくれば準備完了です。
$ amplify push
「amplify push」コマンドを実行します。
✔ Successfully pulled backend environment dev from the cloud.

Current Environment: dev

| Category | Resource name           | Operation | Provider plugin   |
| -------- | ----------------------- | --------- | ----------------- |
| Storage  | reactamplifysnsstorage  | Create    | awscloudformation |
| Auth     | reactamplifysns******** | No Change | awscloudformation |
| Api      | reactamplifysns         | No Change | awscloudformation |
? Are you sure you want to continue? Yes

...省略...

⠋ Updating resources in the cloud. This may take a few minutes...⠋ Uploading fil✔ All resources are updated in the cloud
こんな感じのメッセージが返ってくればOK。

S3バケットも新規に作成されていますね。
なお、このままの状態だと外部からのアクセスができないので、「アクセス許可」内のバケットポリシーに以下のJSONを記述してください。
{
    "Version": "2012-10-17",
    "Statement": [
        {
            "Effect": "Allow",
            "Principal": "*",
            "Action": "s3:GetObject",
            "Resource": "arn:aws:s3:::<バケット名>/public/images/*"
        }
    ]
}

これでひとまず設定完了です。
あとはReactアプリ側のコードを追記していきましょう。
$ yarn add @types/uuid
画像をS3にアップロードする際、ファイル名が被らないようランダムな識別子を付与したいので上記のライブラリをインストールします。
インストールが終わったら、「./src/components/post/PostForm.tsx」を次のように編集してください。
import React, { useCallback, useState, useContext } from "react"

import { experimentalStyled as styled } from "@material-ui/core/styles"
import { makeStyles, Theme } from "@material-ui/core/styles"
import TextField from "@material-ui/core/TextField"
import Button from "@material-ui/core/Button"
import Box from "@material-ui/core/Box"
import IconButton from "@material-ui/core/IconButton"
import PhotoCameraIcon from "@material-ui/icons/PhotoCamera"
import CreateIcon from "@material-ui/icons/Create"
import CancelIcon from "@material-ui/icons/Cancel"

import API, { graphqlOperation } from "@aws-amplify/api"
import { createPost } from "../../graphql/mutations"
import { v4 as uuid } from "uuid"
import awsconfig from "../../aws-exports"
import { Storage } from "aws-amplify"
import { CreatePostInput, PostStatus } from "../../types/index"

import { UserContext } from "../../App"

// S3のバケット名などを取得
const {
  aws_user_files_s3_bucket_region: region,
  aws_user_files_s3_bucket: bucket
} = awsconfig

const useStyles = makeStyles((theme: Theme) => ({
  form: {
    display: "flex",
    flexWrap: "wrap",
    width: 320
  },
  inputFileBtn: {
    marginTop: "10px"
  },
  submitBtn: {
    marginTop: "10px",
    marginLeft: "auto"
  },
  box: {
    margin: "2rem 0 4rem",
    width: 320
  },
  preview: {
    width: "100%"
  }
}))

const Input = styled("input")({
  display: "none"
})

const borderStyles = {
  bgcolor: "background.paper",
  border: 1,
}

const PostForm: React.FC = () => {
  const { userInfo } = useContext(UserContext)

  const classes = useStyles()

  const [content, setContent] = useState<string>("")
  const [file, setFile] = useState<File>()
  const [preview, setPreview] = useState<string>("")

  const uploadImage = useCallback((e) => {
    const file = e.target.files[0]
    setFile(file)
  }, [])

  // 画像プレビュー機能
  const previewImage = useCallback((e) => {
    const file = e.target.files[0]
    setPreview(window.URL.createObjectURL(file))
  }, [])

  const handleCreatePost = async (e: React.FormEvent<HTMLFormElement>) => {
    e.preventDefault()

    if (!content) return

    const data: CreatePostInput = {
      content: content,
      owner: userInfo?.attributes.sub,
      status: PostStatus.published
    }

    if (file) {
      const { name: fileName, type: mimeType } = file
      const key: string = `images/${uuid()}_${fileName}`
      // 最終的な保存先
      const imageUrl: string = `https://${bucket}.s3.${region}.amazonaws.com/public/${key}`

      try {
        await Storage.put(key, file, {
          contentType: mimeType
        })

        data.image = imageUrl
        setFile(undefined)
      } catch (err: any) {
        console.log(err)
      }
    }

    try {
      await API.graphql(graphqlOperation(createPost, { input: data }))
      setContent("")
      setPreview("")
    } catch (err: any) {
      console.log(err)
    }
  }

  return (
    <>
      <form className={classes.form} noValidate onSubmit={handleCreatePost}>
        <TextField
          placeholder="Hello World!"
          variant="outlined"
          multiline
          fullWidth
          rows="4"
          value={content}
          onChange={(e: React.ChangeEvent<HTMLInputElement>) => {
            setContent(e.target.value)
          }}
        />
        <div className={classes.inputFileBtn}>
          <label htmlFor="icon-button-file">
            <Input
              accept="image/*"
              id="icon-button-file"
              type="file"
              onChange={(e: React.ChangeEvent<HTMLInputElement>) => {
                uploadImage(e)
                previewImage(e)
              }}
            />
            <IconButton color="inherit" component="span">
              <PhotoCameraIcon />
            </IconButton>
          </label>
        </div>
        <div className={classes.submitBtn}>
          <Button
            type="submit"
            variant="contained"
            size="large"
            color="inherit"
            disabled={!content || content.length > 140}
            startIcon={<CreateIcon />}
            className={classes.submitBtn}
          >
            Post
          </Button>
        </div>
      </form>
      { preview ?
        <Box
          sx={{ ...borderStyles, borderRadius: 1, borderColor: "grey.400" }}
          className={classes.box}
        >
          <IconButton
            color="inherit"
            onClick={() => setPreview("")}
          >
            <CancelIcon />
          </IconButton>
          <img
            src={preview}
            alt="preview-img"
            className={classes.preview}
          />
        </Box> : null
      }
    </>
  )
}

export default PostForm
最終的にこんな感じの挙動になっていれば完成です。
あとがき
以上、多少雑な説明になってしまいましたが、Amplifyを使ってそれっぽいアプリをサクッと作ってみました。
ある程度の流れ(「amplify add ◯◯(追加したい機能)」→「amplify push ◯◯(追加したい機能)」)さえ掴めればだいぶ高速で開発を進める事はできると思うので、今後も色々試してみたいと思います。