はじめに
Pythonでコード書こうとすると「テストどうやって書くんだっけ??」とよくなってしまい、これではいけないと思い「pytestチートシート」を作成いたしました。足りない部分などありましたらご意見いただけるとありがたいです。
確認に利用したバージョンは以下のとおりです。
Python 3.9.5,pytest 6.2.4,pytest-cov 3.0.0
チートシート
- assertの利用方法
- テストの実行方法
- モックの利用方法
- コンストラクタ,配列,配列のfor文でモックを利用する方法
- parametrizeの利用
- PropertyMockを利用して属性をモック化する方法
- mock_openでファイルのオープン処理もモック化する方法
- 呼び出し時の引数の値にtyping.Anyを指定して検証する方法
- unittest.mock.sentinelを利用してユニークなオブジェクトを生成する方法
- fixtureでテストの前処理を実行する方法
-
カバレッジ
-
カバレッジの計測
- [命令網羅 C0](#命令網羅 C0)
- [条件分岐の網羅 C1](#条件分岐の網羅 C1)
-
カバレッジの計測
assertの利用方法
単純な関数を呼び出し結果をassertする例となります。
# 引数の文字列を結合して返却します。
def join(val1: str, val2: str) -> str:
    return val1 + val2

def test_join():
    # assertを利用して、echoが期待する結果となっていることを確認
    assert join('dummy1', 'dummy2') == 'dummy1dummy2'

    # assert notを利用して、echoが期待しない結果となっていないことを確認
    assert not join('dummy1', 'dummy2') == 'dummy1'
テストの実行方法
プロジェクトのルートがC:/python/pytest_cheatsheetであるとの前提の説明となります。
pytestのテストケースのモジュール(.pyファイル)を相対パスで指定する場合は、cd C:/python/pytest_cheatsheetのようにカレントディレクトリをプロジェクトのルートパスにするとの前提でpytestは実行する説明となります。
相対パスを指定しての実行方法
カレントディレクトリがプロジェクトルートの場合の実行方法を説明させていただきます。
単一のpyファイルを実行する方法
プロジェクトルートに移動後、pytestの引数に相対パスのテストのpyファイルを指定します。
cd C:/python/pytest_cheatsheet
pytest tests/test_assert_sample.py
==================================================== test session starts =====================================================
platform win32 -- Python 3.9.5, pytest-6.2.4, py-1.10.0, pluggy-0.13.1
rootdir: C:\python\pytest_cheatsheet, configfile: pytest.ini
plugins: cov-3.0.0, ipynb-1.1.1, mock-3.6.1
collected 1 item

tests\test_assert_sample.py .                                                                                           [100%]

===================================================== 1 passed in 0.01s ======================================================
単一のpyファイルの特定のメソッドを実行する場合
pytest tests/test_assert_sample.py::test_join
全てのpyファイルを実行する方法
プロジェクトルートに移動後、pytestを引数指定なしで実行します。
cd C:/python/pytest_cheatsheet
C:\python\pytest_cheatsheet>pytest
==================================================== test session starts =====================================================
platform win32 -- Python 3.9.5, pytest-6.2.4, py-1.10.0, pluggy-0.13.1
rootdir: C:\python\pytest_cheatsheet, configfile: pytest.ini
plugins: cov-3.0.0, ipynb-1.1.1, mock-3.6.1
collected 33 items

tests\test_any.py ...                                  [  9%]
tests\test_assert_sample.py .                          [ 12%]
tests\test_file_reader.py ...                          [ 21%]
tests\test_mark.py .....                               [ 36%]
tests\test_os_remove.py ...                            [ 45%]
tests\test_pathlib_path.py .......                     [ 66%]
tests\test_property_mock.py .                          [ 69%]
tests\test_raises.py .                                 [ 72%]
tests\fixture\test_fixture.py .....                    [100%]

===================================================== 33 passed in 10.12s ======================================================
特定のフォルダの配下のpyファイルを実行する場合
プロジェクトルートに移動後、pytestを特定のフォルダ指定で実行します。
以下の例では、tests/fixtureフォルダを指定しています。
cd C:/python/pytest_cheatsheet
C:\python\pytest_cheatsheet>pytest tests/fixture
==================================================== test session starts =====================================================
platform win32 -- Python 3.9.5, pytest-6.2.4, py-1.10.0, pluggy-0.13.1
rootdir: C:\python\pytest_cheatsheet, configfile: pytest.ini
plugins: cov-3.0.0, ipynb-1.1.1, mock-3.6.1
collected 1 item

tests\fixture\test_conftest_sample.py .                                                                                 [100%]

===================================================== 1 passed in 0.03s ======================================================
tests/fixtureフォルダに含まれるpyファイルだけが実行されました。
絶対パスを指定しての実行方法
pyファイルやテストを含むフォルダを絶体パスで指定します。
実行結果は相対パス指定時と同様ですので省略させていただきます。
単一のpyファイルを実行する場合
pytest C:/python/pytest_cheatsheet/tests/test_assert_sample.py
全てのpyファイルを実行する場合
pytest C:/python/pytest_cheatsheet/tests
特定のフォルダの配下のpyファイルを実行する場合
pytest C:/python/pytest_cheatsheet/tests/fixture
標準出力(print関数の出力)を表示する方法
-sを指定するとprint関数の出力がコンソールに表示されます。
pytest -s tests/test_print_sample.py
モックの利用方法
モックの利用方法のサンプル
モックの利用方法のサンプルは以下のとおりです。まずは全体をザクっとご覧ください。詳細は後程説明させていただきます。
import os
import pytest
# unittest.mockのpatchをpytest-mockが利用しているのでインポート
from unittest.mock import patch
# call_args_listで利用するのでインポート
from unittest.mock import call

class UnixFS:
    @staticmethod
    def rm(filename:str) -> None:
        os.remove(filename)

    @staticmethod
    def echo(self, value:str) -> str:
        return value

# mocker.patchでモック化
def test_unix_fs_patch(mocker):
    # os.removeをモック化
    mocker.patch('os.remove')

    # 対象処理を呼び出し
    UnixFS.rm('file')

    # os.removeが引数'file'で一回だけ呼び出されたことを検証
    os.remove.assert_called_once_with('file')

    # 呼び出し回数だけ確認したい場合はcall_countで検証
    assert  os.remove.call_count  == 1

# mocker.patch.objectでモック化
def test_unix_fs_patch_object(mocker):
    mocker.patch.object(os, 'remove')
    UnixFS.rm('file')
    os.remove.assert_called_once_with('file')

# patchデコレータでモック化
@patch('os.remove')
def test_unix_fs_decorator(mocker):
    UnixFS.rm('file')
    os.remove.assert_called_once_with('file')

# mocker.patch.objectでreturn_valueを指定し戻り値を固定させる
def test_return_value(mocker):
    # UnixFS.echoの結果を固定
    mocker.patch.object(UnixFS, 'echo', return_value='100')

    # UnixFS.echoを呼び出して結果を検証
    assert UnixFS.echo('10') == '100'

    # UnixFS.echoが引数'10'で一回だけ呼び出されたことを検証
    UnixFS.echo.assert_called_once_with('10')

# mocker.patch.objectでside_effectで複数の値を指定し、呼び出す回数に応じた戻り値を指定する
def test_side_effect_return_values(mocker):
    # UnixFS.echoの結果を固定
    mocker.patch.object(UnixFS, 'echo', side_effect=['11', '21', '31'])

    # UnixFS.echoを3回呼び出して各結果を検証
    assert UnixFS.echo('10') == '11'
    assert UnixFS.echo('20') == '21'
    assert UnixFS.echo('30') == '31'

    # UnixFS.echoが呼び出しされた時の引数を検証
    assert UnixFS.echo.call_args_list == [
        call('10'),
        call('20'),
        call('30')
    ]

# mocker.patchでside_effectで例外を指定し例外を発生させる
def test_unix_fs_patch_raise_exception(mocker):
    mocker.patch('os.remove', side_effect=OSError)

    with pytest.raises(OSError):
        UnixFS.rm('file')
        os.remove.assert_called_once_with('file')
モック化する方法
mocker.patchでモック化
mocker.patchで任意のオブジェクトの動作をモック化できます。
以下の例では、osのremoveメソッドをモック化しています。
UnixFS.rmは戻り値が存在しないので、assert_called_once_withの検証だけを行っています。
# mocker.patchでモック化
def test_unix_fs_patch(mocker):
    # os.removeをモック化
    mocker.patch('os.remove')

    # 対象処理を呼び出し
    UnixFS.rm('file')

    # os.removeが引数'file'で一回だけ呼び出されたことを検証
    os.remove.assert_called_once_with('file')
mocker.patch.objectでモック化
mocker.patch.objectでは、オブジェクトと動作を別で指定してモック化することが可能です。
# mocker.patch.objectでモック化
def test_unix_fs_patch_object(mocker):
    mocker.patch.object(os, 'remove')
    UnixFS.rm('file')
    os.remove.assert_called_once_with('file')
patchデコレータでモック化
デコレータを指定することでもモック化できます。
# patchデコレータでモック化
@patch('os.remove')
def test_unix_fs_decorator(mocker):
    UnixFS.rm('file')
    os.remove.assert_called_once_with('file')
return_valueで戻り値を固定
# mocker.patch.objectでreturn_valueを指定し戻り値を固定させる
def test_return_value(mocker):
    # UnixFS.echoの結果を固定
    mocker.patch.object(UnixFS, 'echo', return_value='100')

    # UnixFS.echoを呼び出して結果を検証
    assert UnixFS.echo('10') == '100'

    # UnixFS.echoが引数'10'で一回だけ呼び出されたことを検証
    UnixFS.echo.assert_called_once_with('10')
side_effectで呼び出し回数に応じた戻り値を固定
# mocker.patch.objectでside_effectで複数の値を指定し、呼び出し回数に応じた戻り値を固定する
def test_side_effect_return_values(mocker):
    # UnixFS.echoの結果を固定
    mocker.patch.object(UnixFS, 'echo', side_effect=['11', '21', '31'])

    # UnixFS.echoを3回呼び出して各結果を検証
    assert UnixFS.echo('10') == '11'
    assert UnixFS.echo('20') == '21'
    assert UnixFS.echo('30') == '31'

    # UnixFS.echoが呼び出しされた時の引数を検証(複数回)
    assert UnixFS.echo.call_args_list == [
        call('10'),
        call('20'),
        call('30')
    ]

    # UnixFS.echoの呼び出し回数をcall_countで検証
    assert UnixFS.echo.call_count == 3
side_effectで例外を発生させる方法
# mocker.patchでside_effectで例外を指定し例外を発生させる
def test_unix_fs_patch_raise_exception(mocker):
    # os.remove呼び出し時にOSErrorを発生する振る舞いを定義
    mocker.patch('os.remove', side_effect=OSError)

    # os.remove呼び出し時にOSErrorが発生するか検証
    with pytest.raises(OSError):
        UnixFS.rm('file')
        os.remove.assert_called_once_with('file')
コンストラクタ,配列,配列のfor文でモックを利用する方法
PathSampleクラスが繰り返し記載されますが、説明に必要な部分だけ抜き出して記載しておりますので、ご留意ください。
コンストラクタのモック化
# コンストラクタをモック化
def test_constructor(mocker):
    # コンストラクタが返却する結果(モック)を準備
    path_sample_mock = mocker.Mock()

    # コンストラクタをモック化し、戻り値をpath_sample_mockに固定
    mocker.patch('pathlib.Path', return_value=path_sample_mock)

    # 実際にPathを生成
    path_sample = pathlib.Path('.')

    # 生成したPathがpath_sample_mockと一致しているか検証
    assert path_sample == path_sample_mock
配列のlenと要素の参照
PathSampleのcreate_pathを対象として、len(List[str])、配列の要素の参照(0と1の要素)をモック化しています。
class PathSample:
    def __init__(self):
        pass

    # path_partsのサイズが1の場合は対応するパスを返却
    # path_partsのサイズが2の場合はpath_parts[0] + os.sep + path_parts[1]に対応するパスを返却
    @staticmethod
    def create_path(path_parts:List[str]) -> pathlib.Path:
        # __len__がモック化されているかの確認のためにlenで長さ取得
        path_parts_len = len(path_parts)

        # __getitem__で配列の要素の参照時にモック化されているかの確認のための処理
        if path_parts_len == 1:
            return pathlib.Path(path_parts[0])
        elif path_parts_len == 2:
            return pathlib.Path(path_parts[0] + os.sep + path_parts[1])

def test_create_path(mocker):
    path_parts = mocker.MagicMock()

    # len(path_parts)の結果を2に固定
    path_parts.__len__.return_value = 2

    # path_parts[0]='part1', path_parts[1]='part2'に固定
    path_parts.__getitem__.side_effect  = ['part1', 'part2']

    # Pathのコンストラクタをモック化
    path_mock = mocker.Mock()
    mocker.patch('pathlib.Path', return_value=path_mock)

    # 実際の処理を実行
    result = PathSample.create_path(path_parts)

    # 生成したPathがpath_mockと一致しているか検証
    assert result == path_mock

    # Pathのコンストラクタの引数を検証
    pathlib.Path.assert_called_once_with('part1' + os.sep + 'part2')
parametrizeの利用
parametrizeを利用しPathSample.create_path呼び出しで指定するList[str]とpathlib.Path.assert_called_once_withで検証する期待値のstrを複数指定したテストとなります。
import os
import pathlib
from unittest.mock import patch
from typing import Counter, Dict, Tuple, List
from unittest.mock import call, PropertyMock
import pytest

class PathSample:
    def __init__(self):
        pass

    # path_partsのサイズが1の場合は対応するパスを返却
    # path_partsのサイズが2の場合はpath_parts[0] + os.sep + path_parts[1]に対応するパスを返却
    @staticmethod
    def create_path(path_parts:List[str]) -> pathlib.Path:
        # __len__がモック化されているかの確認のためにlenで長さ取得
        path_parts_len = len(path_parts)

        # __getitem__で配列の要素の参照時にモック化されているかの確認のための処理
        if path_parts_len == 1:
            return pathlib.Path(path_parts[0])
        elif path_parts_len == 2:
            return pathlib.Path(path_parts[0] + os.sep + path_parts[1])

@pytest.mark.parametrize(('path_parts_data', 'expected_result'), [
    (['part1', 'part2'], 'part1' + os.sep + 'part2'),
    (['part1'], 'part1')
])
# parametrizeを利用し
# PathSample.create_path呼び出しで指定するpath_parts_data:List[str]と
# pathlib.Path.assert_called_once_withで検証する期待値をexpected_result:strを利用してテストを実行
def test_create_path_parametrize(mocker, path_parts_data:List[str], expected_result:str):
    # コンストラクタが返却する結果(モック)を準備
    path_parts = mocker.MagicMock()

    # len(path_parts)の結果をlen(path_parts_data)に固定
    path_parts.__len__.return_value = len(path_parts_data)
    # path_partsの要素path_parts_dataに固定
    path_parts.__getitem__.side_effect  = path_parts_data

    # pathlib.Pathのコンストラクタの結果のモック
    path_mock = mocker.Mock()
    mocker.patch('pathlib.Path', return_value=path_mock)

    # 実際の処理を実行
    result = PathSample.create_path(path_parts)

    # 生成したPathがpath_mockと一致しているか検証
    assert result == path_mock

    # Pathのコンストラクタの引数を検証
    pathlib.Path.assert_called_once_with(expected_result)
配列のfor文
import os
import pathlib
from unittest.mock import patch
from typing import Counter, Dict, Tuple, List
from unittest.mock import call, PropertyMock
import pytest

class PathSample:
    def __init__(self):
        pass

    # rm_targetsをループし、パスが存在する場合は絶対パスを取得し削除を行います
    @staticmethod
    def rm_paths(rm_targets:List[pathlib.Path]) -> None:
        for target in rm_targets:
            if target.exists():
                # os.remove(target)で消せるがfor文の現在の処理対象のモックの振る舞いもモック化できることを
                # 確認するためにget.absolute()で絶対パスを取得しています。
                absolute_path = target.absolute()
                os.remove(absolute_path)

def test_list_for(mocker):
    rm_targets = mocker.MagicMock()

    # for target in rm_targets:の動作をモック化し
    # ['dummy0','dummy1','dummy2']に対応するPathが処理対象になるように振る舞いを定義
    rm_targets.__iter__.return_value  = iter([pathlib.Path("dummy{}".format(i)) for i in range(3)])

    # pathlib.Path.existsで'dummy1'だけFalseの結果になる振る舞いを定義
    path_exists_mock = mocker.patch('pathlib.Path.exists')
    path_exists_mock.side_effect = [True, False, True]

    # pathlib.Path.absoluteの振る舞いを定義
    path_absolute_mock = mocker.patch('pathlib.Path.absolute')
    path_absolute_mock.side_effect = ['absolute0', 'absolute2']

    mocker.patch.object(os, 'remove')

    # 実際の処理を実行
    PathSample.rm_paths(rm_targets)

    # pathlib.Path.existsは3回実行される
    assert path_exists_mock.call_count == 3

    # pathlib.Path.absoluteは2回実行される
    assert path_absolute_mock.call_count == 2

    # dummy1はpathlib.Path.existsがfalesになるのでos.removeの呼び出しが行われない
    assert os.remove.call_count == 2
    assert os.remove.call_args_list == [call('absolute0'), call('absolute2')]
PropertyMockを利用して属性をモック化する方法
from unittest.mock import PropertyMock

def test_property_mock(mocker):
     # モックを生成
     foo_mock = mocker.Mock()

     # PropertyMockを生成
     property_mock = PropertyMock(return_value='property-mock-value')

     # foo_mockのvalue1属性にproperty_mockをセット
     type(foo_mock).value1 = property_mock

     #foo_mock.value1がPropertyMockのreturn_valueになっていることを検証
     assert foo_mock.value1 == 'property-mock-value'
mock_openでファイルのオープン処理もモック化する方法
ファイルをオープンしwrite
from unittest.mock import patch, MagicMock

def test_mock_open_sample1(mocker):
    # open()の振る舞いを置き換えるモックを生成
    # from unittest.mock import mock_openしてopen_mock = mock_open()でも同じ
    open_mock = mocker.mock_open()

    # open()をモック化
    with patch('builtins.open', open_mock):
        # 仮引数は指定しないでopenを呼び出す
        with open('foo', 'w') as target_io:
            # 文字列をwrite
            target_io.write('some stuff')

    # openが引数 'foo', 'w'で一回だけ呼び出されたことを検証
    open_mock.assert_called_once_with('foo', 'w')

    # MagicMockを取得しwriteの呼び出し検証の準備
    handle = open_mock()

    # handleはMagicMockの継承クラスのオブジェクト
    assert isinstance(handle, MagicMock)

    # writeが'some stuff'を引数として一回だけ呼び出されたことを検証
    handle.write.assert_called_once_with('some stuff')
仮引数指定でファイルをオープンしwrite
openの呼び出し時に仮引数指定を行った場合は、assert_called_once_withでも仮引数指定で呼び出す必要があります。
from unittest.mock import patch, MagicMock

def test_mock_open_sample2(mocker):
    open_mock = mocker.mock_open()

    with patch('builtins.open', open_mock):
        # 仮引数は指定してopenを呼び出す
        with open(file='foo', mode='w') as target_io:
            target_io.write('some stuff')

    # openが引数 file='foo', mode='w'で一回だけ呼び出されたことを検証
    # 仮引数を指定しないと検証は失敗します。
    open_mock.assert_called_once_with(file='foo', mode='w')
ファイルをオープンしreadlines
from typing import List

class FileReader:
    def __init__(self):
        pass

    def read_lines(self, file_name:str) -> List[str]:
        with open(file_name, 'r') as file:
            lines = file.readlines()
            return lines
from src.test_target.file_reader import FileReader
from unittest.mock import patch

def test_mock_open_read_lines(mocker):
    file_name:str = 'hoge.txt'

    # 処理対象クラスのFileReaderのインスタンスを生成
    file_reader = FileReader()

    data = 'read_data_contents'
    # open()の振る舞いを置き換えるモックを生成
    # read_dataを指定することでread(), readline(), readlines() のメソッドが返す文字列を制御できます。
    open_mock = mocker.mock_open(read_data=data)

    # open()をモック化
    with patch('builtins.open', open_mock):
        read_lines_result = file_reader.read_lines(file_name)

        # FileReaderのread_linesメソッドの結果を検証
        # TextIOWrapperのreadlines()はList[str]を返却するので配列する必要がある
        assert read_lines_result == [data]

        # openが引数 'hoge.txt', 'r'で一回だけ呼び出されたことを検証
        open_mock.assert_called_once_with(file_name, 'r')

        # readlinesの呼び出し回数を検証
        handle = open_mock()
        assert  handle.readlines.call_count == 1
ファイルをオープンしread
def test_mock_open_read(mocker):
    file_name:str = 'hoge.txt'

    data = 'read_data_contents'
    open_mock = mocker.mock_open(read_data=data)

    # open()をモック化
    with patch('builtins.open', open_mock):
        # 仮引数は指定しないでopenを呼び出す
        with open(file_name, 'r') as target_io:
            # read()で読み込み
            read_result_1 = target_io.read()
            assert read_result_1 == data

            # 2回目のread()は空文字が返却される
            read_result_2 = target_io.read()
            assert read_result_2 == ''

            # openが引数 'hoge.txt', 'r'で一回だけ呼び出されたことを検証
            open_mock.assert_called_once_with(file_name, 'r')

            # readの呼び出し回数を検証
            handle = open_mock()
            assert  handle.read.call_count == 2
呼び出し時の引数の値にtyping.Anyを指定して検証する方法
typing.Anyを利用してassert_called_once_withを実行する例
from unittest.mock import ANY
import random
import string
from typing import List, Any

# unittest.mock.ANYの説明に利用するクラス
class AnySampleTarget:
    @staticmethod
    def method1(self, value1:str, value2:str) -> None:
        pass

    # List[str]を引数に持つメソッド
    @staticmethod
    def method2_arg_list(self, value1:str, value2:List[str]) -> None:
        pass

# typing.Anyを利用してassert_called_once_withを実行する例
def test_any(mocker):
    # AnySampleTarget.method1をモック化
    mocker.patch.object(AnySampleTarget, 'method1')

    letters = string.ascii_lowercase
    value1 = 'dummyStr'

    # ランダムな文字列を生成
    value2 = ''.join(random.choice(letters) for i in range(10))

    # method1(self, value1:str, value2:str)を実行
    AnySampleTarget.method1(value1, value2)

    # AnySampleTarget.method1が呼び出されたことを検証(value1とvalue2を指定)
    AnySampleTarget.method1.assert_called_once_with(value1, value2)

    # AnySampleTarget.method1が呼び出されたことを検証(value1とANYを指定)
    AnySampleTarget.method1.assert_called_once_with(value1, ANY)

    # AnySampleTarget.method1が呼び出されたことを検証(ANYとANYを指定)
    AnySampleTarget.method1.assert_called_once_with(ANY, ANY)
typing.Anyを含むリストを作成しassert_called_once_withを実行する例
from unittest.mock import ANY
import random
import string
from typing import List, Any

# unittest.mock.ANYの説明に利用するクラス
class AnySampleTarget:
    @staticmethod
    def method1(self, value1:str, value2:str) -> None:
        pass

    # List[str]を引数に持つメソッド
    @staticmethod
    def method2_arg_list(self, value1:str, value2:List[str]) -> None:
        pass

def test_list_any(mocker):
    # AnySampleTarget.method2_arg_listをモック化
    mocker.patch.object(AnySampleTarget, 'method2_arg_list')
    letters = string.ascii_lowercase
    value1 = 'dummyStr'

    # ランダムな文字列を生成
    random_str2_1 = ''.join(random.choice(letters) for i in range(10))
    random_str2_2 = ''.join(random.choice(letters) for i in range(10))
    value2 = [random_str2_1, random_str2_2]

    # method2_arg_list(self, value1:str, value2:List[str])を実行
    AnySampleTarget.method2_arg_list(value1, value2)

    AnySampleTarget.method2_arg_list.assert_called_once_with(value1, value2)

    # (value1, [ANY, ANY])で成功
    AnySampleTarget.method2_arg_list.assert_called_once_with(value1, [ANY, ANY])
    # (ANY, [ANY, ANY])で成功
    AnySampleTarget.method2_arg_list.assert_called_once_with(ANY, [ANY, ANY])
    # (ANY, ANY)で成功
    AnySampleTarget.method2_arg_list.assert_called_once_with(ANY, ANY)

    # (ANY, [ANY])だと失敗
    # AnySampleTarget.method2_arg_list.assert_called_once_with(ANY, [ANY])
unittest.mock.sentinelを利用してユニークなオブジェクトを生成する方法
ランダムな文字列などを自前で生成しなくても、unittest.mock.sentinelを利用すればユニークなオブジェクトが生成可能です。
from unittest.mock import ANY, sentinel
from typing import Any

# unittest.mock.sentinelの説明に利用するクラス
class SentinelSampleTarget:
    # unittest.mock.sentinelの利用方法の説明のためにtyping.Anyを引数に持つメソッドを定義
    @staticmethod
    def method_arg_any(self, value1:Any, value2:Any) -> None:
        pass

def test_sentinel_sample(mocker):
    # SentinelSampleTarget.method_arg_anyをモック化
    mocker.patch.object(SentinelSampleTarget, 'method_arg_any')

    # some_objectはsentinelの属性へのアクセス時にオンデマンドで生成されます。some_object1などの名前は自由に指定可能
    some_object1 = sentinel.some_object1
    some_object2 = sentinel.some_object2

    # 同じ属性に複数回アクセスしても必ず同じオブジェクトが返されます
    assert sentinel.some_object1 == some_object1
    assert sentinel.some_object2 == some_object2
    # sentinel.some_object1 != sentinel.some_object2は完全に成立するかは不明・・・
    assert sentinel.some_object1 != sentinel.some_object2

    # method_arg_any(self, value1:Any, value2:Any)をsentinelを指定して呼び出してみる
    SentinelSampleTarget.method_arg_any(sentinel.some_object1, sentinel.some_object2)

    # 呼び出されたことを検証
    SentinelSampleTarget.method_arg_any.assert_called_once_with(sentinel.some_object1, sentinel.some_object2)
    SentinelSampleTarget.method_arg_any.assert_called_once_with(some_object1, some_object2)
pytest.fixtureの利用方法
fixtureでテストの前処理を実行する方法
fixtureの利用方法
fixture(フィクスチャ)の基本的な利用方法を説明させていただきます。
fixtureの基本的な利用例
fixtureの基本的な利用例は以下のとおりです。詳細は別途説明させていただきます。
import pytest

class Fruit:
    def __init__(self, name):
        self.name = name

@pytest.fixture
def my_fruit_apple():
    print("my_fruit_apple start")
    return Fruit('apple')

# fixtureに他のfixtureを追加するサンプル
@pytest.fixture
def fruit_basket(my_fruit_apple):
    print("fruit_basket start")
    # 'banana'とmy_fruit_appleの配列を返却
    return [Fruit('banana'), my_fruit_apple]

# my_fruit_appleを引数で指定する事でmy_fruit_appleが前処理として実行されるテスト
def test_use_my_fruit_apple(my_fruit_apple):
    print("test_use_my_fruit_apple start")
    assert my_fruit_apple.name == 'apple'
    print("test_use_my_fruit_apple end")

# my_fruit_appleとfruit_basketを追加したテスト
def test_my_fruit_in_basket(my_fruit_apple, fruit_basket):
    assert my_fruit_apple in fruit_basket

# usefixturesでデコレートする事でmy_fruit_appleが前処理として実行されるテスト
@pytest.mark.usefixtures('my_fruit_apple')
def test_usefixtures():
    print("test_usefixtures start")

# pytest -s tests/test_fixture_simple_sample.py::TestFixtureClass
@pytest.mark.usefixtures('my_fruit_apple')
class TestFixtureClass():
    def test_fixture_under_class_1(self):
        print("test_fixture_under_class_1 start")
        assert True

    def test_fixture_under_class_2(self):
        print("test_fixture_under_class_2 start")
        assert True
説明用のfixtureで利用するクラス:Fruit
fixture内部で利用するクラスは以下のとおりです。name属性を保持しています。
class Fruit:
    def __init__(self, name):
        self.name = name
fixtureの宣言方法
fixtureの最もシンプルな宣言方法は以下のとおりです。
pytest.fixtureでデコレートするだけでfixtureと認識されます。
Fruitをインスタンス化して返却しておりますが、fixtureとしては値を返す必要はないです。
@pytest.fixture
def my_fruit_apple():
    print("my_fruit_apple start")
    return Fruit('apple')
fixtureをテストケースの引数に指定し前処理として実行する方法
# my_fruit_appleを引数で指定する事でmy_fruit_appleが前処理として実行されるテスト
def test_use_my_fruit_apple(my_fruit_apple):
    print("test_use_my_fruit_apple start")
    assert my_fruit_apple.name == 'apple'
    print("test_use_my_fruit_apple end")
pytest tests/test_fixture_simple_sample.py::test_use_my_fruit_apple -s
で実行すると以下のような結果となります。
my_fruit_appleが前処理として実行された後にtest_use_my_fruit_appleが実行されている事が確認できました。
my_fruit_apple start
test_use_my_fruit_apple start
test_use_my_fruit_apple end
usefixturesでデコレートし前処理として実行する方法
# usefixturesでデコレートする事でmy_fruit_appleが前処理として実行されるテスト
@pytest.mark.usefixtures('my_fruit_apple')
def test_usefixtures():
    print("test_usefixtures start")
実行すると以下のような結果となります。
my_fruit_apple start
test_usefixtures start
usefixturesでクラスをデコレートし前処理として実行する方法
# pytest -s tests/test_fixture_simple_sample.py::TestFixtureClass
@pytest.mark.usefixtures('my_fruit_apple')
class TestFixtureClass():
    def test_fixture_under_class_1(self):
        print("test_fixture_under_class_1 start")
        assert True

    def test_fixture_under_class_2(self):
        print("test_fixture_under_class_2 start")
        assert True
実行すると以下のような結果となります。
my_fruit_apple start
test_fixture_under_class_1 start
.my_fruit_apple start
test_fixture_under_class_2 start
test_fixture_under_class_1とtest_fixture_under_class_2の両方でmy_fruit_appleが実行されていることが確認できます。
fixtureに他のfixtureを追加する方法
# fixtureに他のfixtureを追加するサンプル
@pytest.fixture
def fruit_basket(my_fruit_apple):
    print("fruit_basket start")
    # 'banana'とmy_fruit_appleの配列を返却
    return [Fruit('banana'), my_fruit_apple]

# my_fruit_appleとfruit_basketを追加したテスト
def test_my_fruit_in_basket1(my_fruit_apple, fruit_basket):
    assert my_fruit_apple in fruit_basket
実行すると以下のような結果となります。
my_fruit_apple start
fruit_basket start
test_my_fruit_in_basket1の引数のmy_fruit_appleは指定は必須ではありません。
def test_my_fruit_in_basket2(fruit_basket):
    assert True
のようにしてもテストは問題なく成功しますし、my_fruit_appleも実行されます。
fixtureのautouseの利用例
fixture定義時にautouse=Trueを指定すると自動的に実行されるようになります。
autouseの利用例は以下のとおりです。
import pytest

class Fruit:
    def __init__(self, name):
        self.name = name

# autouse=Trueのfixture
@pytest.fixture(autouse=True)
def my_fruit_peach():
    print("my_fruit_peach start")
    return Fruit('peach')

# fixtureを明示的に追加していないテスト
def test_autouse_sample():
    print("test_autouse_sample start")
実行すると以下のような結果となります。
my_fruit_peach start
test_autouse_sample start
fixture内でyieldすることで前処理と後処理を実現する方法
fixture内でyieldすることで、前処理(fixtureのyieldより前の処理)、テストケース、後処理(fixtureのyieldより後の処理)との順序で実行されます。
import pytest, datetime

@pytest.fixture()
def fixture_yield_return():
    print("fixture_yield_return start")
    yield datetime.datetime.now()
    print("fixture_yield_return end")

def test_yield_sample(fixture_yield_return):
    print("test_yield_sample start")
    print("test_yield_sample fixture_yield_return={}".format(fixture_yield_return))
test_yield_sampleを実行すると以下のような結果となります。
fixture_yield_return start
test_yield_sample start
test_yield_sample fixture_yield_return=2021-12-02 20:15:35.352146
.fixture_yield_return end
fixtureのscopeの利用方法
scope(スコープ)で指定可能な値は以下のとおりです。
- function
テストケースごとに1回実行、未指定の場合のデフォルト - class
テストクラス全体で1回実行、テストメソッドがクラスに含まれていなくても実行される。 - module
テストファイル全体で1回実行 - session
テスト全体で1回実行
scopeの利用の例は以下のとおりです。全てのfixtureでautouse=Trueとしております。
import pytest, sys

setup:str = 'setup'
teardown:str = 'teardown'

@pytest.fixture(scope='session', autouse=True)
def fixture_session():
    print("start session")
    print("{} {}".format(setup, sys._getframe().f_code.co_name))
    yield
    print("{} {}".format(teardown, sys._getframe().f_code.co_name))

@pytest.fixture(scope='module', autouse=True)
def fixture_module():
    print("{} {}".format(setup, sys._getframe().f_code.co_name))
    yield
    print("{} {}".format(teardown, sys._getframe().f_code.co_name))

@pytest.fixture(scope='class', autouse=True)
def fixture_class():
    print("{} {}".format(setup, sys._getframe().f_code.co_name))
    yield
    print("{} {}".format(teardown, sys._getframe().f_code.co_name))

@pytest.fixture(scope='function', autouse=True)
def fixture_function():
    print("{} {}".format(setup, sys._getframe().f_code.co_name))
    yield
    print("{} {}".format(teardown, sys._getframe().f_code.co_name))

# pytest -s tests/test_fixture_scope_sample.py::test_scope_sample
def test_scope_sample():
    print("test_scope_sample start")
    print("test_scope_sample end")
実行結果は以下のとおりです。
start session
setup fixture_session
setup fixture_module
setup fixture_class
setup fixture_function
test_scope_sample start
test_scope_sample end
.teardown fixture_function
teardown fixture_class
teardown fixture_module
teardown fixture_session
前処理としては、session→module→class→functionの順序で実行され、後処理としては、function→class→module→sessionの順序で実行される事が確認できます。
conftest利用してfixtureを共有する方法
fixtureを同一ファイル内に記載しても利用可能なのですが、実際にテストを実装する時には、他のテストと共有する必要があります。conftest.pyファイル内にfixtureを実装することで、同一フォルダにあるテストファイルで共通で利用可能となります。
import pytest
import sys

setup:str = 'setup'
teardown:str = 'teardown'

@pytest.fixture(scope='session', autouse=True)
def conftest_fixture_session():
    print("start session")
    print("{} {}".format(setup, sys._getframe().f_code.co_name))
    yield
    print("{} {}".format(teardown, sys._getframe().f_code.co_name))

@pytest.fixture(scope='module', autouse=True)
def conftest_fixture_module():
    print("{} {}".format(setup, sys._getframe().f_code.co_name))
    yield
    print("{} {}".format(teardown, sys._getframe().f_code.co_name))
# pytest tests/fixture/test_conftest_sample.py::test_conftest -s
def test_conftest():
    print("test_conftest start")
    assert True
実行すると以下のような結果となりました。
start session
setup conftest_fixture_session
setup conftest_fixture_module
test_conftest start
.teardown conftest_fixture_module
teardown conftest_fixture_session
test_conftest_sample.pyと同一フォルダに存在するconftest.pyのfixtureが実行される事が確認できます。
pytest.markの利用方法
pytest.markとは
pytest.mark(マーカー)でデコレートし、pytest -m マーカーの実行条件でテストを実行するとマーカーの実行条件に合致しているテストケースのみ実行できます。
マーカーでデコレートする最も簡単な例は以下のとおりです。
import pytest

@pytest.mark.dummy_mark1
def test_mark_1():
    print("test_mark_1 start")
名前=dummy_mark1でデコレートしていますので
pytest -m "dummy_mark1" tests/test_mark.py
でdummy_mark1でデコレートされたテストが実行可能となります。
pytest.markでデコレートする基本的な例
import pytest

# pytest -s -m "dummy_mark1" tests/test_mark.py
@pytest.mark.dummy_mark1
def test_mark_1():
    print("test_mark_1 start")

# pytest -s -m "dummy_mark2" tests/test_mark.py
@pytest.mark.dummy_mark2
def test_mark_2():
    print("test_mark_2 start")

@pytest.mark.dummy_mark3
def test_mark_3():
    print("test_mark_3 start")

# pytest -s -m "dummy_mark1 and dummy_mark2" tests/test_mark.py
# pytest -s -m "dummy_mark1 or dummy_mark2" tests/test_mark.py
@pytest.mark.dummy_mark1
@pytest.mark.dummy_mark2
def test_mark_1_2():
    print("test_mark_1_and_2 start")
    assert True
単一のマーカーを指定する方法
dummy_mark1を指定した時の実行結果は以下のとおりです。
C:\python\pytest_cheatsheet>pytest -s -m "dummy_mark1" tests/test_mark.py
===================================================== test session starts ======================================================
platform win32 -- Python 3.9.5, pytest-6.2.4, py-1.10.0, pluggy-0.13.1
rootdir: C:\python\pytest_cheatsheet, configfile: pytest.ini
plugins: cov-3.0.0, ipynb-1.1.1, mock-3.6.1
collected 4 items / 2 deselected / 2 selected

tests\test_mark.py test_mark_1 start
.test_mark_1_2 start
.

======================================================= warnings summary =======================================================
tests\test_mark.py:13
  c:\python\pytest_cheatsheet\tests\test_mark.py:13: PytestUnknownMarkWarning: Unknown pytest.mark.dummy_mark3 - is this a typo?  You can register custom marks to avoid this warning - for details, see https://docs.pytest.org/en/stable/mark.html
    @pytest.mark.dummy_mark3

-- Docs: https://docs.pytest.org/en/stable/warnings.html
========================================== 2 passed, 2 deselected, 1 warning in 0.02s ==========================================
test_mark_1とtest_mark_1_2が実行されている事が確認できます。
テストは全部で4ケースで2ケースがdeselectedされている事も確認できます。
PytestUnknownMarkWarning: Unknown pytest.mark.dummy_mark3とのwarningが出力されています。これはプロジェクトルートに存在するpytest.iniにdummy_mark3が記載されていない事に起因します。
pytest.iniの内容は以下のとおりですのでdummy_mark3を追加すればwarningは出力されなくなります。
このwarningによって予期せぬmark名が存在している状態に気付けます。
[pytest]
markers =
    dummy_mark1: mark a test as a dummy_mark1.
    dummy_mark2: mark a test as a dummy_mark2.
複数のマーカーをand条件で指定する方法
dummy_mark1 and dummy_mark2を指定した時の実行結果は以下のとおりです。
C:\python\pytest_cheatsheet>pytest -s -m "dummy_mark1 and dummy_mark2" tests/test_mark.py
===================================================== test session starts ======================================================
platform win32 -- Python 3.9.5, pytest-6.2.4, py-1.10.0, pluggy-0.13.1
rootdir: C:\python\pytest_cheatsheet, configfile: pytest.ini
plugins: cov-3.0.0, ipynb-1.1.1, mock-3.6.1
collected 4 items / 3 deselected / 1 selected

tests\test_mark.py test_mark_1_2 start
.

======================================================= warnings summary =======================================================
tests\test_mark.py:13
  c:\python\pytest_cheatsheet\tests\test_mark.py:13: PytestUnknownMarkWarning: Unknown pytest.mark.dummy_mark3 - is this a typo?  You can register custom marks to avoid this warning - for details, see https://docs.pytest.org/en/stable/mark.html
    @pytest.mark.dummy_mark3

-- Docs: https://docs.pytest.org/en/stable/warnings.html
========================================== 1 passed, 3 deselected, 1 warning in 0.02s ==========================================
test_mark_1は実行されずtest_mark_1_2のみが実行されている事が確認できます。
複数のマーカーをor条件で指定する方法
dummy_mark1 or dummy_mark2を指定した時の実行結果は以下のとおりです。
C:\python\pytest_cheatsheet>pytest -s -m "dummy_mark1 or dummy_mark2" tests/test_mark.py
==================================================== test session starts =====================================================
platform win32 -- Python 3.9.5, pytest-6.2.4, py-1.10.0, pluggy-0.13.1
rootdir: C:\python\pytest_cheatsheet, configfile: pytest.ini
plugins: cov-3.0.0, ipynb-1.1.1, mock-3.6.1
collected 4 items / 1 deselected / 3 selected

tests\test_mark.py test_mark_1 start
.test_mark_2 start
.test_mark_1_2 start
.

====================================================== warnings summary ======================================================
tests\test_mark.py:13
  c:\python\pytest_cheatsheet\tests\test_mark.py:13: PytestUnknownMarkWarning: Unknown pytest.mark.dummy_mark3 - is this a typo?  You can register custom marks to avoid this warning - for details, see https://docs.pytest.org/en/stable/mark.html
    @pytest.mark.dummy_mark3

-- Docs: https://docs.pytest.org/en/stable/warnings.html
========================================= 3 passed, 1 deselected, 1 warning in 0.02s =========================================
test_mark_3のみが実行されていない事が確認できます。
notを条件で利用する方法
-mの条件にはnotを指定可能です。
dummy_mark1 and not dummy_mark2を指定した時の実行結果は以下のとおりです。
C:\python\pytest_cheatsheet>pytest -s -m "dummy_mark1 and not dummy_mark2" tests/test_mark.py
==================================================== test session starts =====================================================
platform win32 -- Python 3.9.5, pytest-6.2.4, py-1.10.0, pluggy-0.13.1
rootdir: C:\python\pytest_cheatsheet, configfile: pytest.ini
plugins: cov-3.0.0, ipynb-1.1.1, mock-3.6.1
collected 4 items / 3 deselected / 1 selected

tests\test_mark.py test_mark_1 start
.

====================================================== warnings summary ======================================================
tests\test_mark.py:13
  c:\python\pytest_cheatsheet\tests\test_mark.py:13: PytestUnknownMarkWarning: Unknown pytest.mark.dummy_mark3 - is this a typo?  You can register custom marks to avoid this warning - for details, see https://docs.pytest.org/en/stable/mark.html
    @pytest.mark.dummy_mark3

-- Docs: https://docs.pytest.org/en/stable/warnings.html
========================================= 1 passed, 3 deselected, 1 warning in 0.02s =========================================
dummy_mark1かつdummy_mark2でないテストケースのtest_mark_1が実行されている事が確認できました。
pytest.iniのaddoptsでデフォルト対象マークを設定する方法
pytest.iniに
addopts = -m "not dummy_mark1"
との記載を追加してtest_mark.pyを指定してテストを実行してみます。
C:\python\pytest_cheatsheet>pytest -s tests/test_mark.py
==================================================== test session starts =====================================================
platform win32 -- Python 3.9.5, pytest-6.2.4, py-1.10.0, pluggy-0.13.1
rootdir: C:\python\pytest_cheatsheet, configfile: pytest.ini
plugins: cov-3.0.0, ipynb-1.1.1, mock-3.6.1
collected 4 items / 2 deselected / 2 selected

tests\test_mark.py test_mark_2 start
.test_mark_3 start
.

====================================================== warnings summary ======================================================
tests\test_mark.py:13
  c:\python\pytest_cheatsheet\tests\test_mark.py:13: PytestUnknownMarkWarning: Unknown pytest.mark.dummy_mark3 - is this a typo?  You can register custom marks to avoid this warning - for details, see https://docs.pytest.org/en/stable/mark.html
    @pytest.mark.dummy_mark3

-- Docs: https://docs.pytest.org/en/stable/warnings.html
========================================= 2 passed, 2 deselected, 1 warning in 0.02s =========================================
not dummy_mark1が有効になっている事が確認できました。
pytest.markでクラスをデコレートする方法
import pytest

# pytest -s -m "dummy_mark1" tests/test_mark_class.py
@pytest.mark.dummy_mark1
class TestMarkClass:
    def test_mark_class_1(self):
        print("test_mark_class_1 start")

    def test_mark_class_2(self):
        print("test_mark_class_2 start")
実行すると結果は以下のようになりました。
C:\python\pytest_cheatsheet>pytest -s -m "dummy_mark1" tests/test_mark_class.py
==================================================== test session starts =====================================================
platform win32 -- Python 3.9.5, pytest-6.2.4, py-1.10.0, pluggy-0.13.1
rootdir: C:\python\pytest_cheatsheet, configfile: pytest.ini
plugins: cov-3.0.0, ipynb-1.1.1, mock-3.6.1
collected 2 items

tests\test_mark_class.py test_mark_class_1 start
.test_mark_class_2 start
.

===================================================== 2 passed in 0.02s ======================================================

C:\python\pytest_cheatsheet>
pytest.markでparametrizeをデコレートする方法
import pytest

# pytest -s -m "dummy_mark1" tests/test_mark_parametrize.py
@pytest.mark.parametrize(
    ('title'), [('no mark'), pytest.param('dummy_mark1', marks=pytest.mark.dummy_mark1),
    pytest.param('dummy_mark2', marks=pytest.mark.dummy_mark2)]
)
def test_increment(title:str):
    print('execute title={}'.format(title))
dummy_mark1を指定して実行すると結果は以下のようになりました。
C:\python\pytest_cheatsheet>pytest -s -m "dummy_mark1" tests/test_mark_parametrize.py
==================================================== test session starts =====================================================
platform win32 -- Python 3.9.5, pytest-6.2.4, py-1.10.0, pluggy-0.13.1
rootdir: C:\python\pytest_cheatsheet, configfile: pytest.ini
plugins: cov-3.0.0, ipynb-1.1.1, mock-3.6.1
collected 3 items / 2 deselected / 1 selected

tests\test_mark_parametrize.py execute title=dummy_mark1
.

============================================== 1 passed, 2 deselected in 0.02s ===============================================
pytest.param('dummy_mark1', marks=pytest.mark.dummy_mark1)だけが実行されている事が確認できます。
カバレッジ
カバレッジの計測
命令網羅 C0
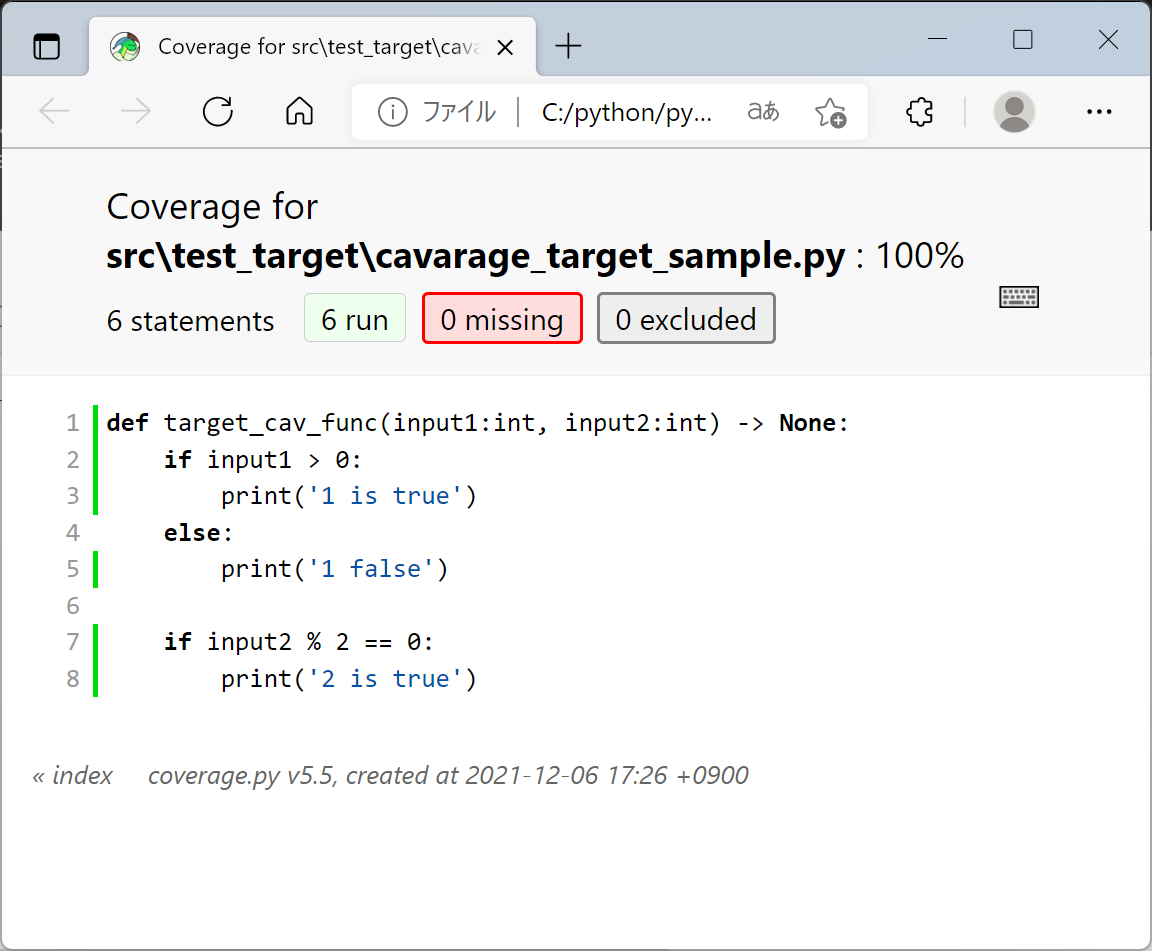
カバレッジの計測対象処理は以下のとおりです。
def target_cav_func(input1:int, input2:int) -> None:
    if input1 > 0:
        print('1 is true')
    else:
        print('1 false')

    if input2 % 2 == 0:
        print('2 is true')
テストケースは以下のとおりです。
from src.test_target import cavarage_target_sample

# pytest -v --cov=.
# pytest -v --cov=. --cov-branch
def test_cavarage_c0_sample():
    cavarage_target_sample.target_cav_func(1, 2)
    cavarage_target_sample.target_cav_func(0, 2)
    # cavarage_target_sample.target_cav_func(2, 1)
コンソールに結果を出力
pytest --cov=. -vで命令網羅(C0)でカバレッジを計測します。
test_cavarage_c0_sampleのカバレッジだけ抜き出した結果は以下のようになりました。
----------- coverage: platform win32, python 3.9.5-final-0 -----------
Name                                        Stmts   Miss  Cover
---------------------------------------------------------------
src\test_target\cavarage_target_sample.py       6      0   100%
htmlファイルに結果を出力
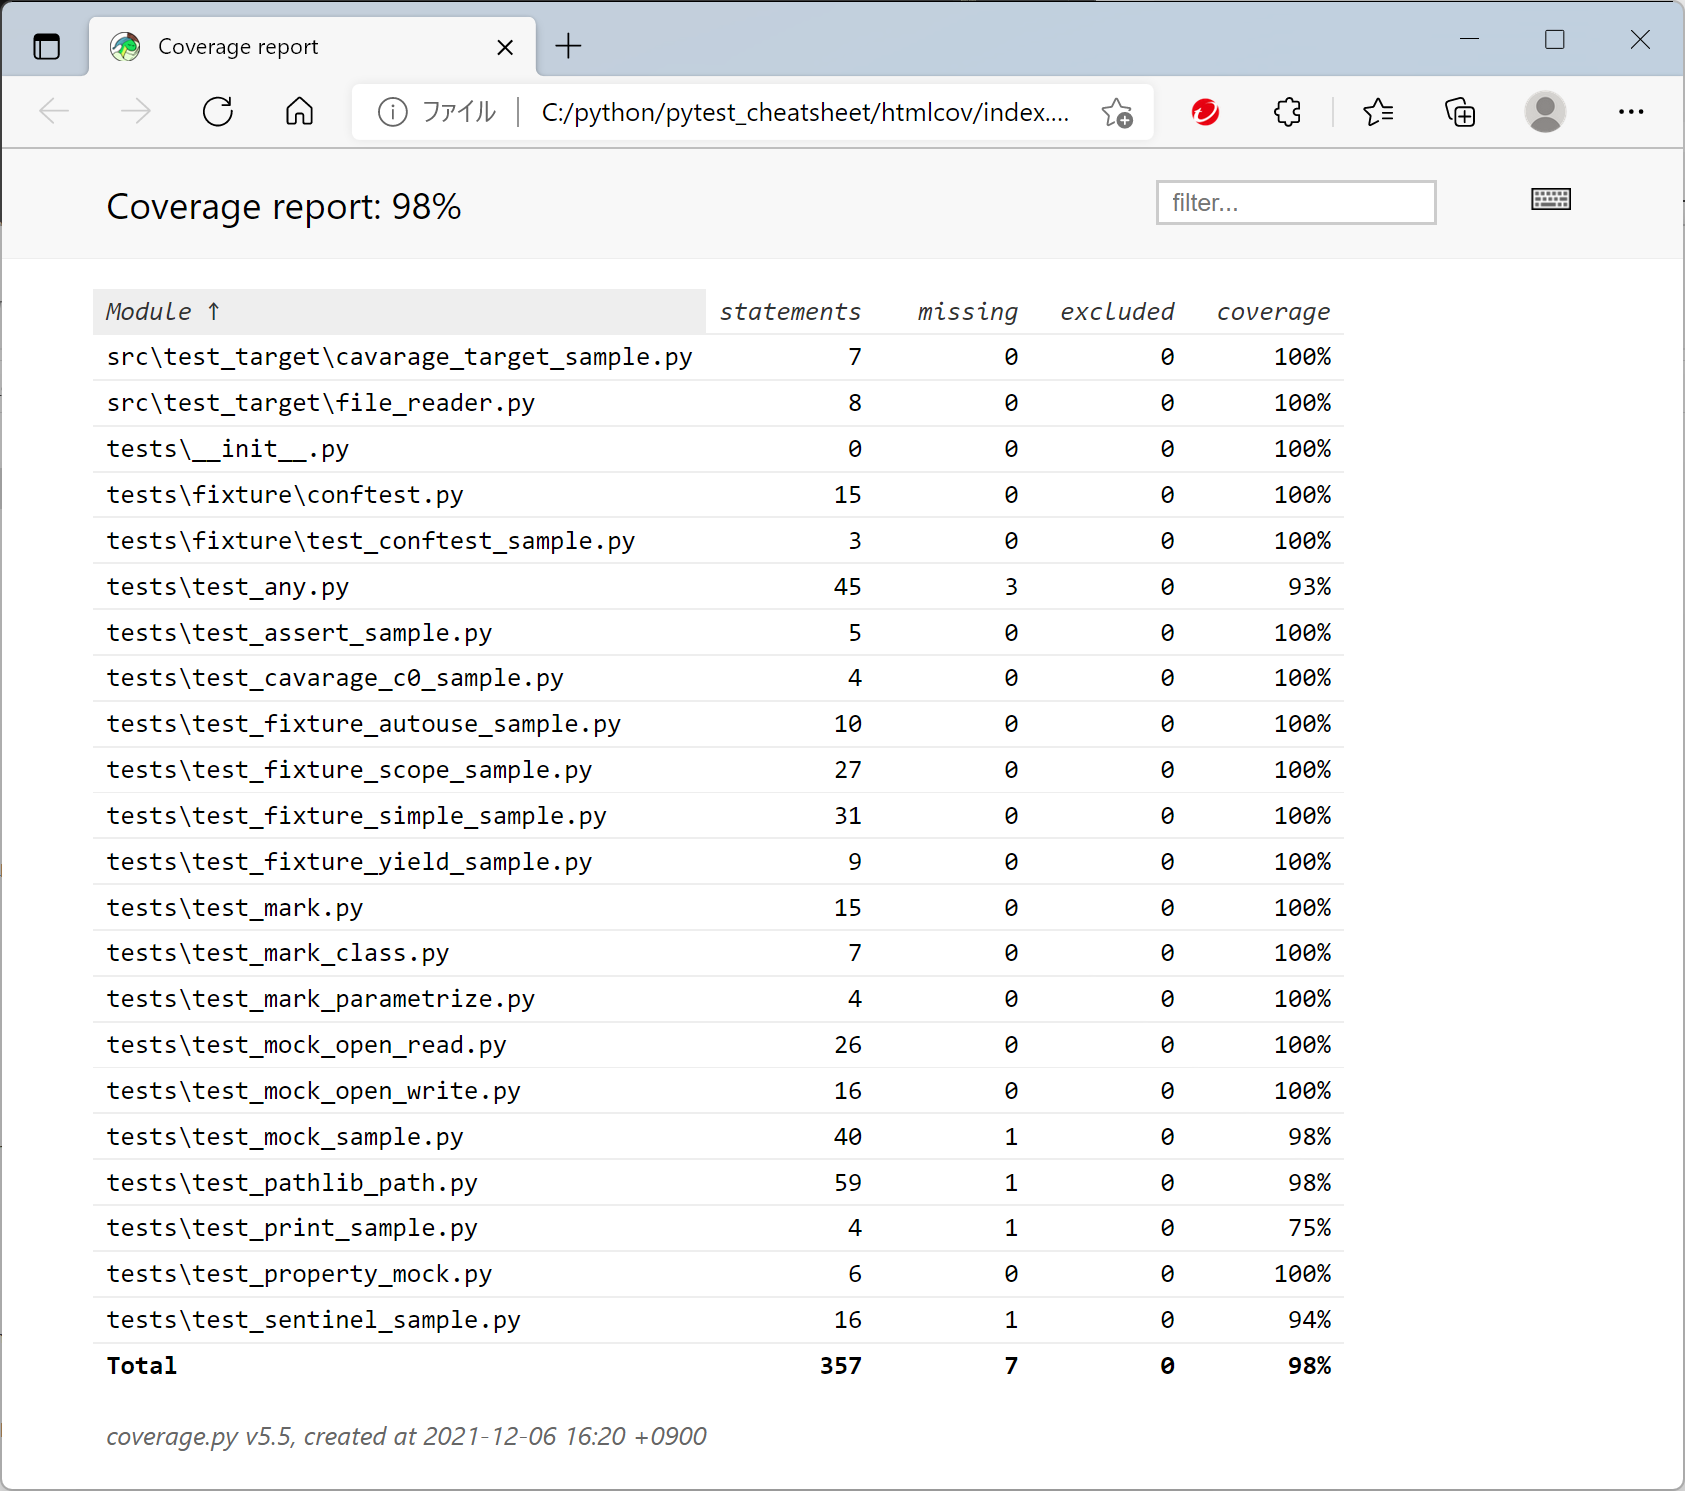
pytest --cov=. --cov-report=htmlで命令網羅(C0)でカバレッジを計測してHTMLファイルを出力します。
htmlcovフォルダが作成され、内部にいろいろファイルが作成されます。
全体のサマリーファイルのindex.htmlは以下のようになりました。
cavarage_target_sample.pyのカバレッジ詳細は以下のようになりました。
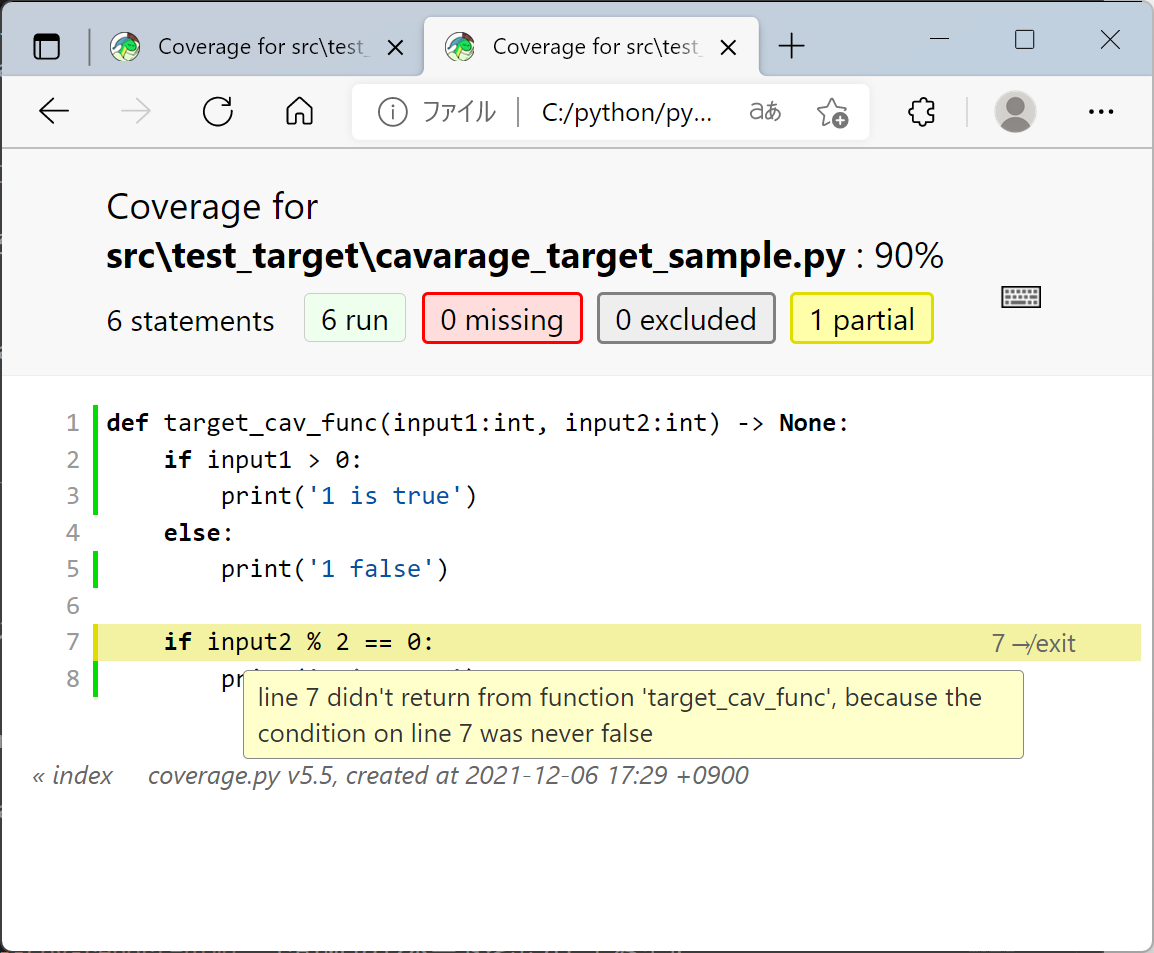
条件分岐の網羅 C1
pytest --cov=. -v --cov-branchのように--cov-branchを追加して条件分岐の網羅でカバレッジを計測します。
test_cavarage_c0_sampleのカバレッジだけ抜き出した結果は以下のようになりました。
----------- coverage: platform win32, python 3.9.5-final-0 -----------
Name                                        Stmts   Miss Branch BrPart  Cover
src\test_target\cavarage_target_sample.py       6      0      4      1    90%
BranchとBrPartが追加されていることが確認できます。
pytest --cov=. -v --cov-branch --cov-report=htmlでHTMLのレポートを出力してみます。
結果はline 7 was never falseで分岐がテストできていないと指摘されています。
test_cavarage_c0_sample.pyの
# cavarage_target_sample.target_cav_func(2, 1)
の#を取り除いて有効にして実行すると以下のようになります。
----------- coverage: platform win32, python 3.9.5-final-0 -----------
Name                                        Stmts   Miss Branch BrPart  Cover
src\test_target\cavarage_target_sample.py       6      0      4      0   100%
BrPartが0になり、カバレッジも100%になることが確認できました。