
NETCON委員の秋山です。
先日、JANOG49で行われたNETCONの「カテゴリSwitching, 問題名Switching-2」について解説したいと思います。
・問題
とある中堅商社の情報システム部。
バカンス明けに出社したら、後輩から相談がありました。
後輩:「バカンス中に営業課から、ワーキングスペースに新たにPCを設置するので、営業課のネットワークに接続してほしいとの依頼がありました」
後輩:「ワーキングスペースのスイッチのポートにVLANを設定したのですが、salesサーバへpingがとおりません。」
私:「なるほど。ワーキングスペースへ営業課の端末が置くのは今回が初めてだね。スイッチの設定を見直してみようか・・・」
ということで、スイッチの設定を変更し、次のようなsalesサーバへpingの結果になるよう変更し、変更した部分とその理由を回答してください。
user01> ping 172.16.10.5

84 bytes from 172.16.10.5 icmp_seq=1 ttl=64 time=31.127 ms
84 bytes from 172.16.10.5 icmp_seq=2 ttl=64 time=39.977 ms
84 bytes from 172.16.10.5 icmp_seq=3 ttl=64 time=42.030 ms
84 bytes from 172.16.10.5 icmp_seq=4 ttl=64 time=34.614 ms
84 bytes from 172.16.10.5 icmp_seq=5 ttl=64 time=49.784 ms
*timeの値は同じでなくてもよい
・解説
それでは早速ネットワーク構成から見ていきます。
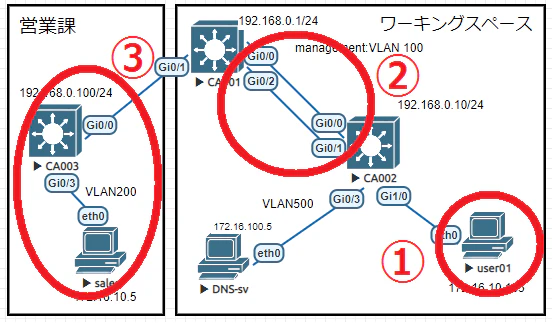
1が今回設置するPCですね。ここからpingを打って疎通確認します。
つぎに2ですが、CA001とCA002の間はLAG(チーミング)になっている可能性があります。設定する時には留意します。
3は既存のネットワークでここにあるマシンに対してpingを打ちます。
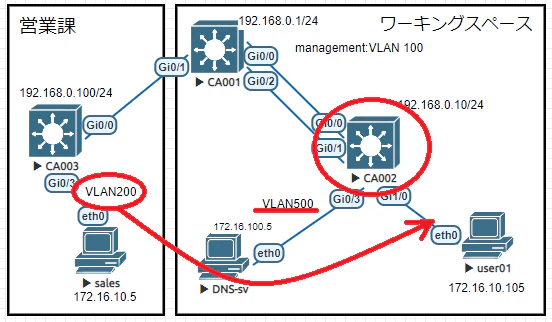
設定するVLANは200のようですね。
それではまず、PCが繋がっているスイッチのポート(CA002のGi1/0)をみていましょう。
CA002 > en <=特権モードへ
CA002 # sh run <=現在動作中の設定をみる

!
interface GigabitEthernet1/0
 switchport access vlan 200
 switchport mode access
 negotiation auto
!
なるほど、ちゃんとVLAN200だし、Accessポートの設定になっています。
次にアップリンクのポート(Gi0/0とGi0/1)を見てみます。
!

interface GigabitEthernet0/0
 switchport trunk allowed vlan 100,500
 switchport trunk encapsulation dot1q
 switchport mode trunk
 negotiation auto
 channel-group 1 mode active
!
interface GigabitEthernet0/1
 switchport trunk allowed vlan 100,500
 switchport trunk encapsulation dot1q
 switchport mode trunk
 negotiation auto
 channel-group 1 mode active
!
おっと、VLAN200の設定がありません。
これでは上位に通信できないので、設定を追加します。
通常ならインターフェイスに設定を入れるのですが、ちょっと待て!
channel-group 1とあります。やはり上位(CA001)との接続にLAGを設定しているようです。
この場合、各インターフェイスに設定をするのではなく、Port-Channelに設定をします。
CA002 # conf t <=設定モードへ
CA002 # int Po1 <=Port-Channelに設定
CA002 # switchport trunk allowed vlan add 200 <=VLAN200を追加
ということで許可VLANを追加しました。
それでは、user01からpingを打ってみましょう。
うまくいきません。
それでは次に上位側スイッチのCA001を見てみましょう。
CA001とCA002はGi0/0とGi0/2でつながっていますので
CA001 > en
CA001 # sh run

interface Port-channel1
 switchport trunk allowed vlan 100,500
 switchport trunk encapsulation dot1q
 switchport mode trunk
!

interface GigabitEthernet0/0
 switchport trunk allowed vlan 100,500
 switchport trunk encapsulation dot1q
 switchport mode trunk
 negotiation auto
 channel-group 1 mode active
!
interface GigabitEthernet0/1
 switchport trunk allowed vlan 100,200
 switchport trunk encapsulation dot1q
 switchport mode trunk
 negotiation auto
!
interface GigabitEthernet0/2
 switchport trunk allowed vlan 100,500
 switchport trunk encapsulation dot1q
 switchport mode trunk
 negotiation auto
 channel-group 1 mode active
!
おっと、Gi0/0とGi0/2にVLAN200が抜けている。
追加します。ちょっと待て!ここも先ほどと同様でPort-Channelに設定する必要があります。
ということで、
CA001 # conf t <=設定モードへ
CA001(config) # int Po1 <=インターフェイスPoert-Channel 1
CA001(config-if) # switchport trunk allowed vlan add 200 <=VLAN200の追加
これでpingが通るようになりました。
なお、設定した後は
CAXXX# copy run start
ってして保存しておかないと再起動できれいさっぱり忘れてくれます。
以上です