概要
MacにESP32向けmruby開発環境を構築します。
前提条件
parallesでmacOSの仮想マシンを新規で作成し、クリーンインストールした状態から試しました。
使用したマシンとOSのバージョンです。
- MacBook Pro (13-inch, 2016, Four Thunderbolt 3 Ports)
- macOS Mojave 10.14.4
- ターゲットデバイス : M5Stack
ターゲットとしてNodeMCU-32Sも試したのですが、うまくいきませんでした。成功したら追記します。
手順
Xcodeをインストール
執筆時点(2019/12/5)で最新のXcode 11.2.1をインストールします。
Homebrewをインストール
下のコマンドでHomebrewをインストールします。
$ /usr/bin/ruby -e "$(curl -fsSL https://raw.githubusercontent.com/Homebrew/install/master/install)"
~/bash_profile に以下を追加してPATHを通します。
export PATH=$PATH:/usr/local/bin
コマンド類のインストール
pipインストール
ESP-IDFのセットアップでpipが必要になるため下のコマンドでインストールします。
$ curl https://bootstrap.pypa.io/get-pip.py -o get-pip.py
$ sudo python get-pip.py
gcc、cmake インストール
$ brew install gcc
$ brew install cmake
ESP-IDF開発環境構築
ESP32でmrubyを使うためにはESP-IDFという開発環境を使います。
今までArduino IDEだけ使用していたので、ESP-IDFという開発環境については全く知識を持ってなくて、どこから始めればいいの?ということになりますが、こちらに公式ドキュメントがありました。
Get Started — ESP-IDF Programming Guide v4.1-dev-1066-g93a8603c5 documentation
ESP-IDFのソースコード 一式Clone
ドキュメントに従ってespディレクトリ内にgithubからCloneします。
$ mkdir ~/esp
$ cd ~/esp
$ git clone --recursive https://github.com/espressif/esp-idf.git
ESP-IDFのセットアップ
install.sh を実行してセットアップします。
$ cd ~/esp/esp-idf
$ ./install.sh
~/.bash_profile に以下の行を追加します。
. $HOME/esp/esp-idf/export.sh
ターミナルを立ち上げ直すか、source ~/.bash_profileを実行して反映させます。
hello worldサンプルプロジェクトのコピー
esp-idfで用意されているhello worldのサンプルをコピーします。
$ cd ~/esp
$ cp -r $IDF_PATH/examples/get-started/hello_world .
Configuration
ビルドに先立ってmenuconfigを起動します。
$ cd ~/esp/hello_world
$ idf.py menuconfig
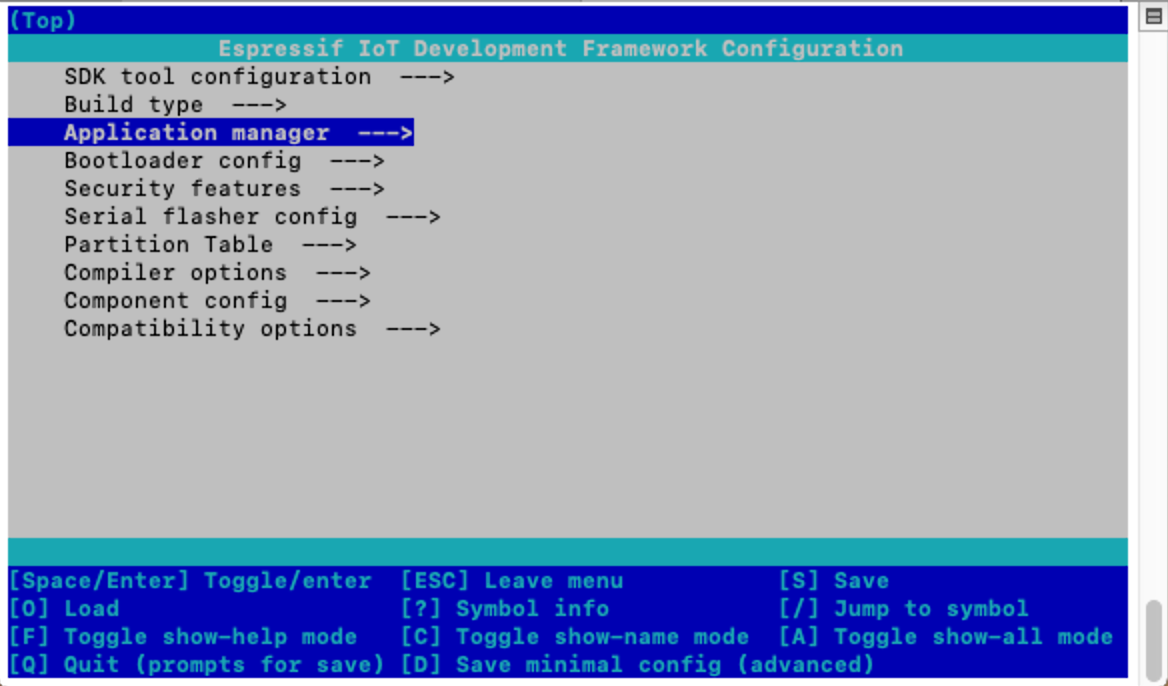
正常に起動すると下の様な画面がでます。
この画面がでればここまでの作業が問題なくできています。
ビルド
下のコマンドでhello world プロジェクトがビルドされます。
$ idf.py build
しかし、Too many open filesエラーがでて失敗しました。
(その後にライブラリーも見つからないなどでてました。)
/Users/kito/.espressif/tools/xtensa-esp32-elf/esp-2019r2-8.2.0/xtensa-esp32-elf/bin/../lib/gcc/xtensa-esp32-elf/8.2.0/../../../../xtensa-esp32-elf/bin/ld: cannot find esp-idf/tcp_transport/libtcp_transport.a: Too many open files
一度に開けるファイルの数を増やす必要がある様です。
/Library/LaunchDaemons/limit.maxfiles.plist を作成して以下の内容を書き込みます。
(viなどのコマンドで作成するにはsudoが必要になります)
<?xml version="1.0" encoding="UTF-8"?>
  <!DOCTYPE plist PUBLIC "-//Apple//DTD PLIST 1.0//EN"
          "http://www.apple.com/DTDs/PropertyList-1.0.dtd">
  <plist version="1.0">
    <dict>
      <key>Label</key>
      <string>limit.maxfiles</string>
      <key>ProgramArguments</key>
      <array>
        <string>launchctl</string>
        <string>limit</string>
        <string>maxfiles</string>
        <string>64000</string>
        <string>524288</string>
      </array>
      <key>RunAtLoad</key>
      <true/>
      <key>ServiceIPC</key>
      <false/>
    </dict>
  </plist>
オーナーを変更してロードさせます。
$ sudo chown root:wheel /Library/LaunchDaemons/limit.maxfiles.plist
$ sudo launchctl load -w /Library/LaunchDaemons/limit.maxfiles.plist
macOSを再起動してからもう一度 build を試してみるとうまくいきました。
$ idf.py build
通信ドライバーインストール
Silicon Labsからシリアル通信用ドライバーをダウンロードします。
下のページのDownload for Macintosh OSX のパッケージをダウンロードします。
執筆時点のバージョンはv5.2.2でした。
USB to UART Bridge VCP Drivers - Silicon Labs
展開してインストーラーでインストールします。
デバイス確認
M5StackをUSBケーブルでつないで ls で確認します。
$ ls /dev/tty.*U*
/dev/tty.SLAB_USBtoUART
/dev/tty.SLAB_USBtoUART がM5Stackとの通信ポートになります。
プログラムのアップロード
プログラムをアップロードするには下のコマンドを実行します。
$ idf.py -p /dev/tty.SLAB_USBtoUART flash
プログラムの動作確認
monitorでプログラムの出力を確認できます。
idf.py -p /dev/tty.SLAB_USBtoUART monitor
Hello world!とチップの情報が出力されているのが確認できます。
Hello world!
This is ESP32 chip with 2 CPU cores, WiFi/BT/BLE, silicon revision 1, 2MB external flash
Restarting in 10 seconds...
これでESP-IDFでプロジェクトビルトから実行まで確認できました。
mruby構築
ソースコードをClone
GitHub の mruby-esp32 のドキュメントに従ってソースコードをCloneします
$ cd ~/
$ git clone --recursive https://github.com/mruby-esp32/mruby-esp32.git
$ cd mruby-esp32
ビルド
ドキュメントにあるようにmakeでビルドします。
MRUBY_EXAMPLE=simplest_mrb.rb はいくつかあるサンプルから使用するmrubyファイルを指定する様です。
$ make MRUBY_EXAMPLE=simplest_mrb.rb
しかし、-Wオプションのチェックでエラーがでました。
error: '%d' directive writing between 1 and 3 bytes into a region of size between 1 and 7 [-Werror=format-overflow=]
 #define IPSTR "%d.%d.%d.%d"
               ^~~~~~~~~~~~~
CFLAGSにチェックを無効にする設定をしてからmakeすると成功しました。
$ export CFLAGS="-Wno-error=format-overflow="
$ make MRUBY_EXAMPLE=simplest_mrb.rb
通信ポートの設定
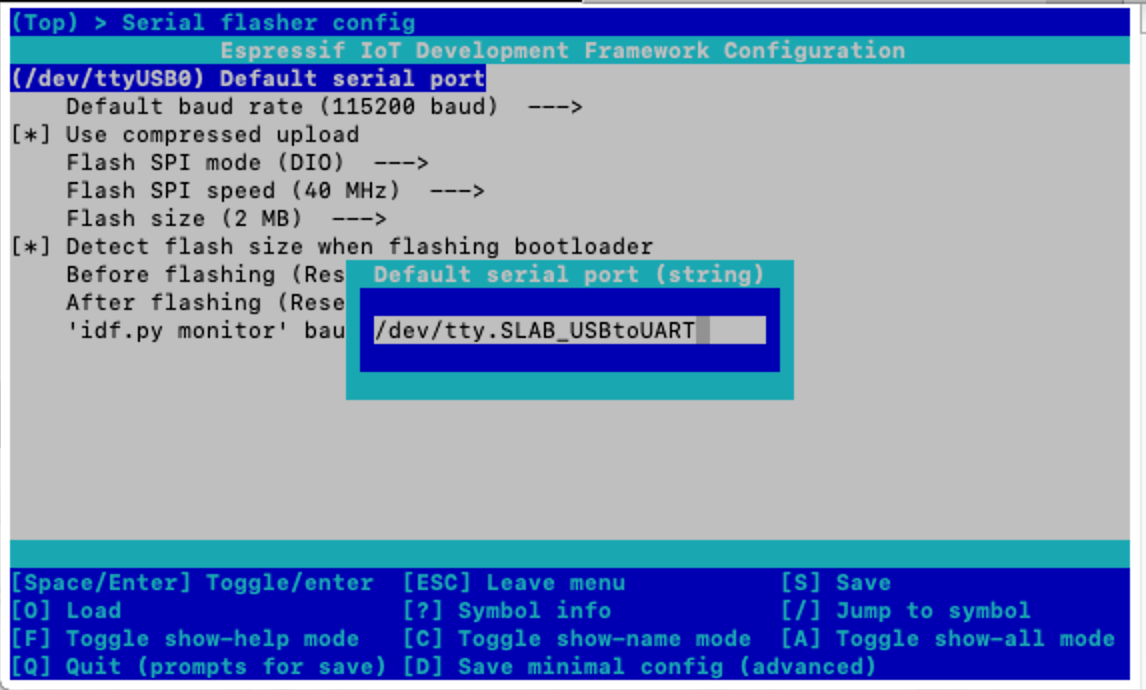
menuconfig で通信に使用するポートを設定します。
$ make menuconfig
menuconfig が起動したら次の様に設定します。
- Serial flasher config ---> を選択
- (/dev/ttyUSB0) Default serail port) を選択
- 使用するポートとして /dev/tty.SLAB_USBtoUART を設定
- ESC を2回押し、ダイアログで Y を押して保存します。
プログラムの書き込みと動作確認
simplest_mrb.rbファイルを確認してみると、下の様に1234と4321の2行出力する様になっています。
puts "1234"
puts "4321"
プログラムの書き込みと動作確認するにはflashとmonitorタスクを実行します。
$ make MRUBY_EXAMPLE=simplest_mrb.rb flash monitor
出力を確認すると正常に動作している様です。
I (542) cpu_start: Starting scheduler on PRO CPU.
I (0) cpu_start: Starting scheduler on APP CPU.
I (370) mruby_task: Loading binary...
1234
4321
I (390) mruby_task: Success
という事で無事mrubyプログラムが実行されました。
やったー!!!
関連
Linux版も書きました。
参照
以下のサイトを参考にさせていただきました。(ほぼまとめサイトの様になっておりますが…)
ありがとうございました。

