はじめに
この記事は JSL (日本システム技研) Advent Calendar 2019 - Qiita 20日目の記事です。
毎年恒例、一人アニバーサリー記念です。![]()
老眼が厳しいお年頃になってきましたが、頑張ります!!
普段、コードを書くことがだいぶ減ってきたので、これを機に当社で採用しているフロントエンドの周りを触っておきたいと思いました。あと、趣味の格ゲー(ストV)のためになにか役に立つものを作ろうと思いました。
PSNフレンドのステータス通知アプリ
普段、PS4で格ゲーを楽しんでいますが、現状対戦相手のフレンドさんがオンライン状態かを知る術がカプコン社の公式サイトへ行って確認する必要があり、ブラウザリロードをして都度確認するのは効率が悪いです・・。
そこで、PSN(Playstation network) APIを使用してオンライン状態のフレンドさんの通知をしてくれるアプリを作ることにしました。
仕様する技術としては、以下を選定しました。
- PWA
- Service woekerを使ってWeb Push
- AWS Amplifyを使ったデプロイ
PSN API
PSN APIのベースは、PHP(https://tusticles.com/psn-php/) のようですが、
その他、ラッパーAPIで各種言語にも対応しているようです。
| 言語 | URL |
|---|---|
| PHP | https://github.com/mgp25/psn-api |
| Python | https://github.com/mgp25/psn-api |
| Java | https://github.com/elminsterjimmy/PSN-API |
| JavaScript | https://www.npmjs.com/package/pxs-psn-api |
今回、このAPIのハック記事を書こうと思ったのですが、仕様が変更されたようで、諸々の調査だけで時間を浪費しそうなためまずは、フロントエンド側の実装を進めることにしました。
今回のゴール
- VueでPWAを作成する
- 今回は基礎を学びたいためNuxt.js等のフレームワークは使用しない
-
コンパニオンサイトからのWeb Pushを受ける
- 公開鍵はローカルストレージに保持する
- サーバーサイドからの公開鍵の取得は次回以降
今回、こちらの記事を参考にさせて頂きました。ありがとうございます!。
実行イメージ
イメージとしては、以下のようなものを想定しています。
-
コンパニオンサイトより取得した公開鍵を書き込み

-
公開鍵を元にエンドポイントを作成
-
エンドポイントをコンパニオンサイトに設定して送信

-
Web Pushを受信

各種バージョン
- Vue:2.6.11
- VueCLI:3.9.2
{
  "name": "vue-pwa-psnlist",
  "version": "0.1.0",
  "private": true,
  "scripts": {
    "serve": "vue-cli-service serve",
    "build": "vue-cli-service build",
    "lint": "vue-cli-service lint"
  },
  "dependencies": {
    "@aws-amplify/analytics": "^2.2.0",
    "@aws-amplify/core": "^2.2.0",
    "aws-amplify": "^2.2.0",
    "aws-amplify-vue": "^1.1.1",
    "core-js": "^3.4.3",
    "register-service-worker": "^1.6.2",
    "vue": "^2.6.10"
  },
  "devDependencies": {
    "@vue/cli-plugin-babel": "^4.1.0",
    "@vue/cli-plugin-eslint": "^4.1.0",
    "@vue/cli-plugin-pwa": "^4.1.0",
    "@vue/cli-service": "^4.1.0",
    "babel-eslint": "^10.0.3",
    "eslint": "^5.16.0",
    "eslint-plugin-vue": "^5.0.0",
    "vue-template-compiler": "^2.6.10"
  }
}
.gitignoreは以下となります。
.DS_Store
node_modules
/dist

# local env files
.env.local
.env.*.local

# Log files
npm-debug.log*
yarn-debug.log*
yarn-error.log*

# Editor directories and files
.idea
.vscode
*.suo
*.ntvs*
*.njsproj
*.sln
*.sw?

# amplify
amplify/\#current-cloud-backend
amplify/.config/*
amplify/.config/local-*
amplify/backend/amplify-meta.json
amplify/backend/*
aws-exports.js
awsconfiguration.json
環境作成
vueプロジェククトの作成
vue-cliでPWAプロジェクトを作成します。
$ vue create vue-psn-notification
Vue CLI v3.9.2
┌───────────────────────────┐
│  Update available: 4.1.1  │
└───────────────────────────┘
? Please pick a preset: Manually select features
? Check the features needed for your project: Babel, PWA, Linter
? Pick a linter / formatter config: Basic
? Pick additional lint features: (Press <space> to select, <a> to toggle all, <i> to invert selection)Lint on save
? Where do you prefer placing config for Babel, PostCSS, ESLint, etc.? In dedicated config files
? Save this as a preset for future projects? Yes
? Save preset as:
AWS Amplifyの設定
次にAWS Amplifyの設定をします。
デプロイに必要なIAMロール等の作成をします。
$ cd vue-psn-notification
$ amplify configure # AWSマネージメントコンソールが開くのでログイン
Follow these steps to set up access to your AWS account:

Sign in to your AWS administrator account:
https://console.aws.amazon.com/
Press Enter to continue

Specify the AWS Region
? region:  ap-northeast-1
Specify the username of the new IAM user:
? user name:  amplify-pIcdh
Complete the user creation using the AWS console
https://console.aws.amazon.com/iam/home?region=undefined#/users$new?step=final&accessKey&userNames=amplify-pIcdh&permissionType=policies&policies=arn:aws:iam::aws:policy%2FAdministratorAccess
Press Enter to continue

Enter the access key of the newly created user:
? accessKeyId:  AKIARLJG6J**********
? secretAccessKey:  Yn1aVbkin4+6ArVbpTTD********************
This would update/create the AWS Profile in your local machine
? Profile Name:  amplify-pIcdh

Successfully set up the new user.
続いてAmplify関連のライブラリをインストールします。
$ npm install @aws-amplify/core
$ npm install aws-amplify aws-amplify-vue
$ amplify init
Note: It is recommended to run this command from the root of your app directory
? Choose your default editor: Visual Studio Code
? Choose the type of app that you're building javascript
Please tell us about your project
? What javascript framework are you using vue
? Source Directory Path:  src
? Distribution Directory Path: dist
? Build Command:  npm run-script build
? Start Command: npm run-script serve
Using default provider awscloudformation

For more information on AWS Profiles, see:
https://docs.aws.amazon.com/cli/latest/userguide/cli-multiple-profiles.html

? Do you want to use an AWS profile? Yes
? Please choose the profile you want to use amplify-pIcdh
⠹ Initializing project in the cloud...
manifest.jsonを以下のようにしました。
{
  "name": "みんなのPSNリスト",
  "short_name": "psn-list",
  "icons": [
    {
      "src": "./img/icons/android-chrome-192x192.png",
      "sizes": "192x192",
      "type": "image/png"
    },
    {
      "src": "./img/icons/android-chrome-512x512.png",
      "sizes": "512x512",
      "type": "image/png"
    }
  ],
  "start_url": "./index.html",
  "display": "standalone",
  "background_color": "#000000",
  "theme_color": "#4DBA87"
}
ローカル環境で実行してみます。
$ amplify push
$ amplify run
| Category | Resource name | Operation | Provider plugin |
| -------- | ------------- | --------- | --------------- |
? Are you sure you want to continue? true
⠋ Updating resources in the cloud. This may take a few minutes...

✔ All resources are updated in the cloud

> vue-psn-notification@0.1.0 serve /Users/xxxx/Documents/vue-psn-notification
> vue-cli-service serve

 INFO  Starting development server...
98% after emitting CopyPlugin

 DONE  Compiled successfully in 3819ms                                                                                                4:44:00 PM


  App running at:
  - Local:   http://localhost:8080/
  - Network: http://192.168.0.103:8080/

  Note that the development build is not optimized.
  To create a production build, run yarn build.
デプロイ
Amplifyを使ってデプロイをします。
デプロイする際にDev(S3)かProd(S3+Cloud Front)かを聞かれますが、今回は個人利用なのでDevにします。
$ amplify hosting add # Devを選択する
? Select the environment setup: DEV (S3 only with HTTP)
? hosting bucket name vuepsnnotification-20191219174004--hostingbucket
? index doc for the website index.html
? error doc for the website index.html

You can now publish your app using the following command:
Command: amplify publish

$ amplify publish
デプロイが完了すると以下のようなS3のURLが返却されます。
http://xxxxxx-20191217111049--hostingbucket.s3-website-ap-northeast-1.amazonaws.com
Service Workerの仕様上、SSL通信でないと起動してくれないため以下のようにURLを変更します。
http://xxxxxx-20191217111049--hostingbucket.s3-website-ap-northeast-1.amazonaws.com
↓
https://xxxxxx-20191217111049--hostingbucket.s3-ap-northeast-1.amazonaws.com
以上で、PWAの環境とデプロイが完了しました。
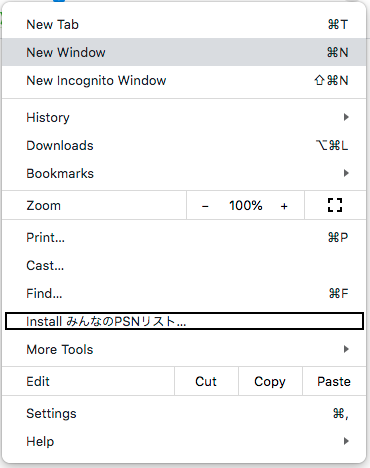
Chomeの設定にアプリのインストールが表示されればPWA化されています。
Web Pushの実装
ここからWeb Pushの実装をしていきます。
Amplify設定の読み込み
import Vue from 'vue'
import App from './App.vue'
import './registerServiceWorker'
import awsconfig from './aws-exports';
import Amplify, * as AmplifyModules from 'aws-amplify';
import { AmplifyPlugin } from 'aws-amplify-vue';

Amplify.configure(awsconfig);
Vue.use(AmplifyPlugin, AmplifyModules);
Vue.config.productionTip = false

new Vue({
  render: h => h(App),
}).$mount('#app')
Servive Workerの実装
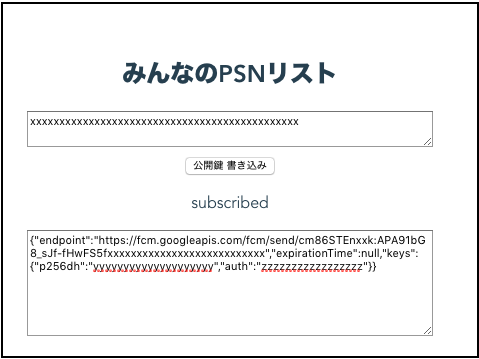
<template>
  <div id="app">
    <div id="nav">
      <h2>みんなのPSNリスト</h2>
      <textarea id="publishkey" v-model="publishkey" placeholder="input publish key"></textarea><br />
      <button v-on:click="writeKey">公開鍵 書き込み</button>

      <div v-if="endpointInfo !== ''">
        <p>{{ state }}</p>
        <textarea id="endpointInfo" v-model="endpointInfo"></textarea><br />
      </div>
    </div>

  </div>
</template>

<script>
import { ServiceWorker } from 'aws-amplify';
const serviceWorker = new ServiceWorker();

export default {
  name: 'app',
  data(){
    return {
      registeredServiceWorker: null,
      publishkey: localStorage.getItem('publicKey'),
      state: '',
      endpointInfo: '',
    }
  },
  methods :{
    isPushSupported() {
      return ('serviceWorker' in navigator && 'PushManager' in window)
    },
    writeKey() {
      localStorage.setItem('publicKey', this.publishkey);
    },
    async updateUI() {
      if (!this.isPushSupported()) {
        this.state = 'Push Notification is not suppoted';
        this.endpointInfo = '';
        return;
      }

      if (Notification.permission == 'denied') {
        this.state = 'blocked';
        this.endpointInfo = '';
      } else {
        var subscription = await this.registeredServiceWorker.pushManager.getSubscription();
        if (subscription) {
          this.state = 'subscribed';
          this.endpointInfo = JSON.stringify(subscription);
        } else {
          this.state = 'Unsubscribed';
          this.endpointInfo = '';
        }
      }
    },
  },
  async mounted(){

    this.registeredServiceWorker = await serviceWorker.register('/service-worker.js', '/');

    if ('permissions' in navigator) {
      let notificationPermission = await navigator.permissions.query({name:'notifications'});
      notificationPermission.onchange = () => {
        this.updateUI();
      };
    }

    if (Notification.permission !== 'denied') {
      await serviceWorker.enablePush(this.publishkey);
    }
    this.updateUI();
  },
}
</script>

<style>
# app {
  font-family: 'Avenir', Helvetica, Arial, sans-serif;
  -webkit-font-smoothing: antialiased;
  -moz-osx-font-smoothing: grayscale;
  text-align: center;
  color: #2c3e50;
  margin-top: 60px;
}

# publishkey {
  width: 400px;
  height: 30px;
}

# endpointInfo {
  width: 400px;
  height: 100px;
}
</style>
  addEventListener('push', (event) => {
    console.log('[Service Worker] Push Received.');
    console.log(`[Service Worker] Push had this data: "${event.data.text()}"`);

    if (!(self.Notification && self.Notification.permission === 'granted'))
      return;

    let data = event.data ? event.data.json() : {};

    let title = data.title || "Web Push Notification";
    let message = data.message || "New Push Notification Received";
    let icon = "img/icons/notification-icon.jpg";
    let badge = "img/icons/badge-icon.jpg";
    let options = {
      body: message,
      icon: icon,
      badge: badge
    };
    event.waitUntil(self.registration.showNotification(title, options));
  });

  addEventListener('notificationclick', (event) => {
    console.log('[Service Worker] Notification click: ', event);
    event.notification.close();
    event.waitUntil(
      clients.openWindow('https://game.capcom.com/cfn/sfv/mylist') // カプコン社のサイトを開く
    );
  });
vue.config.jsの作成
Web Push用にservice-worker.jsを作成しましたが、PWA化のために入れたプラグインcli-plugin-pwaがservice-worker.jsを自動生成するためプラグイン内部で使用されているWorkboxの設定を変更する必要があります。
vue.config.jsをプロジェクトルートに作成します。
module.exports = {
  pwa: {
    // configure the workbox plugin
    workboxPluginMode: 'InjectManifest',
    workboxOptions: {
      swSrc: 'src/service-worker.js',
      swDest: 'service-worker.js'
    }
  }
}
また、自動生成されたservice-worker.jsの一部を自前で作成したservice-worker.jsに
記述して、以下のようにします。こちらの記事を参考にさせて頂きました。ありがとうございます!。
addEventListener('push', (event) => {
  console.log('[Service Worker] Push Received.');
  console.log(`[Service Worker] Push had this data: "${event.data.text()}"`);

  if (!(self.Notification && self.Notification.permission === 'granted'))
    return;

  let data = event.data ? event.data.json() : {};

  let title = data.title || "Web Push Notification";
  let message = data.message || "New Push Notification Received";
  let icon = "img/icons/notification-icon.jpg";
  let badge = "img/icons/notification-icon.jpg";
  let options = {
    body: message,
    icon: icon,
    badge: badge
  };
  event.waitUntil(self.registration.showNotification(title, options));
});

addEventListener('notificationclick', (event) => {
  console.log('[Service Worker] Notification click: ', event);
  event.notification.close();
  event.waitUntil(
    clients.openWindow('https://game.capcom.com/cfn/sfv/mylist')
  );
});

// Auto created by cli-plugin-pwa
//ーーーーーーーー
/**
 * Welcome to your Workbox-powered service worker!
 *
 * You'll need to register this file in your web app and you should
 * disable HTTP caching for this file too.
 * See https://goo.gl/nhQhGp
 *
 * The rest of the code is auto-generated. Please don't update this file
 * directly; instead, make changes to your Workbox build configuration
 * and re-run your build process.
 * See https://goo.gl/2aRDsh
 */

workbox.core.setCacheNameDetails({prefix: "vue-pwa-psnlist"});

self.addEventListener('message', (event) => {
  if (event.data && event.data.type === 'SKIP_WAITING') {
    self.skipWaiting();
  }
});

/**
 * The workboxSW.precacheAndRoute() method efficiently caches and responds to
 * requests for URLs in the manifest.
 * See https://goo.gl/S9QRab
 */
self.__precacheManifest = [].concat(self.__precacheManifest || []);
workbox.precaching.precacheAndRoute(self.__precacheManifest, {});
デプロイ
$ amplify publish
動作確認
以下の手順で確認しました。
-
コンパニオンサイトで「REFRESH KEYS」で公開鍵を払い出して、本アプリへ登録する。
-
本アプリをリロードすると、エンドポイントが払い出されるためコンパニオンサイトの「Subscription to Send To」に貼り付ける。「Text to Send」に以下の形式でメッセージを作成します。
{"title": "Here come a new Challenger! ", "message": "katekichiさんがオンしたよ!"}
- 「SEND PUSH Message」をクリック
課題
理解度が不足していて、aws-amplifyのServiceWorker()とregister-service-workerのregister()と同居させてしまっているけど、おそらく等価な実装があると思うので、リファクタリングしたいです。
最後に - 今後の予定
今回、当社でデファクトスタンダードになりつつある、Vueに触れてみましたが、環境構築含めてハマることが多く普段からの素振りの重要性を再認識した次第です。これを機に本アプリをゴールまで持っていきたいところです。
今後の予定として以下を目指します。
- 公開鍵をサーバーサイドより取得
- PSN APIによりフレンド情報の取得