はじめに / Introduction
先の記事でPower VSのリソースサイズ変更を行うことで、なるべく費用が増加しない形でサーバーの運用を行える可能性を紹介しました。
一方、残念ながら現在のIBM Cloudのポータルから対象とするPower VSのリソース変更をスケジューリングする機能はありません。これを実現するためには、利用者でPower VSのリソースサイズを変更するAPIを実行するスクリプトを作成し、それを何かしらのジョブスケジューラーで定期実行する必要があります。
それをPower VSを利用する各々の利用者で全てゼロから作成するのは時間が勿体ないので、今回紹介するツールをそのまま、あるいは参考にして頂ければ、時間短縮、費用短縮できると思います。
In the previous article, I introduced the possibility of operating the server in a way that minimizes cost increases by changing the resource size of Power VS.
On the other hand, unfortunately, there is no function to schedule changes to targeted Power VS resources from the current IBM Cloud portal. To achieve this, the user must create a script that executes the API that changes the Power VS resource size, and then periodically execute it using some kind of job scheduler.
It would be a waste of time for each Power VS user to create everything from scratch, so I think you can save time and money by using this tools introduced here or using them as a reference.
10/3に更新し、コンテナイメージの最新は1.0.0から1.1.0へ更新しています。リソースサイズ変更のAPIを呼び出す前にインスタンスが稼働するマシンのリソースキャパシティに余裕があるかチェックします。
It was updated on 10/3, and the latest container image has been updated from 1.0.0 to 1.1.0. Before calling the resource size change API, check whether there is enough resource capacity on the machine where the instance is running.
ツールの機能 / Tool features
このツールは、指定されたパラメータ(環境変数)に従って、対象のPower VSのリソースサイズ変更のAPIを呼び出します。
-
PVS_APIKEY: IBM Cloudで対象のPower Virtual Serverのリソース変更を要求可能なAPIキー -
PVS_CRN: 対象のPower Virtual Serverが所属するWorkspaceのCRN -
PVS_REGION: 対象のPower Virtual Serverが存在するリージョン (ex. tok , osa ) -
PVS_INSTNCEID: 対象のPower Virtual ServerのインスタンスID -
PVS_CORE_SIZE: リソース変更後のコアサイズ(数値指定) -
PVS_MEMORY_SIZE: リソース変更後のメモリサイズ(GB単位で数値指定) -
TOOL_PREFIX: (Option) 指定された場合、標準出力のログに指定された文字列を出力する
このツールは指定されたパラメータに沿ってPower Virtual Serverのインスタンスリソースの変更要求を行いますが、その変更を担保するものではありません。 以下のような原因で変更が失敗するケースがあることを念頭にご利用ください。
- インスタンスが変更要求を受け付けられる状態ではない
- インスタンスが存在する実機に要求されたリソースを割り振る余裕リソースが無い
- ツール実行環境が必要なネットワーク環境に接続されていない
Executes a resource size change request for the target instance according to the contents of the environment variables specified below.
-
PVS_APIKEY: API key that allows you to request resource changes for the target Power Virtual Server in IBM Cloud -
PVS_CRN: CRN of the Workspace to which the target Power Virtual Server belongs -
PVS_REGION: Region where the target Power Virtual Server resides (ex. tok , osa ) -
PVS_INSTNCEID: Instance ID of the target Power Virtual Server -
PVS_CORE_SIZE: Core size after resource change (specify numerical value) -
PVS_MEMORY_SIZE: Memory size after resource change (specified numerically in GB) -
TOOL_PREFIX: (Option) If specified, prints the specified string to the log on standard output.
This tool requests changes to Power Virtual Server instance resources according to the specified parameters, but does not guarantee the changes. Please keep in mind that changes may fail due to the following reasons.
- Instance is not ready to accept change requests
- There are no resources available to allocate the requested resources to the actual machine where the instance exists.
- The tool execution environment is not connected to the required network environment
実行イメージ / Execution overview
このツール(ソースコード)はNode.jsのバージョン18以降の環境で動作します。
This tool (source code) works in Node.js version 18 or later.
C:\node-apps\pvs-change-instance-resource\> npm start
[2023-09-13T10:01:56.475] [INFO] default - [PVS-RSR-CHG-I000] Parameter check finished
[2023-09-13T10:01:56.481] [INFO] default - [PVS-RSR-CHG-I000] Required Information : Target Instance [xxxxx] Target Core Size [0.25] Target Memory Size [2]
[2023-09-13T10:01:58.419] [INFO] default - [PVS-RSR-CHG-I000] IAM response check finished
[2023-09-13T10:01:59.780] [INFO] default - [PVS-RSR-CHG-I000] PVS Reference Authorization check finished
[2023-09-13T10:02:03.298] [INFO] default - [PVS-RSR-CHG-I000] PVS Instance Exist check finished
[2023-09-13T10:02:06.299] [INFO] default - [PVS-RSR-CHG-I000] Consistency check of Parameter and PVS Instance finished
[2023-09-13T10:02:06.300] [INFO] default - [PVS-RSR-CHG-I000] PVS Instance Status check finished
[2023-09-13T10:02:08.325] [INFO] default - [PVS-RSR-CHG-I000] PVS Instance Resource Change is called
[2023-09-13T10:02:08.326] [INFO] default - [PVS-RSR-CHG-I000] Waiting for 120 seconds to Resource Change
[2023-09-13T10:04:14.679] [INFO] default - [PVS-RSR-CHG-I000] PVS Instance Resource Change is finished. Current resource is Core size [0.25] Memory size [2]
もしTOOL_PREFIXの環境変数に SYSTEM-A を設定した場合、標準出力される[PVS-RSR-CHG-xxxx]の部分が [SYSTEM-A-PVS-RSR-CHG-xxxx]というように変更されます。
ツールの実行対象としているシステムの識別情報を入れるといったことに活用頂ければと思います。
If SYSTEM-A is set in the TOOL_PREFIX environment variable, the [PVS-RSR-CHG-xxxx] part of the standard output will be changed to [SYSTEM-A-PVS-RSR-CHG-xxxx].
I hope you can use it to enter identification information of the system on which the tool is being executed.
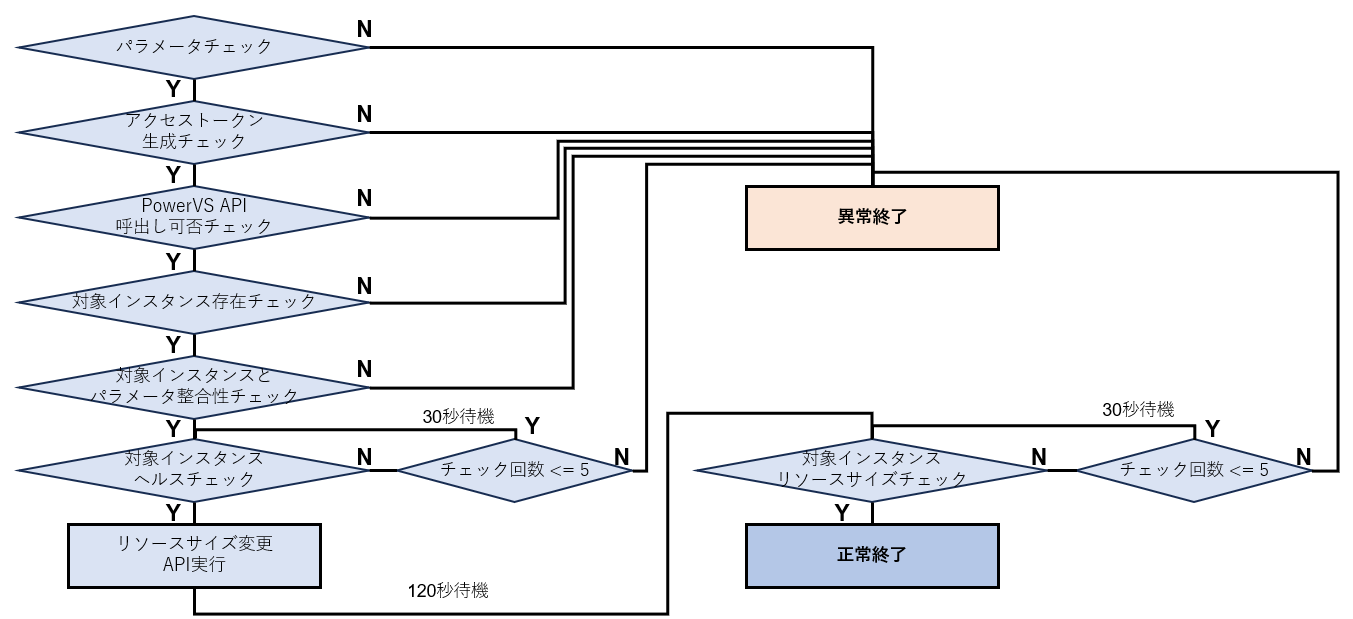
処理概要 / Outline of processing
基本的には指定されたパラメータの整合性を順番に確認して、問題があれば異常終了、指定内容に問題が無ければPower VSのリソースサイズ変更のAPIを呼び出すようにしています。
リソースサイズ変更のAPIを呼び出した後に最低120秒間の待機時間を設けているので、途中ワーニングが発生しなかったとしても3分間程度はツール1回の動作に必要な時間になります。
Basically, this tool check the consistency of the specified parameters in order, and if there is a problem, it terminates abnormally, and if there is no problem with the specified contents, this tool call the Power VS resource size change API.
There is a minimum wait time of 120 seconds after calling the resource size change API, so even if no warnings occur during the process, the time required for one tool operation is about 3 minutes.
ソースコード /Source code
Githubに公開しているので、こちらを参照してください。
実行中に表示される各メッセージIDについても、その内容を解説しています。
It has been published on Github, so please refer to it here.
The contents of each message ID displayed during execution are also explained.
コンテナ / Container
Docker hubに公開しています。Pullリクエストの上限に達した場合の動作保証は出来ないので、利用頂く方のContainer Repogitoryに保存しなおして使ってもらったほうが良いです。
It is published on Docker hub. We cannot guarantee the operation if the pull request limit is reached, so it is better to save it to the user's Container Repository and use it again.
使い方 / How to use
IBM CloudのCode Engineを利用したスケジュール実行をおすすめします。サーバー数が多いと厳しいかもしれませんが、1日に朝と晩にPower VSのリソースサイズを変更する程度であれば、無償枠に収まるのではないかと思います。
I recommend scheduled execution using IBM Cloud's Code Engine. It may be difficult if you have a large number of servers, but if you only change the Power VS resource size in the morning and evening each day, I think it will fall within the free tier.
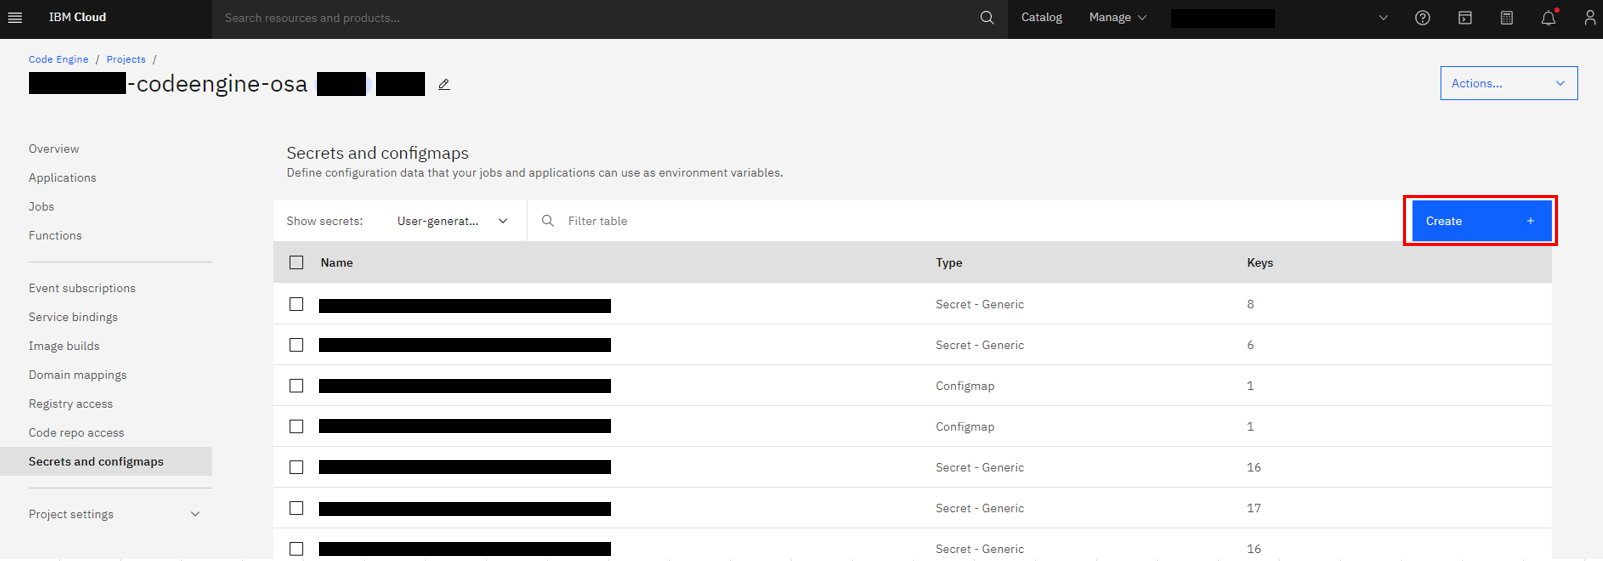
1.Code EngineでSecretsを作成しましょう/ Create Secrets in Code Engine
Code Engineのプロジェクトがある前提ですが、無ければプロジェクトを作成して、Secrets and Configmapsを選択します
It is assumed that you have a Code Engine project, but if you do not have one, create one and select Secrets and Configmaps

既に私はCode Engineをいくつかの目的で利用しているので設定が多くありますが、気にせず Create を選択します
I already use Code Engine for several purposes, so there are a lot of settings, but You don't care and select Create.
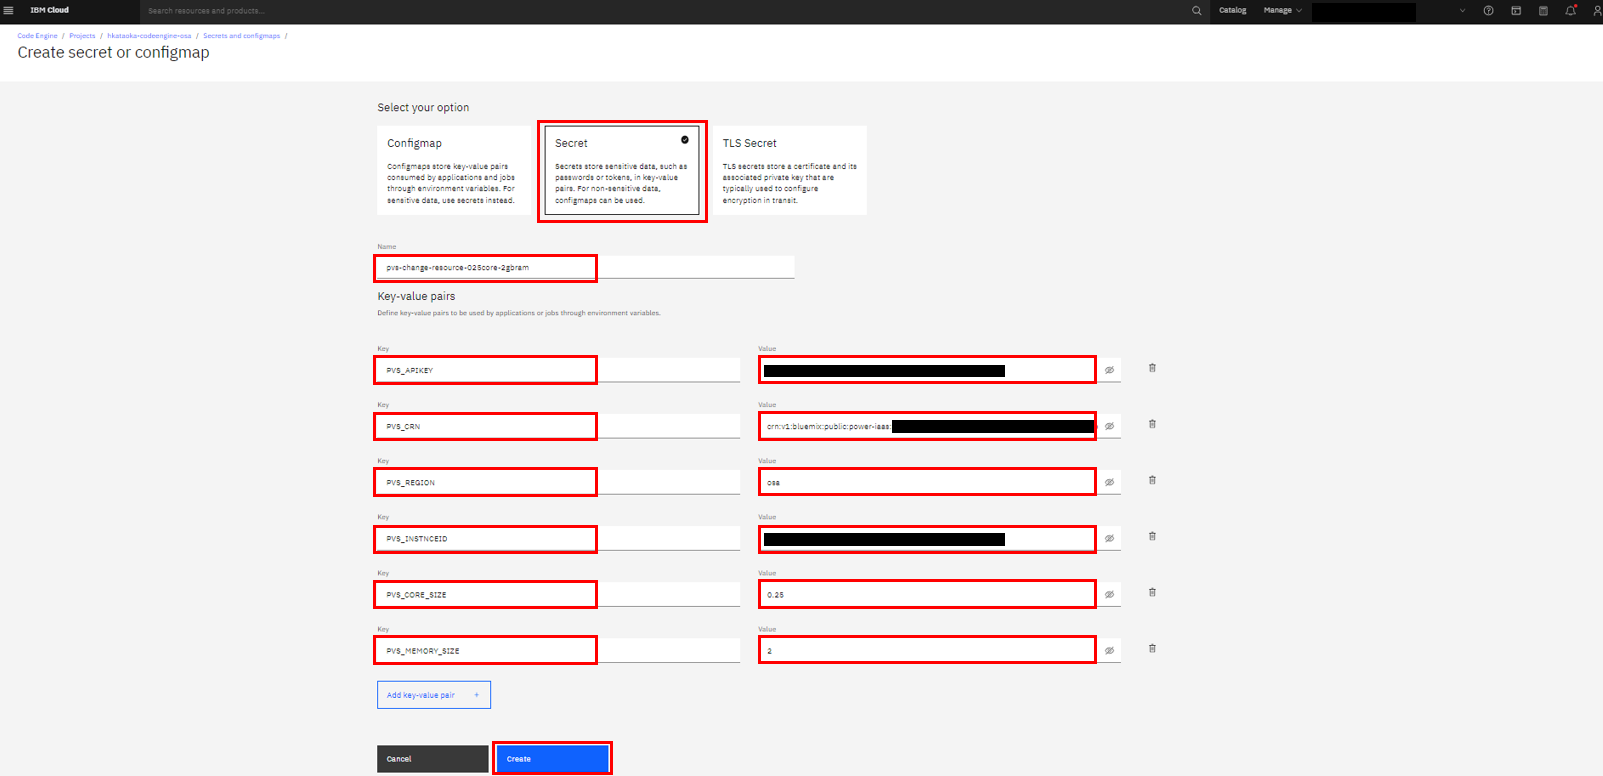
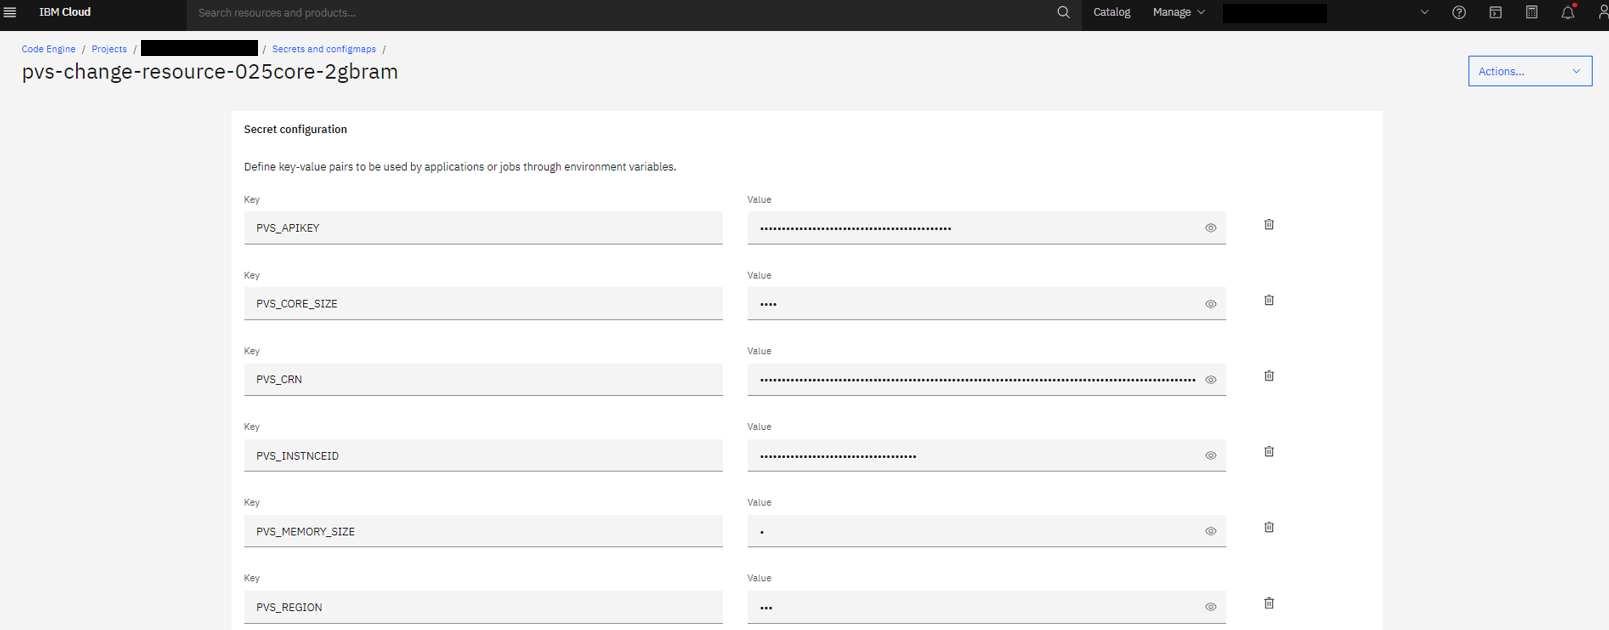
Secretを選択してSecret名を入力した後、先ほど紹介した全てのパラメータを指定してください。最後に Createを選択します
※Secret名は小文字でしか指定できない点に注意してください
After selecting Secret and entering the Secret name, specify all the parameters introduced earlier. Finally select Create
※Please note that secret names can only be specified in lowercase letters.
これで無事にSecretsが作成できました
Now you have successfully created Secrets.
今回はポータル操作でSecretsを作成しましたが、Githubで公開しているコードに従って .envに必要なパラメータを宣言している場合は、IBM Cloud CLIを利用してこのSecretsを簡単に作成することが可能です。
詳細は割愛しますが、ドキュメントを確認してそちらで実行するのも1つの方法になります。
This time I created Secrets using portal operations, but if you declare the necessary parameters in .env according to the code published on Github, you can easily create Secrets using IBM Cloud CLI. Is possible.
I won't go into details, but one way is to check the documentation and run it there.
2.Code EngineでJobを作成する / Create Job in Code Engine
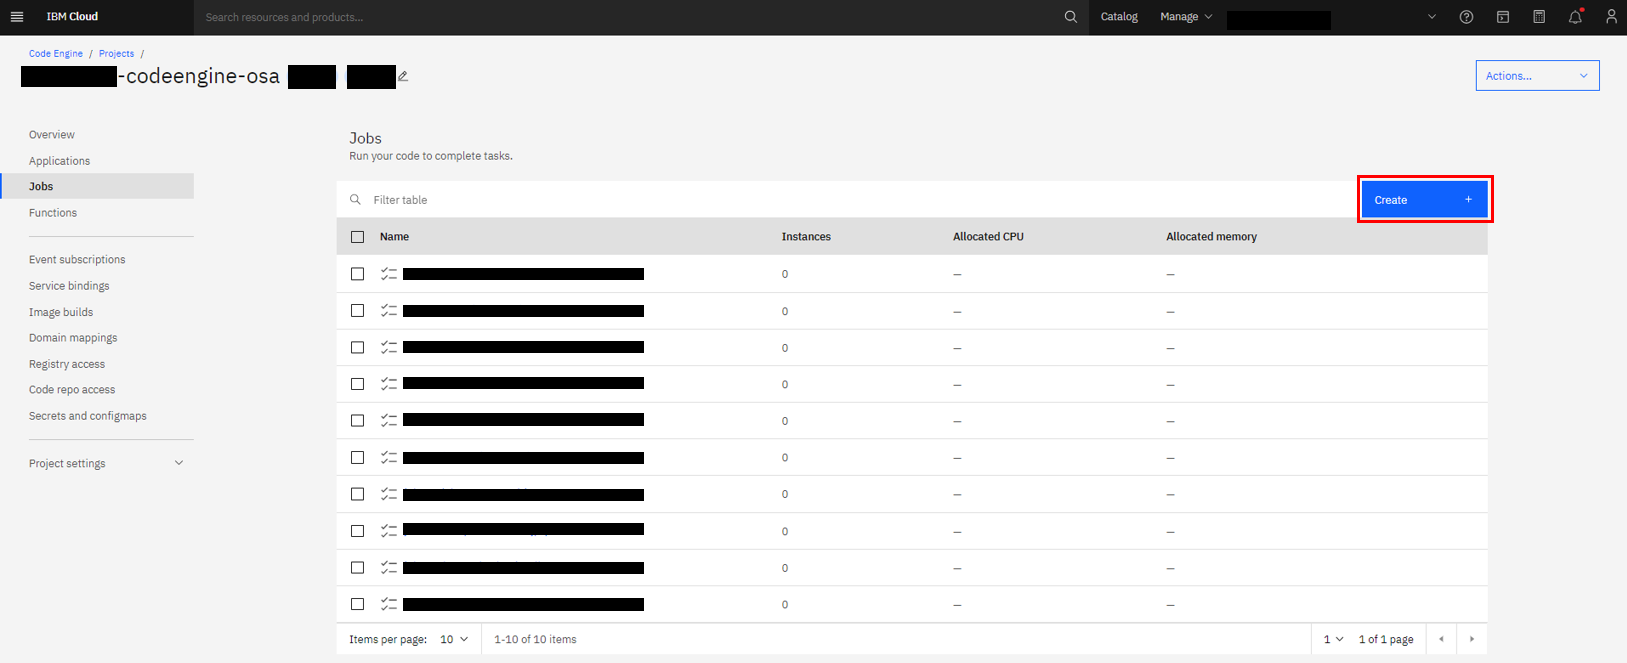
プロジェクトのトップから jobs を選択します
Select jobs from the top of your Code Engine project
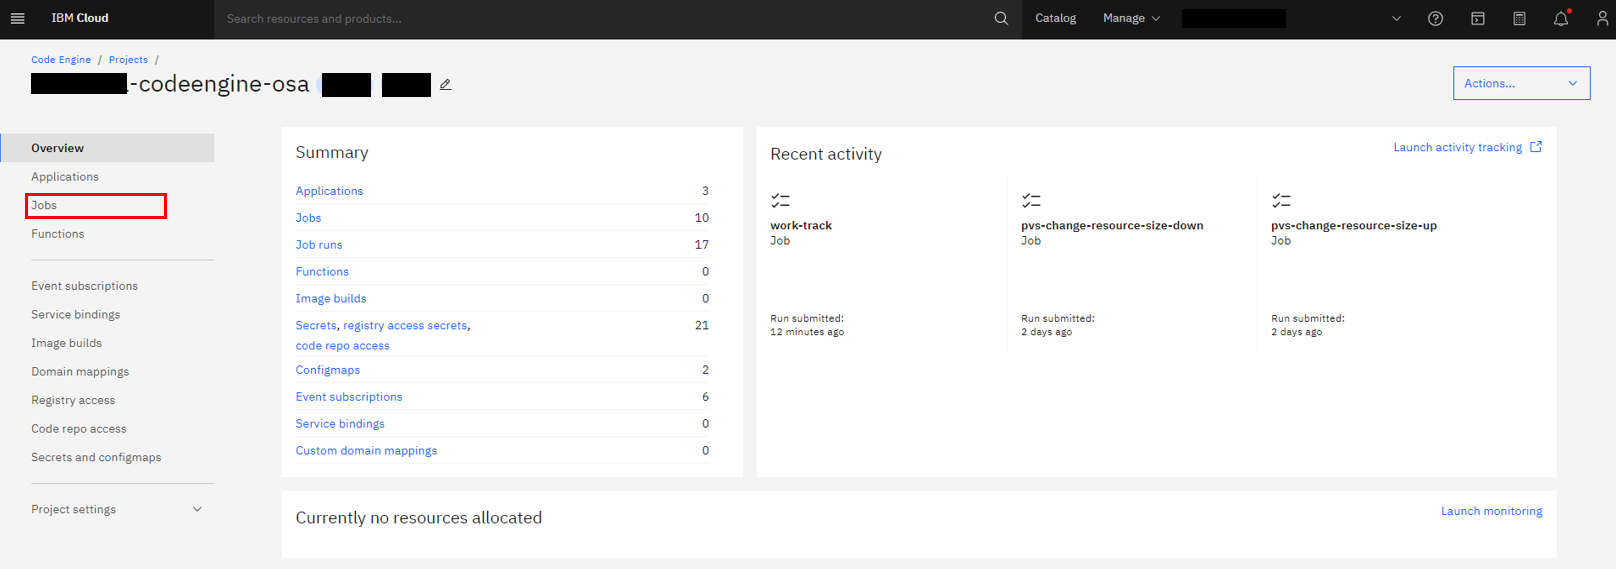
私の環境では大量にJobが定義されていますが、気にせず Createを選択してください。
In my environment, a large number of Jobs are defined, but don't worry about it and select Create.
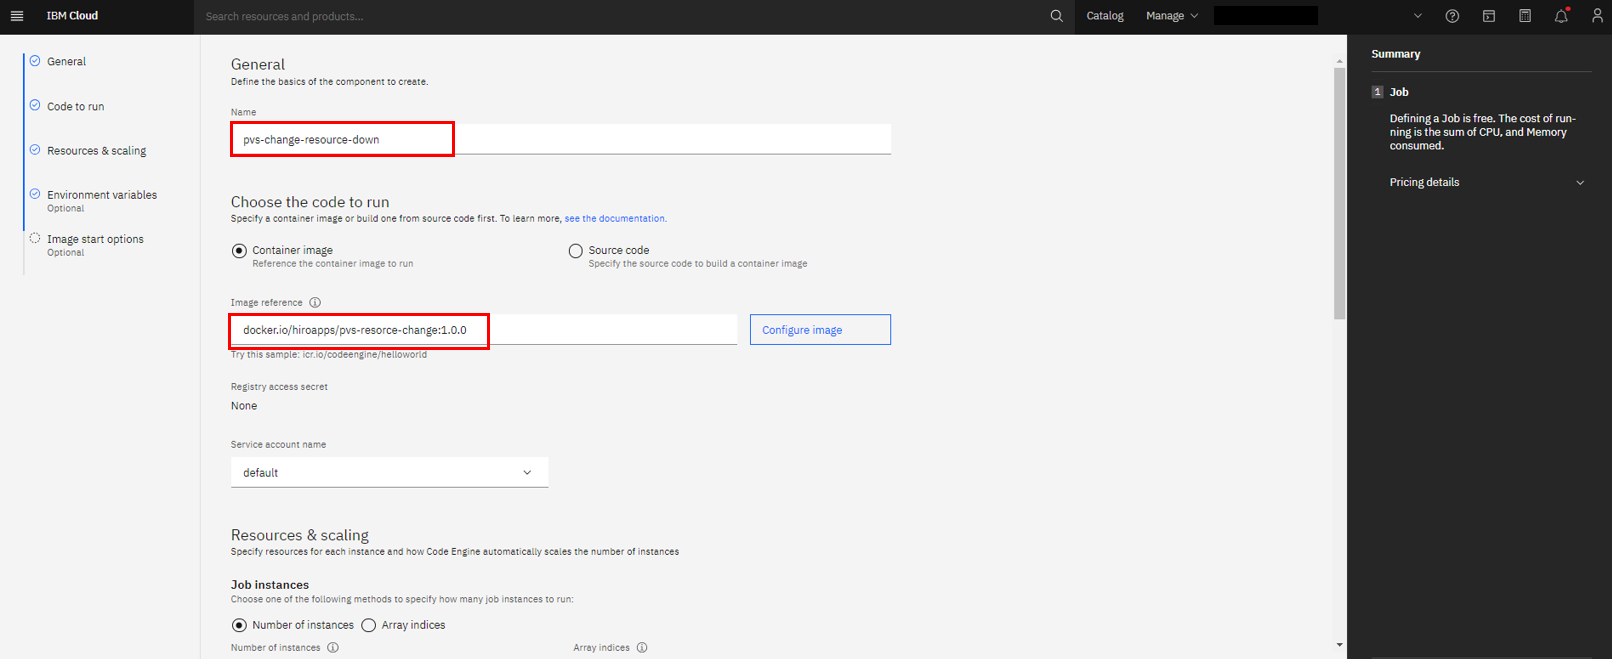
まず NameにJobを識別するための名前を入力してください。
また Image reference には今回のツールが配置されているコンテナイメージのレポジトリを指定してください。Docker Hubで私が公開しているツールでも動作は問題ありません。
First, enter a name to identify the Job in Name.
Also, please specify the repository of the container image where this tool is located in Image reference. There are no problems with the tools I have published on Docker Hub.
Docker Hub : docker.io/hiroapps/pvs-resorce-change:1.1.0
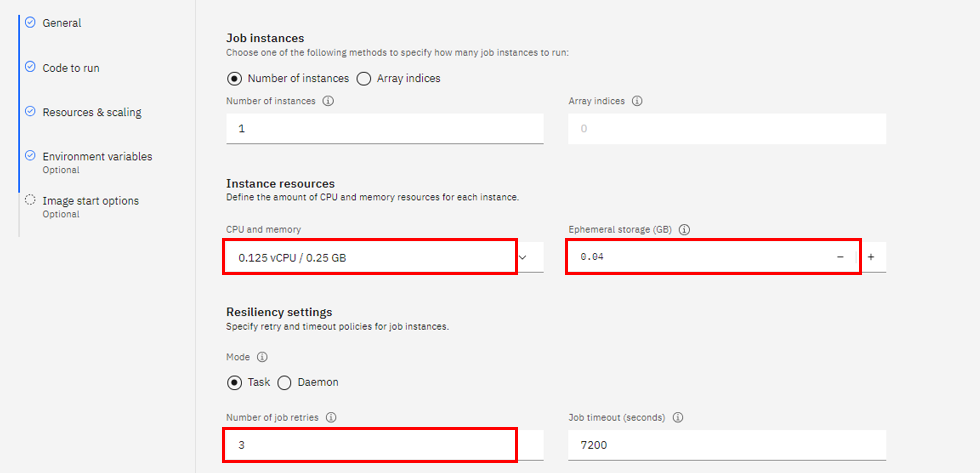
CPU and memoryは一番小さいスペックを選びましょう。基本的にAPIを順番に呼び出す処理なので、スペックは小さくて問題ありません。この中では 0.125vCPU / 0.25GB を選択しています。
Ephemeral storage (GB)も小さくて問題無いです。最小の 0.04 を指定します。
Number of job retriesはJobの実行がエラーになった場合のリトライ回数です。今はデフォルトの3回を指定していますが、利用する環境に合わせて指定してください。
Choose the lowest specs for CPU and memory. Basically, it is a process of calling APIs in order, so the specs are small and there is no problem. In this example, 0.125vCPU / 0.25GB is selected.
Ephemeral storage (GB) is also small and no problem. Specify a minimum of 0.04.
Number of job retries is the number of retries when executing a Job results in an error. Currently, the default setting is 3 times, but please specify it according to your environment.
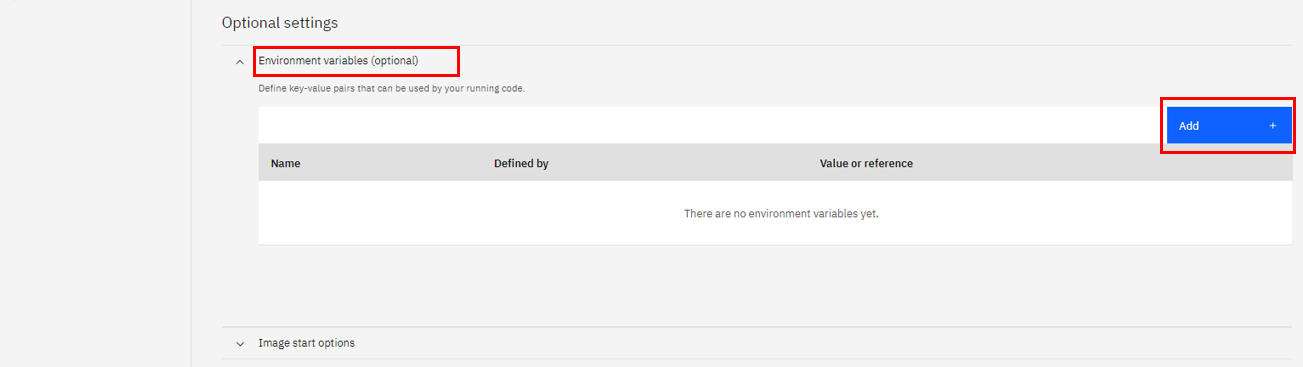
重要な点で、画面下部にある Environment variables(option) を必ず指定することです。 Addを選択してください。
It's important to remember to specify the Environment variables(option) at the bottom of the screen. Select Add.
Reference to full secretを選択し、プルダウンから手順1で作成したSecretを選択して、最後に Add してください。
Select Reference to full secret, select the Secret created in step 1 from the dropdown, and finally Add.
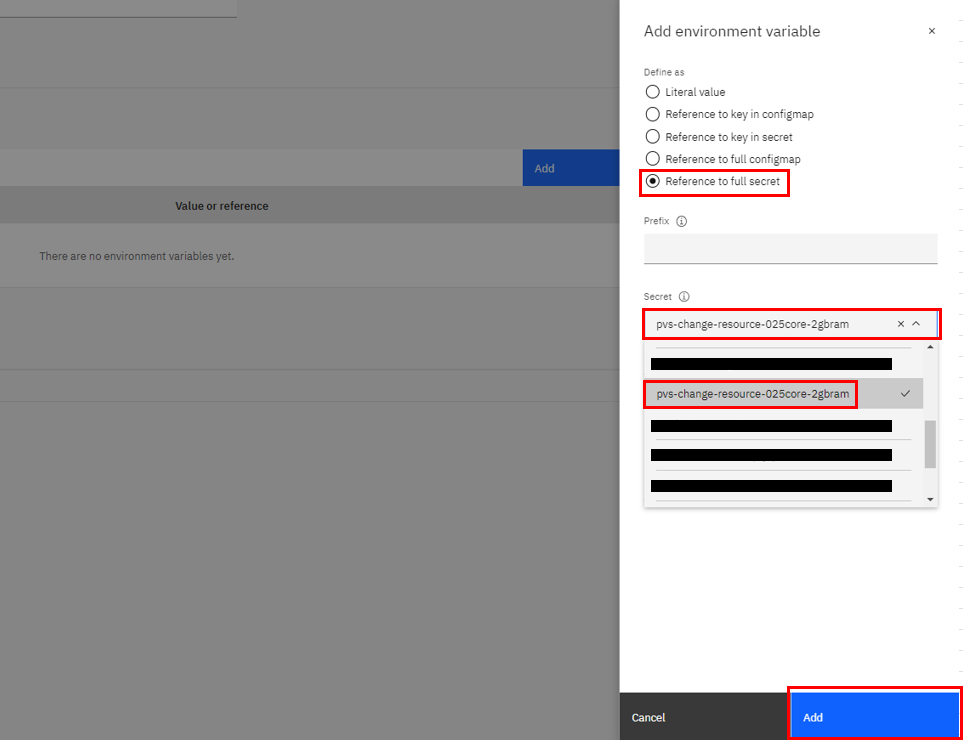
これでSecretで指定した内容が環境変数に設定されたので、最後に Create を選択します。
The contents specified in Secret are now set as environment variables, so finally select Create.

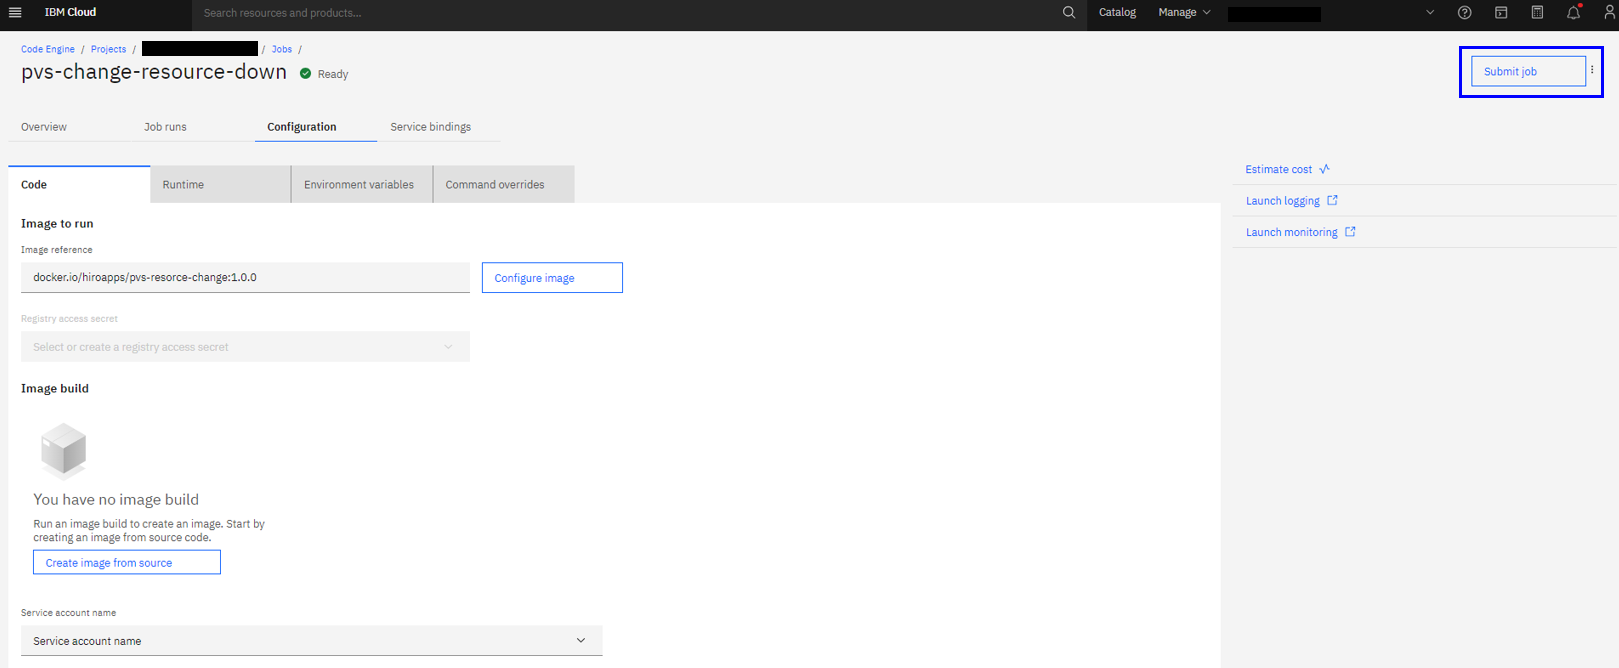
これで無事にJobが定義されました。この後にスケジュールの設定を行うのですが、作成したJobを手動実行する場合は、画面右上の Submit jobから一時的な実行が可能になります。
The Job has now been successfully defined. After this, you will set the schedule, but if you want to manually execute the created Job, you can temporarily execute it by clicking Submit job at the top right of the screen.
スケジュール設定を行う / Set schedule
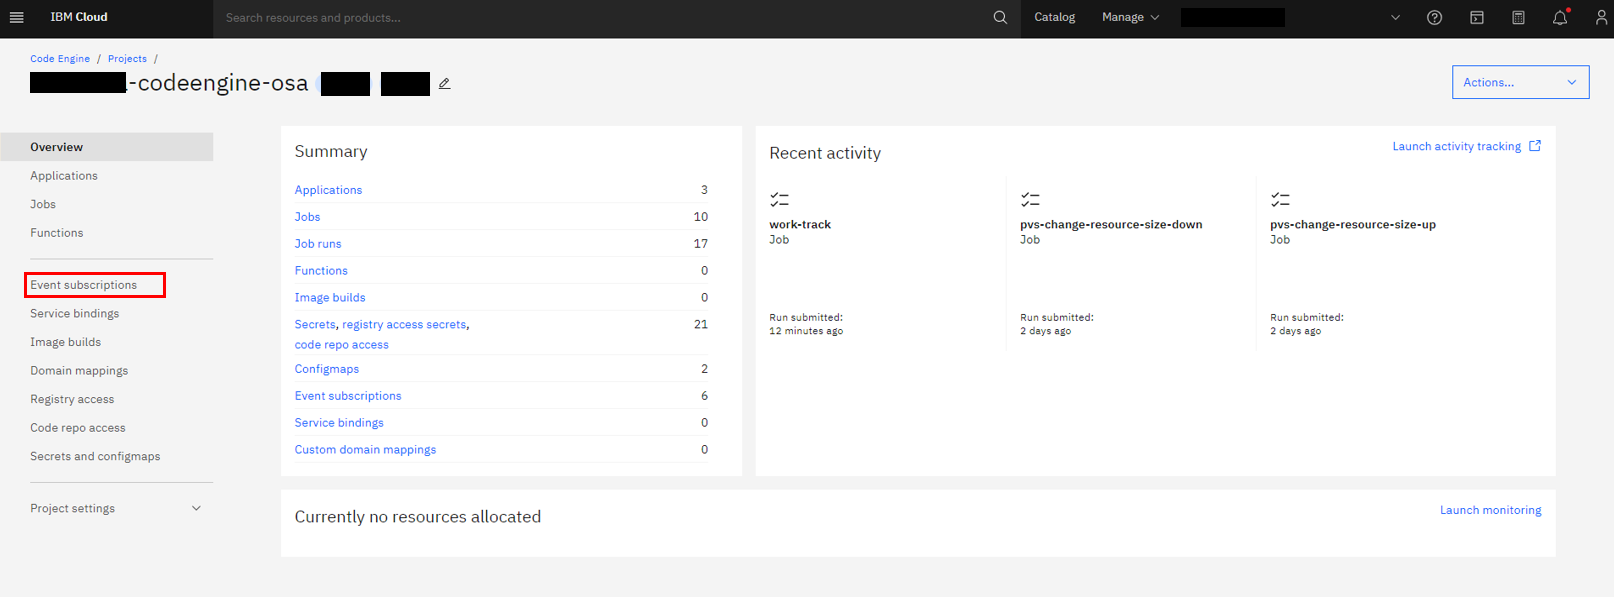
Code Engineのプロジェクトのトップから Event subscriptions を選択してください。
Select Event subscriptions from the top of your Code Engine project.
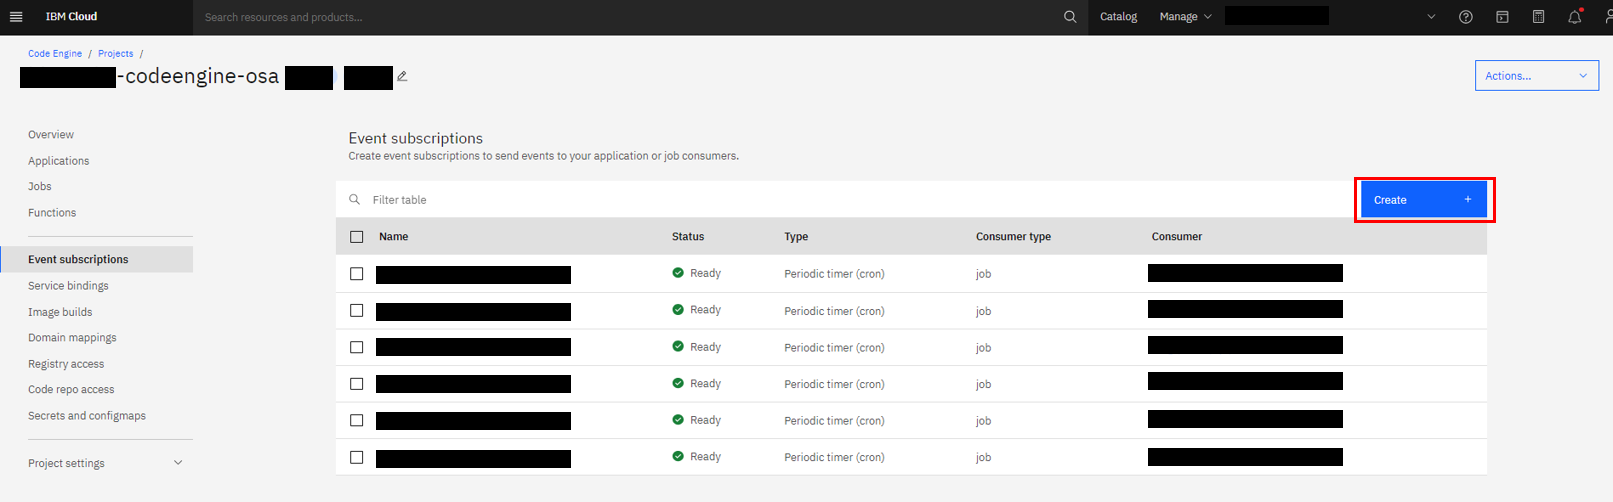
相変わらずいろんな設定が入っている添付画面ですが、無視して Create を選択ください。
The attached screen still contains various settings, but please ignore it and select Create.
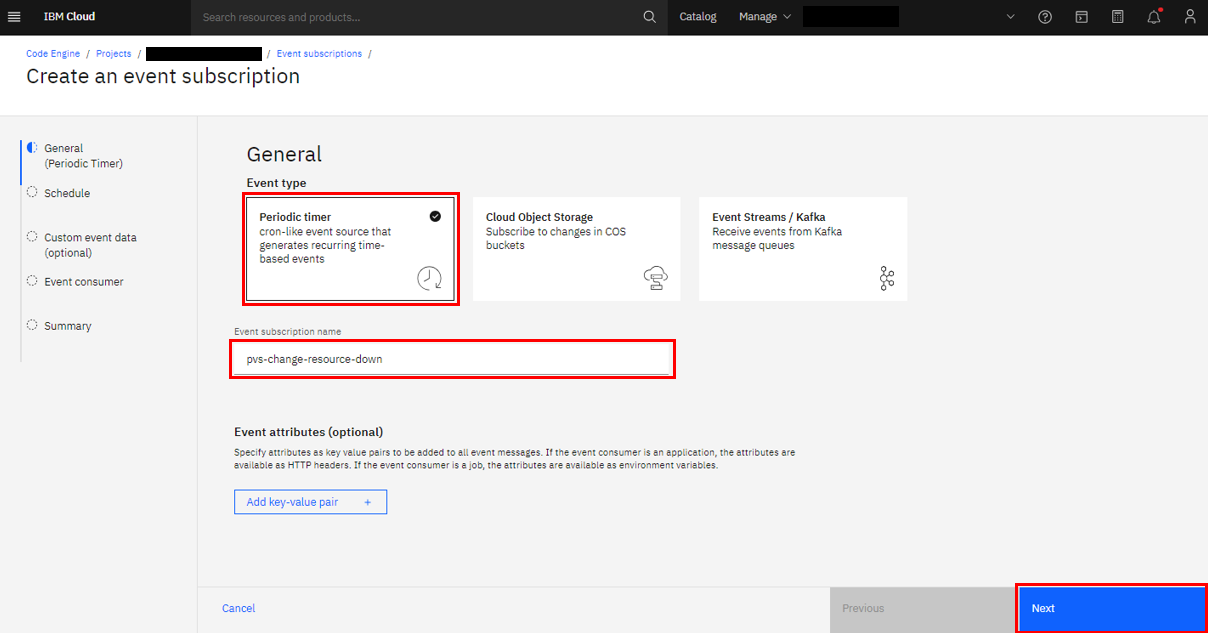
この記事では決まった時間に実行させたいので、Event Typeに Periodic timerを選択してください。
名称はこの定期実行するイベントが何かわかるような名前を指定して Next に行きましょう。
In this article, we want to run it at a fixed time, so select Periodic timer for Event Type.
Specify a name that will help you understand what this regularly executed event is and click Next.
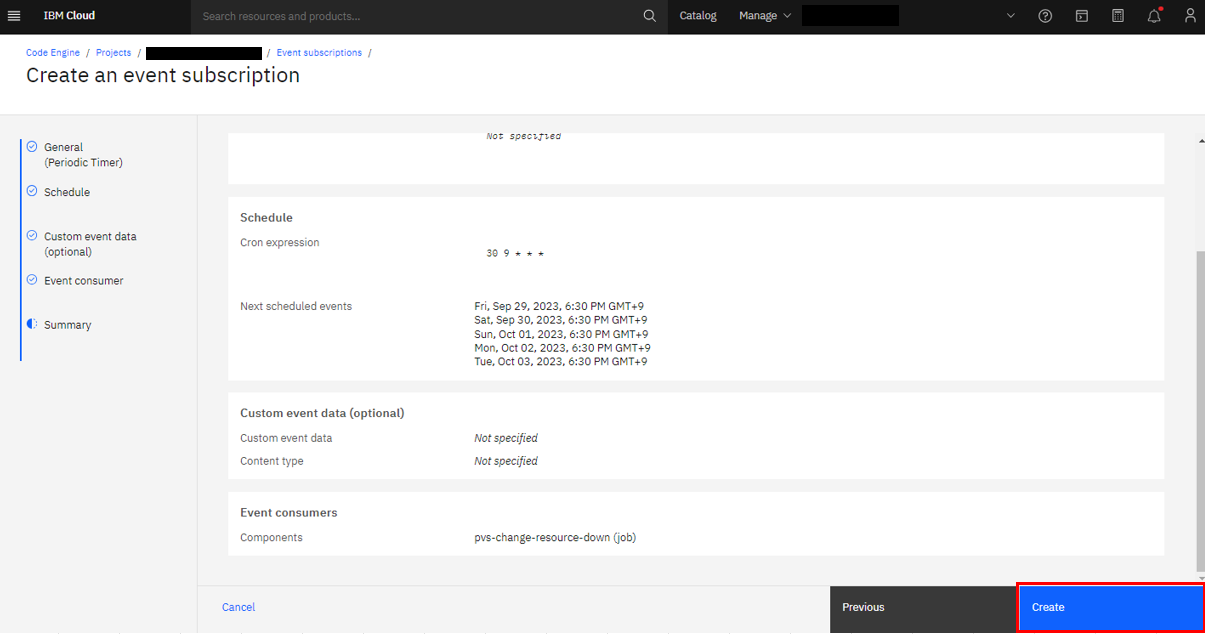
さて、ここがややこしいポイントです。動かしたいジョブをいつ動かすか、これをcron形式で入力する必要がありますが、問題はここで指定する時間は UTC である点です。例えば日本時間(JTC)で考えるなら9時間の時差を考慮して数字を入れる必要があります。私は夕方の18:30になったらリソースサイズを縮小したいと考えるので、 30 9 * * *と設定しています。設定する欄はUTCですが、 画面下部にあるUpcoming scheduled events in your timezoneにはアクセス元のタイムゾーンで予定される実施タイミングが表示されるので、指定が間違っていないかはここで確認しましょう。設定に問題が無ければ Next に行きます。
Now, here's the confusing point. You need to enter the time you want to run the job in cron format, but the problem is that the time specified here is in UTC. For example, if you are thinking in terms of Japan Time (JTC), you need to take into account the 9-hour time difference when entering the numbers. I want to reduce the resource size at 18:30 in the evening, so I set it to 30 9 * * *. The field to set is UTC, but the Upcoming scheduled events in your timezone at the bottom of the screen will display the scheduled implementation timing in the time zone of the access source, so check here to make sure the specification is correct. Sho. If there are no problems with the settings, go to Next.

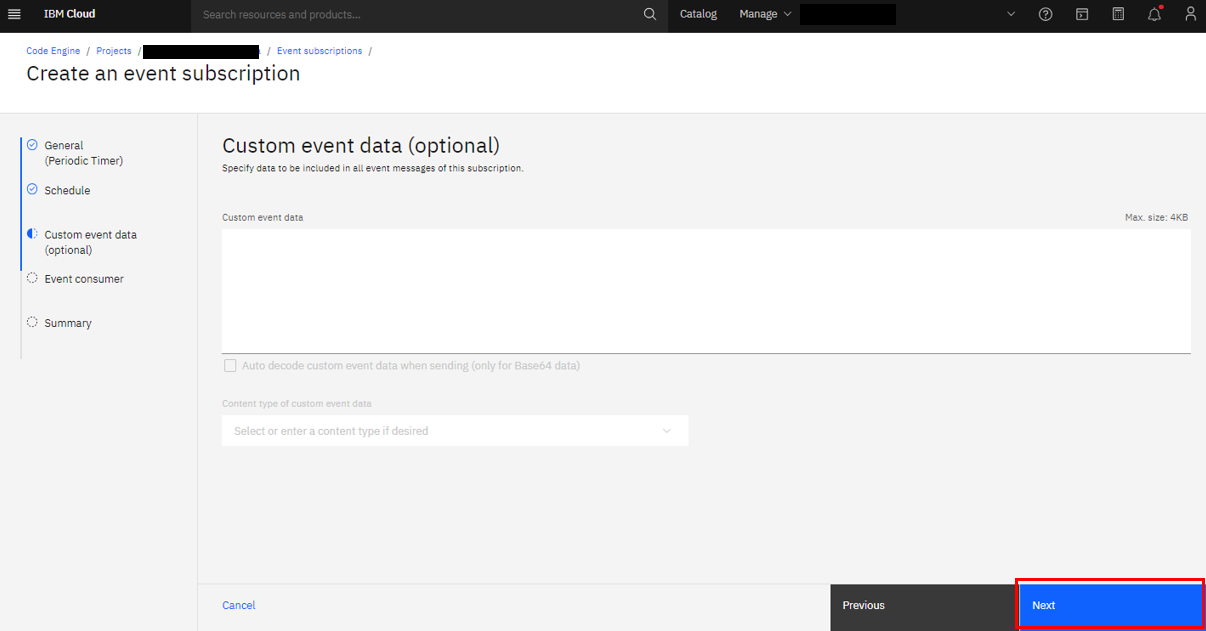
このページは特に設定不要なので、Nextに行きます。
This page does not require any settings, so go to Next.
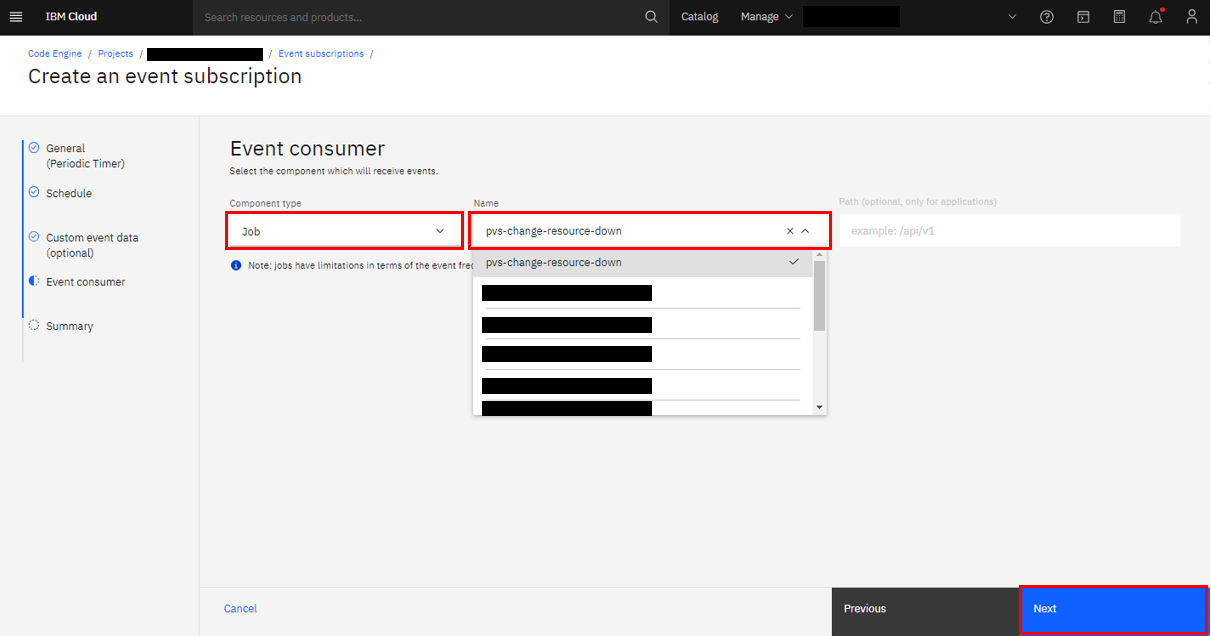
Conponent TypeにJobを選択し、先ほど作成したJobをプルダウンから選び次へ行きましょう。
Select Job for Component Type and select the Job you created earlier from the pulldown to proceed to the next step.
最後に設定内容の一覧を確認して問題なければ Create します。
Finally, check the list of settings and if there are no problems, Create.
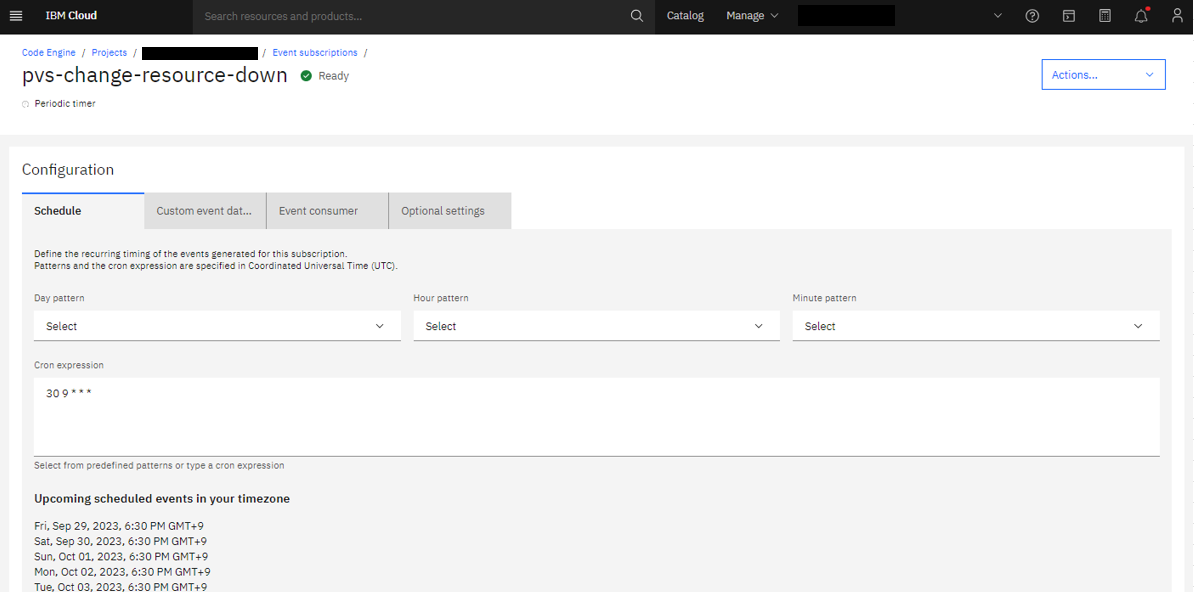
これで、無事にJobの定期実行がスケジュールされました。
The job has now been successfully scheduled for regular execution.
4.同じようにもう1つJobをスケジュールします / Schedule another Job in the same way
手順1-3で紹介したのは、リソースサイズを小さくするためのJobやそのスケジュールだったので、定期的に元のサイズにリソースを変更するためには、同じ手順で今度はリソースサイズを大きくする、もしくは元に戻すパラメータを設定したJobを定義して、スケジュールする必要があります。一度手順に慣れてしまえば簡単でしょう。
Steps 1-3 introduced the job and its schedule for reducing the resource size, so in order to periodically change the resource to its original size, follow the same steps to increase the resource size. Or, you need to define and schedule a Job with parameters to undo. It's easy once you get used to the steps.
実行結果の確認 / Check execution results
さて、日本時間の18:30にサイズダウンするように指示したJobはどう動いたでしょうか?
ここでIBM Cloudのログ監視サービスである IBM Cloud Log Analysis を導入して、かつ Platform Logの出力を有効化していると、Code Engineで動作したコンテナの標準出力の内容を確認、監視することが出来ます。
さて、18:30のログを見てみると。。。
Now, how did the job that was instructed to downsize at 18:30 Japan time work?
If you install IBM Cloud's log monitoring service IBM Cloud Log Analysis and enable the output of Platform Log, you can check and monitor the contents of the standard output of containers running on Code Engine. You can.
If you look at the log at 18:30. . .

[PVS-RSR-CHG-W001] PVS current resource size matches configured parameters.
既にリソースサイズをダウンした後に実行していたため、ワーニングログが出て終了していました。既に指定したサイズになってますよと。とりあえず先に設定したJobのスケジュールが正しく動作していることはわかりました。
Because it was executed after the resource size had already been reduced, a warning log was generated and the process was terminated. It's already the specified size. For now, I found that the Job schedule I set earlier is working correctly.
実は同じ日の16時頃にリソースサイズダウンするためのJobをスケジュールして動かしていました。そのログがこちらになります。
Actually, I scheduled and ran a job to reduce the resource size around 4:00 pm on the same day. Here is the log.

Sep 29 16:00:21 Code Engine pvs-change-resource-size-down-4hgp9-0-0 > pvs-change-instance-resource@1.0.0 start
Sep 29 16:00:21 Code Engine pvs-change-resource-size-down-4hgp9-0-0 [2023-09-29T07:00:18.339] [INFO] default - [PVS-RSR-CHG-I000] Parameter check finished
Sep 29 16:00:21 Code Engine pvs-change-resource-size-down-4hgp9-0-0 [2023-09-29T07:00:18.341] [INFO] default - [PVS-RSR-CHG-I000] Required Information : Target Instance [xxxxx] Target Core Size [0.25] Target Memory Size [2]
Sep 29 16:00:21 Code Engine pvs-change-resource-size-down-4hgp9-0-0 [2023-09-29T07:00:20.181] [INFO] default - [PVS-RSR-CHG-I000] IAM response check finished
Sep 29 16:00:31 Code Engine pvs-change-resource-size-down-4hgp9-0-0 [2023-09-29T07:00:22.079] [INFO] default - [PVS-RSR-CHG-I000] PVS Reference Authorization check finished
Sep 29 16:00:31 Code Engine pvs-change-resource-size-down-4hgp9-0-0 [2023-09-29T07:00:27.862] [INFO] default - [PVS-RSR-CHG-I000] PVS Instance Exist check finished
Sep 29 16:00:41 Code Engine pvs-change-resource-size-down-4hgp9-0-0 [2023-09-29T07:00:34.889] [INFO] default - [PVS-RSR-CHG-I000] Consistency check of Parameter and PVS Instance finished
Sep 29 16:00:41 Code Engine pvs-change-resource-size-down-4hgp9-0-0 [2023-09-29T07:00:34.889] [INFO] default - [PVS-RSR-CHG-I000] PVS Instance Status check finished
Sep 29 16:00:41 Code Engine pvs-change-resource-size-down-4hgp9-0-0 [2023-09-29T07:00:38.568] [INFO] default - [PVS-RSR-CHG-I000] PVS Instance Resource Change is called
Sep 29 16:00:41 Code Engine pvs-change-resource-size-down-4hgp9-0-0 [2023-09-29T07:00:38.568] [INFO] default - [PVS-RSR-CHG-I000] Waiting for 120 seconds to Resource Change
Sep 29 16:02:51 Code Engine pvs-change-resource-size-down-4hgp9-0-0 [2023-09-29T07:02:43.239] [INFO] default - [PVS-RSR-CHG-I000] PVS Instance Resource Change is finished. Current resource is Core size [0.25] Memory size [2]
横に長いのでわかりにくいですが、16時に実行するように定義していて、コンテナはUTCのタイムゾーンで動作するため、コンテナとしてのログは9時間前になる7時にログが出力され始めていることがわかります。
設定するパラメータに問題が無いため、16時40秒ごろにリソースサイズ変更のAPIを実行して、その2分後に意図したリソースサイズになっていることを確認して、無事に終了しています。
It's hard to understand because it's long horizontally, but since it's defined to run at 16:00 and the container operates in the UTC time zone, logs as a container start being output at 7:00, which is 9 hours ago. You can see.
Since there is no problem with the parameters to be set, execute the resource size change API at around 16:00:40, confirm that the intended resource size is reached two minutes later, and finish successfully.
Code Engineは指定された時間に対象のコンテナを起動するため、コンテナイメージ内のプログラムが動作するまでラグがある点に注意してください。
Note that Code Engine starts the target container at the specified time, so there is a lag until the program in the container image starts running.
うまく動作しないケースもあります / There are cases where it doesn't work properly
これは、0.25コア、2GB RAMの環境を 0.5コア、4GB RAMに変更しようとした時のログです。
This is the log when trying to change an environment with 0.25 cores and 2GB RAM to 0.5 cores and 4GB RAM.

[PVS-RSR-CHG-E105] Response HTTP Status : 400. [instance-name], [instance id] could not be modified because the request exceeds host capacity. The core request of 0.5 is greater than the number of host available cores, 0.25.
これは先の注意書きに示したように、対象のインスタンスが稼働しているホスト側にリソース割り当てのための余裕が無かった、というものになります。リソースサイズ変更のAPIでその情報を受け取ったため、Jobが異常終了し、Code EngineのJobの設定に従ってリトライを実施しているので、添付した画像では同じ内容が繰り返し表示されています。今回はリトライ数を3に設定しているので、添付画面ではリトライ2回分しか見えていませんが、もう1回繰り返されています。
As mentioned in the previous note, this means that the host where the target instance is running does not have enough room to allocate resources. The job ended abnormally because the information was received using the resource size change API, and retries are performed according to the Code Engine job settings, so the same content is displayed repeatedly in the attached image. This time, the number of retries is set to 3, so you can only see 2 retries on the attached screen, but it is repeated one more time.
さいごに / Finally
いかがでしたでしょうか?このツールはあくまでリソースサイズ変更のAPIを呼び出すまでで、その変更を担保することはできませんが、うまく利用すればより費用の最適化を目指したPower VSの運用が実現できるでしょう。Power VSを利用する人たちが、なるべくお金をかけずに理想の形で運用できることの手助けになれば幸いです。
What did you think? This tool only calls the resource size change API, and cannot guarantee the change, but if used properly, it will be possible to operate Power VS with the aim of optimizing costs. I hope this will help those who use Power VS to operate it in their ideal form without spending as much money as possible.