OpenAPIというものを教えてもらったので、ちょっと遊んで試してみました。
目標
APIをOpenAPIで定義し、コードをジェネレートしてAPIのレスポンスが得られる。
なので、使うのはOpenAPI SpecificationとOpenAPI generatorになります。
環境など
| ツールなど | バージョンなど |
|---|---|
| MacbookPro | macOS Mojave 10.14.5 |
| Android Studio | 3.6.1 |
| Java | 1.8.0_131 |
| Postman | 7.19.1 |
OpenAPIでAPIを定義する
1.APIの設計
APIの設計をzeroからやったことがないので流儀がよくわからないですが、以下のようなRESTfulAPIを考えます。
とあるログデータ型LogDataがあるとして、データは何かしらのDBに入っていると仮定します。プライマリキーは日付となります(yyyy/MM/ddの文字列と仮定しています)
- ユーザーのログデータをCREATE(post)
- ユーザーのログデータをREAD(get{date}/getAll}
- ユーザーのログデータをUPDATE(put)
- ユーザーのログデータをDELETE(delete)
また、戻りはJsonに固定しようと思います(xmlはパースが大変じゃない?)。
2.YAMLを設定する
OpenAPI SpecificationでAPIの定義を書いていきます。
Jsonでも書けるそうですが、YAMLのほうが見やすい気がするので、YAMLで行ってみます。
(1)エンドポイント
まず、エンドポイントのurlを決めます。
ここでは、http://my.data.example.com/v1とします。
openapi: "3.0.3"

info:
  version: 0.0.1
  title: My SampleData Api
  license:
    name: MIT
servers:
  - url: http://my.data.example.com/v1
(2)パスの定義
RESTfulはパスとメソッドタイプで処理内容を表現するものですが、処理内容がわかっていれば、ほぼ決められますね。
以下のようにパスを定義しました。
- getAll (GET)
/logs
- get{id} (GET)
/logs/{date}
- create (POST)
/logs
- update (PUT)
/logs
- delete (DELETE)
/logs/{date}
YAMLの記述は次のようになります。
※既出の箇所は随時省略していきますので、どこに追記するかは一つ前のコードと見比べて読み取ってください。
servers:
  - url: http://my.data.example.com/v1
paths:
  /logs:
    get:
    post:
    put:
  /logs/{date}:
    get:
    delete:
パスとメソッドの組み合わせで定義していきます。
(3)各メソッドの詳細を定義する
サマリーやoperationId, パラメータなどを定義します。パラメータ以外は主にドキュメントに関わる部分になります。戻り値については次項でやりますので今はおいておきます。
paths:
  /logs:
    get:
      summary: List all logs
      operationId: listLogs
      tags:
        - logs
    post:
      summary: Create a log
      operationId: postLogs
      tags:
        - logs
    put:
      summary: Update a log
      operationId: putLogs
      tags:
        - logs
  /logs/{date}:
    get:
      summary: Log for a specific date
      operationId: showLogByDate
      tags:
        - logs
      parameters:
        - name: date
          in: path
          required: true
          description: The date string formatted yyyy/MM/dd
          schema:
            type: string
    delete:
      summary: Delete log by date key
      operationId: deleteLogByDate
      tags:
        - logs
      parameters:
        - name: date
          in: path
          required: true
          description: The date string formatted yyyy/MM/dd
          schema:
            type: string
何となく見てわかりますよね。
/logsというパスの中には、get:とpost:、put:のメソッドがあり、logs/{date}というパスでは、get:とdelete:が出来る。
get:とdelete:は、dateという名前のパラメータが必須(required)で、string型ですよ、と。
そんな定義が読み取れると思います。
(4)レスポンスの定義
レスポンスの定義は、正常時(HttpStatus=200)の場合のヘッダーやContentTypeを定義します。また、エラー時の定義も行います。
戻すのは、ほぼJsonになりますね。
※スキーマの定義は次項でやります。
paths:
  /logs:
    get:
      summary: List all logs
      operationId: listLogs
      tags:
        - logs
      responses:
        '200':
          description: Array of logs
          content:
            application/json:
        default:
          description: unexpected error
          content:
            application/json:
長くなってきたのでメソッドごとに区切ります。
    post:
      summary: Create a log
      operationId: putLogs
      tags:
        - logs
      responses:
        '201':
          description: Null response
          headers:
            location:
              description: A link to the new log
              schema:
                type: string
        default:
          description: unexpected error
          content:
            application/json:
RESTfulAPIの設計では、CREATEでは作成したらヘッダーにLocationで作成したデータへのGETリクエストパスを返すことが推奨されているので、それを入れています。
https://docs.microsoft.com/ja-jp/azure/architecture/best-practices/api-design#post-methods
    put:
      summary: Update a log
      operationId: putLogs
      tags:
        - logs
      responses:
        '200':
          description: Update results
          content:
            application/json:
        default:
          description: unexpected error
          content:
            application/json:
PUTメソッドでは、作成したら201を返し、更新が成功したら200を返すことが推奨されていますが、今回はどのみちダミーでしか動かないので、200を返す更新成功のみを入れています。ちなみに、戻りのボディに更新後のデータそのものを入れることも推奨されているため、入れることにしました。
  /logs/{date}:
    get:
      summary: Log for a specific date
      operationId: showLogByDate
      tags:
        - logs
      parameters:
        - name: date
          in: path
          required: true
          description: The date string formatted yyyy/MM/dd
          schema:
            type: string
      responses:
      	'200':
      	  description: Expected response to a valid request
          content:
            application/json:
        default:
          description: unexpected error
          content:
            application/json:
    delete:
      summary: Delete log by date key
      operationId: deleteLogByDate
      tags:
        - logs
      parameters:
        - name: date
          in: path
          required: true
          description: The date string formatted yyyy/MM/dd
          schema:
            type: string
      responses:
      	'204':
      	  description: Expected response to a valid request
        default:
          description: unexpected error
          content:
            application/json:
(5)スキーマの定義
スキーマの定義というのは、レスポンスの戻りのJsonの項目を宣言することです。
たとえば、/logs/{date}のGETの場合で考えます。
LogDataのクラスがこのような設定の場合、
class LogData{
  public String date;
  public int foo;
  public bool bar;
}
LogDataのオブジェクト1つを表すJson文字列は、
{
  "date" : "2020/02/22",
  "foo" : 12345,
  "bar" : false,
}
とするのが普通ですから、responseのスキーマはこのように宣言します。
components:
  schemas:
    Log:
      type: object
      required:
        - date
        - foo
        - bar
      properties:
        date:
          type: string
        foo:
          type: integer
          format: int32
        bar:
          type: boolean
スキーマの定義は、components下に置き、それを各API定義のところで参照するという形を取ります。
続いてLogsスキーマを定義します。これはgetAllで返ってくるのが配列なはずなので、それの定義となります。
components:
  schemas:
    Log:
    ....
    Logs:
      type: array
      items:
        $ref: "#/components/schemas/Log"
スキーマの中でスキーマを参照しています。
スキーマを参照するときは、$ref: "#/components/schemas/スキーマ名というように書きます。
LogsはLogの配列ってことですね。
ついでにエラーのスキーマも定義します。
よく、エラー時のレスポンス(Json)はこんな感じにしますよね?
{
  "status" : 100
  "message" : "なんかエラーだよ"
}
というわけで、エラーのときはこれを返すようにスキーマも定義します。
components:
  schemas:
    Log:
      ...
    Logs:
      ...
    Error:
      type: object
      required:
        - status
        - message
      properties:
        code:
          type: integer
          format: int32
        message:
          type: string
(6)APIの戻りスキーマを指定する
作成したスキーマを参照して、各APIメソッドのresponseにきちんと設定してやります。
applicatoin/jsonとした属性の下に、schemaを宣言し、そこで$refで先ほど作成したスキーマを参照指定します。
  /logs:
    get:
      summary: List all logs
      operationId: listLogs
      tags:
        - logs
      responses:
        '200':
          description: Array of logs
          content:
            application/json:
              schema:
                $ref: "#/components/schemas/Logs"
        default:
          description: unexpected error
          content:
            application/json:
              schema:
                $ref: "#/components/schemas/Error"
    post:
      summary: Create a log
      operationId: createLog
      tags:
        - logs
      responses:
        '201':
          description: Null response
          headers:
            location:
              description: A link to the new log
              schema:
                type: string
        default:
          description: unexpected error
          content:
            application/json:
              schema:
                $ref: "#/components/schemas/Error"
    put:
      summary: Update a log
      operationId: putLog
      tags:
        - logs
      responses:
        '200':
          description: Update results
          content:
            application/json:
              schema:
                $ref: "#/components/schemas/Log"
        default:
          description: unexpected error
          content:
            application/json:
              schema:
                $ref: "#/components/schemas/Error"
  /logs/{date}:
    get:
      summary: Log for a specific date
      operationId: showLogByDate
      tags:
        - logs
      parameters:
        - name: date
          in: path
          required: true
          description: The date string formatted yyyy/MM/dd
          schema:
            type: string
      responses:
        '200':
          description: Expected response to a valid request
          content:
            application/json:
              schema:
                $ref: "#/components/schemas/Log"
        default:
          description: unexpected error
          content:
            application/json:
              schema:
                $ref: "#/components/schemas/Error"
    delete:
      summary: Delete log by date key
      operationId: deleteLogByDate
      tags:
        - logs
      parameters:
        - name: date
          in: path
          required: true
          description: The date string formatted yyyy/MM/dd
          schema:
            type: string
      responses:
        '204':
          description: Expected response to a valid request
        default:
          description: unexpected error
          content:
            application/json:
              schema:
                $ref: "#/components/schemas/Error"
(7)リクエストボディの設定
リクエストボディも、スキーマを使って定義します。
    post:
      summary: Create a log
      operationId: createLog
      tags:
        - logs
      requestBody:
        description: log to create
        content:
          application/json:
            schema:
              $ref: "#/components/schemas/Log"
    put:
      summary: Update a log
      operationId: putLog
      tags:
        - logs
      requestBody:
        description: update to create
        content:
          application/json:
            schema:
              $ref: "#/components/schemas/Log"
どうでしょうか?結構なコード量になりましたね。
合ってるかどうかわからなくて不安な人は、Swagger Editorという便利なサイトがありますので、確認しながら書いていくといいでしょう。ただし、スキーマ定義をまっさきにやったほうがいいです。

なんとなく、右側のパネルが、すでにAPI仕様書っぽくなっていますね。
3. example値の設定
OpenAPIの定義に、サンプルの戻り値を設定できます。それがexampleです。
スキーマの下に設定できます。
たとえば、Logオブジェクト1件のサンプル値だと、次のように書けます。
components:
  schemas:
    Log:
      type: object
      required:
        - date
        - foo
        - bar
      properties:
        date:
          type: string
        foo:
          type: integer
          format: int32
        bar:
          type: boolean
      example:
        date: "2020/02/22"
        foo: 11
        bar: true
配列の場合は、-で要素を区切ります。
    Logs:
      type: array
      items:
        $ref: "#/components/schemas/Log"
      example:
        - date: "2020/02/22"
          foo: 11
          bar: true
        - date: "2020/08/23"
          foo: 13
          bar: false
これで、モックサーバーを動かす準備が出来ました。
Swagger Editorのページから、yamlファイルがダウンロードできます。
モックサーバーを動かす
早速、この定義を使って、モックサーバーを動かしてみます。
ただ、OpenAPI Generator等を使うと、サーバープログラムのビルドが必要になってしまいます。それだとサクッと動かしたい・・・という希望に添わないので、探したところ、こちらを発見しました。
API Sprout
https://github.com/danielgtaylor/apisprout
なんとyamlファイルを指定するだけで、モックサーバーを動かしてくれるというではありませんか。
早速インストールしてみます。
1. API Sproutのインストール
Dockerでやるのが良さそうです。
Dockerをインストールしてない方はこちらの記事などを参考に、先に入れて下さい。
(1)Dockerからpull
$ docker pull danielgtaylor/apisprout
普通にpullするだけですね。
2. API Sproutでモックサーバーを起動
$ docker run -p 8000:8000 -v /foo/bar/workspace/openapi/openapi.yaml:/openapi.yml danielgtaylor/apisprout /openapi.yml
/foo/bar/workspace/openapi/openapi.yamlの部分は、自分で作成したファイル名で、フルパスで指定する必要があります。
🌱 Sprouting My SampleData Api on port 8000
と表示が出れば起動OKです。
ブラウザとかでlocalhost:8000/logsとかしてみましょう。
以下はcurlの例です。
$ curl localhost:8000/logs
[
  {
    "bar": true,
    "date": "2020/02/22",
    "foo": 11
  },
  {
    "bar": false,
    "date": "2020/08/23",
    "foo": 13
  }
]
example値がちゃんと出力されましたね!
Postmanで実行
GET以外のメソッドの動作確認にはPostmanを使う方が楽なので、こっちでやってみます。
Postmanのダウンロードはこちらから。
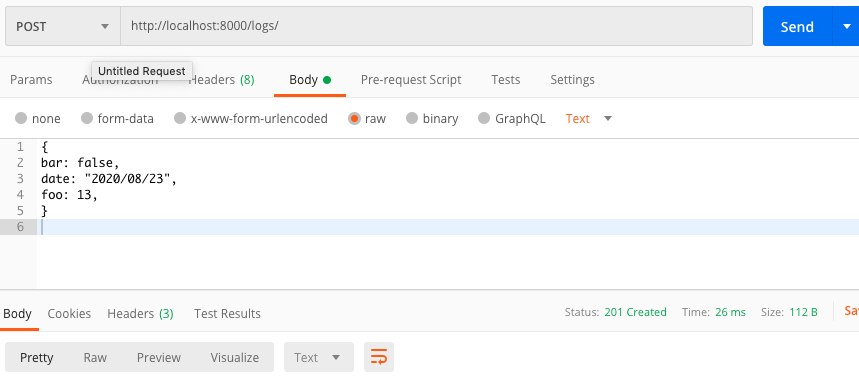
1.POST
メソッドをPOSTにして、[Send]をクリック。
Bodyは、API側がどうせダミーなので指定しなくても大丈夫ですがサンプルでは入れています。
 |
|---|
resultが201 Createdになっていますね。
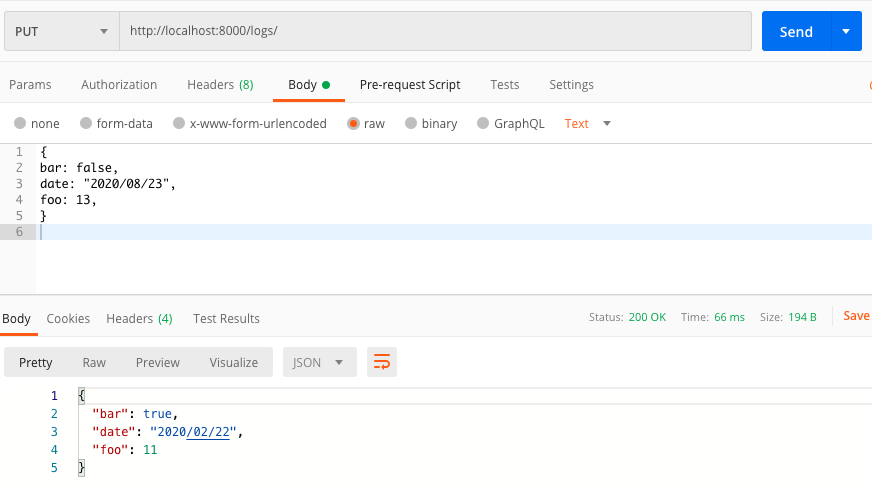
2.PUT
メソッドをPUTにして、[Send]をクリック。
Bodyは今はダミーなので空でもOK。
 |
|---|
resultが200 OKになっていますね。
そしてresponseのBodyに更新結果のJsonが入っています。
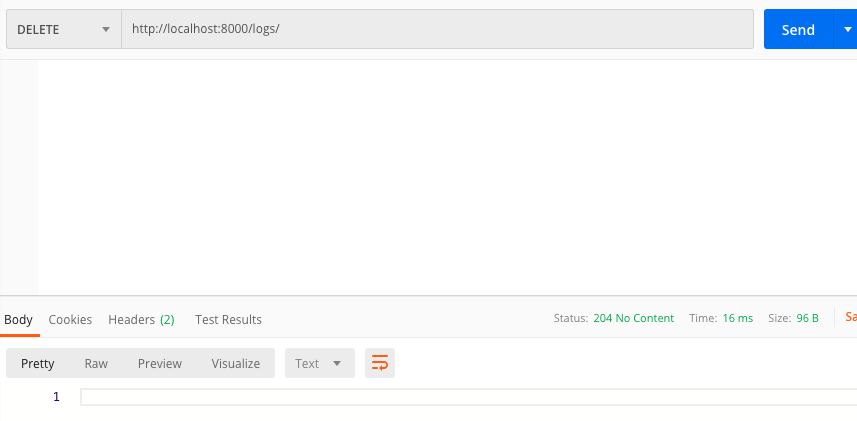
3.DELETE
メソッドをDELETEにして、[Send]をクリック。
 |
|---|
成功のresultは204です。
クライアントアプリの作成
Postmanだけじゃなんだか味気ないので、クライアントアプリがAPI定義ができているだけで実行できるというメリットを確認すべく、なにか作ってみようと思います。
何でもいいのですが、私の得意分野でということで、Android+Kotlin+coroutineでサクッと作ってみようと思います。(本当にサクッと出来たかは内緒w)
なお、APIサーバーがlocalhostで動いているので、エミュレーターを使うしかありません。ひところに比べ、エミュレーターは爆速にはなりましたが、やっぱりもっさり感は否めないですよね・・・まあでも今回は仕方ありません。
エミュレーターでローカルネットワークで稼働するAPIに繋ぐには、localhostや127.0.0.1ではなく、10.0.2.2を使う必要があるので、ご注意を。
1. Androidアプリの作成
Kotlinでサクッと(略)
こちらにサンプルコードがあります。
https://github.com/le-kamba/RestApiCoroutineSample
※後ほど、実装の詳細を別記事に上げる予定。
OpenAPI Generatorで出来るAndroid用コードもあります。
OpenAPI GeneratorのCLIツールでクライアントコードを作成する場合、Dockerを使って次のように出来ます。
$ GENERATOR=android
$ docker run --rm -v ${PWD}:/local openapitools/openapi-generator-cli generate -i /local/openapi.yaml -g ${GENERATOR} -o /local/out/${GENERATOR}
なお、事前にプロジェクトを作りたいフォルダを作ってそこに移動しその中に作成したyamlファイルをコピーしておきます。
が!!
作成されるプロウジェクトが古すぎて、新しめのAndroidStudioでは、もうビルドできない代物になっています(泣) 2系が残っている人はビルドできるかも?^^;
もしこれを新しめ(3系以降?)のAndroidStudioで動かそうとするなら、プロジェクトを新規作成した上で、クラスや依存関係をコピーしてくる方が良さそうです。やりませんけど。
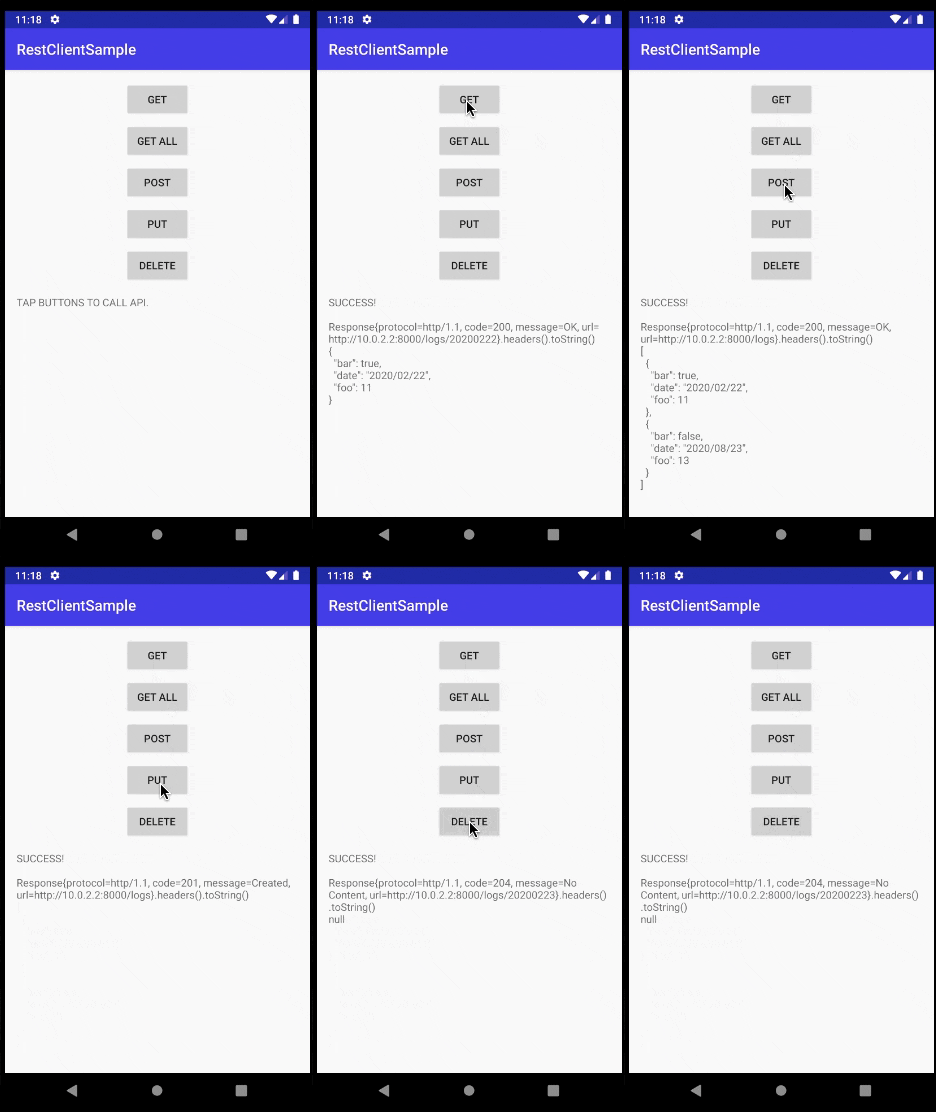
2.動作テスト
文字が潰れて見づらいかもですが、レスポンスヘッダーとボディのJsonをそのまま出力しています。
感想
とっても簡単にAPIのモックサーバーが出来ました。
これで、アプリ側の開発初期でも通信を入れたテストが出来ますね。
I/Fの設計が後で頻繁に変わるようだと辛いのは変わらなさそうですが(汗)
ちなみに、Androidのアプリは、以下のアーキテクチャ・ライブラリなどを使って実装しました。
- Kotlin
- Javaに代わる推し言語
- coroutine
- Kotlinでの非同期処理
- Retrofit2
- 通信ライブラリ
- Koin
- Kotlin用お手軽DI
上にも書きましたがご興味ある方は以下よりご覧頂けます。
https://github.com/le-kamba/RestApiCoroutineSample
YAMLファイルのサンプルも、上記リポジトリのOpenAPIConfigフォルダにあります。
参考サイトなど
apisproutを教えて頂きました。
https://qiita.com/ShoichiKuraoka/items/f1f7a3c2376f7cd9c56
dockerでOpenAPI Generatorを走らせる方法の参考になりました。
https://qiita.com/amuyikam/items/e8a45daae59c68be0fc8
Androidエミュレーターでlocalhostに繋ぐ場合のIPアドレスについて参考になりました。
https://araramistudio.jimdo.com/2018/01/11/android%E3%81%AE%E3%82%A8%E3%83%9F%E3%83%A5%E3%83%AC%E3%83%BC%E3%82%BF%E3%83%BC%E3%81%8B%E3%82%89%E8%87%AA%E8%BA%AB%E3%81%AEpc-localhost-%E3%81%B8%E6%8E%A5%E7%B6%9A/
