LEGO MINDSTORMS EV3 を Android端末でコントロールするために必要な開発環境の構築方法を備忘録も兼ねて記録します。
前回までに、[LEGO MINDSTORMS EV3をコントロールするためのプロジェクト]
(http://qiita.com/karubeita/items/acc00cead82a2db4852b)を作成しました。
今回は、Bluetoothで接続するまでを紹介します。
コンパイルエラーの解消
============================================
新規に作成したプロジェクトが、そのままでは、コンパイルエラー状態になる場合があります。
そのような場合には、以下のURLを参照させていただき、styleを変更します。
[Androidでプロジェクト生成時に自動でimportされるsupport-v7-appcompatを解除する]
(http://qiita.com/key_gao_/items/d25d43c4faf4c33f2322)
============================================
Bluetoothでの接続
1.EV3とAndroid端末の接続
EV3 を Android端末でコントロールするために、Bluetoothで接続します。
1-1. EV3側の設定
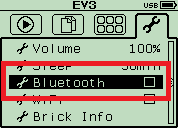
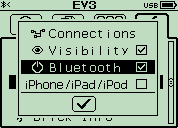
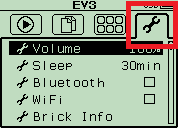
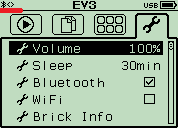
EV3の[Setupタブ]画面から、[Bluetooth]の項目にチェックを付けます
1-2.Android端末側の設定とペアリング
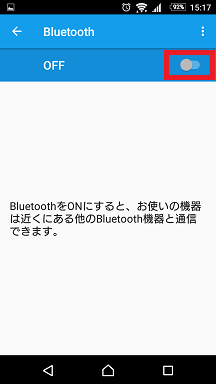
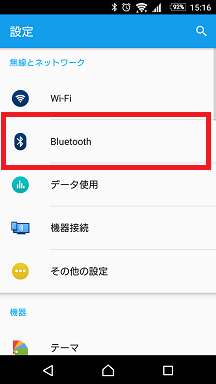
Android端末の[設定]から、[Bluetooth]を開きます。
利用可能なデバイスが自動的に検索され、Bluetooth機能がONになっているEV3が表示されます。
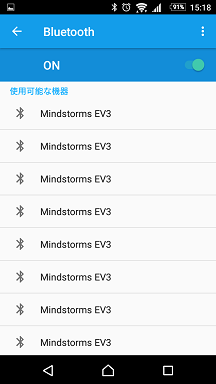
※複数台のLEGO Maindstormsが存在する場合には、EV3側で名前を変更しておきます。
接続したいEV3を選択してペアリングを行います。
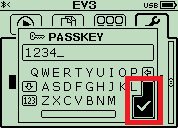
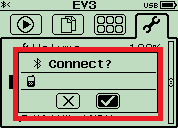
EV3の画面にパスキーが表示されます。EV3のボタンを操作して[✔]を選び、中央ボタンで決定します。
Android端末の画面にもパスキーが表示されます。[1234]と入力して[OK]をタップします。
EV3の画面左上に、Bluetooth接続完了のマークが表示されることを確認します。
2.BluetoothAdapterの準備
EV3とAndroidの接続には、BluetoothAdapterを用意し、EV3のMACアドレスを利用して接続します。
MainActivity.java ファイルに次の様な記述を追記します。
BluetoothAdapter を利用するために、BluetoothAdapter をインポートします。
import android.bluetooth.BluetoothAdapter;
MainActivity クラスに、BluetoothAdapterのメンバ変数を用意します。
private BluetoothAdapter mBtAdapter = null;
onCreate メソッド内で、BluetoothAdapterを生成します。
mBtAdapter = BluetoothAdapter.getDefaultAdapter();
3.デバイスリスト用のボタンを実装
3-1.ボタンの作成
Bluetoothデバイスリストを表示させるためのボタンを作成します。
res/layout/activity_main.xml に ボタン用の記述を追加します。
<Button
    android:id="@+id/bt.connect"
    android:layout_width="match_parent"
    android:layout_height="wrap_content"
    android:text="@string/connect" />
これに合わせて res/values/string.xml に ボタンの名前を設定します。
<string name="connect">Connect</string>
※この時、activity_main.xml テンプレートに記述されていた、hello_world の部分は、使わないので、削除しておきましょう。
※同様に、string.xml に記述されていた、hello_world の記述部分も不要です。
3-2.Bluetoothデバイスリストの表示
Bluetoothデバイスリストを表示するために、MainActivity.javaに対して、次の様な変更を行います。
ボタンのインスタンス変数を作成します。
private Button mConnectButton;
Bluetoothの接続状態を表す定数や、接続が成功したかどうかを表す定数を定義します。
private static final int REQUEST_ENABLE_BT = 1;
private static final int REQUEST_CONNECT_DEVICE = 2;

private ProgressDialog mProgressDialog;

private static final int FAILED_TO_CONNECT = 1;
private static final int SUCCEEDED_CONNECTING = 2;
onCreate メソッド内で、ボタンインスタンスを生成します。
mConnectButton = (Button) findViewById(R.id.bt_connect);
ボタンが押されたら、デバイスリストを表示する様に実装します。
mConnectButton.setOnClickListener(new OnClickListener() {
  @Override
  public void onClick(View v) {
    findEV3Device(); // Show the device list
  }
});
デバイスリストを表示するためのメソッドを実装します。
private void findEV3Device() {
  // Turns on Bluetooth
  if (!mBtAdapter.isEnabled()) {
    Intent enableIntent = new Intent(BluetoothAdapter.ACTION_REQUEST_ENABLE);
    startActivityForResult(enableIntent, REQUEST_ENABLE_BT);
    return;
  }
  // Starts DeviceListActivity
  Intent serverIntent = new Intent(this, DeviceListActivity.class);
  startActivityForResult(serverIntent, REQUEST_CONNECT_DEVICE);
}
Bluetooth接続を試みるメソッド。
private void foundEV3Device(BluetoothDevice device) {
AndroidComm.getInstance().setDevice(device); // Set device

mProgressDialog = new ProgressDialog(this);
mProgressDialog.setTitle("接続中");
mProgressDialog.setMessage("しばらくお待ちください");
mProgressDialog.setProgressStyle(ProgressDialog.STYLE_SPINNER);
mProgressDialog.setCanceledOnTouchOutside(false);
mProgressDialog.show();

// Connect to EV3
new Thread(new Runnable() {
    @Override
    public void run() {
    try {
        EV3Command.open();
	mConnectingHandler.sendEmptyMessage(SUCCEEDED_CONNECTING);
    }
    catch (Exception e) {
        // This exception also occurs when this device hasn't
        // finished paring
        mConnectingHandler.sendEmptyMessage(FAILED_TO_CONNECT);
    }
        mProgressDialog.dismiss(); // Dismiss the dialog
    }
    }).start();
}
Bluetoothで接続したとき、ボタンを切断用に変更するメソッド。
private void connected() {
    mConnectButton.setText("Disconnect");
    mConnectButton.setOnClickListener(new OnClickListener() {
        @Override
        public void onClick(View v) {
            disconnect();
        }
    });
    Toast.makeText(this, "EV3 Connected", Toast.LENGTH_SHORT).show();
}
Bluetoothで接続していないとき、ボタンを接続用に変更するメソッド。
private void disconnect() {
    // Close connection
    try {
        EV3Command.close();
    }
    catch (RuntimeException e) {
    }

    mConnectButton.setText("Connect");
    mConnectButton.setOnClickListener(new OnClickListener() {
        @Override
        public void onClick(View v) {
            findEV3Device();
        }
    });
    Toast.makeText(this, "EV3 Disconnected", Toast.LENGTH_SHORT).show();
}
Bluetooth接続判断用メソッド。
private Handler mConnectingHandler = new Handler(new Handler.Callback() {
    @Override
    public boolean handleMessage(Message message) {
        switch (message.what) {
            case FAILED_TO_CONNECT:
                new AlertDialog.Builder(MainActivity.this)
                        .setTitle("Bluetooth connection error")
                        .setMessage("Bluetooth デバイスとの接続に失敗しました")
                        .setPositiveButton("OK", null)
                        .show();
                return true;

            case SUCCEEDED_CONNECTING:
                connected();
                return true;
        }
        return false;
    }
});
デバイスリスト用アクティビティからの情報を取得して、コントロールするメソッド。
@Override
protected void onActivityResult(int requestCode, int resultCode, Intent data) {
    switch (requestCode) {
        case REQUEST_ENABLE_BT:
            if (resultCode == Activity.RESULT_OK) {
            }
            break;

        case REQUEST_CONNECT_DEVICE:
            // When DeviceListActivity returns with a device to connect
            if (resultCode == Activity.RESULT_OK) {
                // Get the device MAC address
                String address = data.getExtras().getString(
                        DeviceListActivity.EXTRA_DEVICE_ADDRESS);
                // Get the BluetoothDevice object
                BluetoothDevice device = mBtAdapter
                        .getRemoteDevice(address);
                // Attempt to connect to the device
                foundEV3Device(device);
            }
            break;
    }
}
Bluetoothデバイスリストを表示するためのアクティビティ、「DeviceListActivity.java」をダウンロードしてインポートします。
DeviceListActivity.java
AndroidManifest.xml に、次の様な記述を追加します。

※なお、この記述は、AndroidSDKのバージョン11以降に対応しているため、 AndroidManifest.xml に記述している、minSdkVersion が11以降になっている必要があります。
また、デバイスリストを表示するためのレイアウト定義スタイル「device_list.xml」や「device_name.xml」を /res/layout にインポートします。
device_list.xml
device_name.xml
同様に、「strings.xml」を /res/values にインポートします。
strings.xml
これで、デバイスリストから、Bluetothが有効になっている、LEGO Mindstorms EV3を選択して、接続できるようになりました。
プロジェクトを実行して、Bluetooth接続可能なEV3のリストが表示されることを確認してみましょう。
今回は、LEGO MINDSTORMS EV3 を接続するまでを紹介しました。
次は、この環境を利用して、AndroidからLEGO MINDSTORMS EV3をコントロールしてみたいと思います。
