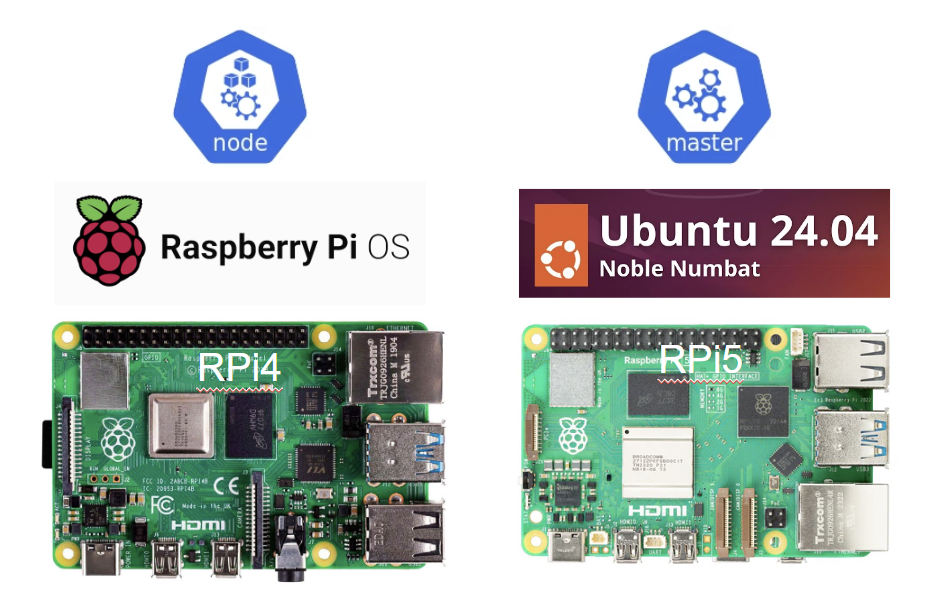
やりたいこと
環境
- Master node
- Device: Raspberry Pi 5
- OS: Ubuntu 24.04 (64-bit)
- Worker node
- Device: Raspberry Pi 4
- OS: Ubuntu Core 24 (64-bit)
- Kubernetes
$ kubectl version Client Version: v1.31.1 Kustomize Version: v5.4.2 Server Version: v1.31.0 $ kubeadm version kubeadm version: &version.Info{Major:"1", Minor:"31", GitVersion:"v1.31.1", GitCommit:"948afe5ca072329a73c8e79ed5938717a5cb3d21", GitTreeState:"clean", BuildDate:"2024-09-11T21:26:49Z", GoVersion:"go1.22.6", Compiler:"gc", Platform:"linux/arm64"} - CRE: cri-o
$ crio version
...
Version:        1.31.1
...
手順
Master nodeセットアップ
準備
- Raspberry Pi 5にUbuntu 24.04をインストール
-
Raspberry Pi Imagerで下記のように設定しSDカードを作成
- Raspberry Piデバイス:Raspberry Pi 5
- OS:Ubuntu Desktop 24.04.1 LTS (64-bit)
- Other general-purpose OS > Ubuntu > Ubuntu Desktop 24.04.1 LTS (64-bit)を選択
- ストレージ:SDXC CARD
- SDカードをRaspberry Pi 5に挿入して起動、初期設定
-
Raspberry Pi Imagerで下記のように設定しSDカードを作成
- sshでアクセスできるようにする
- Ubuntu起動後、Wi-Fiの設定
- openssh serverのインストール
$ sudo apt update
$ sudo apt install -y openssh-server
Kubernetesインストール
-
必要なツールのインストール
$ sudo apt-get install -y software-properties-common curl -
インストールするKubernetesのバージョンに合わせた環境変数設定
$ echo KUBERNETES_VERSION=v1.31 $ echo CRIO_VERSION=v1.31 -
Kubernetesのリポジトリキー・リポジトリを追加
$ curl -fsSL https://pkgs.k8s.io/core:/stable:/$KUBERNETES_VERSION/deb/Release.key | sudo gpg --dearmor -o /etc/apt/keyrings/kubernetes-apt-keyring.gpg $ echo "deb [signed-by=/etc/apt/keyrings/kubernetes-apt-keyring.gpg] https://pkgs.k8s.io/core:/stable:/$KUBERNETES_VERSION/deb/ /" | sudo tee /etc/apt/sources.list.d/kubernetes.list -
CRI-Oのリポジトリキー・リポジトリを追加
$ curl -fsSL https://pkgs.k8s.io/addons:/cri-o:/stable:/$CRIO_VERSION/deb/Release.key | sudo gpg --dearmor -o /etc/apt/keyrings/cri-o-apt-keyring.gpg $ echo "deb [signed-by=/etc/apt/keyrings/cri-o-apt-keyring.gpg] https://pkgs.k8s.io/addons:/cri-o:/stable:/$CRIO_VERSION/deb/ /" | sudo tee /etc/apt/sources.list.d/cri-o.list -
CRI-O, kubelet, kubeadm, kubectl, socatをインストール
$ sudo apt-get update $ sudo apt-get install -y cri-o kubelet kubeadm kubectl socat -
CRI-Oのcgroup設定、サービス起動
$ cat <<EOF | sudo tee /etc/crio/crio.conf.d/02-cgroup-manager.conf [crio.runtime] conmon_cgroup = "pod" cgroup_manager = "cgroupfs" EOF $ sudo systemctl start crio -
swapの無効化
$ sudo systemctl disable swapfile.swap $ sudo systemctl stop swapfile.swap $ sudo swapoff -a $ sudo rm /swapfile -
br_netfilterをロード
$ modprobe br_netfilter -
IP forwardingを有効化
$ sysctl -w net.ipv4.ip_forward=1 $ cat <<EOF | sudo tee /etc/sysctl.d/k8s.conf net.ipv4.ip_forward = 1 EOF $ sudo sysctl --system -
Kubernetes clusterを起動
$ sudo kubeadm init --pod-network-cidr=10.244.0.0/16 -
kubectlの設定$ mkdir -p $HOME/.kube $ sudo cp -i /etc/kubernetes/admin.conf $HOME/.kube/config $ sudo chown $(id -u):$(id -g) $HOME/.kube/config -
flannelのデプロイ
$ kubectl apply -f https://raw.githubusercontent.com/coreos/flannel/v0.25.6/Documentation/kube-flannel.yml
Worker node
準備
- Raspberry Pi 4にRaspberry Pi OSをインストール
-
Raspberry Pi Imagerで下記のように設定しSDカードを作成
- Raspberry Piデバイス:Raspberry Pi 4
- OS:Raspberry Pi OS (64-bit)
- ストレージ:SDXC CARD
- SDカードをRaspberry Pi 4に挿入して起動、初期設定
- 初期セットアップ画面でWi-FiをつなぐとUpdateが走るが、それをすると正常に再起動できなかったため、ネットワークはつながずにセットアップを完了した
-
Raspberry Pi Imagerで下記のように設定しSDカードを作成
- sshでアクセスできるようにする
- Raspberry Pi OS起動後、ターミナルを起動
- Raspberry Pi Software Configuration Toolを起動
$ sudo raspi-config - 3 Interface Options > I1 SSH > Yes を選択し、ssh接続が有効化されることを確認
- cgroup v2のmemory controllerを有効化する
-
/boot/firmware/cmdline.txtを編集$ sudo sed -i -e "1 s/$/ cgroup_enable=memory/" /boot/firmware/cmdline.txt
-
- 再起動
$ sudo reboot
Kubernetesインストール
-
必要なツールのインストール
$ sudo apt-get install -y software-properties-common curl -
インストールするKubernetesのバージョンに合わせた環境変数設定
$ echo KUBERNETES_VERSION=v1.31 $ echo CRIO_VERSION=v1.31 -
Kubernetesのリポジトリキー・リポジトリを追加
$ curl -fsSL https://pkgs.k8s.io/core:/stable:/$KUBERNETES_VERSION/deb/Release.key | sudo gpg --dearmor -o /etc/apt/keyrings/kubernetes-apt-keyring.gpg $ echo "deb [signed-by=/etc/apt/keyrings/kubernetes-apt-keyring.gpg] https://pkgs.k8s.io/core:/stable:/$KUBERNETES_VERSION/deb/ /" | sudo tee /etc/apt/sources.list.d/kubernetes.list -
CRI-Oのリポジトリキー・リポジトリを追加
$ curl -fsSL https://pkgs.k8s.io/addons:/cri-o:/stable:/$CRIO_VERSION/deb/Release.key | sudo gpg --dearmor -o /etc/apt/keyrings/cri-o-apt-keyring.gpg $ echo "deb [signed-by=/etc/apt/keyrings/cri-o-apt-keyring.gpg] https://pkgs.k8s.io/addons:/cri-o:/stable:/$CRIO_VERSION/deb/ /" | sudo tee /etc/apt/sources.list.d/cri-o.list -
CRI-O, kubelet, kubeadm, kubectl, socatをインストール
$ sudo apt-get update $ sudo apt-get install -y cri-o kubelet kubeadm kubectl socat -
CRI-Oのcgroup設定、サービス起動
$ cat <<EOF | sudo tee /etc/crio/crio.conf.d/02-cgroup-manager.conf [crio.runtime] conmon_cgroup = "pod" cgroup_manager = "cgroupfs" EOF $ sudo systemctl start crio -
swapの無効化
$ sudo dphys-swapfile swapoff $ sudo dphys-swapfile uninstall $ sudo update-rc.d dphys-swapfile remove -
必要なモジュールをロード
$ sudo modprobe overlay $ sudo modprobe br_netfilter -
sysctlパラメータの設定・再起動
$ cat <<EOF | sudo tee /etc/sysctl.d/k8s.conf net.bridge.bridge-nf-call-iptables = 1 net.bridge.bridge-nf-call-ip6tables = 1 net.ipv4.ip_forward = 1 EOF $ sudo sysctl --system -
kubeletのDNS情報取得先の設定を変更
$ sudo sed -i 's|resolvConf: /run/systemd/resolve/resolv.conf|resolvConf: /etc/resolv.conf|' /var/lib/kubelet/config.yaml -
CRI-O、kubeletを実行する
$ sudo systemctl enable crio
$ sudo systemctl start crio
$ sudo systemctl enable kubelet
$ sudo systemctl start kubelet
動作確認
- Master node(Raspberry Pi 5)でWorker nodeがReadyとなっていることを確認
$ kubectl get nodes NAME STATUS ROLES AGE VERSION master-desktop Ready control-plane 9h v1.31.1 raspberrypi Ready <none> 9h v1.31.1 - サンプルのDeploymentをデプロイ
$ kubectl apply -f - <<EOF apiVersion: apps/v1 kind: Deployment metadata: name: example-deployment spec: replicas: 3 selector: matchLabels: app: example template: metadata: labels: app: example spec: containers: - name: example-container image: nginx:latest ports: - containerPort: 80 EOF - podが立ち上がっていることを確認
$ kubectl get pods
NAME                                  READY   STATUS    RESTARTS   AGE
example-deployment-86d956c8b7-2s2sr   1/1     Running   0          9h
補足
- 当初はRaspberry Pi5でもUbuntu Core 24 (64-bit)を動かそうと思ったが、初回起動時にフリーズしたっぽくUbuntu 24.04に変更した
- モジュール、sysctlパラメータの詳細、過不足等不明なところが多いため追加で勉強が必要
