はじめに
前回はサーバーサイドの実装をしました。
今回はクライアントサイドの実装をやります。
前回作成したAPIとクライアントの連携です。
ベースのゲームはunity1weekでもよくあるような簡単なものなので特に説明しません。
ランキング部分だけ書いていきます。
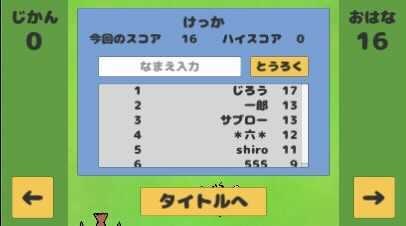
ランキングモーダルの入れ物を実装する
以下の画像のようなランキングモーダルを作成します。
細かな要素
UI>Panelよりモーダルを作成します。ResultPanelと名付けました。
ResultPanelを親として要素を作成していきます。
「今回のスコア」、「ハイスコア」をUI>Textから作成します。
見出し部分はそれぞれNowTitle、HighTitleと名付けました。
数字部分はそれぞれNowScore、HighTitleと名付けました。
「とうろく」ボタンはUI>Buttonから作成しました。
InputField
こちらを参考にしています。
「なまえ入力」はUI>InputFieldから作成しました。
子オブジェクトにPlaceholderとTextがあると思います。
Placeholderに初期表示が入るので「なまえ入力」と入れておきました。
実際に入力されるテキストがTextに入るようになっています。
日本語入力を受け付けるため、Line TypeをMultiLineNewlineに変更します。
ユーザー名は10文字以内で受け付けたいので、Character Limitに10を設定しておきます。
Scroll View
こちらを参考にしています。
ランキング部分はUI>Scroll Viewから作成しました。
子オブジェクトにViewport、Scrollbar Horizontal、Scrollbar Verticalがあると思います。
横スクロールは不要なのでScrollbar Horizontalを削除しておきます。
Viewportの子オブジェクトであるContentにCreate EmptyからRankDataという子オブジェクトを作成します。
これがランキングの1行分になります。
RankDataの子にRank、UserName、ScoreというTextを作成し、位置を調整します。
レイアウトを整えるため、ContentにContent Size FilterコンポーネントとVertical Layout Groupコンポーネントを追加します。
Content Size FilterではVertical FitをPreferred Sizeに変更します。
Vertical Layout GroupではControl Child SizeのWidthにチェックをつけます。
RankDataをコピーして増やせばどんどん行が増えていくはずです。
RankDataをprefab化し、Hierarchyからは消しておきます。
後から取得したランキング情報に合わせてスクリプトでRankDataを作成するようにします。
ユーザー情報を保存する
プレイしているユーザーを識別するため、uuidをjsonで保存、取得する処理を実装します。
こちらを参考にしました。
まず、保存するデータのクラスを用意します。
using System.Collections;
using System.Collections.Generic;
using UnityEngine;
using System;

// 保存するユーザーデータ
[Serializable]
public class SaveData
{
    public string uuid;
}
[Serializable]を使うためには以下をuseしておく必要があります。
using System;
次にユーザーデータを保存、取得するクラスを用意します。
まずはオブジェクト起動時に保存先のパスと保存するデータを読み込んでおきます。
using System.Collections;
using System.Collections.Generic;
using UnityEngine;
using System.IO;

public class SaveManager : MonoBehaviour
{
    string filePath;
    SaveData save;

    void Awake()
    {
        filePath = Application.persistentDataPath + "/" + ".savedata.json";
        save = new SaveData();
    }
}
IOクラスが必要なのでuseしておきましょう。
using System.IO;
次に保存するメソッドを用意します。
// ユーザーデータを保存する
public void Save(string uuid)
{
    save.uuid = uuid;
    string json = JsonUtility.ToJson(save);
    StreamWriter streamWriter = new StreamWriter(filePath);
    streamWriter.Write(json); streamWriter.Flush();
    streamWriter.Close();
}
保存したいuuidを受け取り、jsonに変換してファイルに書き込んでいます。
次に取得するメソッドを用意します。
// ユーザーデータを読み込む
public void Load()
{
    // 既存ユーザー
    if(File.Exists(filePath))
    {
        StreamReader streamReader;
        streamReader = new StreamReader(filePath);
        string data = streamReader.ReadToEnd();
        streamReader.Close();
        save = JsonUtility.FromJson<SaveData>(data);
    }
}
File.Exists(filePath)でファイルが存在するか確かめています。
存在しない場合は新規ユーザーなので読み込みは不要です。
受け取ったjsonデータをデシリアライズします。
save.uuidに保存したuuidが入っているはずです。
ちなみに、File.Delete(filePath);でファイルを削除できます。
Awake()にこれを書いておけばuuidが保存されているファイルが消えるので、新規ユーザーを作り直したいときに使えます。
ユーザー情報取得API連携
こちらを参考にしています。
ユーザー情報取得APIはuuidをポストすると、user_nameとhigh_scoreがレスポンスで返ってくるAPIです。
まずは各パラメータのクラスを作成します。
using System.Collections;
using System.Collections.Generic;
using UnityEngine;
using System;
using System.Text;
using UnityEngine.Networking;
// ユーザー情報取得のAPI
public class UserInfoGetApi : MonoBehaviour
{
    [Serializable]
    private class PostParams
    {
        public string uuid;
    }

    [Serializable]
    public class InfoParams
    {
        public InfoParam[] responseParams;
    }

    [Serializable]
    public class InfoParam
    {
        public string user_name;
        public int high_score;
    }
}
今回のように複数のレスポンスを受け取る場合は上記のように配列と要素の両方を用意しないといけません。
こちらが参考になります。
また、Networkingクラスが必要なのでuseしておきましょう。
using UnityEngine.Networking;
次にリクエストURLを用意しておきます。
string requestURL = "http://localhost:8002/laravel/public/api/user/info/get";
コルーチンで呼びたいので、以下のように書きます。
public void Post(string uuid)
{
    StartCoroutine(PostData(uuid));
}
コルーチンの中身は以下です。
private IEnumerator PostData(string uuid)
{
    var data = new PostParams();
    data.uuid = uuid;
    var json     = JsonUtility.ToJson(data);
    var postData = Encoding.UTF8.GetBytes(json);

    using(var request = new UnityWebRequest(requestURL, UnityWebRequest.kHttpVerbPOST))
    {
        request.uploadHandler = new UploadHandlerRaw(postData);
        request.downloadHandler = new DownloadHandlerBuffer();
        request.SetRequestHeader("Content-Type", "application/json");
        yield return request.SendWebRequest();

        if(request.isNetworkError)
        {
            Debug.Log(request.error);
        }
        else if(request.isHttpError)
        {
            Debug.Log(request.error);
        }
        else
        {
            var jsonParam = request.downloadHandler.text;
            var userInfos = JsonUtility.FromJson<InfoParams>(jsonParam);

            string user_name = userInfos.responseParams[0].user_name;
            int high_score = userInfos.responseParams[0].high_score;
        }
    }
}
受け取ったuuidをjsonにシリアライズし、それをポストしています。
エラーはログに出るようにします。
jsonレスポンスはrequest.downloadHandler.textに入ってくるので、それをデシリアライズし、user_nameとhigh_scoreを抜き出します。
ランキング情報取得API連携
コルーチンまでは先ほどと同じように書けます。
リクエストはなく、レスポンスだけ受け取ります。
using System.Collections;
using System.Collections.Generic;
using UnityEngine;
using System;
using System.Text;
using UnityEngine.Networking;

// ランキング情報取得のAPI
public class UserRankingGetApi : MonoBehaviour
{
    [Serializable]
    public class ResponseParams
    {
        public ResponseParam[] responseParams;
    }

    [Serializable]
    public class ResponseParam
    {
        public string user_name;
        public int score;
    }

    string requestURL = "http://localhost:8002/laravel/public/api/user/ranking/get";

    private IEnumerator GetData()
    {
        ・・・
    }

    public void Get()
    {
        StartCoroutine(GetData());
    }
}
コルーチンの中身は以下です。
private IEnumerator GetData()
{
    using(var request = UnityWebRequest.Get(requestURL))
    {
        yield return request.SendWebRequest();

        if(request.isNetworkError)
        {
            Debug.Log(request.error);
        }
        else if(request.isHttpError)
        {
            Debug.Log(request.error);
        }
        else
        {
            var json = request.downloadHandler.text;
            var rankLists = JsonUtility.FromJson<ResponseParams>(json);

            List<int> ranks = new List<int>();
            List<string> user_names = new List<string>();
            List<int> scores = new List<int>();

            int num = 0;
            foreach (var rankList in rankLists.responseParams)
            {
                ranks.Add(num + 1);
                user_names.Add(rankList.user_name);
                scores.Add(rankList.score);
                num++;
            }
        }
    }
}
ユーザー名、スコアが複数取れるので、順位も加えてそれぞれListに入れてあげます。
ランキング登録API連携
コルーチンまでは先ほどと同じように書けます。
uuid、user_name、scoreをポストし、新規ユーザーの場合は生成したuuidをレスポンスで受け取ります。
using System.Collections;
using System.Collections.Generic;
using UnityEngine;
using System;
using System.Text;
using UnityEngine.Networking;

// ユーザーランキング登録のAPI
public class UserRankingAddApi : MonoBehaviour
{
    [Serializable]
    private sealed class PostParams
    {
        public string uuid;
        public string user_name;
        public int score;
    }

    string requestURL = "http://localhost:8002/laravel/public/api/user/ranking/add";

    private IEnumerator PostData(string uuid, string user_name, int score)
    {
        ・・・
    }

    public void Post(string uuid, string user_name, int score)
    {
        StartCoroutine(PostData(uuid, user_name, score));
    }
}
コルーチンの中身は以下です。
private IEnumerator PostData(string uuid, string user_name, int score)
{
    var data = new PostParams();
    data.uuid = uuid;
    data.user_name = user_name;
    data.score = score;
    var json     = JsonUtility.ToJson(data);
    var postData = Encoding.UTF8.GetBytes(json);

    using(var request = new UnityWebRequest(requestURL, UnityWebRequest.kHttpVerbPOST))
    {
        request.uploadHandler = new UploadHandlerRaw(postData);
        request.downloadHandler = new DownloadHandlerBuffer();
        request.SetRequestHeader("Content-Type", "application/json");
        yield return request.SendWebRequest();

        if(request.isNetworkError)
        {
            Debug.Log(request.error);
        }
        else if(request.isHttpError)
        {
            Debug.Log(request.error);
        }
        else
        {
            string new_uuid = request.downloadHandler.text;
        }
    }
}
新規ユーザーの場合はrequest.downloadHandler.textに新規生成したuuidが入っているはずです。
ランキングモーダルにデータを送る
制限時間30秒のスコアアタック形式のゲームを作成しました。
制限時間が0秒でゲーム終了なので、そのタイミングでまずは保存されているユーザー情報を取得します。
// ユーザー保存データを取得
this.GetComponent<SaveManager>().Load();
既存のユーザーだった場合、保存されていたuuidをポストしてユーザー情報取得APIを使用します。
// ユーザーデータを読み込む
public void Load()
{
    // 既存ユーザー
    if(File.Exists(filePath))
    {
        StreamReader streamReader;
        streamReader = new StreamReader(filePath);
        string data = streamReader.ReadToEnd();
        streamReader.Close();
        save = JsonUtility.FromJson<SaveData>(data);

        // ユーザー情報取得
        this.GetComponent<UserInfoGetApi>().Post(save.uuid);
    }
}
レスポンスからuser_nameとhigh_scoreが返ってくるはずです。
else
{
    var jsonParam = request.downloadHandler.text;
    var userInfos = JsonUtility.FromJson<InfoParams>(jsonParam);

    string user_name = userInfos.responseParams[0].user_name;
    int high_score = userInfos.responseParams[0].high_score;

    this.GetComponent<Scorer>().MakeUser(uuid, user_name, high_score);
}
それを使ってランキングモーダル上部のユーザー結果部分を作成します。
// ユーザー結果を作成
public void MakeUser(string now_uuid, string user_name, int high_score)
{
    uuid = now_uuid;
    userNameText.text = user_name;
    userNameText.interactable = false;
    highScoreText.text = high_score.ToString();

    if(score <= high_score)
    {
        enterButton.GetComponent<Button>().interactable = false;
    }
}
uuidに保存されていたユーザーのuuidを入れてあげます。
「なまえ入力」にuser_nameを、「ハイスコア」にhigh_scoreを入れてあげます。
既存ユーザーなので「なまえ入力」の編集を不可にします。
また、今回のスコアがハイスコアを超えていなければ登録ボタンも押せなくします。
既存ユーザーの場合の処理はこれで完了です。
既存ユーザーの処理の後、共通のランキング表示を作成します。
まずはランキングデータ取得のAPIを実行します。
// ランキングデータ取得
this.GetComponent<UserRankingGetApi>().Get();
rank、user_name、scoreがListで得られると思います。
else
{
    var json = request.downloadHandler.text;
    var rankLists = JsonUtility.FromJson<ResponseParams>(json);

    List<int> ranks = new List<int>();
    List<string> user_names = new List<string>();
    List<int> scores = new List<int>();

    int num = 0;
    foreach (var rankList in rankLists.responseParams)
    {
        ranks.Add(num + 1);
        user_names.Add(rankList.user_name);
        scores.Add(rankList.score);
        num++;
    }
    this.GetComponent<Scorer>().MakeRanking(ranks, user_names, scores);
}
それを使ってランキング部分を作成します。
// ランキング作成
public void MakeRanking(List<int> ranks, List<string> user_names, List<int> scores)
{
    nowScoreText.text = nowScoreText.text = score.ToString();
    resultPanel.SetActive(true);
    titleButton.SetActive(true);

    // 行を生成
    foreach(int rank in ranks)
    {
        rankData = Instantiate(_rankData, transform.position, Quaternion.identity, content);
        rankData.transform.FindChild("Rank").gameObject.GetComponent<Text>().text = rank.ToString();
        rankData.transform.FindChild("UserName").gameObject.GetComponent<Text>().text = user_names[rank - 1];
        rankData.transform.FindChild("Score").gameObject.GetComponent<Text>().text = scores[rank - 1].ToString();
    }
}
「今回のスコア」にscoreを入れてあげます。
はじめ非アクティブにしていたランキングモーダルとタイトルへ戻るボタンをアクティブにします。
受け取ったListの分だけ繰り返し、Scroll ViewのContentにRankDataを作成します。
これでランキング表示も作成できました。
最後にランキング登録処理を実装します。
登録ボタンが押されたときに以下のメソッドを呼び出します。
// 登録
public void OnEnter()
{
    string user_name = userNameText.text;
    userNameText.interactable = false;
    enterButton.GetComponent<Button>().interactable = false;

    // ランキング登録
    this.GetComponent<UserRankingAddApi>().Post(uuid, user_name, score);

    highScoreText.text = score.ToString();

    for(int i = 0; i < content.childCount; i++)
    {
        GameObject.Destroy(content.GetChild(i).gameObject);
    }
}
InputFieldに入力された名前をuser_nameに入れてあげます。
登録は一度しかできないようにしたいので、「なまえ入力」と「とうろく」ボタンを編集不可にします。
ランキング登録のAPI実行後、ハイスコアを更新し、表示しているランキングデータを削除しておきます。
else
{
    // 新規ユーザーならユーザーデータを保存
    if(uuid == null)
    {
        string new_uuid = request.downloadHandler.text;
        this.GetComponent<SaveManager>().Save(new_uuid);
    }

    // ランキング再表示
    this.GetComponent<UserRankingGetApi>().Get();
}
ランキング登録のAPIでは、新規ユーザーの場合は新規生成したuuidをレスポンスで受け取れます。
受け取ったuuidはユーザーデータとして保存しておきます。
次回からはこれが読み込まれ、既存ユーザーとして識別されます。
その後、もう一度ランキング情報取得のAPIを実行します。
これで先ほど登録したデータも含めた新しいランキングが表示されるはずです。
さいごに
これでゲームは完成です。
完成したゲームの説明とGitHubはひとつ目の記事に載せているのでより詳しく確認したい方は見てくださると嬉しいです。