はじめに
TableViewCellに画像を入れる方法について調べたので、メモとしてまとめる事にしました。
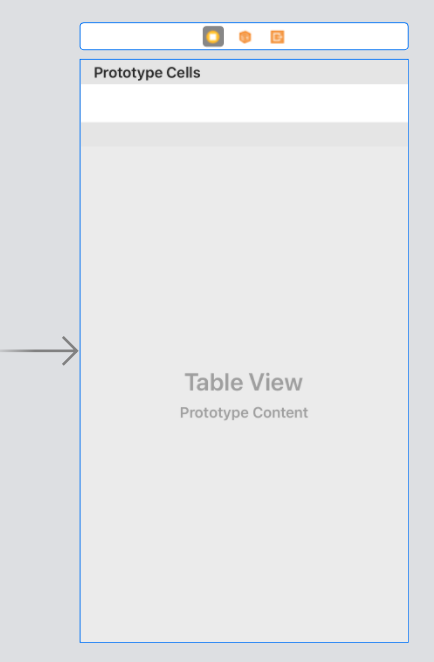
storyboardにTableViewとTableViewCellを準備
cellにIdentifierを付ける
今回はIdentifierは「cell」にしました。

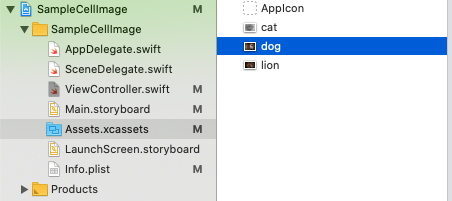
Assets.xcassetsに画像ファイルを入れる
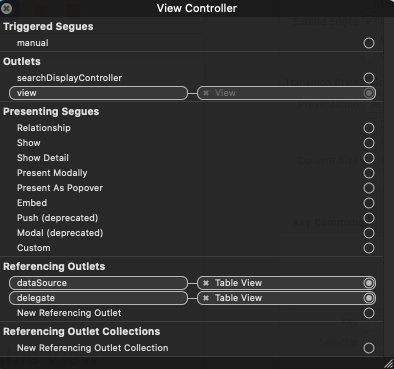
TableViewをdatasouceとdelegateに繋ぐ
UITableViewDelegate,UITableViewDatasourceを追加
ViewController.swift
class ViewController: UIViewController,UITableViewDelegate,UITableViewDataSource {
配列を準備
ViewController.swift
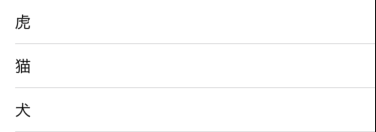
 let animalArray = ["虎", "猫","犬"]
    //画像用
 let imageArray = ["lion", "cat", "dog"]
セルの設定
ViewController.swift
 //セルの個数を指定する
    func tableView(_ tableView: UITableView, numberOfRowsInSection section: Int) -> Int {

        return animalArray.count

    }

    //セルに値を設定する
    func tableView(_ tableView: UITableView, cellForRowAt indexPath: IndexPath) -> UITableViewCell {

        //セルを取得
        let cell = tableView.dequeueReusableCell(withIdentifier: "cell", for: indexPath)

        //セルに表示する値を設定
        //テキストラベル
        cell.textLabel?.text = animalArray[indexPath.row]
        return cell
    }
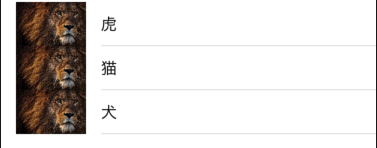
①1つの画像を全てのcellに入れる
ViewController.swift
 //①画像(1つの画像を全てのcellに入れる)
        cell.imageView?.image = UIImage(named: "lion")
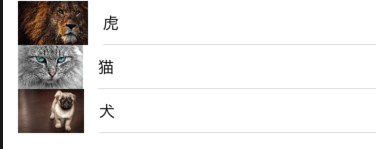
②cellの1つずつに別の画像を入れる
ViewController.swift
 //②画像を複数入れる
        cell.imageView?.image = UIImage(named: imageArray[indexPath.row])
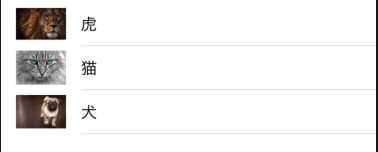
③cellの1つずつに別の画像を入れる(同じサイズにリサイズ)
CGSizeのwidth:50,height:50を変更する事で画像サイズを変更できます。
ViewController.swift
//③画像を同じサイズにリサイズ
        cell.imageView?.image = UIImage(named: imageArray[indexPath.row])?.resize(size: CGSize(width: 50, height: 50))
リサイズメソッド
ViewController.swift
extension UIImage {

    func resize(size: CGSize) -> UIImage {
        let widthRatio = size.width / self.size.width
        let heightRatio = size.height / self.size.height
        let ratio = (widthRatio < heightRatio) ? widthRatio : heightRatio
        let resizedSize = CGSize(width: (self.size.width * ratio), height: (self.size.height * ratio))
        // 画質を落とさないように以下を修正
        UIGraphicsBeginImageContextWithOptions(resizedSize, false, 0.0)
        draw(in: CGRect(x: 0, y: 0, width: resizedSize.width, height: resizedSize.height))
        let resizedImage = UIGraphicsGetImageFromCurrentImageContext()
        UIGraphicsEndImageContext()
        return resizedImage!
    }
}
全てのコード
①②のコードはコメントアウトしてあります。
ViewController.swift
import UIKit

class ViewController: UIViewController,UITableViewDelegate,UITableViewDataSource {

    let animalArray = ["虎", "猫","犬"]
    //画像用
    let imageArray = ["lion", "cat", "dog"]

    override func viewDidLoad() {
        super.viewDidLoad()
        // Do any additional setup after loading the view.
    }

    //セルの個数を指定する
    func tableView(_ tableView: UITableView, numberOfRowsInSection section: Int) -> Int {

        return animalArray.count

    }

    //セルに値を設定する
    func tableView(_ tableView: UITableView, cellForRowAt indexPath: IndexPath) -> UITableViewCell {

        //セルを取得
        let cell = tableView.dequeueReusableCell(withIdentifier: "cell", for: indexPath)

        //セルに表示する値を設定
        //テキストラベル
        cell.textLabel?.text = animalArray[indexPath.row]
        //①画像(1つの画像を全てのcellに入れる)
//        cell.imageView?.image = UIImage(named: "lion")

        //②画像を複数入れる
//        cell.imageView?.image = UIImage(named: imageArray[indexPath.row])

        //③画像を同じサイズにリサイズ
        cell.imageView?.image = UIImage(named: imageArray[indexPath.row])?.resize(size: CGSize(width: 50, height: 50))

        return cell
    }
}

//リサイズメソッド
extension UIImage {

    func resize(size: CGSize) -> UIImage {
        let widthRatio = size.width / self.size.width
        let heightRatio = size.height / self.size.height
        let ratio = (widthRatio < heightRatio) ? widthRatio : heightRatio
        let resizedSize = CGSize(width: (self.size.width * ratio), height: (self.size.height * ratio))
        // 画質を落とさないように以下を修正
        UIGraphicsBeginImageContextWithOptions(resizedSize, false, 0.0)
        draw(in: CGRect(x: 0, y: 0, width: resizedSize.width, height: resizedSize.height))
        let resizedImage = UIGraphicsGetImageFromCurrentImageContext()
        UIGraphicsEndImageContext()
        return resizedImage!
    }
}
終わりに
初学者のため、もし間違いがあれば教えていただければ幸いです。
参考サイト