ThingWorx Java SDK サンプル解説 - SimpleThing 編
対象バージョン
本記事は ThingWorx 8 を対象として記載しています。ThingWorx 6、ThingWorx 7 でも動作するはずですが未検証です。また、ThingWorx 9 以降は動作しなくなる可能性があります。
対象読者
本記事は Java 言語の基本的な知識と、ThingWorx の基本機能を理解しているかたを対象としています。
ThingWorx Java SDK とは
ThingWorx はサーバー機能の他に、デバイスやクライアント側に組み込むアプリケーションを開発するためのソフトウェア開発キット(Software Development Kit: SDK)を提供しています。現在利用可能なプラットフォームは、
- Java
- Android
- C
- .Net
- iOS
となっており、それぞれThingWorx のマーケットプレイスから入手可能です。なおマーケットプレイスの利用には無料のアカウントを登録する必要があります。
ThingWorx SDK を利用して作成したプログラムは、ThingWorx サーバーと通信し、下記の処理を実行します。
- データを ThingWorx サーバーへ送信する
- データを ThingWorx サーバーから受け取る
- ローカルのメソッドを ThingWorx サーバーから実行する
本記事では、マーケットプレイスから入手できるThingWorx Java SDKのサンプルプログラムを解説しながら、これらの機能を概観します。
以下、ThingWorx Java SDK で作成されたプログラムを、単に Java クライアントと呼びます。
Javaクライアントの構造
Java クライアントは、大きく分けて二つのクラスで構成されます。
- ConnectedThingClient を継承した実装クラス(Concrete Class)。このサンプルでは、SimpleThingClient という名前でクラスが定義されます。
- VirtualThing を継承した実装クラス。このサンプルでは、SimpleThing という名前でクラスが定義されます。
ConnectedThingClient を実装したクラスは、ThingWorx サーバーとの WebSocket 接続を確立させ、Always On プロトコルでの通信を担います。また、VirtualThing クラスの processScanRequest() メソッドを呼び出し、VirtualThing のインスタンスに ThingWorx サーバーへのデータ送信を促します。ThingWorx サーバーとの接続に SSL を使うのか、ApplicationKey は何を使うのかなど、通信の確立と管理の実際を ConnectedThingClient は司ります。
VitualThing を実装したクラスは、ConnectedThingClient が確立したソケットを通じて実際のデータを ThingWorx サーバーへ送信する処理を実行します。Thing がどういったプロパティを持つのか、プロパティがどういう条件を満たしたらサーバーに送信するのかなどを細かく処理するのは VirtualThing 実装クラスの役目になります。
ThingWorx サーバーから見た Java クライアント
Java クライアントに限らず、ThingWorx SDK を使用して作成したクライアントはすべて、ThingWorx サーバーからは Remote Thing として見えます。本記事では紹介しませんが、Kepware(ThingWorx Industrial Connectivity) も同様に Remote Thing として見えるので、ThingWorx サーバー上でアプリケーションを作成する開発者は、Remote Thing が実際にどのような言語やプラットフォームを使っているのか、その詳細を知ることなく統一的な Thing のモデリングが可能になります。
ThingWorx Java SDK の入手
ThingWorx マーケットプレイスからThingWorx Java SDKを入手します。入手するには、PTC に無料のアカウント登録が必要です。
ThingWorx Java SDK は zip 形式でダウンロードされます。zip ファイルを回答すると、次のようなフォルダ構成になっています。
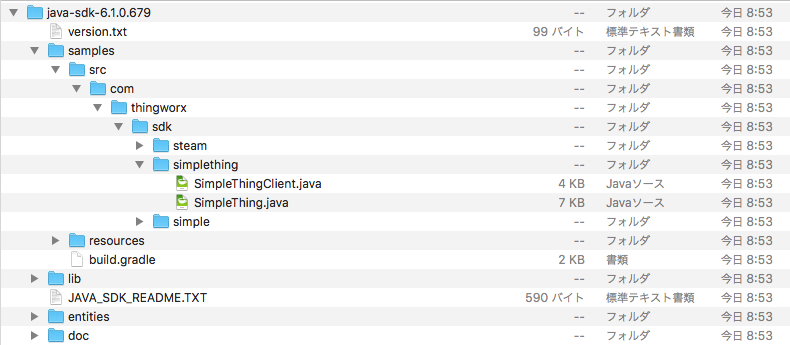
回答したフォルダの直下にある samples フォルダにすべての(といっても二つだけですが)サンプルプログラムが格納されています。
Packageは下記の三つが含まれていますが、
- com.thingworx.sdk.steam
- com.thingworx.sdk.simplething
- com.thingworx.sdk.simple
今回説明するのは com.thingworx.sdk.simplething になります。
早速 Samples/src/com/thingworx/sdk/simplething フォルダにある、ふたつの Java ソースコードを見ていきましょう。
SimpleThingClient.java
SimpleThingClient.javaは、ConnectedThingClient 抽象クラスを実装するクラスで、ThingWorx サーバーとの通信処理を担います。
コード自体はとても短いものなので、最初に全体を見渡して見ましょう。なお、下記のコードサンプルは改行位置が見辛いですが、改行位置の調整はせずサンプルコードそのままを掲載しています。
package com.thingworx.sdk.simplething;

import org.slf4j.Logger;
import org.slf4j.LoggerFactory;

import com.thingworx.communications.client.ClientConfigurator;
import com.thingworx.communications.client.ConnectedThingClient;
import com.thingworx.communications.client.things.VirtualThing;

public class SimpleThingClient extends ConnectedThingClient {

    private static final Logger LOG = LoggerFactory.getLogger(SimpleThingClient.class);

    private static String ThingName = "SimpleThing_1";

    public SimpleThingClient(ClientConfigurator config) throws Exception {
        super(config);
    }

    public static void main(String[] args) {

        ClientConfigurator config = new ClientConfigurator();

        // Set the URI of the server that we are going to connect to
        config.setUri("wss://localhost:443/Thingworx/WS");

        // Set the ApplicationKey. This will allow the client to authenticate with the server.
        // It will also dictate what the client is authorized to do once connected.
        config.setAppKey("xxxxxxxx-xxxx-xxxx-xxxx-xxxxxxxxxxxx");

        // This will allow us to test against a server using a self-signed certificate.
        // This should be removed for production systems.
        config.ignoreSSLErrors(true); // All self signed certs

        try {

            // Create our client.
            SimpleThingClient client = new SimpleThingClient(config);

            // Start the client. The client will connect to the server and authenticate
            // using the ApplicationKey specified above.
            client.start();

            // Wait for the client to connect.
            if (client.waitForConnection(30000)) {

                LOG.info("The client is now connected.");

                //
                // Create a VirtualThing and bind it to the client
                ///////////////////////////////////////////////////////////////

                // Create a new VirtualThing. The name parameter should correspond with the
                // name of a RemoteThing on the Platform.
                SimpleThing thing = new SimpleThing(ThingName, "A basic virtual thing", client);

                // Bind the VirtualThing to the client. This will tell the Platform that
                // the RemoteThing 'Simple1' is now connected and that it is ready to
                // receive requests.
                client.bindThing(thing);

                // This will prevent the main thread from exiting. It will be up to another thread
                // of execution to call client.shutdown(), allowing this main thread to exit.
                while (!client.isShutdown()) {

                    Thread.sleep(15000);

                    // Every 15 seconds we tell the thing to process a scan request. This is
                    // an opportunity for the thing to query a data source, update property
                    // values, and push new property values to the server.
                    //
                    // This loop demonstrates how to iterate over multiple VirtualThings
                    // that have bound to a client. In this simple example the things
                    // collection only contains one VirtualThing.
                    for (VirtualThing vt : client.getThings().values()) {
                        vt.processScanRequest();
                    }
                }

            } else {
                // Log this as a warning. In production the application could continue
                // to execute, and the client would attempt to reconnect periodically.
                LOG.warn("Client did not connect within 30 seconds. Exiting");
            }

        } catch (Exception e) {
            LOG.error("An exception occurred during execution.", e);
        }

        LOG.info("SimpleThingClient is done. Exiting");
    }
}
早速コードの中身を見ていきましょう。まずは import 文から。
package com.thingworx.sdk.simplething;

import org.slf4j.Logger;
import org.slf4j.LoggerFactory;

import com.thingworx.communications.client.ClientConfigurator;
import com.thingworx.communications.client.ConnectedThingClient;
import com.thingworx.communications.client.things.VirtualThing;
Package の宣言、SLF4J のインポートに続き、ThingWorx のクラスが三つほどインポートされています。これらは ThingWorx サーバーとの接続を簡単に記述するためのヘルパークラスである ClientConfigurator と、COnnectedThingClient 抽象クラス、そして VirutalThing 抽象クラスです。
つづいてクラス定義ですが、ここでは ConnectedThingClient クラスを実装することを宣言しています。
public class SimpleThingClient extends ConnectedThingClient {
続いてロガーの設定です。
private static final Logger LOG = LoggerFactory.getLogger(SimpleThingClient.class);
SLF4Jのlogback.xml のサンプルファイルは ThingWorx Java SDK では配布されませんので、必要に応じて作成してください。(作成しなくてもサンプルの動作に問題はありません)
SimpleThingClientクラスが内部的に使用するデータを定義します。
private static String ThingName = "SimpleThing_1";
ここで定義している "ThingName" は後ほど VirtualThing をインスタンス化する際に使用します。
次にコンストラクタの処理。
    public SimpleThingClient(ClientConfigurator config) throws Exception {
        super(config);
    }
ここも特別な処理は実施していませんが、コンストラクタに ClientConfigurator クラスを引数として渡していることに注意してください。
ClientConfigurator は Java クライアントが ThingWorx サーバーに接続する際の通信の実際のオプションを設定するヘルパークラスです。サンプルコードでは、コンストラクタに続いてこの ClientConfigurator オブジェクトを作成しています。
なお、本記事を通じでコードサンプル中に出てくる日本語のコメントは、筆者が翻訳したものです。実際のサンプルコードのコメントは英語です。
        ClientConfigurator config = new ClientConfigurator();

        // 接続先のサーバーURLの指定。
        config.setUri("wss://localhost:443/Thingworx/WS");

        // ApplicationKeyの指定。サーバーはここに指定したApplicationKeyで認証を行う。
        // また、一旦サーバーに接続した後にこのクライアントがどういった処理を行えるかを、
        // ここに指定した ApplicationKeyを元に制限する。
        config.setAppKey("xxxxxxxx-xxxx-xxxx-xxxx-xxxxxxxxxxxx");

        // サーバーの自己署名証明書を利用可能にする。開発からテストフェーズでの使用を推奨。
        // この設定は本番システムでは削除されるべきである。
        config.ignoreSSLErrors(true); // All self signed certs
setUri でありがちなミスとして、URL のスキーム部分にwssを指定(SSL 通信になります)しているにも関わらず、80 だったり 8080 だったりと、ThingWorx サーバー側が非 SSL 通信を期待しているポート番号を指定してしまう、というものがあります。
また、万一 WebSocket ではなく HTTP/1.0 あるいは HTTP/1.1 で接続したい場合には、URLのスキーム部分をhttp/httpsに指定します。
また、ApplicationKey は、ThingWorx サーバー側で発行したものを設定します。ApplicationKeyはデバイスにBasic認証やForm認証をさせずにThingWorxサーバーにアクセスさせるための重要な鍵ですので、取り扱いには注意が必要です。筆者はデモ用のプログラムでは外部のテキストファイルからApplicationKeyを読み込ませるようにしていますが、そうした実装はセキュリティ上の脆弱性に容易に結びつくので、本番のシステムでは採用しない方が良いでしょう。
接続先のThingWorxサーバーの指定が終わったので、早速接続します。
       try {

            // SimpleThingClientのインスタンスを作る。
            SimpleThingClient client = new SimpleThingClient(config);

            // サーバーに接続し、上記で設定したAPplicationKeyを使って認証を受ける。
            client.start();
ThingWorx サーバーに対して、WebSocket on SSL で接続するためのコードはこれだけです。HttpURLConnection などを使用してコネクションを自分で張る必要はありません。
ThingWorx サーバーに無事接続したことを確認して、VirtualThing 実装クラスのインスタンスを作成します。このサンプルではインスタンス化している VirtualThing は一つだけですが、必要に応じて任意の数の VirtualThing を作成できます。VirtualThing で行う処理の紹介は本記事の後半に記載します。
            if (client.waitForConnection(30000)) {

                LOG.info("The client is now connected.");

                // VirtualThingを作成し、自分自身のインスタンス(client)へバインドする。
                ///////////////////////////////////////////////////////////////

                // 新しいVirtualThingを一つ作成する。
                // ThingName は ThingWorx サーバー上の RemoteThing の名前と
                // 一致する必要がある。
                SimpleThing thing =
                                new SimpleThing(ThingName, "Comment", client);

                // 作成した VirtualThing を SimpleThingClient の
                // インスタンス(自分自身)へバインドする。この処理で、'Simple1' Thing は
                // ThingWorx サーバーに接続し、データの送受信が可能になる。
                client.bindThing(thing);
client.waitForConnection(30000) は、サーバーへの接続完了を最大 30秒間待機する指定です。30秒以内に接続が完了するとこのメソッドはすぐに true を返します。指定している 30秒でサーバーへの接続が完了しない場合には、false を戻します。
ここまでの処理で VirtualThing のインスタンスは ThingWorx サーバーへ接続し、データの受け渡しを行う準備が完了しています。実際のデータの受け渡しはいろいろなタイミングで行えますが、サンプルプログラムでは簡単な方法を紹介しています。
                // ループ処理をおこない、main()メソッドが終了しないようにする。
                // main()を終了するには、client.shutdown()を使用する。
                while (!client.isShutdown()) {

                    Thread.sleep(15000);

                    // 15 秒おきにバインドしている VirtualThing に対して
                    // 「スキャン要求」を行う。「スキャン要求」は VirutalThing が
                    // ハードウェアからデータを読み取って ThingWorx サーバーの
                    // プロパティ値を更新する契機となる。
                    //
                    // 下記のループ処理は、複数の VirtualThing に対してどのように
                    // 「スキャン要求」を発行するかをデモしてもの。
                    // このサンプルコードでは、Thing は一つしかないので、
                    // Collection vt に含まれる Thing は一つしかなく、
                    // 処理は一度しか行われない。
                    for (VirtualThing vt : client.getThings().values()) {
                        vt.processScanRequest();
                    }
                }
(!client.isShutdown()) で ThingWorx サーバーに対する接続が有効なのか、それとも停止中なのかを判断しています。その後、15秒間スリープした後、client.getThings().values() メソッドで自分自身にバインドしている VirutalThing(への参照)のリストを得ています。getThings().values() メソッドは Collection を返しますので、それをそのまま for-each 文で回しながら、Collection に含まれる VirtualThing(=自分自身にバインドしている VirtualThing )のそれぞれのインスタンスの processScanRequest() メソッドを呼び出しています。
コードの残りの部分はエラー処理です。
           } else { // client.waitForConnection(30000)に対応
                //
                // WARNレベルでログを書き出す。商用環境ではアプリケーションは実行を継続し、
                // clientは定期的に再接続を試みるように実装可能。
                LOG.warn("Client did not connect within 30 seconds. Exiting");
            }
        } catch (Exception e) {
            LOG.error("An exception occurred during execution.", e);
        }

        LOG.info("SimpleThingClient is done. Exiting");
    }
}
Java クライアントのふたつのクラスのうち、SimpelThingClient クラスの実装はこれでお終いです。サーバーへの接続などの面倒な作業はすべて ConnectedThingClient 抽象クラスで実装されいるので、アプリケーション開発者が書かなければならないコードが大幅に削減されていることがわかります。
SimpleThing.java
それでは、もうひとつのクラス SimpelThing のコードを見ていきましょう。SimpleThing は VirtualThing を継承したクラスであり、ConnectedThingClient クラスのインスタンス(SimpleThingCilent)を通じて ThingWorx サーバーとデータの受け渡しを行います。
package com.thingworx.sdk.simplething;

import java.util.Random;

import org.slf4j.Logger;
import org.slf4j.LoggerFactory;

import com.thingworx.communications.client.ConnectedThingClient;
import com.thingworx.communications.client.things.VirtualThing;
import com.thingworx.metadata.PropertyDefinition;
import com.thingworx.metadata.annotations.ThingworxPropertyDefinition;
import com.thingworx.metadata.annotations.ThingworxPropertyDefinitions;
import com.thingworx.metadata.annotations.ThingworxServiceDefinition;
import com.thingworx.metadata.annotations.ThingworxServiceParameter;
import com.thingworx.metadata.annotations.ThingworxServiceResult;
import com.thingworx.types.primitives.IPrimitiveType;
import com.thingworx.types.primitives.IntegerPrimitive;
SimpleThingClient クラスの実装に比べてインポートしているパッケージが増えています。com.thingworx.metadata.* は、ThingWorx サーバーとの間で送受信するデータの詳細を定義するために使用されます。com.thingworx.types.primitives.* は、Java 言語のデータ型から ThingWorx のデータ型への変換を行うヘルパークラス群です。このサンプルでは Integer のみを扱っているため、Integer を変換するためのクラスのみを読み込んでいます。
つづいて、Thing が所持するプロパティの定義です。「Remote Thing にどのようなプロパティを持っているか」を ThingWorx サーバーに通知するための仕組みです。
@ThingworxPropertyDefinitions(properties = {

        // 時系列データを収集するための設定。
        // 収集されたそれぞれの値は、processScanRequest()メソッド内部で
        // ThingWorxサーバーへ自動的に送信される。
         @ThingworxPropertyDefinition(
                name = "Temperature", description = "The device temperature",
                baseType = "NUMBER",
                aspects = { "dataChangeType:NEVER",
                            "dataChangeThreshold:0",
                            "cacheTime:0",
                            "isPersistent:FALSE",
                            "isReadOnly:FALSE",
                            "pushType:ALWAYS",
                            "isFolded:FALSE",
                            "defaultValue:0"
                    }
        ),

        // 次のプロパティも同様にサーバーへ送信されるが、上記とは違い、値に変化があった時のみ
        // 処理される。
        @ThingworxPropertyDefinition(
                name = "Humidity", description = "The device humidity",
                baseType = "NUMBER",
                aspects = { "dataChangeType:VALUE",
                            "dataChangeThreshold:0",
                            "cacheTime:0",
                            "isPersistent:FALSE",
                            "isReadOnly:FALSE",
                            "pushType:VALUE",
                            "defaultValue:0"
                    }
        ),

        // このプロパティはサーバー側に自動的に送信されない。サーバーがこのプロパティの値を
        // 参照したいときには、ThingWorxサーバー上のアプリケーション側から読み取り処理を
        // 実施しなければならない。
        @ThingworxPropertyDefinition(
                name = "SetPoint", description = "The desired temperature",
                baseType = "NUMBER",
                aspects = { "dataChangeType:NEVER",
                            "dataChangeThreshold:0",
                            "cacheTime:-1",
                            "isPersistent:TRUE",
                            "isReadOnly:FALSE",
                            "pushType:NEVER",
                            "defaultValue:70"
                    }
        )
})
上記のアノテーションでは、プロパティを三つ用意しています。"Temperature"、"Humidity"、"SetPoint" ですね。それぞれのプロパティは、"pushType" でデータのプッシュタイミングを指定しています。データのプッシュは processScanRequest の内部で行われますが、どのデータを送るかは "pushType" に設定した値によって異なります。"pushType" の値がそれぞれ、
- ALWAYS では、常にデータをサーバー側へ送ります。
- VALUE では、前回のデータから変化があった時にサーバーへ送ります。変化がない場合には、サーバーへは送りません。
- NEVER では、
processScanRequest()の実行時にはサーバーへデータを送りません。
という動作をします。VALUE に指定するとデータが変化しない時はサーバー側へ送信しませんので、データの通信量が抑えられます。どのくらいデータが変化したらサーバー側へ送るかを指定する場合には、"dataChangeThreshold" に閾値を設定します。
さて、続いて VirtualThing 実装部分です。
/**
 * 基本的なVirtualThing。プロパティを二つと、”サービス”をひとつ実装する。
 * また、定期的なアクション実行のために processScanRequest を実装する。
 */
public class SimpleThing extends VirtualThing {

    private static final Logger LOG = LoggerFactory.getLogger(SimpleThing.class);

    /**
     * カスタムのコンストラクタ。アノテーションを処理してオブジェクトに反映するための
     * initializeFromAnnotations を呼び出すためにコンストラクタは自前としている。
     * @param name Thing の名前.
     * @param description Thing の説明.
     * @param client この Thing がバインドするべき ConnectedThingClientクラスの名前
     */
    public SimpleThing(String name,
                       String description,
                       ConnectedThingClient client) throws Exception {

        super(name, description, client);
        this.initializeFromAnnotations();

        try {
            this.setPropertyValue("SetPoint", new IntegerPrimitive(70));
        } catch (Exception e) {
            LOG.warn("Could not ser default value for SetPoint");
        }
    }
SimpleThing のコンストラクタはオーバーライドされていて、String 型の引数をふたつと、ConnectedThingClient クラスのオブジェクト参照を一つ受け取ります。この引数は、前述した SimpleThingClient.java の次のコードと一致していることに注意してください。
                SimpleThing thing =
                                new SimpleThing(ThingName, "Comment", client);
ThingWorx サーバーへの接続を管理しているのは、SimpleThingClient です。SimpleThing クラスは、SimpleThingClient への参照をここで受け取っています。
this.initializeFromAnnotations() メソッドは、前段で定義したアノテーションからオブジェクトを生成する処理です。
その後にある try - catch 節では、"SetPoint" プロパティに初期値を設定しています。this.setPropertyValue() メソッドの二番目の引数が、"70" という Java のプリミティブ型ではなく、IntegerPrimitive() メソッドを呼び出して ThingWorx のオブジェクト型へ変換されていることに注意してください。
続く部分は、processScanRequest() の実装です。このメソッドは、SimpleThingClient.java 内で、次の for-each 内で呼ばれていました。
                    for (VirtualThing vt : client.getThings().values()) {
                        vt.processScanRequest();
実際の processScanRequest()メソッドを見ていきましょう。
   /**
     * このメソッドはVirtualThingに定期的に処理を行うためのインタフェースを提供する。
     * このメソッドの呼び出しを契機として、データを読み取って更新し、サーバーへ送信し、
     * その他のアクションを起こす。
     */
    @Override
    public void processScanRequest() {

        // このメソッド内で"Temperature"と"Humidity"の値をランダムに生成・変更する。
        // 実際のシステムでは、センサーデータを読み取ったりデータソースにアクセスしたりする。
        Random random = new Random();

        int temperature = 50 + random.nextInt(51);
        int humidity = random.nextInt(101);

        try {

            // Thing の内部プロパティを更新する。この処理ではサーバー側のプロパティは
            // 更新されない。単に内部プロパティの更新処理にとどまる。
            this.setPropertyValue("Temperature", new IntegerPrimitive(temperature));
            this.setPropertyValue("Humidity", new IntegerPrimitive(humidity));

            // 次の処理ですべてのプロパティを検査し、サーバー側への送信が必要かどうかを
            // 判断する。判断には各プロパティが持つ "pushType" の値が用いられる。
            // "VALUE" では前回の更新時からデータに変化があった場合にサーバーへ送信される。
            // "NEVER" ではプロパティ値はこの処理ではサーバーへ送信されない。
            // TemperatureプロパティのpushTypeはALWAYSであるため、このメソッドが
            // 呼び出される度に毎回サーバーへデータが送られる。
            // サーバー側では定期的に送られてくるデータを時系列データとして保存できる。
            // HumidityプロパティのpushTypeはVALUEであるため、値に変化があった時にだけ
            // サーバーへ送られる。
            this.updateSubscribedProperties(10000);

        } catch (Exception e) {
            // もしも setPropertyValue に未知のパラメタを指定すると、このブロックに入る。
            LOG.error("Exception occurred while updating properties.", e);
        }
    }
コメントがあるので長々として記述になっていますが、やっていることは単純です。
-
setPropertyValue()メソッドで、プロパティに値をセットする。 -
updateSubscribedProperties()メソッドで、サーバーにデータを送る。
このサンプルコードでは、setPropertyValue() を通じて Temperature と Humidity プロパティに Random.nextInt() から戻された値をセットしていますが、実際の環境では、センサーの値を取得したり、データソースにアクセスして値を読みだしたり、凡そ Java 言語として記載可能なことであればなんでも記述できます。
コードの重要な部分はこれで終わりですが、残りの部分にも目を通しましょう。
    /**
     * サーバーからThingのプロパティ値を更新することもできる。このサンプルでは、
     * SetPointプロパティだけがサーバーから更新可能になっている。
     * TemperatureとHumidityプロパティの値はこのクラス内で制御されているので、
     * サーバーからの更新要求は拒絶しなければならない。
     * @see VirtualThing#processPropertyWrite(PropertyDefinition, IPrimitiveType)
     */
    @Override
    public void processPropertyWrite(PropertyDefinition property,
            @SuppressWarnings("rawtypes") IPrimitiveType value) throws Exception {

        // どのプロパティに対する更新要求なのかをチェックする
        String propName = property.getName();

        if (!"SetPoint".equals(propName)) {
            throw new Exception("The property "
                              + propName
                              + " is read only on the simple device.");
        }

        this.setPropertyValue(propName, value);
    }
こちらも複雑なことは何もしていません。サーバーから受け取った値を setPropertyValue() メソッドを通じてローカルのプロパティへ反映させています。
コードの最後の部分は少々特徴的です。ThingWorx は、デバイス(クライアント)からサーバーへ値を送信するだけではなく、サーバーから値を受け取ってローカルのデータを変更することができます。上記に説明したコードですね。単なるデーターの読み取り・書取りにとどまらず、ThingWorx ではサーバーからデバイスに対して処理の実行を要求することもできます。次の部分を見てください。
    // 下記のアノテーションはサーバーから実行可能なローカルサービスを宣言する。
    // アノテーションにはサーバー上で識別されるサービスの名前、入力パラメタの名前と型、
    // 戻すデータの名前と型を宣言する。
    @ThingworxServiceDefinition(
                name = "Add",description = "Add two numbers")

    @ThingworxServiceResult(
                name = "result", description = "The sum of the two parameters",
                baseType = "NUMBER")

    public Double Add(
            @ThingworxServiceParameter(name = "p1",
                    description = "The first addend of the operation",
                    baseType = "NUMBER") Double p1,
            @ThingworxServiceParameter(name = "p2",
                    description = "The second addend of the operation",
                    baseType = "NUMBER") Double p2)
            throws Exception {

        LOG.info("Adding the numbers {} and {}", p1, p2);
        return p1 + p2;
    }
}
すこしわかりづらいですが、@ThingworxServiceDefinition で指定した名前が ThingWorx サーバー側で Remote Method として参照されます。@ThingworxServiceReuslt は、このサービスが返すデータの名前と型を指定しています。
ふたつの @ThingworxServicePrameter アノテーションは、このサービスが NUMBER 型のふたつのインプットパラメタを取ることを宣言しています。実際にやっていることは、渡された NUMBER 型の二つのパラメタ、p1 と p2 を足して返しているだけです。
終わりに
以上、Java クライアントのサンプル実装を見てきました。
ThingWorx ではサーバーとクライアントは WebSocket を通じて、Always On という独自の形式で接続します。ThingWorx Java SDK ではこうした接続を実現するために煩わしいコードの記述が不要になっており、非常に短期間でクライアント側の実装が可能になっています。
最後に、このコードを動かす際に私が使用している logback.xml のサンプルを記載しておきます。
<configuration>

    <appender name="STDOUT" class="ch.qos.logback.core.ConsoleAppender">
        <encoder>
            <pattern>%d{HH:mm:ss.SSS} [%thread] %-5level - %msg%n</pattern>
        </encoder>
    </appender>

    <appender name="ROLLING" class="ch.qos.logback.core.rolling.RollingFileAppender">
        <file>/tmp/JavaClientSDK.log</file>
        <rollingPolicy class="ch.qos.logback.core.rolling.TimeBasedRollingPolicy">
            <!-- rollover daily -->
            <fileNamePattern>/tmp/JavaClientSDK-%d.%i.log</fileNamePattern>
            <timeBasedFileNamingAndTriggeringPolicy class="ch.qos.logback.core.rolling.SizeAndTimeBasedFNATP">
                <!-- or whenever the file size reaches 100MB -->
                <maxFileSize>100MB</maxFileSize>
            </timeBasedFileNamingAndTriggeringPolicy>
        </rollingPolicy>
        <encoder>
            <!-- pattern>%d{yyyy-MM-dd HH:mm:ss.SSS} [%thread] %-5level %logger{36} - %msg%n</pattern -->
            <pattern>%d{yyyy-MM-dd HH:mm:ss.SSS} [%thread] %-5level - %msg%n</pattern>
        </encoder>
    </appender>

    <logger name="io.netty" level="WARN" />
    <logger name="com.thingworx.communications.client.connection.netty" level="ERROR" />
    <logger name="com.thingworx.sdk.scale" level="INFO" />
    <logger name="com.thingworx.sdk.simplething" level="DEBUG" />
    <root level="WARN">
        <appender-ref ref="STDOUT" />
        <appender-ref ref="ROLLING" />
    </root>

</configuration>