環境・使用技術
- react-router-dom : ルーティング(ページ移動)モジュール
- firebase : Authentication機能を利用
- react-redux : 状態管理
- redux-thunk : 非同期処理
- material-ui : cssフレームワーク
Reactアプリの作成する
create React App でアプリの雛形を作成する。
// Yarnがローカルに存在
$ which yarn
/opt/homebrew/bin/yarn

// Create React Appでアプリを作成
$ npx create-react-app <アプリ名>
必要なモジュールをインストールします。
//yarnの場合
$ yarn add @material-ui/core redux react-router-dom
//npmの場合
$ npm install --save @material-ui/core react-router-dom
Material-UI を利用するため、事前にライブラリをインストールする。
$ npm install @mui/material @emotion/react @emotion/styled
$ npm install @mui/material @mui/styled-engine-sc styled-components
※ npm infoを使用して、最新バージョンを確認すること
$ npm info @material-ui/icons
//インストールしていなかったら、下記のコードを使用する
$ yarn add @material-ui/icons@4.11.2
Firebaseのプロジェクトの作成
公式サイト:[Firebase]
(https://firebase.google.com/?hl=ja)
① 画面右上のコンソールへ移動のボタンをクリック
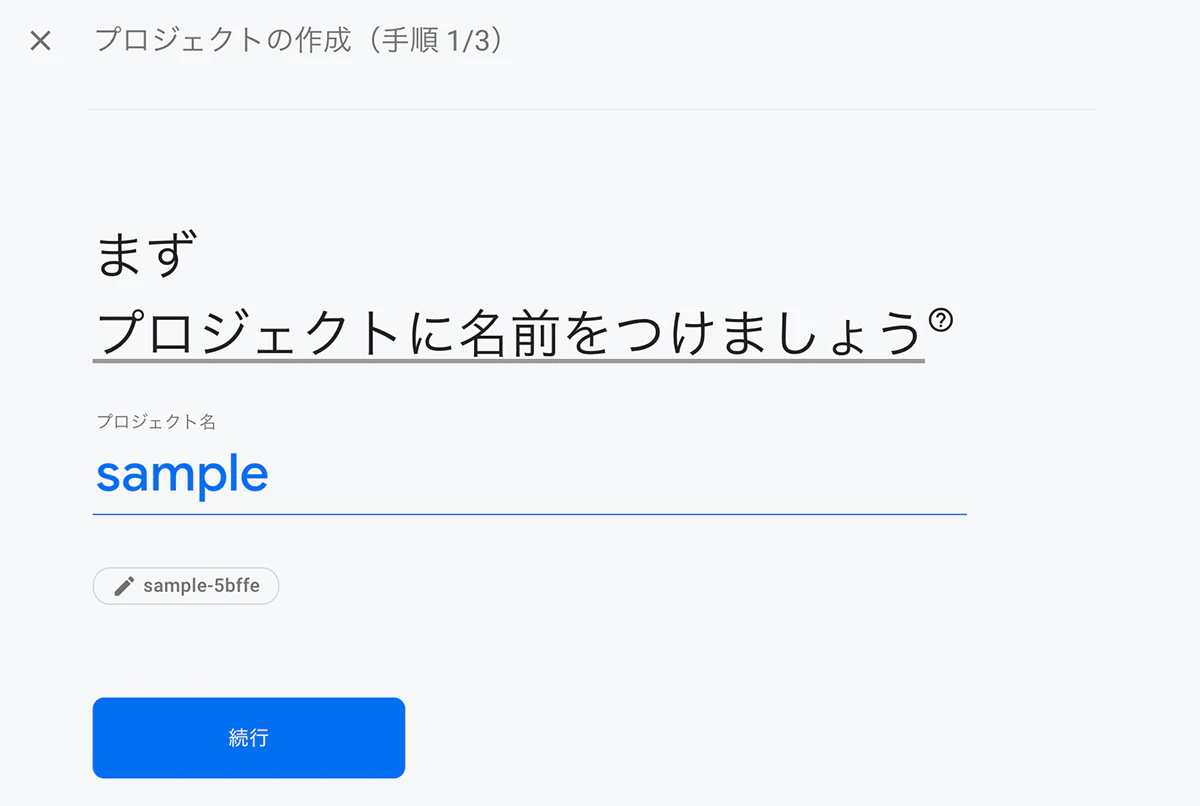
② プロジェクトを追加をクリック
③ プロジェクトの名前を付ける
④ Google アナリティクスを無効にする
このプロジェクトでGoogleアナリティクスを有効にするが『ON』になっているが
利用しないので『OFF』に設定して”プロジェクトを作成”ボタンをクリックする。

⑤ プロジェクト作成ボタンを押し、作成できたら続行ボタンを押す
プロジェクトの準備完了
プロジェクトの概要ページが表示される。これでプロジェクトの作成は完了。
⑥ Firebaseを追加画面のウェブ>をクリック
ReactからFirebaseのサービスに接続するための認証情報が必要になるのでプロジェクトの概要画面の左から3番目のボタンをクリックしてアプリの登録を行う。
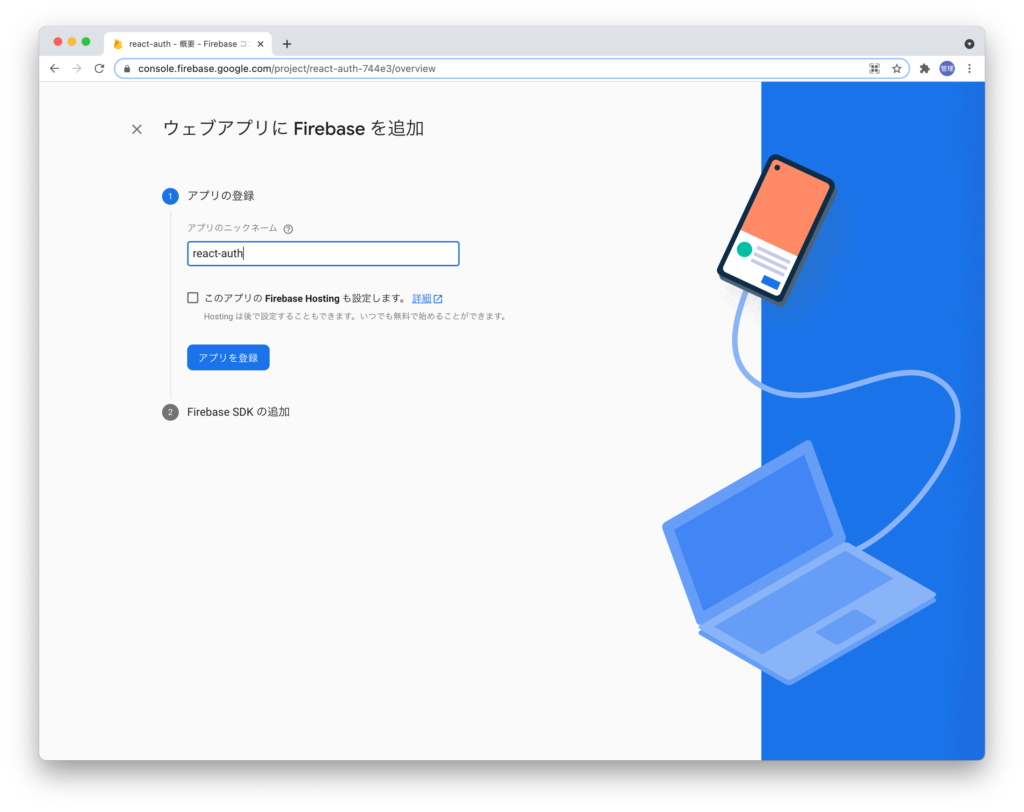
⑦ アプリのニックネームの登録
アプリの登録を行うためニックネームの設定を行う必要があり、任意の名前をつける。設定したら”アプリ登録”ボタンをクリックする。
『アプリの登録』ボタンをクリックするとFirebaseに接続する為の情報が表示される。
⑧ Firebase SDKの追加
表示されている情報はReactで環境変数として利用するため作成したReactプロジェクトフォルダの直下に.env.localファイルを作成し、下記のソースコードを入力する。
※ " "の中身は、firebaseConfigを確認して入力する。
src
 ├── .env
$ touch .env
REACT_APP_FIREBASE_API_KEY="",
REACT_APP_FIREBASE_AUTH_DOMAIN="",
REACT_APP_FIREBASE_DATABASE="https://<PROJECT_ID>.firebaseio.com",
REACT_APP_FIREBASE_PROJECT_ID="",
REACT_APP_FIREBASE_STORAGE_BUCKET="",
REACT_APP_FIREBASE_MESSAGE_SENDER_ID="",
REACT_APP_FIREBASE_APP_ID=""


//REACT_APP_FIREBASE_DATABASE="https://<PROJECT_ID>.firebaseio.com",の <PROJECT_ID>は、
下記のREACT_APP_FIREBASE_PROJECT_ID="",の""を記載すること
⑨ .gitignoreファイルに.envを追加
.gitignoreファイルに.envを追加することでgithubにアップロードされない。
//省略
# misc
.DS_Store
.env.local
.env.development.local
.env.test.local
.env.production.local
.env
//省略
⑩ firebase.jsをsrcフォルダの下に作成し、編集する。
src
 ├── firebase
       ├── firebase.js
$ mkdir firebase
$ touch firebase/firebase.js
import firebase from "firebase/compat/app";
import "firebase/compat/auth";
import "firebase/compat/firestore";

firebase.initializeApp({
  apiKey: process.env.REACT_APP_FIREBASE_API_KEY,
  authDomain: process.env.REACT_APP_FIREBASE_AUTH_DOMAIN,
  databaseURL: process.env.REACT_APP_FIREBASE_DATABASE,
  projectId: process.env.REACT_APP_FIREBASE_PROJECT_ID,
  storageBucket: process.env.REACT_APP_FIREBASE_STORAGE_BUCKET,
  messagingSenderId: process.env.REACT_APP_FIREBASE_MESSAGE_SENDER_ID,
  appId: process.env.REACT_APP_FIREBASE_SENDER_ID,
});

export const auth = firebase.auth();
export const db = firebase.firestore();
⑪firebaseパッケージをインストールする。
firebase.jsファイルでは、firebaseに接続するために必要なfirebaseと認証に必要なfirebase/authをimportする。firebaseをimportしていますがReactにデフォルトから含まれているわけではないのでfirebaseパッケージのインストールが必要である。
プロジェクトフォルダ直下でnpmコマンドによりfirebaseパッケージをインストールする。
※必要なパッケージでインストール済み
$ npm install --save firebase
$ npm i firebase@9.5.0
Firebaseの認証の設定
①Firebaseの認証(Authentication)の設定を行う。
プロジェクトの概要ページから中央にあるAuthentication(ユーザの認証と管理)をクリックする。
②プロジェクトの概要から認証をクリック
Authenticationのページが表示されるので”始まる”ボタンをクリックする。
③Authenticationページを編集する
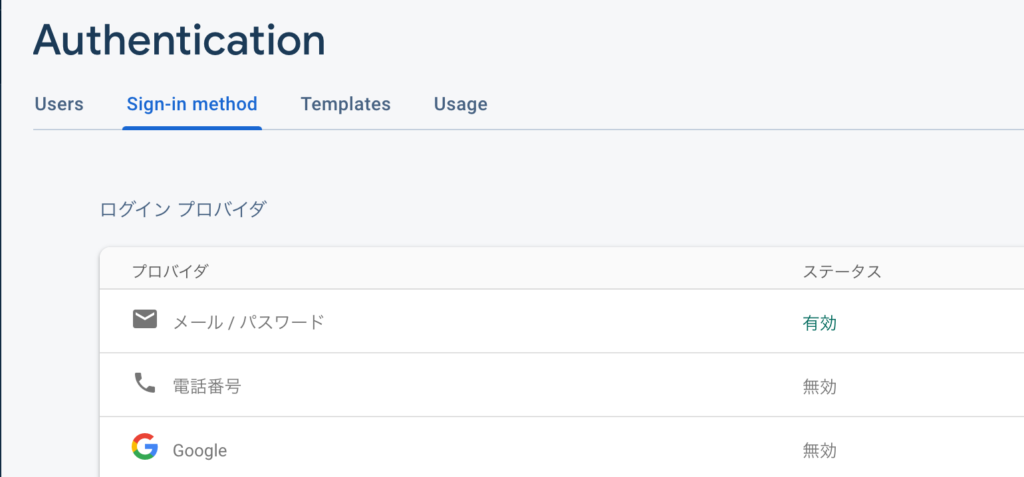
ユーザがサインイン(ログイン)するための方法の一覧が表示される。Googleアカウントなども利用することができるが、今回はメール/パスワードを利用する。
※ 理由:一般的なサービスではユーザ登録としてメールアドレスを登録してもらうことが多いから
メールアドレスとパスワードを使用して登録を有効にしてください。有効にしたら”保存”ボタンをクリックする。

メール/パスワードでの設定
保存後はメール/パスワードのステータスのみ”有効”になっていることが確認できる。
ログイン機能の実装
①『auth』ディレクトリを作成し、こちらに認証機能系は集約する。
src
 ├── auth
    ├── AuthProvider.js
    └── Login.js
    └── PrivateRoute.js
    └── SignUp.js
 ├── components
 ├── firebase
 ├── App.js
$ mkdir src/auth
$ touch src/auth/AuthProvider.js
$ touch src/auth/Login.js
$ touch src/auth/PrivateRoute.js
$ touch src/auth/SignUp.js
② App.jsにログイン状態で表示ページを変える為、Routerを作成する。
exactはpathが「含む」とならないように指定。
import React from "react";
import './App.css';
import { BrowserRouter as Router, Route, Switch } from "react-router-dom";
import PrivateRoute from "./auth/PrivateRoute";
import { AuthProvider } from "./auth/AuthProvider";
import Home from "./components/Home";
import Login from "./auth/Login";
import SignUp from "./auth/SignUp";

const App = () => {
  return (
    <AuthProvider>
      <Router>
        <Switch>
          <PrivateRoute exact path="/" component={Home} />
          <Route exact path="/login" component={Login} />
          <Route exact path="/signup" component={SignUp} />
        </Switch>
      </Router>
    </AuthProvider>
  );
};

export default App;
③ AuthPrivider.jsを編集する。
認証の情報(ユーザーがログイン、サインアップする)は、このファイルで作成する。ユーザー情報が必要なコンポーネントでuseContextを使用する。
- 通常データはトップダウン形式でpropsを渡さないといけないですが、contextを使うことで、コンポーネントツリーに簡単にデータを共有することができる。
import React, { useEffect, useState } from "react";
import { auth } from "../firebase/Firebase";

const AuthContext = React.createContext()

const AuthProvider = ({ children }) => {
  const [currentUser, setCurrentUser] = useState(null);

  //サインアップ後認証情報を更新
  const signup = async (email, password, history) => {
    try {
      await auth.createUserWithEmailAndPassword(email, password);
      auth.onAuthStateChanged(user => setCurrentUser(user));
      history.push("/");
    } catch (error) {
      alert(error);
    }
  };

  //ログインさせる
  const login = async (email, password, history) => {
    try {
      await auth.signInWithEmailAndPassword(email,password);
      auth.onAuthStateChanged(user => setCurrentUser(user));
      history.push("/");
    } catch (error) {
      alert(error);
    }
  }

  //初回アクセス時に認証済みかチェック
  useEffect(() => {
    auth.onAuthStateChanged(setCurrentUser);
  }, []);

  return (
    <AuthContext.Provider value={{ signup, login, currentUser}}>
      {children}
    </AuthContext.Provider>
  )
}

export {AuthContext, AuthProvider}
初期値のユーザーのステートはnull。
signup関数
引数にemail、password、historyを渡して非同期処理を行う。
auth.createUserWithEmailAndPassword(email, password)は、
firebaseのメソッドでemailとpasswordを元にアカウントが作成される。
その後userの情報を取得し、CurrentUserにセットする。
history.push("/")は、reactRouterの画面遷移させる機能で、今回はログイン後、Home画面に行くようにする。
login関数
同じ様に、ユーザーがログインしたら情報を取得しCurrentUserを更新するようにする。
auth.signInWithEmailAndPassword(email,password)
これもまたfirebaseのメソッドである。
あとは、最初にログインしてるか確認する為、useEffectで一回だけauth.onAuthStateChangedを実行する。
※一回だけ実行したいので、第二引数には空の配列[]を渡します。
④ PrivateRoute.jsを編集する。
アプリのメイン画面Home.jsは、PrivateRouteに指定する。
ここで、ユーザーが『ログインしてれば => メイン画面を表示』
『未ログインの場合 => ログイン画面を表示』の作業を行なう。
import React, { useContext } from "react";
import { Route } from "react-router-dom";
import { AuthContext } from "./AuthProvider";
import Login from "./Login";

const PrivateRoute = ({ component, ...rest }) => {
  const { currentUser } = useContext(AuthContext);
  //AuthContextからcurrentUserを受け取る

  const renderingComponent = currentUser ? component : Login;
  //currentUserがtrueの場合component=Home、falseならLoginコンポーネントにroute

  return <Route {...rest} component={renderingComponent} />;
};

export default PrivateRoute;
...restは、残りのpropsをまとめて引数に渡す(今回、他のpropsはない)
⑤SignUp.jsとLogin.jsを編集する。
SignUp.jsコンポーネントでは、ユーザー登録画面の表示、登録内容を取得する。
handleSubmitが実行される時、入力されたemailとpasswordの内容をAuthProviderで作ったsignup関数の引数に渡してデータが登録される。
アップデート後のhistory(情報)を渡すために、最後exportの時withRouter(SignUp)を使う。
import React, { useContext } from "react";
import { withRouter } from "react-router";
import { Link } from 'react-router-dom'
import { AuthContext } from "./AuthProvider";
import { styled } from '@material-ui/core/styles';
import Button from '@material-ui/core/Button';

const SignUpButton = styled(Button)({
  background: '#f16272',
  fontSize: '1.8rem',
  border: 0,
  borderRadius: 3,
  color: 'white',
  padding: '10px 40px',
  marginTop: '30px',
  '&:hover': {
    backgroundColor: '#ee3e52',
  },
});

const SignUp = ({ history }) => {
  const { signup } = useContext(AuthContext);
  //AuthContextからsignup関数を受け取る

  const handleSubmit = event => {
    event.preventDefault();
    const { email, password } = event.target.elements;
    signup(email.value, password.value, history);
  };

  return (
    <div className="wrapper">
      <div className="auth-container">
        <h1>Sign Up</h1>
        <form className="auth-form" onSubmit={handleSubmit}>
          <div className="auth-form-item">
            <label>E-mail Address</label>
            <input name="email" type="email" placeholder="email@gmail.com" />
          </div>
          <div className="auth-form-item">
            <label>Password</label>
            <input name="password" type="password" placeholder="Password"/>
          </div>
            <SignUpButton className="signUp-btn" type="submit">SIGN UP</SignUpButton>
        </form>
        <Link to="/login" className="auth-bottom" >SignInへ戻る</Link>
      </div>
    </div>
  );
};

export default withRouter(SignUp);
Login.jsも同様。signup部分をloginに変えるだけ。
import React, { useContext } from "react";
import { withRouter } from "react-router";
import { Link } from 'react-router-dom'
import { AuthContext } from "./AuthProvider";
import "firebase/auth";
import { styled } from '@material-ui/core/styles';
import Button from '@material-ui/core/Button';

const SignInButton = styled(Button)({
  background: '#6fc4f9',
  fontSize: '1.8rem',
  border: 0,
  borderRadius: 3,
  color: 'white',
  padding: '10px 40px',
  marginTop: '30px',
  '&:hover': {
    backgroundColor: '#57baf8',
  },
});


const Login = ({ history }) => {
  const { login } = useContext(AuthContext);
  //AuthContextからlogin関数を受け取る

  const handleSubmit = event => {
    event.preventDefault();
    const { email, password } = event.target.elements;
    login(email.value, password.value, history);
  };

  return (
    <div className="wrapper">
      <div className="auth-container">
        <h1>Sign In</h1>
        <form className="auth-form" onSubmit={handleSubmit}>
          <div className="auth-form-item">
            <label>E-mail Address</label>
            <input name="email" type="email" placeholder="email@gmail.com" />
          </div>
          <div className="auth-form-item">
            <label>Password</label>
            <input name="password" type="password" placeholder="Password"/>
          </div>
            <SignInButton type="submit">SIGN IN</SignInButton>
        </form>
        <Link to="/signup" className="auth-bottom" >SignUpはこちら</Link>
      </div>
    </div>
  );
};

export default withRouter(Login);
コンポーネント・ファイル構成
アプリのメイン画面を担うコンポーネントを作成し、メイン画面を編集する。
※ メイン(親)のコンポーネントは、Home.jsになる。
src
 ├── auth
 ├── components
    ├── Home.js
    └── Header.js
    └── Balance.js
    └── IncomeExpense.js
    └── AddItem.js
    └── ItemsLists.js
    └── IncomeItem.js
    └── ExpenseItems.js
    └── TotalIncomeExpense.js //共通関数ファイル
 ├── firebase
 ├── App.js
$ mkdir src/components
$ touch src/components/Home.js
$ touch src/components/Header.js
$ touch src/components/Balance.js
$ touch src/components/IncomeExpense.js
$ touch src/components/AddItem.js
$ touch src/components/ItemsLists.js
$ touch src/components/IncomeItem.js
$ touch src/components/ExpenseItems.js
$ touch src/components/TotalIncomeExpense.js
ステートの作成/更新
親コンポーネントから子コンポーネントに渡す為、ステートは全てHome.jsで作成する。
  const [inputText, setInputText] = useState("");
  const [inputAmount, setInputAmount] = useState(0);
  const [incomeItems, setIncomeItems] = useState([]);
  const [expenseItems, setExpenseItems] = useState([]);
  const [type, setType] = useState("inc");
  const [date, setDate] = useState(new Date());
収入incomeの配列incomeItemsと、支出expenseの配列expenseItemsは、後々考え、計算が楽なので分けて作成する。
データを追加する
Firestoreからデータを取得・追加は全てHome.jsで行う。
こちらは追加バージョン
  const addIncome = (text, amount) => {
    const docId = Math.random().toString(32).substring(2);
    const date = firebase.firestore.Timestamp.now();
    db.collection('incomeItems').doc(docId).set({
      uid: currentUser.uid,
      text,
      amount,
      date,
    });
    .then(response => {
      setIncomeItems([
        ...incomeItems, {text: inputText, amount: inputAmount, docId: docId , date: date}
      ]);
    });
  }
① 収入income用の関数addIncomeを用意する。引数にはユーザーが入力したtextとamountを渡す。
② docIdをこちらで作る。
③ 収入リストが順番に並べられるようにdateを作成。firebase.firestore.Timestamp.now()(入力時間が登録される)⇨ firebaseのメソッド
④ どこのcollectionのdocumentに追加するかは、firebaseのメソッドを使用db.collection('incomeItems').doc(docId).set({})
⑤ setしたいデータを配列として追加uid ~ date
⑥ その後.thenで、reactアプリ側のsetIncomeItemsのステートを更新
ポイントは、ユーザーが削除ボタンを押した時、データを削除するのにdocIdを使います。reactアプリと連動させたいので、こちら側で手動で作成してます。
※ その時、数値だとエラーになるので文字列に変換.toString(32).substring(2)
手動で作らない場合は、「.set」ではなく「.add」で自動生成可能。
これと同じ内容で出費expense用の関数も用意すれば、値はFirestoreとReact上で無事追加/更新される。
データを取得する
Firestoreからデータを取ってきて、アプリ上で表示させます。
  const getIncomeData = () => {
    const incomeData = db.collection('incomeItems')
    incomeData.where('uid', '==', currentUser.uid).orderBy('date').startAt(startOfMonth(date)).endAt(endOfMonth(date)).onSnapshot(query => {
      const incomeItems = []
      query.forEach(doc => incomeItems.push({...doc.data(), docId: doc.id}));
      setIncomeItems(incomeItems);
    });
  }
① 取得したいデータのIncome用の関数getIncomeDataを作成
② コレクションincomeItemsのドキュメントを取得→変数incomeDataに代入
③ uidが現在のユーザーと一致する場合のstartOfMonth~endOfMonthのドキュメントを取得
④ 取得したデータを保存する空の配列incomeItemsを作成
⑤ その配列にドキュメントのdataとidをpush(追加)する
⑥ reactアプリ側のincomeItemsの配列を更新する
ポイントは、orderByのメソッドでdateを昇順する。
リストがバラバラに表示されてしまうので、制御する為に必要。
また、orderByで昇順にしようとするとfirebaseから『indexを作れ』というエラーが表示される。その際、親切にURLが表示されるのでそこにアクセスしてindexを作ればOK。
startAtとendAtは、その月の分だけ表示させる為で、この引数の中身については、後ほど詳細を書く。
これと同じ内容で出費expense用の関数も用意すれば、無事Firestoreからデータを取得できて、Reactのステートに更新/表示がされる。
尚、データを取得するタイミングは、useEffectを使って操作する。
① 最初の1回のみ実行してほしい。引数は空の配列。
② dateが更新されるたびに実行してほしい。
※dateは次で解説してますがヘッダーの月の部分です。
  useEffect (() => {
    getIncomeData();
    getExpenseData();
  }, []);

  useEffect(() => {
    getIncomeData();
    getExpenseData();
  }, [date]);
月ごとにデータを表示させる
月ごとにデータを分けて表示させる為、ステートで作ったdateを使います。
初期値は現在の日時が入っている。
const [date, setDate] = useState(new Date());
ヘッダーに渡して表示
dateは、ユーザーがヘッダーの"前月"か"次月"ボタンを押すと更新されます。
↓の関数で月の部分を変えいる。
  //for Header
  const setPrevMonth = () => {
    const year = date.getFullYear();
    const month = date.getMonth()-1;
    const day = date.getDate();
    setDate(new Date(year, month, day));
  }

  const setNextMonth = () => {
    const year = date.getFullYear();
    const month = date.getMonth()+1;
    const day = date.getDate();
    setDate(new Date(year, month, day));
  }
これらはHeader.jsで使うのでpropsで渡してあげる。
<Header
  date={date}
  setPrevMonth={setPrevMonth}
  setNextMonth={setNextMonth}
/>
import React, { useState, useContext, useEffect } from 'react';
import { db } from "../firebase/Firebase";
import { Header } from './Header';
import { Balance } from './Balance';
import { IncomeExpense } from './IncomeExpense';
import { AddItem } from './AddItem';
import { ItemsList } from './ItemsList';
import { AuthContext } from '../auth/AuthProvider';
import { totalCalc } from './TotalIncome';
import firebase from "firebase/app";
import "firebase/firestore";

function Home () {

  const [inputText, setInputText] = useState("");
  const [inputAmount, setInputAmount] = useState(0);
  const [incomeItems, setIncomeItems] = useState([]);
  const [expenseItems, setExpenseItems] = useState([]);
  const [type, setType] = useState("inc")
  const [date, setDate] = useState(new Date());

  const { currentUser } = useContext(AuthContext)

  useEffect (() => {
    getIncomeData();
    getExpenseData();
  }, []);

  useEffect(() => {
    getIncomeData();
    getExpenseData();
  }, [date]);

  //for Header
  const setPrevMonth = () => {
    const year = date.getFullYear();
    const month = date.getMonth()-1;
    const day = date.getDate();
    setDate(new Date(year, month, day));
  }

  const setNextMonth = () => {
    const year = date.getFullYear();
    const month = date.getMonth()+1;
    const day = date.getDate();
    setDate(new Date(year, month, day));
  }

  //get first date of the month
  const startOfMonth = (date) => {
    return new Date(date.getFullYear(), date.getMonth(), 1);
  }

  //get last date of this month
  const endOfMonth = (date) => {
    return new Date(date.getFullYear(), date.getMonth() + 1, 0);
  }

  //operate add form and income/expense list
  const selectedMonth = date.getMonth() + 1;
  const today = new Date();
  const thisMonth = today.getMonth() + 1;

  //firebase IncomeData
  const getIncomeData = () => {
    const incomeData = db.collection('incomeItems')
    incomeData.where('uid', '==', currentUser.uid).orderBy('date').startAt(startOfMonth(date)).endAt(endOfMonth(date)).onSnapshot(query => {
      const incomeItems = []
      query.forEach(doc => incomeItems.push({...doc.data(), docId: doc.id}))
      setIncomeItems(incomeItems);
    })
  }

  const addIncome = (text, amount) => {
    const docId = Math.random().toString(32).substring(2);
    const date = firebase.firestore.Timestamp.now();
    db.collection('incomeItems').doc(docId).set({
      uid: currentUser.uid,
      text,
      amount,
      date,
    })
    .then(response => {
      setIncomeItems([
        ...incomeItems, {text: inputText, amount: inputAmount, docId: docId , date: date}
      ]);
    })
  }

  const deleteIncome = (docId) => {
    db.collection('incomeItems').doc(docId).delete()
  }

  //firebase Expense data
  const getExpenseData = () => {
    const expenseData = db.collection('expenseItems')
    expenseData.where('uid', '==', currentUser.uid).orderBy('date').startAt(startOfMonth(date)).endAt(endOfMonth(date)).onSnapshot(query => {
      const expenseItems = []
      query.forEach(doc => expenseItems.push({...doc.data(), docId: doc.id}))
      setExpenseItems(expenseItems);
    })
  }

  const addExpense = (text, amount) => {
    const docId = Math.random().toString(32).substring(2);
    const date = firebase.firestore.Timestamp.now();
    db.collection('expenseItems').doc(docId).set({
      uid: currentUser.uid,
      text,
      amount,
      date,
    })
    .then(response => {
      setExpenseItems([
        ...expenseItems, {text: inputText, amount:inputAmount, docId: docId, date: date}
      ]);
    })
  }

  const deleteExpense = (docId) => {
    db.collection('expenseItems').doc(docId).delete()
  }

  // calculate % and show total
  const incomeTotal = totalCalc(incomeItems);

  return (
    <div className="container">
      <div className="top">
        <Header
          date={date}
          setPrevMonth={setPrevMonth}
          setNextMonth={setNextMonth}
        />
        <Balance
          incomeTotal={incomeTotal}
          expenseItems={expenseItems}
        />
        <IncomeExpense
          incomeTotal={incomeTotal}
          expenseItems={expenseItems}
        />
      </div>
        <AddItem
          addIncome={addIncome}
          addExpense={addExpense}
          inputText={inputText}
          setInputText={setInputText}
          inputAmount={inputAmount}
          setInputAmount={setInputAmount}
          type={type}
          setType={setType}
          selectedMonth={selectedMonth}
          thisMonth={thisMonth}
        />
        <ItemsList
          deleteIncome={deleteIncome}
          deleteExpense={deleteExpense}
          incomeTotal={incomeTotal}
          incomeItems={incomeItems}
          expenseItems={expenseItems}
          selectedMonth={selectedMonth}
          thisMonth={thisMonth}
        />
    </div>
  )
}

export default Home;
Header.jsでは、現在の月を表示させる為、yearとmonthを作り、
隣に前月と次月ボタンを表示させる。
  const today = date;
  const year = today.getFullYear();
  const month = today.getMonth()+1;

  return (
    <div className="head">
      <SignOutButton onClick={() => auth.signOut()}>Sign Out</SignOutButton>
      <div>
        <button onClick={() => setPrevMonth()}>←前月 </button>
        <h1>{year}年{month}月</h1>
        <button onClick={() => setNextMonth()}> 次月→</button>
      </div>
    </div>
  )
import React, { useContext } from 'react'
import { auth } from "../firebase/Firebase";
import { AuthContext } from '../auth/AuthProvider';
import { styled } from '@material-ui/core/styles';
import Button from '@material-ui/core/Button';

const SignOutButton = styled(Button)({
  background: '#C1C1C1',
  fontSize: '1.0rem',
  border: 0,
  borderRadius: 3,
  color: 'white',
  height: 30,
  padding: '0 10px',
  margin: '0 0 0 auto',
  display: 'block',
  '&:hover': {
    backgroundColor: '#B4B4B4',
  },
});

export const Header = ({date, setPrevMonth, setNextMonth}) => {

  const { currentUser } = useContext(AuthContext)

  const today = date;
  const year = today.getFullYear();
  const month = today.getMonth()+1;

  return (
    <div className="head">
      <SignOutButton onClick={() => auth.signOut()}>Sign Out</SignOutButton>
      <div className="showMonth">
        <button onClick={() => setPrevMonth()}>←前月 </button>
        <h1>{year}年{month}月</h1>
        <button onClick={() => setNextMonth()}> 次月→</button>
      </div>
    </div>
  )
}
これでボタンをクリックしたら、setPrevMonth()とsetNextMonth()が実行され、月の表示が変わる。
ユーザーの入力内容を操作する
ユーザーが入力した内容を取得する関数は、AddItem.jsコンポーネントで行う。
export const AddItem = ({ addIncome, addExpense, inputText, setInputText, inputAmount, setInputAmount, type, setType, selectedMonth, thisMonth}) => {

  const typeHandler = (e) => {
    setType(e.target.value);
  }

  const inputTextHandler = (e) => {
    setInputText(e.target.value);
  };

  const inputAmountHandler = (e) => {
    setInputAmount(parseInt(e.target.value));
  }

  const reset = () => {
    setInputText("");
    setInputAmount("");
  }

  const submitItemHandler = (e) => {
    e.preventDefault();
    if (inputText == '' || inputAmount == '0' || !(inputAmount > 0 && inputAmount <= 10000000)) {
      alert ('正しい内容を入力してください')
    } else if ( type === 'inc') {
      addIncome(inputText, inputAmount)
      reset();
    } else if ( type === 'exp' ) {
      addExpense(inputText, inputAmount)
      reset();
    }
  }

  const thisMonthForm = () => {
    return (
      <form>
        <select onChange={typeHandler}>
          <option value="inc">+</option>
          <option value="exp">-</option>
        </select>
        <div>
          <label>内容</label>
          <input type="text" value={inputText} onChange={inputTextHandler}/>
        </div>
        <div>
          <label>金額</label>
          <input type="number" value={inputAmount} onChange={inputAmountHandler}/>
          <div>円</div>
        </div>
        <div>
        <AddButton type="submit" onClick={submitItemHandler}>追加</AddButton>
        </div>
      </form>
    )
  }

  const otherMonthForm = () => {
    return (
      <form></form>
    )
  }

  return (
    <>
    {thisMonth === selectedMonth ? thisMonthForm() : otherMonthForm()}
    </>
  )

}
収入income、出費expense、どちらに追加するのかはtypeで分ける。
ユーザーが、option を選択した時にtypeHandler関数でtypeの値を更新する。
inputの値とamountの値もonChangeで取得する。
amountについては、後に計算するのでparseIntで値を数値化する。
submitItemHandlerで追加ボタンが押された時、操作してる内容は下記のようになる。
- デフォルトのイベント(動作)をキャンセル
- 正しい内容が入力されてない場合、エラーを表示
- incタイプなら、Home.jsで定義したaddIncomeの引数に ユーザーの入力内容inputTextとinputAmountを渡す
- expタイプも同様
=> Firestoreのデータが追加され、reactアプリのステートも更新されるという流れ。
ヘッダーが今月なのか、今月でない月かによって表示方法を変える為、条件付きレンダーを行う。(* 今月のみ追加フォームを表示させる為)
この条件に使ってるselectedMonthとthisMonthは、
他のコンポーネント(リスト)でも使うので、Home.jsで作ってpropsで渡す。
  //operate add form and income/expense list
  const selectedMonth = date.getMonth() + 1;
  const today = new Date();
  const thisMonth = today.getMonth() + 1;
リストの表示
リストの表示はItemsList.jsを作り、そこでitemsに対してmapを行い、IncomeItemとExpenseItemをそれぞれ表示します
src/components/ItemsList.js
export const ItemsList = ({ deleteIncome, deleteExpense, incomeItems, expenseItems, incomeTotal, selectedMonth, thisMonth}) => {
return (
)
}
mapを実行して作られた一つ一つの項目を表示されるコンポーネントがこちら↓
Incomeバージョン
src/components/IncomeItem.js
export const IncomeItem = ({ deleteIncome, incomeItem, incomeText, incomeAmount, thisMonth, selectedMonth}) => {
const deleteHandler = () => {
deleteIncome(incomeItem.docId);
}
const showThisMonth = () => {
return (
×
)
}
const showPastMonth = () => {
return (
)
}
return (
<>
{thisMonth === selectedMonth ? showThisMonth() : showPastMonth()}
>
)
}
Number(incomeAmount).toLocaleString()は、カンマ「,」を表示させる為。
deleteHandlerは "×" を押した時にdleteIncomeを実行してます。
このdelteIncomeは、fireStoreのdocIdの関係上、Home.jsで定義されてます。↓
引数にこのincomeItem.docIdを渡せば該当のアイテムは削除されます。
src/compoments/Home.js
const deleteIncome = (docId) => {
db.collection('incomeItems').doc(docId).delete();
}
firebaseのメソットを使い、incomeItemsコレクションにある、該当ドキュメントを削除してます。
あとは、スタイル上、表示の仕方を変えたいので、ここでも条件付きレンダーを行ってます。
→ showThisMonthとshowPastMonthで分ける。
これで今月以外、削除ボタンを表示させないようにしてます。
これと同じようにexpenseバージョンも作ればOK
収入/支出の値を計算する
収入と支出の各合計
値の計算はそれぞれのincomeItemsとexpenseItemsの配列から、amountを取り出して計算します。
src/components/IncomeExpense.js
export const IncomeExpense = ({ incomeTotal, expenseItems }) => {
const expenseAmounts = expenseItems.map(expenseItem => expenseItem.amount);
const expenseTotal = expenseAmounts.reduce((acc, cur) => acc += cur, 0);
const percentage = () => {
if (incomeTotal >= 1) {
return ${Math.round((expenseTotal / incomeTotal) * 100)} %;
} else {
return '---';
}
};
return (
)
}
mapとreduceについては、こちらを元に別で記事を書いています。
※filterは途中色々変えたので、結局今回のアプリに使っていません。
map・filter・reduceの書き方・使い方
支出expenseの合計計算
- expenseAmountにexpenseItemsの中のamountだけ取り出した配列を代入します。
- expenseAmountを使って、累計を計算し、expenseTotalとします。
これを収入incomeItemsでも同じことをします。
ただincomeバージョンについては、他のコンポーネントでも使うので、共通関数ファイルTotalIncome.jsを作成してます。
TotalIncome.jsで関数totalCalcを作り、Home.jsでincomeItemsを引数に渡してます。
src/components/Home.js
// calculate % and show total
const incomeTotal = totalCalc(incomeItems);
src/components/TotalIncome.js
export const totalCalc = (incomeItems) => {
const incomeAmounts = incomeItems.map(incomeItem => incomeItem.amount);
return incomeAmounts.reduce((acc, cur) => acc += cur, 0);
};
こちらを使う他のコンポーネントとは、
割合%を表示するIncomeExpense.js、ExpenseItemと、計算に必要なBalance.jsになります。
残高の計算
総合計の残高を計算をするBalance.jsコンポーネントでは、
IncomeTotal - ExpenseTotalをすれば計算できます。
src/components/Balance.js
const balance = incomeTotal - expenseTotal
アプリを公開
$ firebase login
$ firebase init
// 選択項目は FireStore, Functions, Hosting
// publicディレクトリはbuildにする
$ npm run build
$ firebase deploy
参考サイト
[【React】 Firebaseを使用してEmail・パスワードでの認証機能の実装]
(https://qiita.com/k-penguin-sato/items/6e892231922b360a8659)
[ReactHooks + Firebase(Authentication, Firestore)でTodoアプリ作る]
(https://qiita.com/k_tada/items/ed05d14458d1ddfcefae)
[React + Firebase入門]
(https://zenn.dev/masalib/books/2d6e8470732c8b)
[初心者がReact & Firebaseを使って収支管理アプリを作成(解説編)]
(https://qiita.com/kana-wwib/items/73d141e27759440f53c4)
[日本一わかりやすいReact入門【実践編】#3...Firebaseプロジェクトの作成と初めてのデプロイ]
(https://www.youtube.com/watch?v=ta2m6nfYHuQ&list=PLX8Rsrpnn3IVOk48awq_nKW0aFP0MGpnn&index=4)
[useContextの使い方]
(https://www.sunapro.com/usecontext/)
[【完全版】ReactのFirebase Authentication(認証)を基礎からマスターする]
(https://reffect.co.jp/react/react-firebase-auth)
[バージョン8からモジュラーWebSDKにアップグレードします]
(https://firebase.google.com/docs/web/modular-upgrade#update_imports_to_v9_compat)
[ReactでFirebase Authenticationを使う]
(https://qiita.com/zaburo/items/801bd288cec47bd28764)
[初心者がReact & Firebaseを使って収支管理アプリを作成(解説編)]
(https://qiita.com/kana-wwib/items/73d141e27759440f53c4#%E3%83%AD%E3%82%B0%E3%82%A4%E3%83%B3%E6%A9%9F%E8%83%BD%E3%81%AE%E5%AE%9F%E8%A3%85)
[https://github.com/Kana-TAGUCHI/My-budget-app]
(https://github.com/Kana-TAGUCHI/My-budget-app)
