Keras動かせたから何かそこらにあるものを対象にできないかと、Raspberry Piの純正カメラモジュールを使って、定番の画像分類をやってみた。
RasPi OneでTensorflow/Kerasを動かす。で使ったKerasのClassify ImageNet classes with ResNet50にPicameraの出力を渡しているだけです。
カメラモジュール: PiNoIR Camera Module
オリジナルのものです。今はVer.2になってます。
 ## サンプルコード
import io
import time
import picamera
import picamera.array
import cv2
from keras.applications.resnet50 import ResNet50
from keras.preprocessing.image import array_to_img
from keras.applications.resnet50 import preprocess_input, decode_predictions
import numpy as np

t1= time.clock()
model = ResNet50(weights='imagenet')
t2= time.clock()
print('load resnet50: %.3f s' % (t2 - t1))

WINDOW_WIDTH = 640 #854
WINDOW_HEIGHT = 480
ORG_WIDTH = 640 #1280
ORG_HEIGHT = 480 #720

windowName = 'Pi NoIR'

cv2.namedWindow(windowName)
cv2.resizeWindow(windowName, WINDOW_WIDTH, WINDOW_HEIGHT)

w_offset = int((ORG_WIDTH - ORG_HEIGHT)/2)

with picamera.PiCamera() as camera:
        camera.start_preview()
        camera.resolution = (ORG_WIDTH, ORG_HEIGHT)
        time.sleep(2)
#        str = 'not yet classified'

        while True:
            t1= time.clock()
            with picamera.array.PiRGBArray(camera) as stream:
                camera.capture(stream, 'bgr')
                image = stream.array
                if WINDOW_WIDTH != ORG_WIDTH:
                    image = cv2.resize(image, (WINDOW_WIDTH, WINDOW_HEIGHT), int
erpolation = cv2.INTER_AREA)
                #cv2.putText(image, str,(0, CAMERA_HEIGHT - 30), cv2.FONT_HERSHE
Y_PLAIN, 2, (0,0,255))
                cv2.imshow(windowName, image)

            t2 = time.clock()
#            print('capture image : %.3f s' % (t2 - t1))
            key = cv2.waitKey(12)
            #press Esc(27) to quit, press c(99) to classify
            if key==27:
                break
            elif key==99:
                print('classifying image...')
                t2 = time.clock()
                image = image[: ,w_offset:w_offset + ORG_HEIGHT, :]
                image = cv2.resize(image, (224, 224), interpolation = cv2.INTER_
AREA)
                x = cv2.cvtColor(image, cv2.COLOR_BGR2RGB).astype(np.float32)
                array_to_img(x).save('classified.jpg')
                x = np.expand_dims(x, axis=0)
                x = preprocess_input(x)
                preds = model.predict(x)
                print('Predicted:', decode_predictions(preds))
#                str = '{}'.format(decode_predictions(preds)[0][0][1:])
                t3 = time.clock()
                print('inference :  %.3f s' % (t3 - t2))

cv2.destroyAllWindows()
簡単な説明
model = ResNet50(weights='imagenet')
ResNet50のモデル読み込み。RasPi Oneでは約7分かかる。。。
        while True:
            with picamera.array.PiRGBArray(camera) as stream:
                camera.capture(stream, 'bgr')
                image = stream.array
                if WINDOW_WIDTH != ORG_WIDTH:
                    image = cv2.resize(image, (WINDOW_WIDTH, WINDOW_HEIGHT), int
erpolation = cv2.INTER_AREA)
                cv2.imshow(windowName, image)
whileループの中で、picameraのBasic Recipe 4.4. Capturing to an OpenCV objectを参考に、OpenCV形式のBGRオーダのnumpy arrayを取り込んで、OpenCVのimshow()関数で表示させてます。
後述のResNet50の標準入力サイズ224 x 224にリサイズするときに、高解像度で取り込んだ画像をresizeした方が画質いいかなと思い、取り込みと表示で画像のサイズを異らせるよう、後でも使うOpenCVのresize()関数を使ってます。
結局、高解像度で取り込んで224 x 224にしても、表示に適当な640 x 480で取り込んで224 x 224にしても目視では画質にあまり大差なかったので、使ってませんが。。。
            key = cv2.waitKey(12)
            #press Esc(27) to quit, press c(99) to classify
            if key==27:
                break
            elif key==99:
                print('classifying image...')
                t2 = time.clock()
                image = image[: ,w_offset:w_offset + ORG_HEIGHT, :]
後述の推論(画像分類)にRasPi Oneでは50秒弱かかるので、画像取り込むたびに推論するのはやめ、cを押すと推論するようにしています。
ResNet50の標準入力サイズは224 x 224なので、まず取り込んだnumpy array型の配列のインスタンスimageを正方形にクロップします。
imageはORG_HEIGHT x ORG_WIDTH x 3(サンプルコードでは480 x 640 x 3)で取り込まれるため、画像の中心の正方形部分をクロップするように、配列中から横方向に(ORG_WIDTH - ORG_HEIGHT)/2画素オフセットしたところから、ORG_HEIGHTの幅の配列を取り出してます。
                image = cv2.resize(image, (224, 224), interpolation = cv2.INTER_
AREA)
                x = cv2.cvtColor(image, cv2.COLOR_BGR2RGB).astype(np.float32)
                array_to_img(x).save('classified.jpg')
ORG_HEIGHT x ORG_HEIGHT x 3にクロップしたimageを、OpenCVのresize()関数で224 x 224にリサイズします。
ResNet50のモデルが求める入力画像はRGBの並びなので、OpenCVのcvtColor()関数でBGRオーダの配列をRGBオーダにします。加えて、配列imageはBGR値がuint型になっているのでResNet50のモデルが求めるfloat型に型変換しています。
ここで、実際にどんな画像をReNet50のモデルに渡しているか確認するために、Kerasのarray_to_img()関数とPILのsave()関数でclassified.jpgという224x224のサイズの画像をカレントディレクトリに保存しています。
                x = np.expand_dims(x, axis=0)
                x = preprocess_input(x)
                preds = model.predict(x)
                print('Predicted:', decode_predictions(preds))
                t3 = time.clock()
                print('inference :  %.3f s' % (t3 - t2))
ここからは、Classify ImageNet classes with ResNet50のサンプル通りです。
RasPi OneでTensorflow/Kerasを動かす。と同じで、画像を渡して、物体認識するのにだいたい50秒弱かかります。
分類例
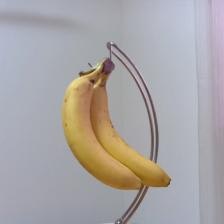

トップで表示しているウィンドウを、実際に正方形にクロップ、224 x 224にリサイズして渡しているバナナの画像ですが、背景さっぱりしてて、明らかにバナナですという場合、93%くらいバナナらしいです。


秋田県産のサンふじの画像は、14%くらいGranny Smithらしいとのこと。Granny Smithって何って思ったら青リンゴのようです。