やりたいこと
エンジニア階級「癸(みずのと)」なりに、フランス語のアプリをガチで個人開発しています。![]()
今回は、いよいよ本番リリース。
Amazon Lightsailで個人開発のRailsアプリをデプロイしたいです。
Lightsailと言えど、サーバーのインスタンスとして使われているのはAWS EC2。基本的には下のリンクの記事を見れば、ある程度pikaわかるのですが(ほんとありがたい)、一部DBの設定などが違ったので自分がうまくいった手順を日記としてメモしておきたいと思います。
全然体系立ってないですがご容赦ください!
部分的に誰かの為にもなれば幸いです。
実際にデプロイしたサイトはこちら。
フランス語勉強している方はぜひ使ってみてください。
実装!
1. インスタンスの作成

Linux/Unix
Amazon Linux 2
sshペアキー: SSHキーペアの変更。新規作成後、ダウンロード。
インスタンスプランの選択: $10(3ヶ月無料)
インスタンス名: Amazon_Linux_2-1
キーオンリータグ: なし
キー値タグ: なし
2. 静的IPの作成
ネットワーキング → 静的 IP の作成 → インスタンスにアタッチ
3. sshでインスタンスに接続
ブラウザで使えるターミナルで簡単にssh接続できるぜ!というのがLightsailのウリらしいけど、僕は普通にローカルPCのターミナルからssh接続に挑戦。
ダウンロードしてデスクトップに置いてたSSHキーペアを.sshフォルダに格納。
$ mv ~/Desktop/*.pem ~/.ssh
キーの権限を変える。
既存のACL(Access Control List)を削除して,モードの数値の指定に従ったACLを再設定します。
所有者に読み取り権限を与える。
$ cd ~/.ssh

~/.ssh
$ chmod 400 YourKeyPair.pem
楽にssh接続できるようにconfigファイルに設定を記述
~/.ssh
$ vi config
Host lightsail-yourapp
  HostName 12.345.67.890 #静的IPアドレス
  User ec2-user
  IdentityFile ~/.ssh/YourKeyPair.pem
次からこれでssh接続できるようになる。
~/.ssh
$ ssh lightsail-yourapp

The authenticity of host '35.75.254.144 (35.75.254.144)' can't be established.
ECDSA key fingerprint is SHA256:uGfj9K1234567yY0rbxa2nI7Uabcdefghijk.
Are you sure you want to continue connecting (yes/no/[fingerprint])? yes
Warning: Permanently added '35.75.254.144' (ECDSA) to the list of known hosts.

       __|  __|_  )
       _|  (     /   Amazon Linux 2 AMI
      ___|\___|___|
4. インスタンスの環境構築
初期設定
$ sudo yum update

Total download size: 34 M
Is this ok [y/d/N]: y

Complete!
[追記] 2022/03/05に実行したら下記のような結果になりました。
$ sudo yum update
読み込んだプラグイン:extras_suggestions, langpacks, priorities, update-motd
amzn2-core                                                                                                                                                                                                                                               | 3.7 kB  00:00:00
No packages marked for update
必要なパッケージのインストール
$ sudo yum -y install gcc-c++ make patch git curl zlib-devel openssl-devel ImageMagick-devel readline-devel libcurl-devel libffi-devel libicu-devel libxml2-devel libxslt-devel
Node.js
JavaScriptが動くように、Node.jsをインストール。
$ curl -sL https://rpm.nodesource.com/setup_14.x | sudo bash -

$ sudo yum install -y nodejs
yarnをインストール
$ curl -sL https://dl.yarnpkg.com/rpm/yarn.repo | sudo tee /etc/yum.repos.d/yarn.repo

$ sudo yum -y install yarn
.
.
Installed:
  yarn.noarch 0:1.22.17-1

Complete!
rbenvインストール
$ git clone https://github.com/sstephenson/rbenv.git ~/.rbenv

$ echo 'export PATH="$HOME/.rbenv/bin:$PATH"' >> ~/.bash_profile

$ echo 'eval "$(rbenv init -)"' >> ~/.bash_profile

$ source .bash_profile
$ git clone https://github.com/sstephenson/ruby-build.git ~/.rbenv/plugins/ruby-build

$ rbenv install 2.7.2
// ここでフリーズした...?と思うくらい結構時間かかりました。

$ rbenv rehash

$ rbenv global 2.7.2

$ ruby --version
ruby 2.7.2p137 (2020-10-01 revision 5445e04352) [x86_64-linux]
5. DBを作る(Postgresql)
実は当初アプリケーションサーバーのローカルにDBを置いちゃうか、別にインスタンスを立てるか(=マネージドデータベースにするか)と迷っていましたが、ローカルに置くということは、パブリックなサーバーにDBを置くということということに気づき、ちゃんとDBはDBのインスタンスを作ることにしました。(言えない、僕がAWSソリューションアーキテクトプロフェッショナルだなんて... ![]() )
)
Lightsailマネージドデータベースの作成
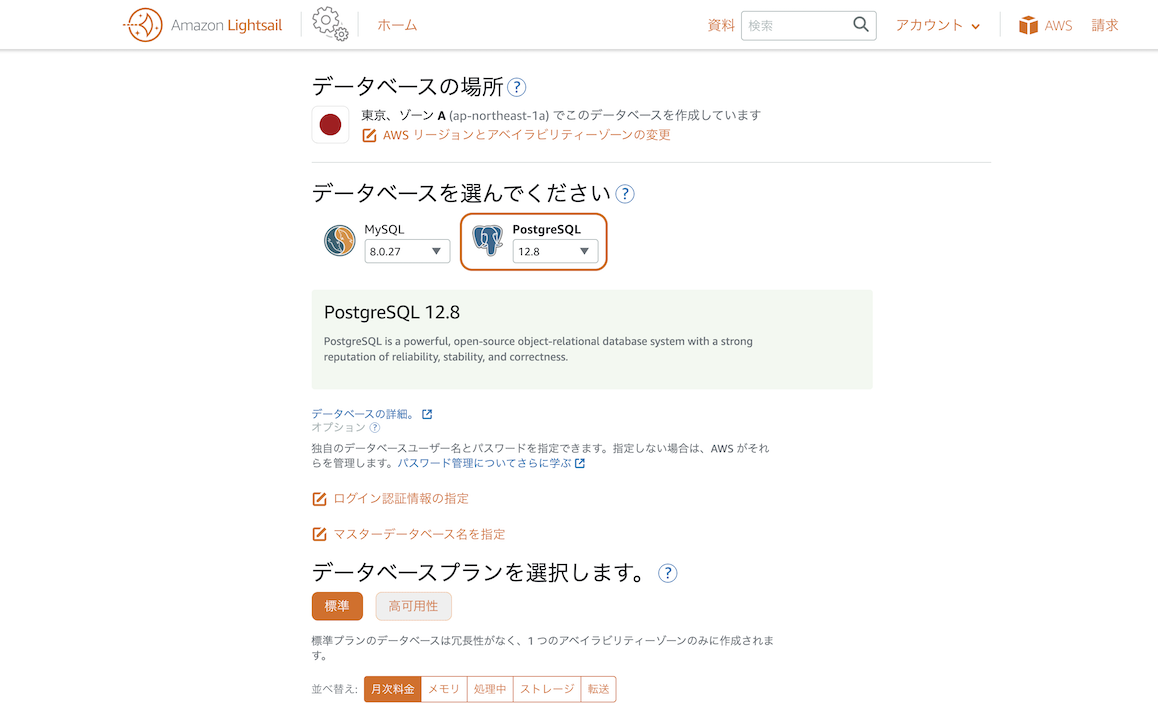

ap-northeast-1a
PostgreSQL 12.8
ログイン認証情報の指定: なし
マスターデータベース名を指定: なし
データベースプラン: 標準、$15 USD(最初の3ヶ月無料)
名前: 一意であればなんでも。わかりやすいのを。
キーオンリータグ: なし
キー値タグ: なし
結構時間かかります。10分くらいかかったかな。
6. インスタンスにアプリを入れる
鍵作る。
$ ssh-keygen -t rsa
Generating public/private rsa key pair.
// 以下Enterを押すだけ
Enter file in which to save the key (/home/ec2-user/.ssh/id_rsa):
Enter passphrase (empty for no passphrase):
Enter same passphrase again:
作った鍵を見てみる。
$ cat ~/.ssh/id_rsa.pub
表示された鍵をコピーしてgithubへ。
https://github.com/settings/keys
New SSH keyボタンを押して、鍵ペーストして任意の名前を。
でssh接続してみる。
[ec2-user@... ~]$ ssh -T git@github.com
The authenticity of host 'github.com (52.192.72.89)' can't be established.
ECDSA key fingerprint is SHA256:p2...
ECDSA key fingerprint is MD5:7b:....
Are you sure you want to continue connecting (yes/no)? yes
Warning: Permanently added 'github.com,52.192.72.89' (ECDSA) to the list of known hosts.
Hi kakudaisuke! You've successfully authenticated, but GitHub does not provide shell access.
アプリをインストールするディレクトリ作っておく。
ここに後でアプリのリポジトリをgit cloneします。
$ sudo mkdir /var/www/

// ディレクトリの権限をec2-userにする
$ sudo chown ec2-user /var/www/
7. Nginxインストール
[ec2-user@... ~]$ sudo amazon-linux-extras install nginx1

$ nginx -v
nginx version: nginx/1.20.0

$ sudo systemctl start nginx
ブラウザで静的IPアドレスを入力すると見れる!

Nginxの設定をする。
// Nginxの設定を見られる
$ cat /etc/nginx/nginx.conf

// rails.confを作って開く
$ sudo vi /etc/nginx/conf.d/rails.conf
pikawakaさんのを参照しました。
upstream unicorn {
  server unix:/var/www/YOUR_APP_NAME/tmp/sockets/unicorn.sock;
}

server {
  listen 80;
  server_name http://35.75.254.144/; // IPアドレス
  root /var/www/YOUR_APP_NAME/public;

  location ^~ /assets/ {
    gzip_static on;
    expires max;
    add_header Cache-Control public;
  }

  location @unicorn {
    proxy_set_header X-Forwarded-For $proxy_add_x_forwarded_for;
    proxy_set_header Host $http_host;
    proxy_redirect off;
    proxy_pass http://unicorn;
  }

  try_files $uri/index.html $uri @unicorn;
  error_page 500 502 503 504 /500.html;
}
8. unicornを入れる
自分のアプリのローカルリポジトリで作業です。
Gemにunicornを追加します。
group :production do
  gem 'unicorn', '5.4.1'
end
unicorn.rbファイルを下記のように作成します。
pikawakaさんの引用です(まるぱくりとも言う...)。
# rootパスのディレクトリを指定
root_path = File.expand_path('../../', __FILE__)

# アプリケーションサーバの性能を決定する
worker_processes 2

# アプリケーションの設置されているディレクトリを指定
working_directory root_path

# プロセスIDの保存先を指定
pid "#{root_path}/tmp/pids/unicorn.pid"

# ポート番号を指定
listen "#{root_path}/tmp/sockets/unicorn.sock"

# エラーのログを記録するファイルを指定
stderr_path "#{root_path}/log/unicorn.stderr.log"

# 通常のログを記録するファイルを指定
stdout_path "#{root_path}/log/unicorn.stdout.log"

#応答時間を待つ上限時間を設定
timeout 30

# ダウンタイムなしでUnicornを再起動時する
preload_app true

GC.respond_to?(:copy_on_write_friendly=) && GC.copy_on_write_friendly = true

check_client_connection false

run_once = true

before_fork do |server, worker|
  defined?(ActiveRecord::Base) &&
    ActiveRecord::Base.connection.disconnect!

  if run_once
    run_once = false # prevent from firing again
  end

  old_pid = "#{server.config[:pid]}.oldbin"
  if File.exist?(old_pid) && server.pid != old_pid
    begin
      sig = (worker.nr + 1) >= server.worker_processes ? :QUIT : :TTOU
      Process.kill(sig, File.read(old_pid).to_i)
    rescue Errno::ENOENT, Errno::ESRCH => e
      logger.error e
    end
  end
end

after_fork do |_server, _worker|
  defined?(ActiveRecord::Base) && ActiveRecord::Base.establish_connection
end
9. gitからリポジトリをクローンする
前準備として、Passwordを設定する。下記ドキュメントの手順で作ればOK。
[ec2-user@... ~]$ cd /var/www/
[ec2-user@... www]$ git clone https://github.com/YOUR_ACCOUNT/YOUR_REPOSITORY.git
Cloning into 'minnfra'...
Username for 'https://github.com': アカウント名を入れる
Password for 'https://YOUR_ACCOUNT@github.com': ここは打っても何も表示されない
ローカルでbundlerのバージョンを確認。
❯ bundler --version
Bundler version 2.2.3
ローカルと同じバージョンのbundlerをインストール。
[ec2-user@... minnfra]$ gem install bundler -v 2.2.3
Fetching bundler-2.2.3.gem
Successfully installed bundler-2.2.3
Parsing documentation for bundler-2.2.3
Installing ri documentation for bundler-2.2.3
Done installing documentation for bundler after 3 seconds
1 gem installed
bundle installする
[ec2-user@... minnfra]$ bundle install
エラー1(NoMemoryError: failed to allocate memory)
## Backtrace

NoMemoryError: failed to allocate memory
.
.
.
Unfortunately, an unexpected error occurred, and Bundler cannot continue.

First, try this link to see if there are any existing issue reports for this error:
https://github.com/rubygems/rubygems/search?q=failed+to+allocate+memory&type=Issues

If there aren't any reports for this error yet, please create copy and paste the report template above into a new issue. Don't forget to anonymize any private data! The new issue form is located at:
https://github.com/rubygems/rubygems/issues/new?labels=Bundler
↑月$10(メモリ2GB)のインスタンスの時はこんなエラーにならなかったけど、$3.5(メモリ512MB)を選ぶとこうなりました。。
こういう時は、pikawakaさんの「スワップファイルでメモリを強化」を見て実行すればOK。本当にありがとうございます。
エラー2(An error occurred while installing pg (1.2.3))
Fetching pg 1.2.3
Installing pg 1.2.3 with native extensions
Gem::Ext::BuildError: ERROR: Failed to build gem native extension.

    current directory: /home/ec2-user/.rbenv/versions/2.7.2/lib/ruby/gems/2.7.0/gems/pg-1.2.3/ext
/home/ec2-user/.rbenv/versions/2.7.2/bin/ruby -I /home/ec2-user/.rbenv/versions/2.7.2/lib/ruby/2.7.0 -r
./siteconf20220103-19854-1bxwn8w.rb extconf.rb
checking for pg_config... no
No pg_config... trying anyway. If building fails, please try again with
 --with-pg-config=/path/to/pg_config
checking for libpq-fe.h... no
Can't find the 'libpq-fe.h header
*** extconf.rb failed ***
Could not create Makefile due to some reason, probably lack of necessary
libraries and/or headers.  Check the mkmf.log file for more details.  You may
need configuration options.

Provided configuration options:
	--with-opt-dir
	--without-opt-dir
	--with-opt-include
	--without-opt-include=${opt-dir}/include
  (以下略)

To see why this extension failed to compile, please check the mkmf.log which can be found here:

  /home/ec2-user/.rbenv/versions/2.7.2/lib/ruby/gems/2.7.0/extensions/x86_64-linux/2.7.0/pg-1.2.3/mkmf.log

extconf failed, exit code 1

Gem files will remain installed in /home/ec2-user/.rbenv/versions/2.7.2/lib/ruby/gems/2.7.0/gems/pg-1.2.3 for inspection.
Results logged to /home/ec2-user/.rbenv/versions/2.7.2/lib/ruby/gems/2.7.0/extensions/x86_64-linux/2.7.0/pg-1.2.3/gem_make.out

An error occurred while installing pg (1.2.3), and Bundler cannot continue.
Make sure that `gem install pg -v '1.2.3' --source 'https://rubygems.org/'` succeeds before bundling.

In Gemfile:
  pg
今度はpg(postgresql)で怒られている。
インスタンスにpostgresのクライアントをインスタンスにインストール必要がある?
てか、そうか、PostgreSQLもクラサバなのか!
アプリサーバーにクライアントがあって、それでもってデータベースのサーバーと通信するってわけか?
インスタンスにPostgresqlのクライアントを入れる
この記事のコマンドを拝借。
https://qiita.com/santasan1224/items/22a08e4b6fc9929c7ad4
$ amazon-linux-extras list | grep postgre
  5  postgresql9.6            available    \
  6  postgresql10             available    [ =10  =stable ]
 41  postgresql11             available    [ =11  =stable ]
 58  postgresql12             available    [ =stable ]
 59  postgresql13             available    [ =stable ]
先ほどLightsailマネジメントコンソール上で作ったマネージドデータベースのPostgreSQLがver 12.8なのでpostgresql12を選択。
$ sudo amazon-linux-extras install -y postgresql12
これでインストールはできた。
ちなみに、12.8とかそういう小数点以下を指定するのは無いらしい↓
$ sudo amazon-linux-extras install postgresql12.8
Topic postgresql12.8 is not found.
これでLightsailインスタンス内でpsqlコマンドが打てるようになった!
$ psql --version
psql (PostgreSQL) 12.7
でもbundle installがまだ怒られる。
よく読むとNo pg_config...と。pg_configってのがないのか?
この辺を読む
このコマンド↓を打つ!って記事が多い。この辺はPostgreSQLのパッケージらしい。
$ sudo yum install postgresql-server postgresql-devel postgresql-contrib
でも今は、pg_configってのがないって怒られていて、postgresql-develがPostgreSQLのヘッダやpg_configなどの開発用モジュールらしいからとりあえずこれだけインストールしてみる。
$ sudo yum install postgresql-devel
この状態でもう一度bundle install挑戦。
ぬお通った!
10.precompileをする
$ rails assets:precompile RAILS_ENV=production
rails aborted!
ArgumentError: Missing `secret_key_base` for 'production' environment, set this string with `bin/rails credentials:edit
怒られた。
credentialsを作ります。
本番環境用のcredentialsファイルを作ります。
ローカルでの作業になります。
$ EDITOR="vim" bin/rails credentials:edit --environment=production
Adding config/credentials/production.key to store the encryption key: 1234566789abcdefghijklm

Save this in a password manager your team can access.

If you lose the key, no one, including you, can access anything encrypted with it.

      create  config/credentials/production.key

Ignoring config/credentials/production.key so it won't end up in Git history:

      append  .gitignore

Couldn't decrypt config/credentials/production.yml.enc. Perhaps you passed the wrong key?
余談ですが、誤って先に手動でconfig/credentials/にproduction.yml.encとファイルを作ってから、このコマンドでこのファイルを開こうとするとこういう残念な結果になります(恥)↓
$ EDITOR="vim" bin/rails credentials:edit --environment=production
Couldn't decrypt config/credentials/production.yml.enc. Perhaps you passed the wrong key?
さて。
もう一回rails assets:precompile RAILS_ENV=productionやってみる。
[ec2-user@ip-172-26-0-224 minnfra]$ rails assets:precompile RAILS_ENV=production
Missing encryption key to decrypt file with. Ask your team for your master key and write it to /var/www/minnfra/config/credentials/production.key or put it in the ENV['RAILS_MASTER_KEY'].
怒られた。
credentialsディレクトリはこんな状況。
$ ls config/credentials/
credentials.yml.enc  production.yml.enc
そうか、master.keyがない!(production.yml.encの場合、prodcution.key)
作る。
$ vi production.key
で、ローカルリポジトリのconfig/production.keyの中身をコピーして貼り付ける。
そして再度突進。
$ rails assets:precompile RAILS_ENV=production
rails aborted!
ArgumentError: Missing `secret_key_base` for 'production' environment, set this string with `bin/rails credentials:edit
突き返される。
secret_key_baseがない。
secret_key_baseとは?
Railsのsecret_key_baseを理解する(翻訳)
Lightsailインスタンスの中でこれをやる↓
$ rake secret
abcdefghijklmnopqrstuvwsyz0123456789abcdefghijklmnopqrstuvwsyz0123456789
この出力された文字列をローカルでエディタでproduction.yml.encに書き込んでリモートリポジトリにプッシュして、インスタンスにデプロイ(git pull)。
で、もういっちょrails assets:precompile RAILS_ENV=production。
通った!でもなんかwarning出てる。
WARNING in asset size limit: The following asset(s) exceed the recommended size limit (244 KiB).
This can impact web performance.
Assets:
  css/application-9184e8ff.css (1.45 MiB)
  js/application-797e26ccb2c4e5207df8.js (1.43 MiB)
  js/bundle-d36948777eda3f1527a8.js.map.gz (287 KiB)
  js/application-797e26ccb2c4e5207df8.js.gz (517 KiB)
  js/application-797e26ccb2c4e5207df8.js.map.gz (794 KiB)
  js/application-797e26ccb2c4e5207df8.js.br (429 KiB)
  js/application-797e26ccb2c4e5207df8.js.map.br (656 KiB)

WARNING in entrypoint size limit: The following entrypoint(s) combined asset size exceeds the recommended limit (244 KiB). This can impact web performance.
Entrypoints:
  application (2.88 MiB)
      css/application-9184e8ff.css
      js/application-797e26ccb2c4e5207df8.js


WARNING in webpack performance recommendations:
You can limit the size of your bundles by using import() or require.ensure to lazy load some parts of your application.
For more info visit https://webpack.js.org/guides/code-splitting/
Child mini-css-extract-plugin node_modules/css-loader/dist/cjs.js??ref--7-1!node_modules/postcss-loader/src/index.js??ref--7-2!node_modules/sass-loader/dist/cjs.js??ref--7-3!app/javascript/stylesheets/application.scss:
    Entrypoint mini-css-extract-plugin = *
    [0] ./node_modules/css-loader/dist/cjs.js??ref--7-1!./node_modules/postcss-loader/src??ref--7-2!./node_modules/sass-loader/dist/cjs.js??ref--7-3!./app/javascript/stylesheets/application.scss 4.27 MiB {0} [built]
        + 1 hidden module
ちなみに、Railsのデフォルトの環境は、development, test, productionらしく、stagingとか作りたかったら、webpacker.ymlもちゃんと定義してあげないといけないみたい。こんな風に怒られた↓
RAILS_ENV=staging environment is not defined in config/webpacker.yml, falling back to production environment
定義してあげる。
staging:
  <<: *default

  # Production depends on precompilation of packs prior to booting for performance.
  compile: false

  # Extract and emit a css file
  extract_css: true

  # Cache manifest.json for performance
  cache_manifest: true
11.本番用のDB作成
ドキドキ。縄文土器。
$ rails db:create RAILS_ENV=production

$ rails db:migrate RAILS_ENV=production
データベースにアクセスしてみる。
[ec2-user@ip-172-26-0-224 ~]$ psql --host=ls-47e123456789abcdefghijkl.abcd123456.ap-northeast-1.rds.amazonaws.com --port=5432 --username=<USER_NAME> --password --dbname=<DATABASE_NAME>
Password: <Lightsailマネジメントコンソール参照>
psql: error: FATAL:  database "DATABASE_NAME" does not exist
怒られた。
これで解決↓。
[ec2-user@... ~]$ psql --host=ls-47e031b8c36b0ab29fdca644c674b3ccf1a9e5ce.c6jqhebd9xuz.ap-northeast-1.rds.amazonaws.com --port=5432 --username=minnfra --password --dbname=postgres
Password: <Lightsailマネジメントコンソール参照>
なるほど、dbnameはpostgresなのか。
12. 起動する
Nginx起動。
$ sudo systemctl reload nginx

$ sudo systemctl start nginx
Rails起動
$ unicorn_rails -c config/unicorn.rb -E production -D
IPアドレスにアクセス...
み、みれる!!!!アプリが見れる涙(ら抜き表現)
後日再度試したら、Nginxのページしか表示されなかったのですが、一度プロセスをkillして再起動したらちゃんとアプリのページが表示されました。
$ ps aux | grep unicorn

$ kill 12345