概要
アドカレの休憩回として書いています。
機能の為ではないプログラミングと言うものに関し持ってみたら楽しいよーと言う話です。
ビジュアルイメージをサクッと作って見ようぜ!!!!!
修飾子とか結構適当なままなのは愛嬌だよっ!てへぺろ
今回作るモノ
こんなのとか

こんなのとか、

こんなの作ろうぜ!!!

Processingとは?
正確な定義は置いていおいて、便宜上今回の様な機能の為では無いプログラミングをアートプログラミングと呼ぶことにして進めます。
Processingはアートプログラミングの為の開発環境で画像、音、Arduinoなど色んな要素を掛け合わせて好き勝手面白いもの綺麗なもの作ろうぜ的なsomethingです。
アートプログラミング向け開発環境は今回使用するProcessingだけでは無く、openFrameworks、TouchDesignerなどなどありますが、個人的にはProcessingが入門において扱い易いと思うのでこれ使います。
まずはダウンロード、インストールして新規プロジェクトを作りましょう。
構造の論理的な説明
作成物の確認
まずは今回作るものをもう一度確認しましょう。
線のメンバ
この画像がどう作られているかの説明をします。
まず線1本1本がLineクラスのインスタンスです。Lineクラスは自作します。
Lineクラスは、
- 線の傾き(角度)
- 線の中点
- 線の端点(2つ)
- 線の長さ
をメンバとして持ちます。
大まかな流れ
メインのスクリプトでLineクラスの配列を生成し、for文ぶん回して
各線の角度を少しずつズラしながら設定します。
各線の中点の座標を少しずつズラしながら設定します。
(線の長さはあらかじめクラスの定義に書いておきます。)
中点と角度が定まったので、三角関数で線の両端の点の位置を計算し各線に設定します。
両端の点が定まったので、2点を線で結ぶメソッドを使って全ての線を描画します。
以上!
今回の肝
各線の角度、中点の座標を少しずつズラしと書きましたがここに今回の肝があります。
パーリンノイズと言う乱数を使用します。
よくある乱数はrandom()、パーリンノイズはnoise()で扱うことが出来ます。
Processingにおいてrandom()もnoise()も基本的には0.0~1.0のfloat値を返しますが、
random()はこんな感じで何度実行しても毎回ランダムに値を返します。
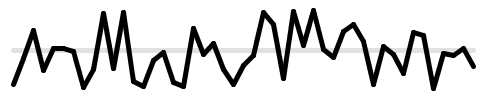
一方、noise()はこんな感じで引数で渡すfloat値に近い値を入れると返ってくるfloat値も近い値になります。

この画像の横軸が引数に入れた値、縦軸が返ってきた値と言うことになります。
実際のコードと解説
Line.pde
Lineクラスの解説をします。
Processingでは一般的に以下の画像タブの右にある逆三角形から新規スクリプトを作成し、そこにクラスを書きます。
まず、コード全体はこちら。
class Line{
  public float angle;
  public PVector center, point1, point2;
  public float length = 1200;

  Line(){
    center = new PVector();
    point1 = new PVector();
    point2 = new PVector();
  }

  public void CalPoint(){
    point1.y =  sin(angle)* length + center.y;
    point1.x =  cos(angle)* length + center.x;
    point2.y = -sin(angle)* length + center.y;
    point2.x = -cos(angle)* length + center.x;
  }
}
angle変数は、線の角度。
PVectorクラスはProcessingで用意されているベクトルクラスです。このクラスで線の中点と両端の点の変数を定義。
center変数は、線の中点。
point1変数とpoint2変数が両端の点。
length変数は線の長さ。
ちなみに、座標系は画面のピクセルと一致していて(0,0)が画面左上右に1ピクセル、下に1ピクセル移動したら(1,1)です。
CalPoint()は中点と線の長さから両端の点を計算するメソッドです。
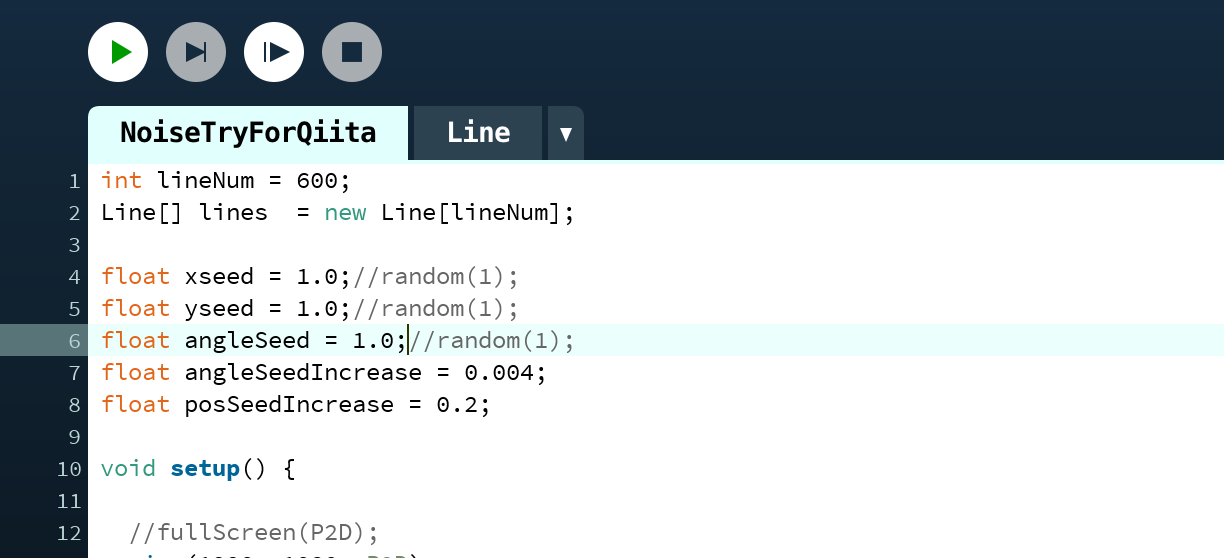
Noise.pde
これがメインのスクリプトです。
まず、全体のスクリプトがこちら。
int lineNum = 600;
Line[] lines  = new Line[lineNum];

float xseed = random(1);
float yseed = random(1);
float angleSeed = random(1);
float angleSeedIncrease = 0.004;
float posSeedIncrease = 0.2;

void setup() {

  //fullScreen(P2D);
  size(1920, 1080, P2D);
  stroke(30, 180, 255, 100);
  strokeWeight(0.5);

  for (int i = 0; i < lineNum; i++) {
    lines[i]  = new Line();
  }


  for (int i = 0; i < lineNum; i++) {
    if (i <= 0) {
      lines[i].angle = noise(angleSeed) * 4 * PI;
    } else {
      lines[i].angle = noise(angleSeed) * 4 * PI;
    }


    if (i <= 0) {
      lines[i].center.x = noise(xseed) ;
      lines[i].center.y = noise(yseed) ;
    } else {
      lines[i].center.x =  lines[i-1].center.x + noise(xseed)*5 ;
      lines[i].center.y =  lines[i-1].center.y + noise(yseed)*3 ;
    }


    lines[i].CalPoint();
    angleSeed += angleSeedIncrease;
    xseed += posSeedIncrease;
    yseed += posSeedIncrease;
  }
}

void draw() {
  background(255);
  for (int i = 0; i < lineNum; i++) {
        float y1;
      float x1;
      float y2;
      float x2;
    y1 = lines[i].point1.y;
    x1 = lines[i].point1.x;
    y2 = lines[i].point2.y;
    x2 = lines[i].point2.x;
    line(x1, y1, x2, y2);
  }
}
細かく説明します。
int lineNum = 600;で線の数を定義しています。
Line[] lines = new Line[lineNum];で線の配列を定義しています。
float xseed = random(1);
float yseed = random(1);
float angleSeed = random(1);
float angleSeedIncrease = 0.004;
float posSeedIncrease = 0.2;
ここでは、noise()に渡す引数を定義しています。
それぞれの線の中点のx座標、y座標、線の角度を少しずつズラすのでxseed,yseed、sngleSeedを定義しています。
angleSeedIncreaseは、for文で角度を決める際に毎周angleSeedに足すことでズレを作ります。この値を大きくすればズレは大きくなり、値を小さくすればズレは小さくなります。
posSeedIncreaseも同様でxseedとyseedに足すことで中点の位置をズラします。
Processingでは実行時setup()が1度呼ばれます。
それ以後、draw()が毎フレーム実行されます。
size()は実行時に実行結果が映るウィンドウのサイズを決めるメソッドです。第三引数のP2Dを入れると画質が少し悪くなり処理が早くなります。
コメントアウトされているfullScreen(P2D);はフルスクリーンのウィンドウで実行するメソッドです。こっちを使うときはsize()をコメントアウトしましょう。
stroke(30, 180, 255, 100);は線の色を決めるメソッドです。引数は(R,G,B,アルファ値)です。(アルファ値は透明度のことです。)
strokeWeight(0.5);は線の太さを決めるメソッドです。太さを変えたい場合はここをいじりましょう。
  for (int i = 0; i < lineNum; i++) {
    lines[i]  = new Line();
  }
線の配列lines[]の要素にインスタンスを代入してます。Javaってこれやらないとダメなんですね。
  for (int i = 0; i < lineNum; i++) {

    lines[i].angle = noise(angleSeed) * 4 * PI;

    if (i <= 0) {
      lines[i].center.x = noise(xseed) ;
      lines[i].center.y = noise(yseed) ;
    } else {
      lines[i].center.x =  lines[i-1].center.x + noise(xseed)*5 ;
      lines[i].center.y =  lines[i-1].center.y + noise(yseed)*3 ;
    }


    lines[i].CalPoint();
    angleSeed += angleSeedIncrease;
    xseed += posSeedIncrease;
    yseed += posSeedIncrease;
  }
線の配列をfor文で回してます。
lines[i].angle = noise(angleSeed) * 4 * PI;で角度を決めています。
noise()に4πをかけているので、0.0~4πの間で値が返ってきます。
    if (i <= 0) {
      lines[i].center.x = noise(xseed) ;
      lines[i].center.y = noise(yseed) ;
    } else {
      lines[i].center.x =  lines[i-1].center.x + noise(xseed)*5 ;
      lines[i].center.y =  lines[i-1].center.y + noise(yseed)*3 ;
    }
このif文で中点を決めています。
1つ前の線の中点を基準に少しズラしていきます。
xは0.0~5までの間で値が返ってきます。
yは0.0~3までの間で値が返ってきます。
画面のアスペクト比を考慮して適当にxの方を大きくしました。
    lines[i].CalPoint();
    angleSeed += angleSeedIncrease;
    xseed += posSeedIncrease;
    yseed += posSeedIncrease;
角度と中点が定まったので、lines[i].CalPoint();で両端の点を計算します。
    angleSeed += angleSeedIncrease;
    xseed += posSeedIncrease;
    yseed += posSeedIncrease;
各Seedの値をズラします。
void draw() {
  background(255);
  for (int i = 0; i < lineNum; i++) {
        float y1;
      float x1;
      float y2;
      float x2;
    y1 = lines[i].point1.y;
    x1 = lines[i].point1.x;
    y2 = lines[i].point2.y;
    x2 = lines[i].point2.x;
    line(x1, y1, x2, y2);
  }
}
draw()メソッドです。
background()は背景を塗るメソッドです。background(255)の場合は背景は白です。(R,G,B)でも出来ます。
  for (int i = 0; i < lineNum; i++) {
        float y1;
      float x1;
      float y2;
      float x2;
    y1 = lines[i].point1.y;
    x1 = lines[i].point1.x;
    y2 = lines[i].point2.y;
    x2 = lines[i].point2.x;
    line(x1, y1, x2, y2);
  }
line()メソッドは2点を線で結ぶメソッドです。(点aのx座標, 点aのy座標, 点bのx座標, 点bのy座標)で2点を引数として渡します。
今回の記述だとフレームごとに変化がないのでdraw()に書くことはないですが、ここから何か動きをつけようとしたら必要になるので一応記述しておきました。自由に遊んであげてください。線達も喜びます。
終わり
以上で終わりです。
興味を持った人は、「ジェネラティブアート」とか「ジェネラティブデザイン」とかで検索してみると色々出てくると思いますし、本も売ってるので買ってみるといいと思います。