Amazon Managed Blockchainが2019/05/01にリリースされたのでさっそくお試ししてみました。
Amazon Managed BlockchainやHyperledger Fabricってなんぞ?という方は下記に情報をまとめていますので、ご参考ください。
Amazon Managed BlockchainがリリースされたのでHyperledger Fabricも合わせて情報をまとめてみた - Qiita
https://qiita.com/kai_kou/items/5a968f42c5f96296f6fe
はじめに
基本的には公式のチュートリアルに沿えばブロックチェーンネットワークを構築して利用することが確認できます。
日本語訳がまだありませんが、Google翻訳さんでなんとかなります。
Get Started Creating a Hyperledger Fabric Blockchain Network Using Amazon Managed Blockchain - Amazon Managed Blockchain
https://docs.aws.amazon.com/managed-blockchain/latest/managementguide/managed-blockchain-get-started-tutorial.html
ドキュメントの変更履歴を確認すると2019/04/08更新までとなっており、Preview時点の情報のままとなっている箇所があり所々でハマります。(2019/05/07時点)
そのへんも含めて手順をまとめました。
Document History for Amazon Managed Blockchain Management Guide - Amazon Managed Blockchain
https://docs.aws.amazon.com/managed-blockchain/latest/managementguide/managed-blockchain-management-guide-doc-history.html
前提
- AWSアカウントがある
- AWSアカウントに以下の作成権限がある
- インターフェイスVPCエンドポイント
- セキュリティグループ
- Managed Blockchainネットワーク
- EC2インスタンス
- AWS CLIがインストールされている
-
aws configureコマンドでアカウント設定済み
-
詳細な前提条件については下記が参考になります。
Prerequisites and Considerations - Amazon Managed Blockchain
https://docs.aws.amazon.com/managed-blockchain/latest/managementguide/get-started-prerequisites.html
ネットワーク構成
これから作成するブロックチェーンネットワークの構成を確認してきます。
こちらのドキュメントにある図がわかりやすかったです。
Key Concepts: Managed Blockchain Networks, Members, and Peer Nodes - Amazon Managed Blockchain
https://docs.aws.amazon.com/managed-blockchain/latest/managementguide/network-components.html

IBMさんのドキュメントにある図と合わせてみるとよりわかりやすいです。
Hyperledger Fabricでいう会社・組織 がAmazon Managed Blockchainではメンバー と呼ばれています。
Hyperledger Fabric 入門, 第 1 回: 基本的な構成
https://www.ibm.com/developerworks/jp/cloud/library/cl-hyperledger-fabric-basic-1/index.html

構築手順
チュートリアルにはAWSマネジメントコンソールとAWS CLIを利用した2パターンの手順が用意されています。
AWSマネジメントコンソールではできない作業があるため、今回はターミナル上で作業が完結するようにしました。
AWS CLIをインストール or アップデートする
AWS CLIでAmazon Managed Blockchain関連のコマンドが実行できるように、AWS CLIをインストールもしくはアップデートします。pip コマンド実行はグローバルか(venvなどを利用して)仮想環境下で行うかはお好みで。
インストール or アップデート後、aws managedblockchain help コマンドが実行できたら完了です。
# インストール
> pip install awscli

# アップデート
> pip install --upgrade awscli

Successfully installed awscli-1.16.153 botocore-1.12.143 s3transfer-0.2.0
You are using pip version 19.0.3, however version 19.1.1 is available.

> aws --version

aws-cli/1.16.153 Python/3.6.6 Darwin/18.5.0 botocore/1.12.143

> aws managedblockchain help

MANAGEDBLOCKCHAIN()                                        MANAGEDBLOCKCHAIN()

NAME
       managedblockchain -

DESCRIPTION
AVAILABLE COMMANDS
       o create-member
(略)
初回インストールもしくはアカウントを設定していない場合は、aws configure コマンドで利用するアカウントを設定してください。
> aws configure
詳しくはGitHubリポジトリをご参考ください。
aws/aws-cli: Universal Command Line Interface for Amazon Web Services
https://github.com/aws/aws-cli
リージョンとAWSアカウントの指定
現在、バージニア北部リージョンのみで提供されているためus-east-1 を指定する必要があります。(2019/05/07時点)
.aws/credentials ファイルの[default] 以外でアクセスする場合はaws コマンドで--profile を指定してください。
.aws/credentials ファイルでregion を指定していない場合は、コマンドで--region を指定してください。
ネットワークとメンバーを作成する
aws managedblockchain create-network コマンドを利用して、ブロックチェーンネットワークとメンバーを作成します。
注意点
ブロックチェーンフレームワークの選択
ブロックチェーンフレームワークは現在、Hyperledger Fabricのみ選択可能で、バージョンはv1.2 となります。Hyperledger Fabricの最新バージョンはv1.4 (厳密にはv1.4.1 )となります。(2019/05/07時点)
What’s new in v1.4 — hyperledger-fabricdocs master documentation
https://hyperledger-fabric.readthedocs.io/en/release-1.4/whatsnew.html
メンバーの作成
ネットワーク作成時に最初のメンバーを--member-configuration オプションで一緒に作成する必要があります。
管理者ユーザー情報の指定
CAを作成するため、管理者ユーザーの名前とパスワードを指定する必要があります。パスワードは8文字以上で、少なくとも1つの数字と1つの大文字を含める必要があります。
チュートリアルのコマンドサンプルに間違いあり
チュートリアルにあるコマンドサンプルには以下の間違いがあったのでご注意ください。(2019/05/07時点)
-
--network-configurationオプションは存在しない。(多分Preview時代の名残^^) - パラメータ値をJSON指定する場合、シングルクォーテーション
'括りの内ではバックスラッシュ\はいらない
コマンドの実行
コマンドの以下オプションは任意で指定ください。そのままでも実行できます。
-
--name: ネットワーク名 -
--description: ネットワークの説明 -
--framework-configuration-
Fabric.Edition: ネットワークの規模(STARTERorSTANDARD)- Editionによりメンバー数や料金設定が異なります
- 参考) https://aws.amazon.com/jp/managed-blockchain/pricing/
-
-
--voting-policy-
ApprovalThresholdPolicy: 提案の承認条件
-
-
--member-configuration-
Name: メンバー名 -
Description: メンバーの説明 -
FrameworkConfiguration.Fabric-
AdminUsername: CA管理者ユーザー名 -
AdminPassword: CA管理者ユーザーのパスワード
-
-
コマンド実行を実行して成功するとネットワークとメンバー作成が開始されて、NetworkId とMemberId がレスポンスとして得られます。
> aws managedblockchain create-network \
    --name TestNetwork \
    --description TestNetworkDescription \
    --framework HYPERLEDGER_FABRIC \
    --framework-version 1.2 \
    --framework-configuration '{"Fabric": {"Edition": "STARTER"}}' \
    --voting-policy '
      {
        "ApprovalThresholdPolicy": {
          "ThresholdPercentage": 50,
          "ProposalDurationInHours": 24,
          "ThresholdComparator": "GREATER_THAN"
        }
      }' \
    --member-configuration '
      {
        "Name": "org1",
        "Description": "Org1 first member of network",
        "FrameworkConfiguration": {
          "Fabric": {
            "AdminUsername": "AdminUser",
            "AdminPassword": "Password123"
          }
        }
      }'

{
    "NetworkId": "n-XXXXXXXXXXXXXXXXXXXXXXXXXX",
    "MemberId": "m-XXXXXXXXXXXXXXXXXXXXXXXXXX"
}
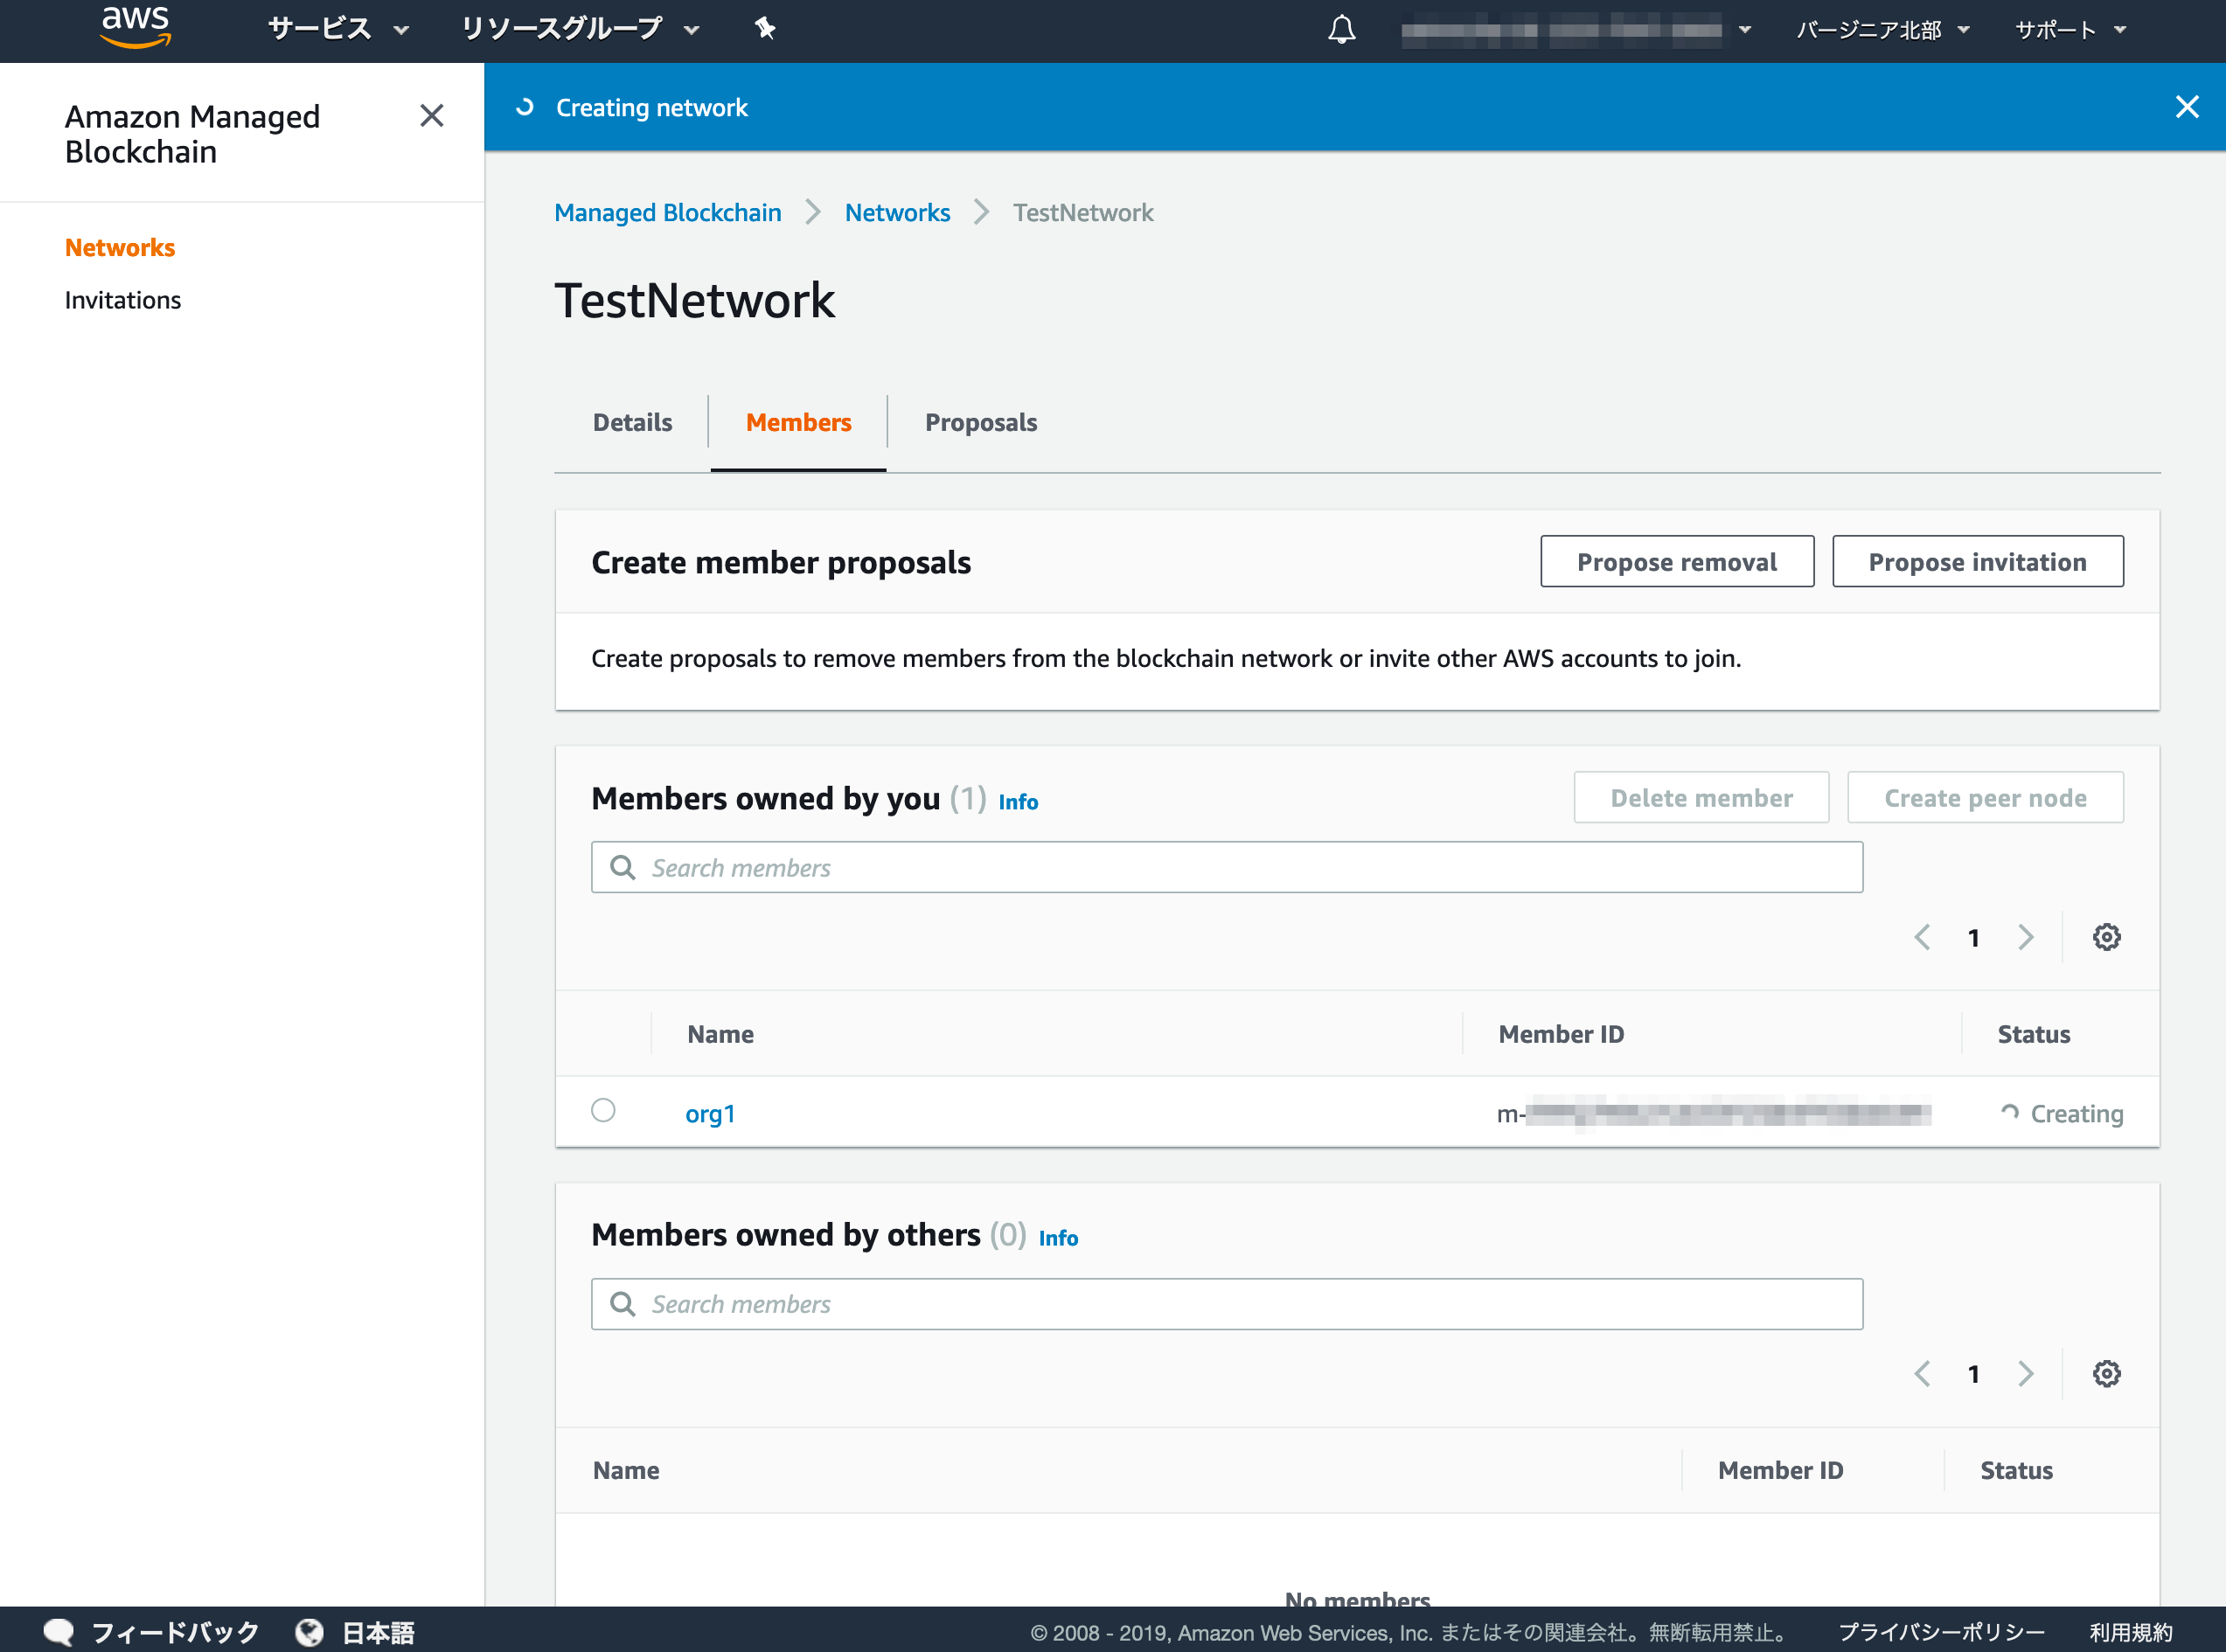
AWSマネジメントコンソールでみるとネットワークとメンバーを作成中なのが確認できます。
作成完了までに20分程度かかりました。
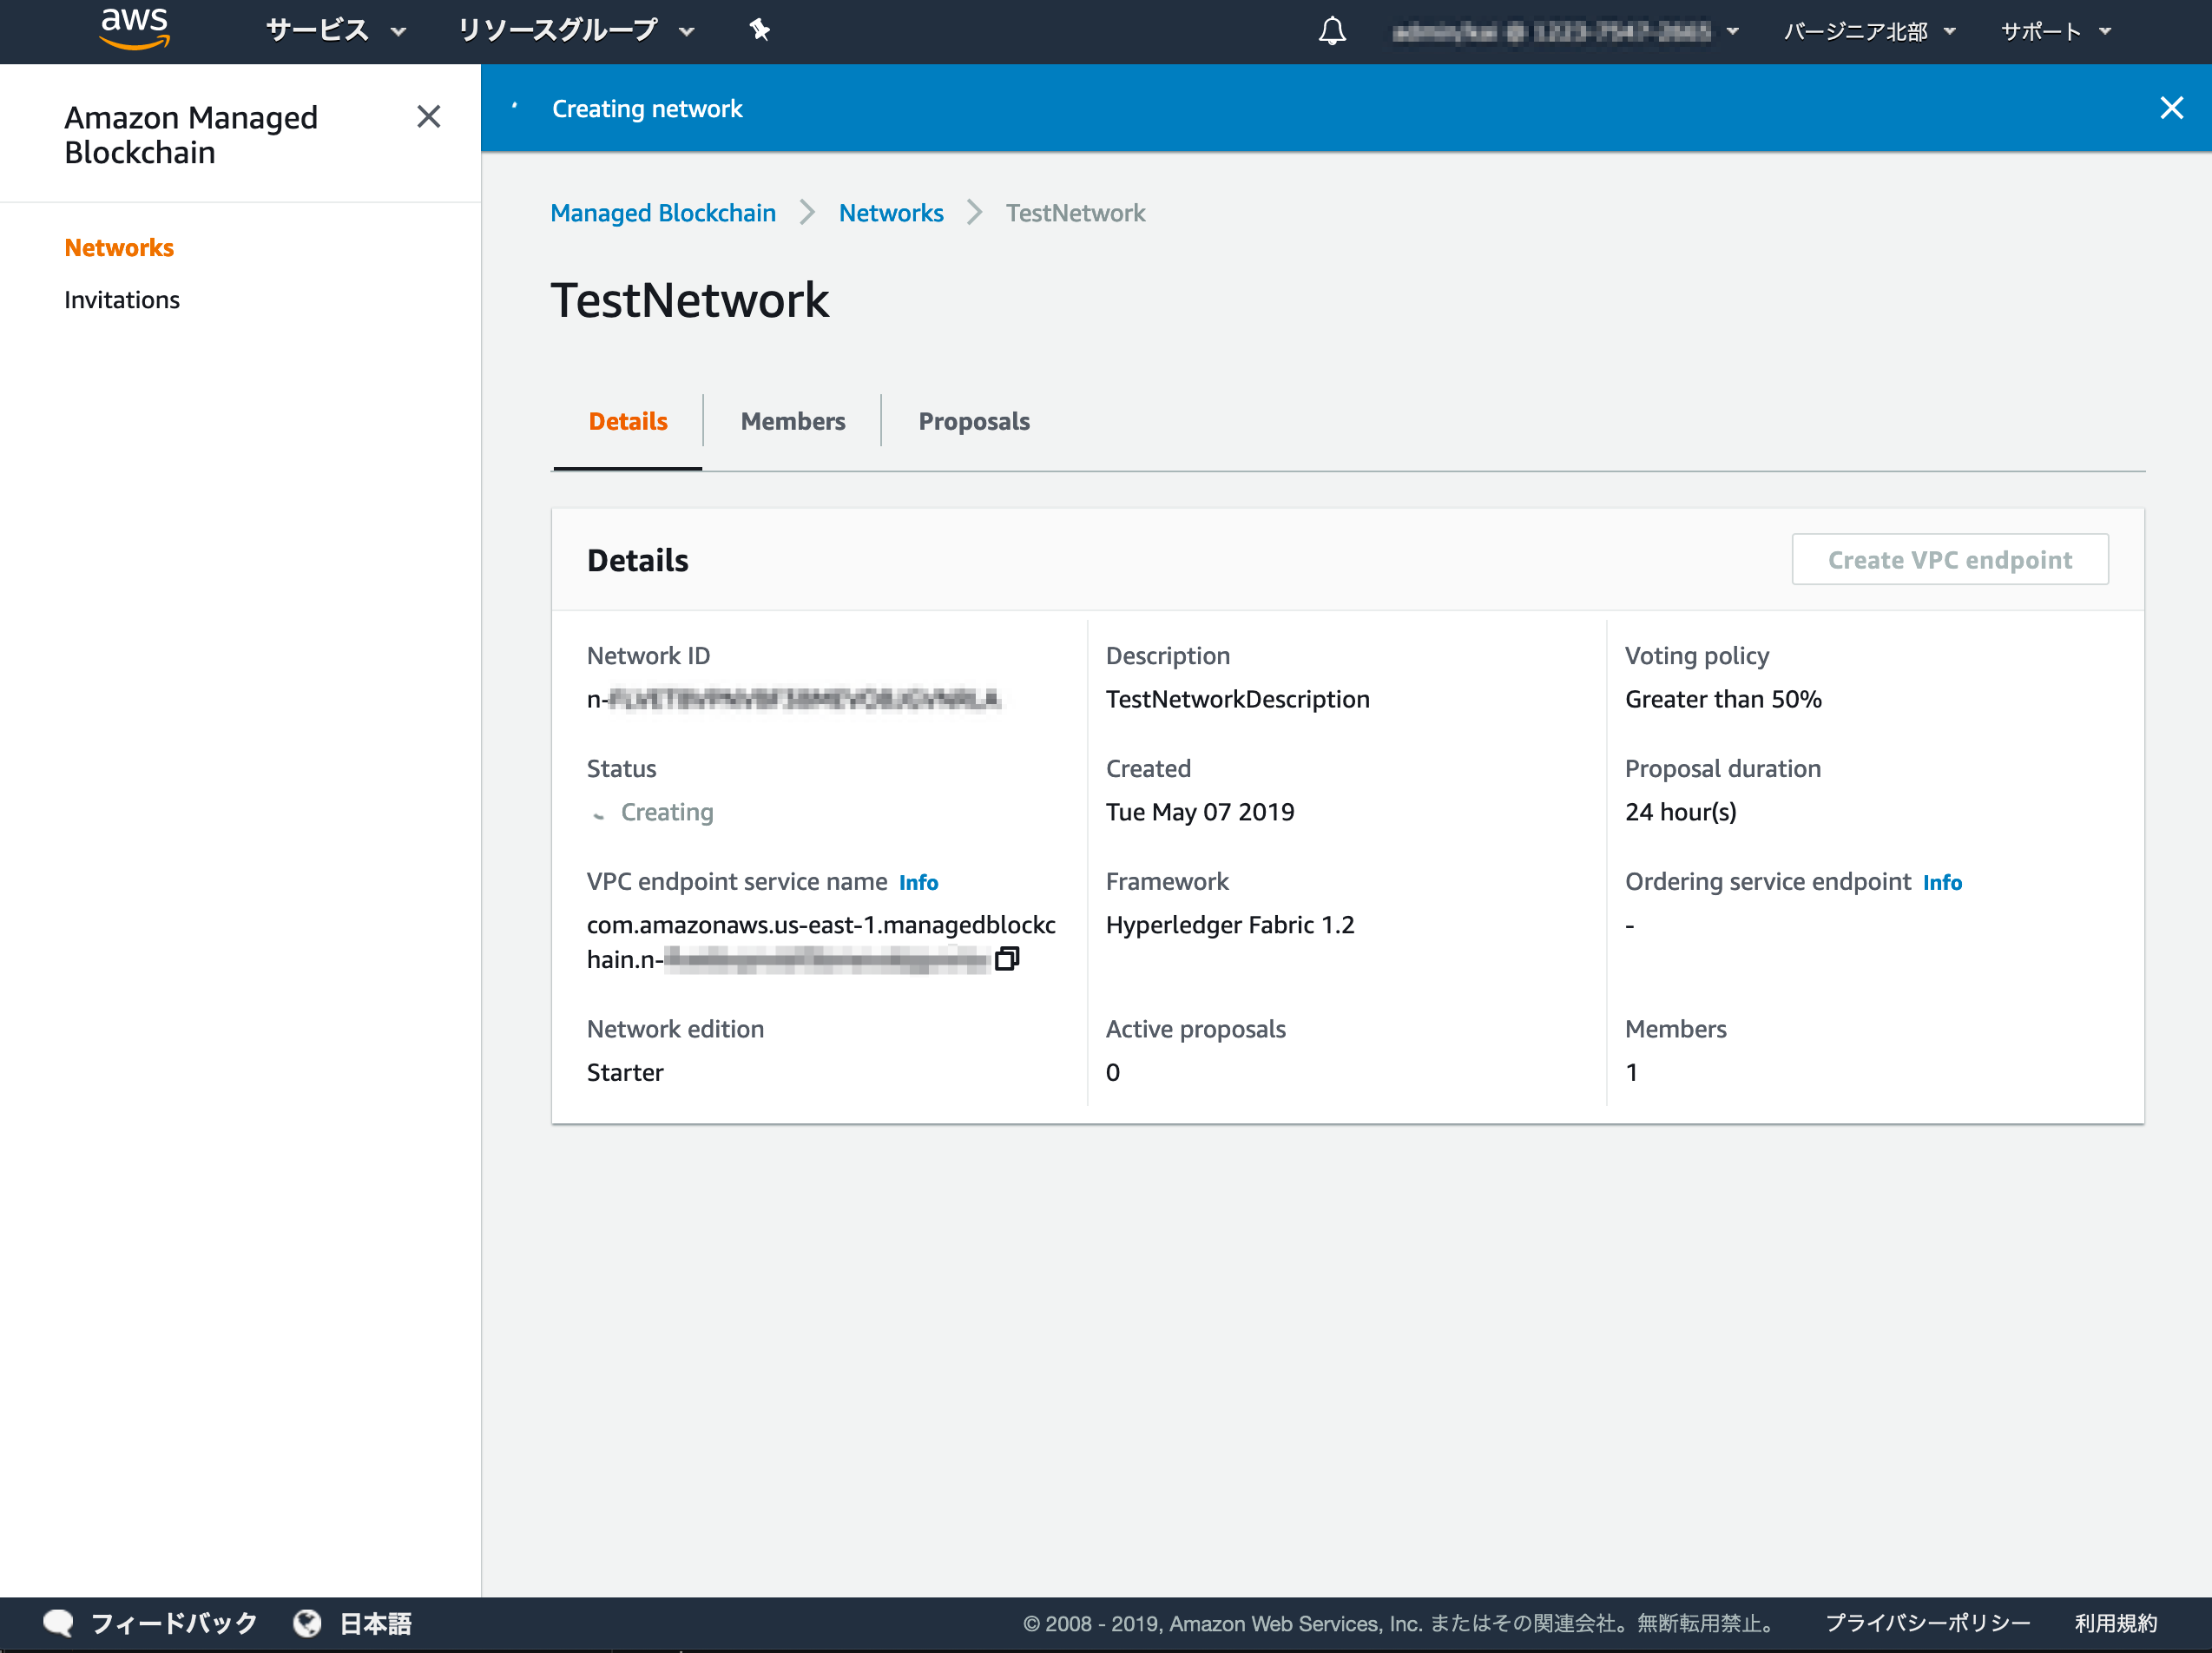
以下のコマンドでネットワーク情報が取得できます。
n-XXXXXXXXXXXXXXXXXXXXXXXXXX はaws managedblockchain create-network で得られたNetworkId に置き換えてください。
> aws managedblockchain get-network \
    --network-id n-XXXXXXXXXXXXXXXXXXXXXXXXXX

{
    "Network": {
        "Id": "n-XXXXXXXXXXXXXXXXXXXXXXXXXX",
        "Name": "TestNetwork",
        "Description": "TestNetworkDescription",
        "Framework": "HYPERLEDGER_FABRIC",
        "FrameworkVersion": "1.2",
        "FrameworkAttributes": {
            "Fabric": {
                "OrderingServiceEndpoint": "orderer.n-xxxxxxxxxxxxxxxxxxxxxxxxxx.managedblockchain.us-east-1.amazonaws.com:30001",
                "Edition": "STARTER"
            }
        },
        "VpcEndpointServiceName": "com.amazonaws.us-east-1.managedblockchain.n-xxxxxxxxxxxxxxxxxxxxxxxxxx",
        "VotingPolicy": {
            "ApprovalThresholdPolicy": {
                "ThresholdPercentage": 50,
                "ProposalDurationInHours": 24,
                "ThresholdComparator": "GREATER_THAN"
            }
        },
        "Status": "AVAILABLE",
        "CreationDate": "2019-05-07T06:30:04.975Z"
    }
}
セキュリティグループを作成する
Amazon Managed Blockchainで利用するセキュリティグループを作成します。
セキュリティグループの設定内容は下記に詳しくあります。
Configuring Security Groups - Amazon Managed Blockchain
https://docs.aws.amazon.com/managed-blockchain/latest/managementguide/managed-blockchain-security-sgs.html
【注意】参考にしているのはチュートリアルなので、最低限必要となるルール設定になります。
aws ec2 describe-vpcs コマンドでVPCのVpcId を取得します。
VPCが複数ある場合、専用のVPCを作成したい場合は任意で選択・作成してください。ここでは最初から存在するVPCを利用します。
> aws ec2 describe-vpcs \
    --query "Vpcs"

[
    {
        "CidrBlock": "xxx.xxx.0.0/16",
        "DhcpOptionsId": "dopt-xxxxxxxx",
        "State": "available",
        "VpcId": "vpc-xxxxxxxx",
        "InstanceTenancy": "default",
        "CidrBlockAssociationSet": [
            {
                "AssociationId": "vpc-cidr-assoc-xxxxxxxx",
                "CidrBlock": "xxx.xxx.0.0/16",
                "CidrBlockState": {
                    "State": "associated"
                }
            }
        ],
        "IsDefault": true
    }
]
セキュリティグループを作成して、インバウンドにルールを追加します。
追加する設定は以下となります。
Orderer、CA、Peerが利用するポートは固定ではないため(おそらく)、リソース作成時に確認する必要があります。
| In/Out | Type | Source | |
|---|---|---|---|
| Inbound | SSH(Port 22) | [自身のグローバルIP]/32 | EC2インスタンスへのログイン用 |
| Inbound | Custom TCP(Port 30001) | 0.0.0.0/0 | Ordererへのアクセス用 |
| Inbound | Custom TCP(Port 30002) | 0.0.0.0/0 | CAへのアクセス用 |
| Inbound | Custom TCP(Port 30003-30004) | 0.0.0.0/0 | Peerへのアクセス用 |
【注意】--cidr はお試し設定となっていますので、必要に応じて見直してください。
# Ordererエンドポイントの取得
> aws managedblockchain get-network \
    --network-id n-XXXXXXXXXXXXXXXXXXXXXXXXXX \
    --query "Network.FrameworkAttributes.Fabric.OrderingServiceEndpoint"

"orderer.n-xxxxxxxxxxxxxxxxxxxxxxxxxx.managedblockchain.us-east-1.amazonaws.com:30001"


# CAエンドポイントの取得
> aws managedblockchain get-member \
    --network-id n-XXXXXXXXXXXXXXXXXXXXXXXXXX \
    --member-id m-XXXXXXXXXXXXXXXXXXXXXXXXXX \
    --query "Member.FrameworkAttributes.Fabric.CaEndpoint"

"ca.m-xxxxxxxxxxxxxxxxxxxxxxxxxx.n-xxxxxxxxxxxxxxxxxxxxxxxxxx.managedblockchain.us-east-1.amazonaws.com:30002"


# セキュリティグループ作成
# --group-nameと--descriptionは任意でどうぞ
> aws ec2 create-security-group \
    --group-name mb-test \
    --description "Managed Blockchain Test" \
    --vpc-id vpc-xxxxxxxx

{
    "GroupId": "sg-xxxxxxxxxxxxxxxxx"
}

# セキュリティグループにインバウンド設定追加
# SSH
> aws ec2 authorize-security-group-ingress \
    --group-id sg-xxxxxxxxxxxxxxxxx \
    --protocol tcp \
    --port 22 \
    --cidr [自身のグローバルIP]/32

# Ordererエンドポイント
> aws ec2 authorize-security-group-ingress \
    --group-id sg-xxxxxxxxxxxxxxxxx \
    --protocol tcp \
    --port 30001 \
    --cidr 0.0.0.0/0

# CAエンドポイント
> aws ec2 authorize-security-group-ingress \
    --group-id sg-xxxxxxxxxxxxxxxxx \
    --protocol tcp \
    --port 30002 \
    --cidr 0.0.0.0/0
インターフェイスVPCエンドポイントを作成・設定する
Hyperledger Fabricクライアントとして利用するEC2インスタンスが、Hyperledger Fabricエンドポイントへアクセスできるようにaws ec2 create-vpc-endpoint コマンドでインターフェイスVPCエンドポイント(AWS PrivateLink)を作成します。
コマンドの詳細は下記が参考になります。
create-vpc-endpoint — AWS CLI 1.16.154 Command Reference
https://docs.aws.amazon.com/cli/latest/reference/ec2/create-vpc-endpoint.html
指定するパラメータ
--security-group-ids には、さきほど作成したセキュリティグループのIDを指定します。
--subnet-ids もエンドポイントを利用するのに必須となるので、以下コマンドでサブネット情報を取得して利用するサブネットのID(SubnetId )を指定します。
> aws ec2 describe-subnets \
  --query "Subnets"

[
    {
        "AvailabilityZone": "us-west-1a",
        "AvailableIpAddressCount": 4091,
        "CidrBlock": "xxx.xxx.xxx.0/20",
        "DefaultForAz": true,
        "MapPublicIpOnLaunch": true,
        "State": "available",
        "SubnetId": "subnet-xxxxxxxx",
        "VpcId": "vpc-xxxxxxxx",
        "AssignIpv6AddressOnCreation": false,
        "Ipv6CidrBlockAssociationSet": []
    },
    (略)
]
--service-name に指定するVPCエンドポイントは以下コマンドで取得します。
> aws managedblockchain get-network \
    --network-id n-XXXXXXXXXXXXXXXXXXXXXXXXXX \
    --query "Network.VpcEndpointServiceName"

"com.amazonaws.us-east-1.managedblockchain.n-xxxxxxxxxxxxxxxxxxxxxxxxxx"
インターフェイスVPCエンドポイントはプライベートDNS名を有効にする必要があるので、--private-dns-enabled オプションを利用します。--private-dns-enabled を指定するには--vpc-endpoint-type でエンドポイントタイプをInterface にする必要があります。
コマンドの実行
> aws ec2 create-vpc-endpoint \
    --vpc-id vpc-xxxxxxxx \
    --security-group-ids sg-xxxxxxxxxxxxxxxxx \
    --subnet-ids subnet-xxxxxxxx \
    --service-name com.amazonaws.us-east-1.managedblockchain.n-xxxxxxxxxxxxxxxxxxxxxxxxxx \
    --vpc-endpoint-type Interface \
    --private-dns-enabled

{
    "VpcEndpoint": {
        "VpcEndpointId": "vpce-xxxxxxxxxxxxxxxxx",
        "VpcEndpointType": "Interface",
        "VpcId": "vpc-xxxxxxxx",
        "ServiceName": "com.amazonaws.us-east-1.managedblockchain.n-xxxxxxxxxxxxxxxxxxxxxxxxxx",
        "State": "pending",
        "RouteTableIds": [],
        "SubnetIds": [
            "subnet-xxxxxxxx"
        ],
        "Groups": [
            {
                "GroupId": "sg-xxxxxxxxxxxxxxxxx",
                "GroupName": "mb-test"
            }
        ],
        "PrivateDnsEnabled": true,
        "NetworkInterfaceIds": [
            "eni-xxxxxxxxxxxxxxxxx"
        ],
        "DnsEntries": [
          (略)
        ],
        "CreationTimestamp": "2019-05-07T08:57:17.000Z"
    }
}
インターフェイスVPCエンドポイントの作成には少し時間がかかるので、以下コマンドでステータスを確認します。State がpending からavailable に変わればOKです。
VPCエンドポイントが複数ある場合は、--query オプションを指定せずにコマンドを実行して確認してください。
> aws ec2 describe-vpc-endpoints \
    --vpc-endpoint-ids vpce-xxxxxxxxxxxxxxxxx \
    --query "VpcEndpoints[0].State"

"available"
ここまでで、Hyperledger Fabricネットワークで必要となるOrderer、CAが作成できました。
続けて、Hyperledger Fabric Clientをセットアップして、Peerノードを追加します。
Hyperledger Fabric Clientのセットアップ
EC2インスタンスを起動する
EC2インスタンスを起動してHyperledger Fabric Clientをセットアップします。
EC2インスタンスの起動手順は下記を参考にしました。
チュートリアル: AWS Command Line Interface を使用して Amazon EC2 開発環境をデプロイする - AWS Command Line Interface
https://docs.aws.amazon.com/ja_jp/cli/latest/userguide/cli-chap-tutorial.html#tutorial-launch-and-connect
AMIはAmazon Linux2(ami-0de53d8956e8dcf80 )にしています。
--security-group-ids には、さきほど作成したセキュリティグループのIDを指定します。
--subnet-id には、インターフェイスVPCエンドポイントと同じサブネットのIDを指定します。
# キーペア作成
> cd 任意のディレクトリ
> aws ec2 create-key-pair \
    --key-name mb-test-ec2-key \
    --query "KeyMaterial" \
    --output text > mb-test-ec2-key.pem

> chmod 400 mb-test-ec2-key.pem


# EC2インスタンス起動
> aws ec2 run-instances \
    --image-id ami-0de53d8956e8dcf80 \
    --security-group-ids sg-xxxxxxxxxxxxxxxxx \
    --subnet-id subnet-xxxxxxxx \
    --count 1 \
    --instance-type t2.micro \
    --key-name mb-test-ec2-key \
    --query "Instances[0].InstanceId"

"i-xxxxxxxxxxxxxxxxx"


# インスタンスのパブリックIPアドレスを取得
# --instance-idsを作成したインスタンスのIDに置き換える
> aws ec2 describe-instances \
    --instance-ids i-xxxxxxxxxxxxxxxxx \
    --query "Reservations[0].Instances[0].PublicIpAddress"

"xxx.xxx.xxx.xxx"


# SSHでEC2インスタンスにログイン
# xxx.xxx.xxx.xxxは取得したインスタンスのパブリックIPアドレスに置き換える
> ssh -i mb-test-ec2-key.pem ec2-user@xxx.xxx.xxx.xxx
       __|  __|_  )
       _|  (     /   Amazon Linux 2 AMI
      ___|\___|___|

https://aws.amazon.com/amazon-linux-2/
1 package(s) needed for security, out of 3 available
Run "sudo yum update" to apply all updates.
[ec2-user@ip-xxx-xxx-xxx-xxx ~]$
EC2インスタンスに必要なパッケージをインストールする
EC2インスタンスにDockerやGO言語など必要となるパッケージをインストールします。
$ sudo yum update -y
$ sudo yum install -y telnet
$ sudo yum -y install emacs
$ sudo yum install -y docker
$ sudo service docker start
$ sudo usermod -a -G docker ec2-user

$ exit
usermodを有効化するのにいったんログアウトします。再ログイン後、Docker Compose、GO言語をインストールします。
インストールするパッケージはチュートリアルのままですが、今回はtelnet とemacs は利用しないのでインストールしなくてもOKです。(中の人はemacs推しなんですかねw)
# SSHでEC2インスタンスにログイン
# xxx.xxx.xxx.xxxは取得したインスタンスのパブリックIPアドレスに置き換える
> ssh -i mb-test-ec2-key.pem ec2-user@xxx.xxx.xxx.xxx
# Docker Composeのインストール
$ sudo curl -L \
    https://github.com/docker/compose/releases/download/1.20.0/docker-compose-`uname \
    -s`-`uname -m` -o /usr/local/bin/docker-compose
$ sudo chmod a+x /usr/local/bin/docker-compose
$ sudo yum install libtool -y


# GO言語のインストール
$ wget https://dl.google.com/go/go1.10.3.linux-amd64.tar.gz
$ tar -xzf go1.10.3.linux-amd64.tar.gz
$ sudo mv go /usr/local
$ sudo yum install libtool-ltdl-devel -y
$ sudo yum install git -y


# 環境変数の設定
$ cat >> ~/.bash_profile << "EOF"

# GOROOT is the location where Go package is installed on your system
export GOROOT=/usr/local/go

# GOPATH is the location of your work directory
export GOPATH=$HOME/go

# Update PATH so that you can access the go binary system wide
export PATH=$GOROOT/bin:$PATH
export PATH=$PATH:/home/ec2-user/go/src/github.com/hyperledger/fabric-ca/bin

EOF


# 環境変数の読み込み
$ source ~/.bash_profile
必要となるパッケージがインストールできたかを確認します。
$ docker --version
Docker version 18.06.1-ce, build e68fc7a215d7133c34aa18e3b72b4a21fd0c6136

$ docker-compose --version
docker-compose version 1.20.0, build ca8d3c6

$ go version
go version go1.10.3 linux/amd64
AWS CLIのアップデートと初期設定
アップデート
Amazon Linux2(ami-0de53d8956e8dcf80 )のyum でインストールできるAWS CLIのバージョンが古いため、pip を利用して最新のバージョンにします。(2019/05/07時点)
以下が参考になりました。
Linux に AWS CLI をインストールする - AWS Command Line Interface
https://docs.aws.amazon.com/ja_jp/cli/latest/userguide/install-linux.html
Amazon Linux に AWS CLI をインストールする - AWS Command Line Interface
https://docs.aws.amazon.com/ja_jp/cli/latest/userguide/install-linux-al2017.html
# pipのインストール
$ curl -O https://bootstrap.pypa.io/get-pip.py
$ python get-pip.py --user
$ pip --version

pip 19.1.1 from /home/ec2-user/.local/lib/python2.7/site-packages/pip (python 2.7)

$ pip install --upgrade --user awscli
Successfully installed awscli-1.16.153 botocore-1.12.143 s3transfer-0.2.0

# パスがとおるように環境変数を設定
$ cat >> ~/.bash_profile << "EOF"

export PATH=/home/ec2-user/.local/bin:$PATH

EOF

# 環境変数の読み込み
$ source ~/.bash_profile


aws --version
aws-cli/1.16.153 Python/2.7.14 Linux/4.14.104-95.84.amzn2.x86_64 botocore/1.12.143

$ aws managedblockchain help

MANAGEDBLOCKCHAIN()                                        MANAGEDBLOCKCHAIN()

NAME
       managedblockchain -

DESCRIPTION
(略)
設定
AWS CLIの初期設定を行います。リージョンにus-east-1 を指定しておきます。
$ aws configure
Hyperledger Fabric CAエンドポイントへの接続確認
作成済みのインターフェイスVPCエンドポイントを利用して、Hyperledger Fabric CAエンドポイントに接続できるか確認します。
# CAエンドポイントの取得
$ aws managedblockchain get-member \
    --network-id n-XXXXXXXXXXXXXXXXXXXXXXXXXX \
    --member-id m-XXXXXXXXXXXXXXXXXXXXXXXXXX \
    --query "Member.FrameworkAttributes.Fabric.CaEndpoint"

"ca.m-xxxxxxxxxxxxxxxxxxxxxxxxxx.n-xxxxxxxxxxxxxxxxxxxxxxxxxx.managedblockchain.us-east-1.amazonaws.com:30002"


# 接続確認
# https://[CaEndpoint]/cainfo にアクセスして接続を確認する
$ curl https://ca.m-xxxxxxxxxxxxxxxxxxxxxxxxxx.n-xxxxxxxxxxxxxxxxxxxxxxxxxx.managedblockchain.us-east-1.amazonaws.com:30002/cainfo -k

{"result":{"CAName":"m-XXXXXXXXXXXXXXXXXXXXXXXXXX","CAChain":"(略)","Version":"1.2.1-snapshot-"}
Hyperledger Fabric CAクライアントを構成する
CAへアクセスするためのクライアントを構成します。
$ go get -u github.com/hyperledger/fabric-ca/cmd/...
$ cd /home/ec2-user/go/src/github.com/hyperledger/fabric-ca
$ git fetch
$ git checkout release-1.2
Branch 'release-1.2' set up to track remote branch 'release-1.2' from 'origin'.
Switched to a new branch 'release-1.2'

$ make fabric-ca-client
Building fabric-ca-client in bin directory ...
Built bin/fabric-ca-client
チュートリアルで必要となるサンプルリポジトリを取得します。
$ cd /home/ec2-user
$ git clone https://github.com/hyperledger/fabric-samples.git
Hyperledger Fabric CLI用のDockerコンテナを起動する
PeerノードなどにアクセスするためのDockerコンテナを起動します。yamlファイルの内容はそのままでOKです。
$ cd ~/
$ cat >> ~/docker-compose-cli.yaml << "EOF"
version: '2'
services:
  cli:
    container_name: cli
    image: hyperledger/fabric-tools:1.2.0
    tty: true
    environment:
      - GOPATH=/opt/gopath
      - CORE_VM_ENDPOINT=unix:///host/var/run/docker.sock
      - CORE_LOGGING_LEVEL=info
      - CORE_PEER_ID=cli
      - CORE_CHAINCODE_KEEPALIVE=10
    working_dir: /opt/gopath/src/github.com/hyperledger/fabric/peer
    command: /bin/bash
    volumes:
        - /var/run/:/host/var/run/
        - /home/ec2-user/fabric-samples/chaincode:/opt/gopath/src/github.com/
        - /home/ec2-user:/opt/home
EOF


# Dockerコンテナの起動
$ docker-compose -f ~/docker-compose-cli.yaml up -d

Creating network "ec2user_default" with the default driver
Pulling cli (hyperledger/fabric-tools:1.2.0)...
(略)
Status: Downloaded newer image for hyperledger/fabric-tools:1.2.0
Creating cli ... done


# Dockerサービスが起動していなくてコンテナが立ち上がらなかったら
$ sudo service docker start
Hyperledger Fabricのネットワークを設定する
Peerノード追加やアクセスするのに必要となる設定をします。
メンバー管理者をCAに登録する
証明書ファイルを用意する
$ aws s3 cp s3://us-east-1.managedblockchain/etc/managedblockchain-tls-chain.pem  /home/ec2-user/managedblockchain-tls-chain.pem


# ファイルが正しいかチェック
# 証明書情報が表示されたらOK
$ openssl x509 -noout -text \
    -in /home/ec2-user/managedblockchain-tls-chain.pem
Certificate:
(略)
メンバー管理者をCAに登録する
fabric-ca-client enroll コマンドでCAエンドポイントに対して管理者ユーザーと証明書ファイルを指定してメンバー管理者をCAに登録します。
-u オプションのAdminUsername とAdminPassword、CAEndpointAndPort を置き換えてください。
# CAエンドポイントの取得
$ aws managedblockchain get-member \
    --network-id n-XXXXXXXXXXXXXXXXXXXXXXXXXX \
    --member-id m-XXXXXXXXXXXXXXXXXXXXXXXXXX \
    --query "Member.FrameworkAttributes.Fabric.CaEndpoint"

"ca.m-xxxxxxxxxxxxxxxxxxxxxxxxxx.n-xxxxxxxxxxxxxxxxxxxxxxxxxx.managedblockchain.us-east-1.amazonaws.com:30002"


# AdminUsername、AdminPassword、CAEndpointAndPortを置き換えて実行
$ fabric-ca-client enroll \
    -u https://AdminUsername:AdminPassword@CAEndpointAndPort \
    --tls.certfiles /home/ec2-user/managedblockchain-tls-chain.pem \
    -M /home/ec2-user/admin-msp

2019/05/07 09:57:50 [INFO] Created a default configuration file at /home/ec2-user/.fabric-ca-client/fabric-ca-client-config.yaml
2019/05/07 09:57:50 [INFO] TLS Enabled
2019/05/07 09:57:50 [INFO] generating key: &{A:ecdsa S:256}
2019/05/07 09:57:50 [INFO] encoded CSR
2019/05/07 09:57:51 [INFO] Stored client certificate at /home/ec2-user/admin-msp/signcerts/cert.pem
2019/05/07 09:57:51 [INFO] Stored root CA certificate at /home/ec2-user/admin-msp/cacerts/ca-m-xxxxxxxxxxxxxxxxxxxxxxxxxx-n-xxxxxxxxxxxxxxxxxxxxxxxxxx-managedblockchain-us-east-1-amazonaws-com-30002.pem
fabric-ca-client enroll コマンドが実行できたら、証明書ファイルをコピーします。
$ cp -r admin-msp/signcerts admin-msp/admincerts
これで、Membership Service Provider(MSP)として機能するようになります。
MSPはネットワーク内で証明書の発行や検証、ユーザ認証などを行います。MSPに関する詳細は下記が詳しいです。
Hyperledger Fabric 入門, 第 4 回: Membership Service Provider
https://www.ibm.com/developerworks/jp/cloud/library/cl-hyperledger-fabric-basic-4/index.html?ca=drs-
Hyperledger FabricのMSPについて - Qiita
https://qiita.com/Ruly714/items/bdd76cf73195e62228e9
Peerノードを作成する
Hyperledger Fabricのネットワークを構築するのに欠かせないPeerノードを作成します。
ざっくりいうとPeerにはトランザクションを検証して署名する(Endorsement Peer)、自身の台帳に書き込む(Committing Peer)2つの役割があります。Peerの役割については下記が詳しいです。
Hyperledger Fabric 入門, 第 2 回: Peer/チャネル/Endorsement Policy の解説
https://www.ibm.com/developerworks/jp/cloud/library/cl-hyperledger-fabric-basic-2/index.html
Peerノード作成時に利用するインスタンスタイプを指定する必要があります。
Amazon Managed Blockchainで利用できるインスタンスタイプについては下記が参考になります。
Amazon Managed Blockchain Instance Types
https://aws.amazon.com/jp/managed-blockchain/instance-types/
# Peerノードの作成
$ aws managedblockchain create-node \
    --network-id n-XXXXXXXXXXXXXXXXXXXXXXXXXX \
    --member-id m-XXXXXXXXXXXXXXXXXXXXXXXXXX \
    --node-configuration InstanceType=bc.t3.small,AvailabilityZone=us-east-1a

{
    "NodeId": "nd-XXXXXXXXXXXXXXXXXXXXXXXXXX"
}


# Peerノードの情報取得
$ aws managedblockchain get-node \
    --network-id n-XXXXXXXXXXXXXXXXXXXXXXXXXX \
    --member-id m-XXXXXXXXXXXXXXXXXXXXXXXXXX \
    --node-id nd-XXXXXXXXXXXXXXXXXXXXXXXXXX

{
    "Node": {
        "NetworkId": "n-XXXXXXXXXXXXXXXXXXXXXXXXXX",
        "Status": "AVAILABLE",
        "AvailabilityZone": "us-east-1a",
        "FrameworkAttributes": {
            "Fabric": {
                "PeerEndpoint": "nd-xxxxxxxxxxxxxxxxxxxxxxxxxx.m-xxxxxxxxxxxxxxxxxxxxxxxxxx.n-xxxxxxxxxxxxxxxxxxxxxxxxxx.managedblockchain.us-east-1.amazonaws.com:30003",
                "PeerEventEndpoint": "nd-xxxxxxxxxxxxxxxxxxxxxxxxxx.m-xxxxxxxxxxxxxxxxxxxxxxxxxx.n-xxxxxxxxxxxxxxxxxxxxxxxxxx.managedblockchain.us-east-1.amazonaws.com:30004"
            }
        },
        "MemberId": "m-XXXXXXXXXXXXXXXXXXXXXXXXXX",
        "Id": "nd-XXXXXXXXXXXXXXXXXXXXXXXXXX",
        "CreationDate": "2019-05-08T02:57:12.168Z",
        "InstanceType": "bc.t3.small"
    }
}
Status がAVAILABLE になったら作成完了です。
Peerノードへアクセスできるようにセキュリティグループに設定を追加します。
--cidr はお試し設定となっていますので、各自見直してください。
$ aws ec2 authorize-security-group-ingress \
    --group-id sg-xxxxxxxxxxxxxxxxx \
    --protocol tcp \
    --port 30003-30004 \
    --cidr 0.0.0.0/0
チャネルを作成する
Hyperledger FabricではPeerが持つ台帳を共有する範囲をチャネルという機能で制御しています。チャネルはブロックチェーンネットワーク内に作られた仮想ネットワークで、特定の参加者間だけで台帳が共有できます。詳しくは下記が参考になります。
Hyperledger Fabric 入門, 第 2 回: Peer/チャネル/Endorsement Policy の解説
https://www.ibm.com/developerworks/jp/cloud/library/cl-hyperledger-fabric-basic-2/index.html
チャネル構成を定義する
チャネル構成はconfigtx というトランザクションで管理されます。
トランザクションを作成するのにconfigtx.yaml を用意します。MemberID は自身のものに書き換えてください。
MSPDir のパスが/opt/home/admin-msp となっていますが、Dockerコンテナ内のパスなのでそのままでOKです。
# MemberIDを書き換える
$ cat >> ~/configtx.yaml << "EOF"
Organizations:
    - &Org1
        Name: MemberID
        ID: MemberID
        MSPDir: /opt/home/admin-msp
        AnchorPeers:
            - Host:
              Port:
Application: &ApplicationDefaults
    Organizations:
Profiles:
    OneOrgChannel:
        Consortium: AWSSystemConsortium
        Application:
            <<: *ApplicationDefaults
            Organizations:
                - *Org1
EOF
cli configtxgen コマンドを実行してconfigtx.yaml ファイルからconfigtx ピアブロックを作成します。パスが/opt/home/ となっていますが、Dockerコンテナ内のパスになります。
$ docker exec cli configtxgen \
    -outputCreateChannelTx /opt/home/mychannel.pb \
    -profile OneOrgChannel \
    -channelID mychannel \
    --configPath /opt/home/

2019-05-08 03:09:39.954 UTC [common/tools/configtxgen] main -> INFO 001 Loading configuration
2019-05-08 03:09:39.960 UTC [common/tools/configtxgen] doOutputChannelCreateTx -> INFO 002 Generating new channel configtx
2019-05-08 03:09:39.960 UTC [common/tools/configtxgen/encoder] NewApplicationGroup -> WARN 003 Default policy emission is deprecated, please include policy specificiations for the application group in configtx.yaml
2019-05-08 03:09:39.962 UTC [common/tools/configtxgen/encoder] NewApplicationOrgGroup -> WARN 004 Default policy emission is deprecated, please include policy specificiations for the application org group m-XXXXXXXXXXXXXXXXXXXXXXXXXX in configtx.yaml
2019-05-08 03:09:39.964 UTC [common/tools/configtxgen] doOutputChannelCreateTx -> INFO 005 Writing new channel tx
ログにWARN が出力されますが、エラーではないのでスルーでOKです。
WARN の内容はデフォルトのポリシー発行は非推奨です。configtx.yamlにアプリケーショングループのポリシー仕様を含めてください。 (Google翻訳) だそうです。
チャネルを作成する
チャネルを作成する前に環境変数を設定します。MSP、ORDERER、PEER の値は自身の環境のに置き換えてください。
# MSP=MemberID
$ aws managedblockchain list-members \
    --network-id n-XXXXXXXXXXXXXXXXXXXXXXXXXX \
    --query "Members[0].Id"

"m-XXXXXXXXXXXXXXXXXXXXXXXXXX"


# ORDERER=OrderingServiceEndpoint
$ aws managedblockchain get-network \
    --network-id n-XXXXXXXXXXXXXXXXXXXXXXXXXX \
    --query "Network.FrameworkAttributes.Fabric.OrderingServiceEndpoint"

"orderer.n-xxxxxxxxxxxxxxxxxxxxxxxxxx.n.managedblockchain.us-east-1.amazonaws.com:30001"


# PEER=PeerNodeEndpoint
$ aws managedblockchain get-node \
    --network-id n-XXXXXXXXXXXXXXXXXXXXXXXXXX \
    --member-id m-XXXXXXXXXXXXXXXXXXXXXXXXXX \
    --node-id nd-XXXXXXXXXXXXXXXXXXXXXXXXXX \
    --query "Node.FrameworkAttributes.Fabric.PeerEndpoint"

"nd-xxxxxxxxxxxxxxxxxxxxxxxxxx.n.m-xxxxxxxxxxxxxxxxxxxxxxxxxx.n.n-xxxxxxxxxxxxxxxxxxxxxxxxxx.n.managedblockchain.us-east-1.amazonaws.com:30003"


# 環境変数の設定
# MemberID、OrderingServiceEndpoint、PeerNodeEndpointを↑で取得した値に書き換える
$ cat >> ~/.bash_profile << "EOF"

export MSP_PATH=/opt/home/admin-msp
export MSP=MemberID
export ORDERER=OrderingServiceEndpoint
export PEER=PeerNodeEndpoint

EOF

# 環境変数の読み込み
$ source ~/.bash_profile
環境変数の設定と読み込みができたらcli peer channel create コマンドを実行してチャネルを作成します。
$ docker exec -e "CORE_PEER_TLS_ENABLED=true" \
    -e "CORE_PEER_TLS_ROOTCERT_FILE=/opt/home/managedblockchain-tls-chain.pem" \
    -e "CORE_PEER_ADDRESS=$PEER" \
    -e "CORE_PEER_LOCALMSPID=$MSP" \
    -e "CORE_PEER_MSPCONFIGPATH=$MSP_PATH" \
    cli peer channel create -c mychannel \
    -f /opt/home/mychannel.pb -o $ORDERER \
    --cafile /opt/home/managedblockchain-tls-chain.pem --tls

2019-05-08 03:13:38.298 UTC [channelCmd] InitCmdFactory -> INFO 001 Endorser and orderer connections initialized
2019-05-08 03:13:38.441 UTC [cli/common] readBlock -> INFO 002 Got status: &{NOT_FOUND}
2019-05-08 03:13:38.456 UTC [channelCmd] InitCmdFactory -> INFO 003 Endorser and orderer connections initialized
2019-05-08 03:13:38.658 UTC [cli/common] readBlock -> INFO 004 Got status: &{NOT_FOUND}
2019-05-08 03:13:38.668 UTC [channelCmd] InitCmdFactory -> INFO 005 Endorser and orderer connections initialized
2019-05-08 03:13:38.870 UTC [cli/common] readBlock -> INFO 006 Got status: &{NOT_FOUND}
2019-05-08 03:13:38.881 UTC [channelCmd] InitCmdFactory -> INFO 007 Endorser and orderer connections initialized
2019-05-08 03:13:39.083 UTC [cli/common] readBlock -> INFO 008 Got status: &{NOT_FOUND}
2019-05-08 03:13:39.094 UTC [channelCmd] InitCmdFactory -> INFO 009 Endorser and orderer connections initialized
2019-05-08 03:13:39.296 UTC [cli/common] readBlock -> INFO 00a Got status: &{NOT_FOUND}
2019-05-08 03:13:39.307 UTC [channelCmd] InitCmdFactory -> INFO 00b Endorser and orderer connections initialized
2019-05-08 03:13:39.509 UTC [cli/common] readBlock -> INFO 00c Got status: &{NOT_FOUND}
2019-05-08 03:13:39.520 UTC [channelCmd] InitCmdFactory -> INFO 00d Endorser and orderer connections initialized
2019-05-08 03:13:39.724 UTC [cli/common] readBlock -> INFO 00e Got status: &{NOT_FOUND}
2019-05-08 03:13:39.735 UTC [channelCmd] InitCmdFactory -> INFO 00f Endorser and orderer connections initialized
2019-05-08 03:13:39.937 UTC [cli/common] readBlock -> INFO 010 Got status: &{NOT_FOUND}
2019-05-08 03:13:39.946 UTC [channelCmd] InitCmdFactory -> INFO 011 Endorser and orderer connections initialized
2019-05-08 03:13:40.148 UTC [cli/common] readBlock -> INFO 012 Got status: &{NOT_FOUND}
2019-05-08 03:13:40.159 UTC [channelCmd] InitCmdFactory -> INFO 013 Endorser and orderer connections initialized
2019-05-08 03:13:40.362 UTC [cli/common] readBlock -> INFO 014 Got status: &{NOT_FOUND}
2019-05-08 03:13:40.373 UTC [channelCmd] InitCmdFactory -> INFO 015 Endorser and orderer connections initialized
2019-05-08 03:13:40.575 UTC [cli/common] readBlock -> INFO 016 Got status: &{NOT_FOUND}
2019-05-08 03:13:40.585 UTC [channelCmd] InitCmdFactory -> INFO 017 Endorser and orderer connections initialized
2019-05-08 03:13:40.789 UTC [cli/common] readBlock -> INFO 018 Received block: 0
Got status: &{NOT_FOUND} が気になりますが、気にせずにcli peer channel join コマンドを実行してチャネルにPeerノードを参加させます。
$ docker exec -e "CORE_PEER_TLS_ENABLED=true" \
    -e "CORE_PEER_TLS_ROOTCERT_FILE=/opt/home/managedblockchain-tls-chain.pem" \
    -e "CORE_PEER_ADDRESS=$PEER" \
    -e "CORE_PEER_LOCALMSPID=$MSP" \
    -e "CORE_PEER_MSPCONFIGPATH=$MSP_PATH" \
    cli peer channel join -b mychannel.block \
    -o $ORDERER \
    --cafile /opt/home/managedblockchain-tls-chain.pem --tls

2019-05-08 03:14:32.878 UTC [channelCmd] InitCmdFactory -> INFO 001 Endorser and orderer connections initialized
2019-05-08 03:14:33.141 UTC [channelCmd] executeJoin -> INFO 002 Successfully submitted proposal to join channel
Successfully submitted proposal to join channel とログ出力されたので、チャネル作成とPeerノードの参加ができました。
チェーンコードをインストールして実行する
チェーンコードとはEthereumでいうところのスマートコントラクトになります。チェーンコードはGo、Node.js、Javaのプログラム言語で開発できます。Peerにデプロイして、ブロックチェーンネットワーク上の台帳へ情報書き込み・読み込みする処理が実装できます。詳細は下記が参考になります。
Hyperledger Fabric 入門, 第 5 回: チェーンコードの書き方
https://www.ibm.com/developerworks/jp/cloud/library/cl-hyperledger-fabric-basic-5/index.html
チェーンコードの実装
チュートリアルにあるサンプルを利用します。下記が実装となります。
fabric/chaincode_example02.go at v0.6 · hyperledger/fabric
https://github.com/hyperledger/fabric/blob/v0.6/examples/chaincode/go/chaincode_example02/chaincode_example02.go
チェーンコードには4つの関数(init 、invoke 、query 、main )が必要になります。
-
init- チェーンコードをデプロイ(
instantiate)、アップデート(upgrade)する際に呼び出される - サンプルでは
aとbというキーで数値を保持するように実装されています
- チェーンコードをデプロイ(
-
invoke- 台帳の更新時に呼び出させる
- サンプルではパラメータで指定されたとおりに数値を移動する実装がされています
- 例)
aからbへ10を移動する
- 例)
-
query- 台帳の参照時に呼び出させる
- サンプルでは
aまたはbの値を取得する実装がされています
台帳へアクセスするときに利用できるAPIが用意されています。(一部)
- 単一キーの操作
PutState(Key string)GutState(Key string)DelState(Key string)
- キー範囲照会
GetStateByRange(startKey string, endkey string)
- 非キー指定による照会
GetQueryResult(query string)
- 変更履歴の照会
GetHistoryForKey(key string)
こちらの記事も参考になりました。
Hyperledger Fabric のチェーンコードを実装する - Qiita
https://qiita.com/kyrieleison/items/9368ed8a5254588c89b6
HyperLedger Fabric v1.1でchaincodeを実行する - Qiita
https://qiita.com/yukike/items/f3654bae36e8c68e1f6c
チェーンコードのデプロイ
cli peer chaincode install コマンドでチェーンコードをPeerにインストールします。
-n でチェーンコード名、-v でバージョン、-p で実装のファイルパスを指定します。
$ docker exec -e "CORE_PEER_TLS_ENABLED=true" \
    -e "CORE_PEER_TLS_ROOTCERT_FILE=/opt/home/managedblockchain-tls-chain.pem" \
    -e "CORE_PEER_LOCALMSPID=$MSP" \
    -e "CORE_PEER_MSPCONFIGPATH=$MSP_PATH" \
    -e "CORE_PEER_ADDRESS=$PEER" \
    cli peer chaincode install \
    -n mycc -v v0 -p github.com/chaincode_example02/go

2019-05-08 04:01:55.501 UTC [chaincodeCmd] checkChaincodeCmdParams -> INFO 001 Using default escc
2019-05-08 04:01:55.502 UTC [chaincodeCmd] checkChaincodeCmdParams -> INFO 002 Using default vscc
2019-05-08 04:01:56.031 UTC [chaincodeCmd] install -> INFO 003 Installed remotely response:<status:200 payload:"OK" >
cli peer chaincode instantiate コマンドでチェーンコードをチャネル上で初期化(デプロイ)します。
instantiate 実行時はチェーンコードのInit メソッドが呼び出されます。
-c オプションでチェーンコードへ引き渡すパラメータを指定します。Args の最初にinit を指定していますが、これはチェーンコードのInit メソッドの第1パラメータfunction string として受け取り、2つ目からがargs []string として扱われます。
$ docker exec -e "CORE_PEER_TLS_ENABLED=true" \
    -e "CORE_PEER_TLS_ROOTCERT_FILE=/opt/home/managedblockchain-tls-chain.pem" \
    -e "CORE_PEER_LOCALMSPID=$MSP" \
    -e "CORE_PEER_MSPCONFIGPATH=$MSP_PATH" \
    -e "CORE_PEER_ADDRESS=$PEER" \
    cli peer chaincode instantiate \
    -o $ORDERER -C mychannel \
    -n mycc -v v0 \
    -c '{"Args":["init","a","100","b","200"]}' \
    --cafile /opt/home/managedblockchain-tls-chain.pem --tls

2019-05-08 04:02:37.231 UTC [chaincodeCmd] checkChaincodeCmdParams -> INFO 001 Using default escc
2019-05-08 04:02:37.231 UTC [chaincodeCmd] checkChaincodeCmdParams -> INFO 002 Using default vscc
# 数秒応答が返ってこなくなるけどそのまま待つ
チェーンコードがデプロイされたかcli peer chaincode list コマンドで確認できます。
$ docker exec -e "CORE_PEER_TLS_ENABLED=true" \
    -e "CORE_PEER_TLS_ROOTCERT_FILE=/opt/home/managedblockchain-tls-chain.pem" \
    -e "CORE_PEER_LOCALMSPID=$MSP" \
    -e  "CORE_PEER_MSPCONFIGPATH=$MSP_PATH" \
    -e "CORE_PEER_ADDRESS=$PEER"  \
    cli peer chaincode list --instantiated \
    -o $ORDERER -C mychannel \
    --cafile /opt/home/managedblockchain-tls-chain.pem --tls

Get instantiated chaincodes on channel mychannel:
Name: mycc, Version: v0, Path: github.com/chaincode_example02/go, Escc: escc, Vscc: vscc
チェーンコードの実行
cli peer chaincode query コマンドで台帳の情報が参照できます。
query 実行時はチェーンコードのQuery メソッドが呼び出されます。-c オプションの挙動は初期化(デプロイ)と同様となります。
$ docker exec -e "CORE_PEER_TLS_ENABLED=true" \
    -e "CORE_PEER_TLS_ROOTCERT_FILE=/opt/home/managedblockchain-tls-chain.pem" \
    -e "CORE_PEER_ADDRESS=$PEER" \
    -e "CORE_PEER_LOCALMSPID=$MSP" \
    -e "CORE_PEER_MSPCONFIGPATH=$MSP_PATH" \
    cli peer chaincode query \
    -C mychannel \
    -n mycc -c '{"Args":["query","a"]}'

100
cli peer chaincode invokeコマンドで台帳の情報を更新します。
invoke 実行時はチェーンコードのInvoke メソッドが呼び出されます。-c オプションの挙動は初期化(デプロイ)と同様となります。
$ docker exec -e "CORE_PEER_TLS_ENABLED=true" \
    -e "CORE_PEER_TLS_ROOTCERT_FILE=/opt/home/managedblockchain-tls-chain.pem" \
    -e "CORE_PEER_ADDRESS=$PEER" \
    -e "CORE_PEER_LOCALMSPID=$MSP" \
    -e "CORE_PEER_MSPCONFIGPATH=$MSP_PATH" \
    cli peer chaincode invoke \
    -C mychannel \
    -n mycc -c '{"Args":["invoke","a","b","10"]}' \
    -o $ORDERER \
    --cafile /opt/home/managedblockchain-tls-chain.pem --tls

2019-05-08 04:04:47.514 UTC [chaincodeCmd] chaincodeInvokeOrQuery -> INFO 001 Chaincode invoke successful. result: status:200
正常に実行されたのでキーa からb へ数値を10 移動させることができたはずです。
cli peer chaincode query コマンドを実行して確認してみます。
$ docker exec -e "CORE_PEER_TLS_ENABLED=true" \
    -e "CORE_PEER_TLS_ROOTCERT_FILE=/opt/home/managedblockchain-tls-chain.pem" \
    -e "CORE_PEER_ADDRESS=$PEER" \
    -e "CORE_PEER_LOCALMSPID=$MSP" \
    -e "CORE_PEER_MSPCONFIGPATH=$MSP_PATH" \
    cli peer chaincode query \
    -C mychannel \
    -n mycc -c '{"Args":["query","a"]}'

90


$ docker exec -e "CORE_PEER_TLS_ENABLED=true" \
    -e "CORE_PEER_TLS_ROOTCERT_FILE=/opt/home/managedblockchain-tls-chain.pem" \
    -e "CORE_PEER_ADDRESS=$PEER" \
    -e "CORE_PEER_LOCALMSPID=$MSP" \
    -e "CORE_PEER_MSPCONFIGPATH=$MSP_PATH" \
    cli peer chaincode query \
    -C mychannel \
    -n mycc -c '{"Args":["query","b"]}'

210
やったぜ。
これでAmazon Managed Blockchainを利用してHyperledger Fabricのブロックチェーンネットワークを構築してトランザクション実行するところまでが確認できました。ネットワークに他のメンバーを招待する手順については今回割愛します。
つかってみて
フルマネージドなサービスだけあって、インフラに関してはクライアント用のEC2インスタンスを除き、裏でなにが動作しているのか意識せずにブロックチェーンネットワークが構築できました。
ただ、チャネル作成やチェーンコードのデプロイなどはAWSマネジメントコンソールでは実行できず、Hyperledger Fabricに関する知識がないと利用するのが難しいこともわかりました。
Oracle Cloudのフルマネージドサービスだと、ブラウザ上でチェーンコードの管理まで行うことができるので、より敷居が下がっていて使いやすくなりそうです。今後、Ethereumフレームワークが利用できるようになると考えると、なおのことに。。。ぜひとも追随していただきたいところです。
Oracle Blockchain Cloud Service 触ってみた(Dataspiderとの連携もちょっと紹介) - Qiita
https://qiita.com/Yosuke_Sakaue/items/159d86fb5022426d4bce
Azure Blockchain WorkbenchでHello Blockchain! - Qiita
https://qiita.com/shingo_kawahara/items/6acceac42ec2701bf336
参考
Amazon Managed BlockchainがリリースされたのでHyperledger Fabricも合わせて情報をまとめてみた - Qiita
https://qiita.com/kai_kou/items/5a968f42c5f96296f6fe
Get Started Creating a Hyperledger Fabric Blockchain Network Using Amazon Managed Blockchain - Amazon Managed Blockchain
https://docs.aws.amazon.com/managed-blockchain/latest/managementguide/managed-blockchain-get-started-tutorial.html
Document History for Amazon Managed Blockchain Management Guide - Amazon Managed Blockchain
https://docs.aws.amazon.com/managed-blockchain/latest/managementguide/managed-blockchain-management-guide-doc-history.html
Prerequisites and Considerations - Amazon Managed Blockchain
https://docs.aws.amazon.com/managed-blockchain/latest/managementguide/get-started-prerequisites.html
aws/aws-cli: Universal Command Line Interface for Amazon Web Services
https://github.com/aws/aws-cli
What’s new in v1.4 — hyperledger-fabricdocs master documentation
https://hyperledger-fabric.readthedocs.io/en/release-1.4/whatsnew.html
Configuring Security Groups - Amazon Managed Blockchain
https://docs.aws.amazon.com/managed-blockchain/latest/managementguide/managed-blockchain-security-sgs.html
create-vpc-endpoint — AWS CLI 1.16.154 Command Reference
https://docs.aws.amazon.com/cli/latest/reference/ec2/create-vpc-endpoint.html
チュートリアル: AWS Command Line Interface を使用して Amazon EC2 開発環境をデプロイする - AWS Command Line Interface
https://docs.aws.amazon.com/ja_jp/cli/latest/userguide/cli-chap-tutorial.html#tutorial-launch-and-connect
Linux に AWS CLI をインストールする - AWS Command Line Interface
https://docs.aws.amazon.com/ja_jp/cli/latest/userguide/install-linux.html
Amazon Linux に AWS CLI をインストールする - AWS Command Line Interface
https://docs.aws.amazon.com/ja_jp/cli/latest/userguide/install-linux-al2017.html
Hyperledger Fabric 入門, 第 4 回: Membership Service Provider
https://www.ibm.com/developerworks/jp/cloud/library/cl-hyperledger-fabric-basic-4/index.html?ca=drs-
Hyperledger FabricのMSPについて - Qiita
https://qiita.com/Ruly714/items/bdd76cf73195e62228e9
Hyperledger Fabric 入門, 第 2 回: Peer/チャネル/Endorsement Policy の解説
https://www.ibm.com/developerworks/jp/cloud/library/cl-hyperledger-fabric-basic-2/index.html
Amazon Managed Blockchain Instance Types
https://aws.amazon.com/jp/managed-blockchain/instance-types/
Hyperledger Fabric 入門, 第 5 回: チェーンコードの書き方
https://www.ibm.com/developerworks/jp/cloud/library/cl-hyperledger-fabric-basic-5/index.html
fabric/chaincode_example02.go at v0.6 · hyperledger/fabric
https://github.com/hyperledger/fabric/blob/v0.6/examples/chaincode/go/chaincode_example02/chaincode_example02.go
Hyperledger Fabric のチェーンコードを実装する - Qiita
https://qiita.com/kyrieleison/items/9368ed8a5254588c89b6
HyperLedger Fabric v1.1でchaincodeを実行する - Qiita
https://qiita.com/yukike/items/f3654bae36e8c68e1f6c
AWSセキュリティグループ設定をコマンド(aws-cli)でやる - Qiita
https://qiita.com/S-T/items/3d4197bbed1022ccac43
Oracle Blockchain Cloud Service 触ってみた(Dataspiderとの連携もちょっと紹介) - Qiita
https://qiita.com/Yosuke_Sakaue/items/159d86fb5022426d4bce
Azure Blockchain WorkbenchでHello Blockchain! - Qiita
https://qiita.com/shingo_kawahara/items/6acceac42ec2701bf336
Amazon Managed Blockchain Pricing
https://aws.amazon.com/jp/managed-blockchain/pricing/
Work with Proposals - Amazon Managed Blockchain
https://docs.aws.amazon.com/managed-blockchain/latest/managementguide/managed-blockchain-proposals.html