Unity ML-Agents(v0.11.0)をDocker上で動作させてみました。
UnityやUnity ML-Agentsの環境構築などは下記をご参考ください。
Macでhomebrewを使ってUnityをインストールする(Unity Hub、日本語化対応)
https://qiita.com/kai_kou/items/445e614fb71f2204e033
MacでUnity ML-Agentsの環境を構築する(v0.11.0対応) - Qiita
https://qiita.com/kai_kou/items/0d40157cbc303fb10c22
手順
v0.10.1まではDockerでの学習方法についてドキュメントがあったのですが、v0.11.0の時点でドキュメントが削除されています。情報としては若干古くなりますが、v0.11.0でもこちらを参考にして動作させることができます。
ml-agents/Using-Docker.md at 0.10.1 · Unity-Technologies/ml-agents
https://github.com/Unity-Technologies/ml-agents/blob/0.10.1/docs/Using-Docker.md
Dockerのインストール
Dockerがインストールされていない場合、インストールします。
> brew cask install docker
(略)

> docker --version
Docker version 19.03.4, build 9013bf5
※Dockerを初回起動すると初期設定のためにパスワード入力が求められます。
UnityにLinuxビルドサポートコンポーネントを追加する
Unity Hubを利用してUnityにLinuxビルドサポートコンポーネントを追加します。
Unityのバージョンは2019.2.10f1 を利用しています。
Unity Hubがインストールされていない場合は下記をご参考ください。
Macでhomebrewを使ってUnityをインストールする(Unity Hub、日本語化対応)
https://qiita.com/kai_kou/items/445e614fb71f2204e033
- Unity Hubアプリを起動する
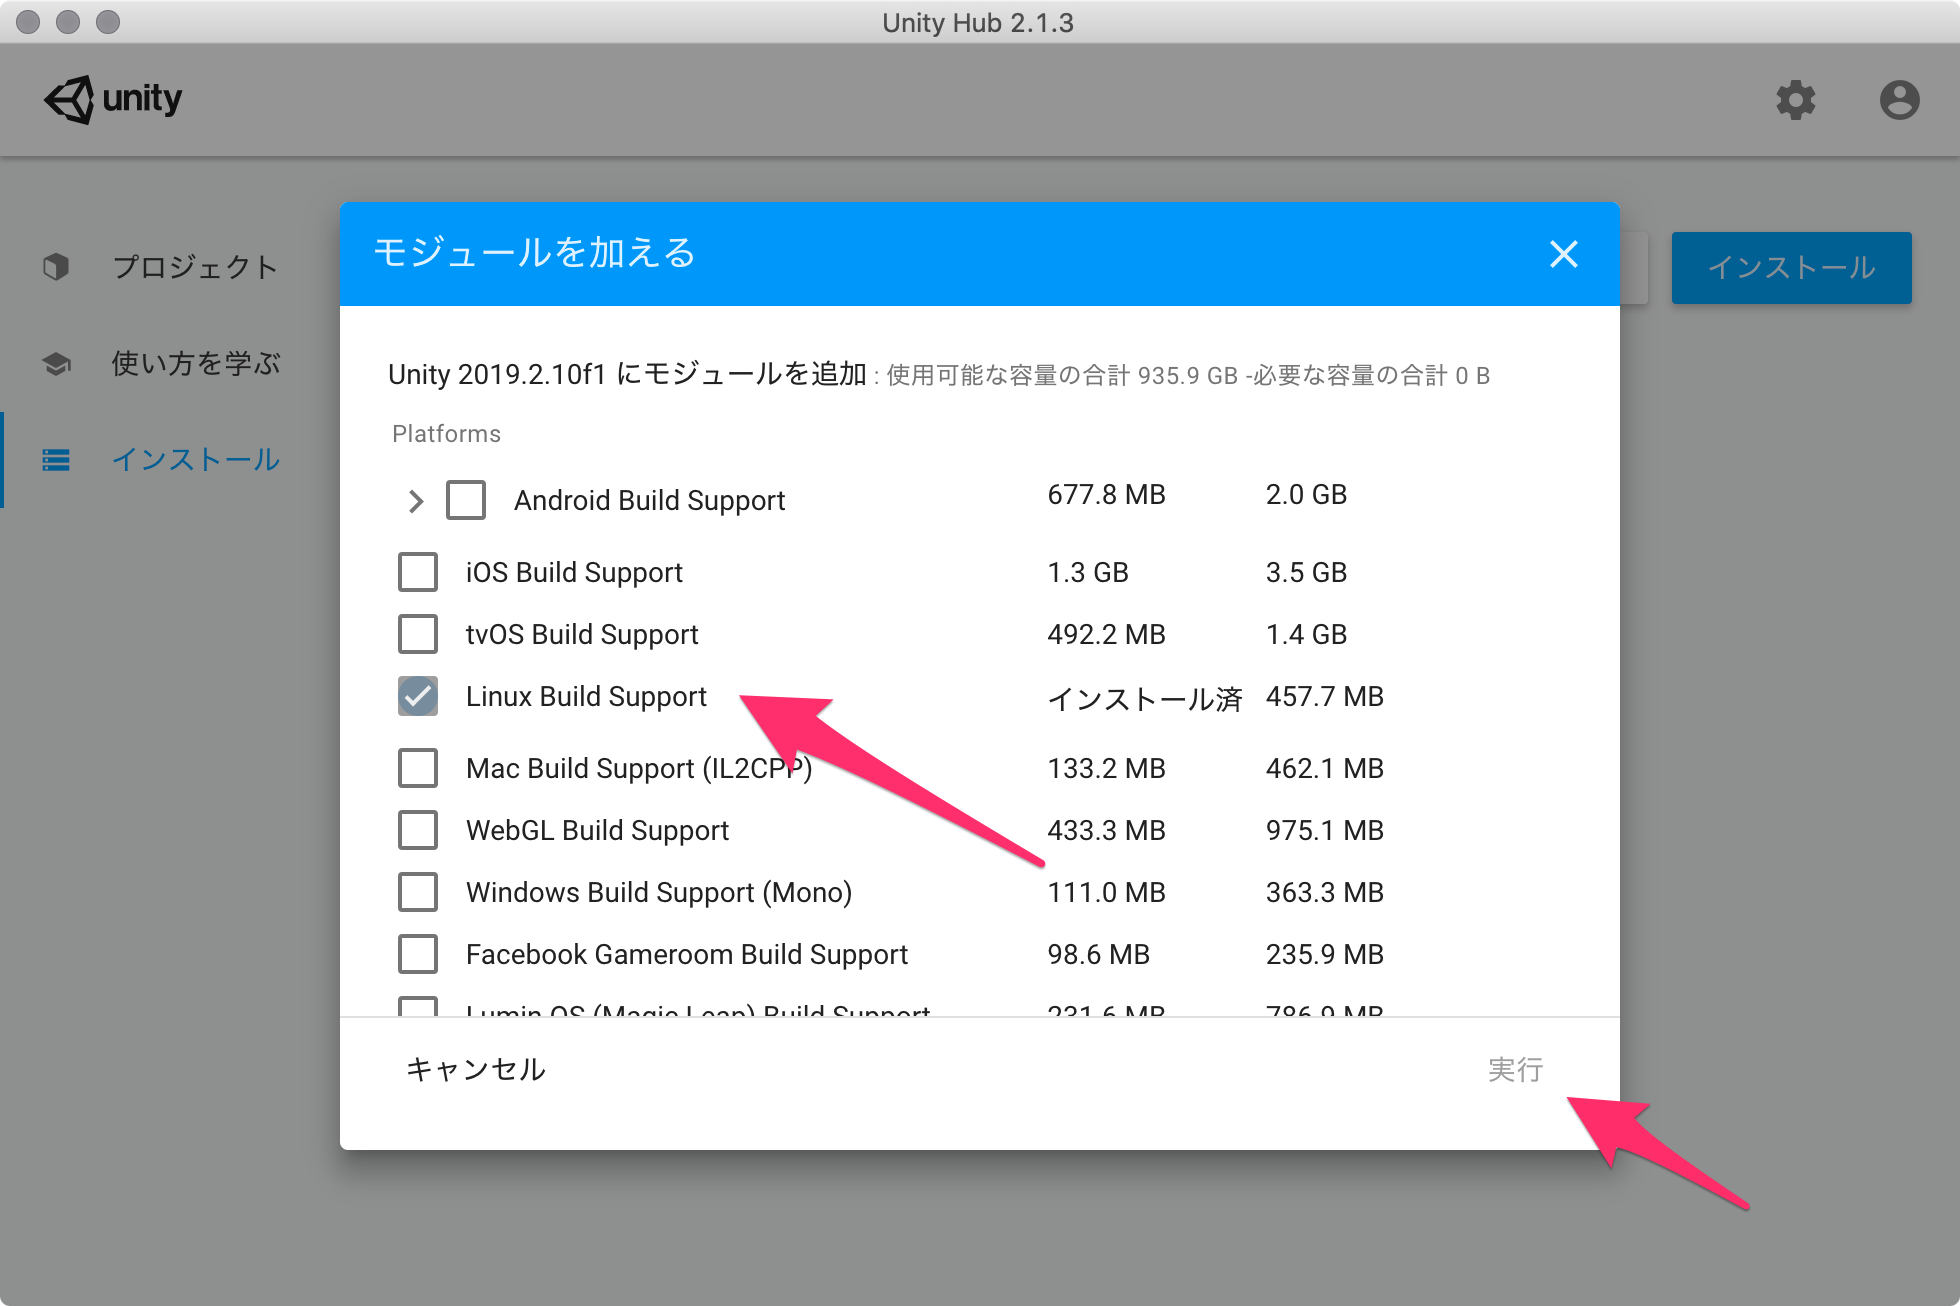
- [インストール] > [Unityの利用するアプリ]右側にある[︙]をクリックして[モジュールを加える]を選択する

 - [モジュールを加える]ダイアログの[Platforms]にある[Linux Build Support]にチェックを入れて[実行]ボタンをクリックする
学習用のUnityアプリをダウンロードしてビルドする
ML-Agentsリポジトリに含まれているサンプルを学習できるようにします。
ML-Agentsリポジトリをダウンロード
適当なディレクトリにリポジトリをダウンロードする。
> mkdir 適当なディレクトリ
> cd 適当なディレクトリ
> git clone https://github.com/Unity-Technologies/ml-agents.git
Unityアプリからサンプルプロジェクトを開く
Unity Hubでアプリを立ち上げます。
ML-Agentsを利用するにはUnityのバージョン2017.4 以上が必要となります。今回は2019.2.10f1 を利用しました。
アプリが立ち上がったら「開く」ボタンから任意のディレクトリ/ml-agents/UnitySDK フォルダを選択します。


Unityエディタのバージョンによっては、アップグレードするかの確認ダイアログが立ち上がります。

「確認」ボタンをクリックして進めます。アップグレード処理に少し時間がかかります。

起動しました。
今回は、サンプルにある[3DBall]Scenesを利用します。
- Unityアプリの下パネルにある[Project]タブから以下のフォルダまで開く
- [Assets] > [ML-Agents] > [Examples] > [3DBall] > [Scenes]
- 開いたら、[3DBall]ファイルがあるので、ダブルクリックして開く

Scenes(シーン)の設定
ML-Agentsで学習させるための設定です。
- Unityアプリの[Edit]メニューから[Project Settings]を開く

- [Inspector]パネルで以下の設定を確認する
- [Resolution and Presentation]の[Run In Background]がチェックされている
- [Display Resolution Dialog]がDisableになっている

ビルド設定
- Unityアプリの[File]メニューから[Build Settings]を選択して[Build Settings]ダイアログを開く
- [Add Open Scenes]をクリックする
- [Scenes In Build]で[ML-Agents/Examples/3DBall/Scenes/3DBall]にチェックを入れる
- [Platform]で
PC, Mac & Linux Standaloneが選択されていることを確認する - [Target Platform]を
Linuxに変更する - [Architecture]を
x86_64に変更する - [Server Build]にチェックを入れる
- [Build]ボタンをクリックする
- ファイル保存ダイアログで以下を指定してビルドを開始する
- ファイル名: 3DBall
- フォルダ名: 任意のディレクトリ/ml-agents/unity-volume


すると、unity-volume に以下フォルダ・ファイルが出力されます。
> ls 任意のディレクトリ/ml-agents/unity-volume

3DBall.x86_64 3DBall_Data
ハイパーパラメーターファイルの用意
ハイパーパラメーターファイルをunity-volume フォルダにコピーしておきます。
> cp ml-agents/config/trainer_config.yaml ml-agents/unity-volume/
Dockerイメージを作成する
すでにDockerfileが用意されているので、docker build するだけ。楽々ですね。
ml-agents-on-docker はイメージ名となりますので、任意でOKです。
> docker build -t ml-agents-on-docker ./ml-agents

(略)
Removing intermediate container c1384ee9d5a6
 ---> 9ff8832e88dc
Step 19/20 : EXPOSE 5005
 ---> Running in 53253a272fb4
Removing intermediate container 53253a272fb4
 ---> f0b43146ad36
Step 20/20 : ENTRYPOINT ["mlagents-learn"]
 ---> Running in f80f7504b790
Removing intermediate container f80f7504b790
 ---> 9caddd5a62b1
Successfully built 9caddd5a62b1
Successfully tagged ml-agents-on-docker:latest


> docker images
REPOSITORY          TAG                 IMAGE ID            CREATED             SIZE
ml-agents-on-docker latest              9caddd5a62b1        2 minutes ago       1.23GB
注意点
ml-agents ディレクトリ直下でdocker build コマンドを実行するとエラーになるのでご注意ください。
> cd ml-agents
> docker build -t ml-agents-on-docker .

error checking context: 'file ('/Users/xxx/xxxxx/ml-agents/UnitySDK/Temp') not found or excluded by .dockerignore'.
v0.10.0からPython 3.7.xにも対応しましたが、Dockerfile を覗いてみるとPyhtonのバージョンは3.6.4 のままでした。
ENV PYTHON_VERSION 3.6.4
Dockerコンテナの実行
ビルドできたら実行してみます。
# ml-agents-3dball: コンテナ名(任意)
# ml-agents-on-docker: Dockerでビルド時に付けたイメージ名
# 3DBall: Unityでビルド時に付けたアプリの名前(拡張子なし)

> cd ml-agents
> docker run -it --rm \
  --name ml-agents-3dball \
  --mount type=bind,source="$(pwd)"/unity-volume,target=/unity-volume \
  -p 5005:5005 \
  -p 6006:6006 \
  ml-agents-on-docker:latest \
    --docker-target-name=unity-volume \
    --env=3DBall \
    --train \
    trainer_config.yaml
mlagents-learn コマンドの--docker-target-name オプションはdocker run コマンドの--workdir(-w) に置き換えることもできます。
> docker run -it --rm \
  --name ml-agents-3dball \
  --mount type=bind,source="$(pwd)"/unity-volume,target=/unity-volume \
  -w /unity-volume \
  -p 5005:5005 \
  -p 6006:6006 \
  ml-agents-on-docker:latest \
    --env=3DBall \
    --train \
    trainer_config.yaml
fishシェルで実行する場合は、"$(pwd)" を"$PWD" に置き換えます。
> cd ml-agents
> docker run -it --rm \
  --name ml-agents-3dball \
  --mount type=bind,source="$PWD"/unity-volume,target=/unity-volume \
  -p 5005:5005 \
  -p 6006:6006 \
  ml-agents-on-docker:latest \
    --docker-target-name=unity-volume \
    --env=3DBall \
    --train \
    trainer_config.yaml
実行すると、学習が始まります。
trainer_config.yaml のmax_steps で指定されているステップ数が完了するか、ctrl + c キーで学習が終了します。
> docker run (略)


                        ▄▄▄▓▓▓▓
                   ╓▓▓▓▓▓▓█▓▓▓▓▓
              ,▄▄▄m▀▀▀'  ,▓▓▓▀▓▓▄                           ▓▓▓  ▓▓▌
            ▄▓▓▓▀'      ▄▓▓▀  ▓▓▓      ▄▄     ▄▄ ,▄▄ ▄▄▄▄   ,▄▄ ▄▓▓▌▄ ▄▄▄    ,▄▄
          ▄▓▓▓▀        ▄▓▓▀   ▐▓▓▌     ▓▓▌   ▐▓▓ ▐▓▓▓▀▀▀▓▓▌ ▓▓▓ ▀▓▓▌▀ ^▓▓▌  ╒▓▓▌
        ▄▓▓▓▓▓▄▄▄▄▄▄▄▄▓▓▓      ▓▀      ▓▓▌   ▐▓▓ ▐▓▓    ▓▓▓ ▓▓▓  ▓▓▌   ▐▓▓▄ ▓▓▌
        ▀▓▓▓▓▀▀▀▀▀▀▀▀▀▀▓▓▄     ▓▓      ▓▓▌   ▐▓▓ ▐▓▓    ▓▓▓ ▓▓▓  ▓▓▌    ▐▓▓▐▓▓
          ^█▓▓▓        ▀▓▓▄   ▐▓▓▌     ▓▓▓▓▄▓▓▓▓ ▐▓▓    ▓▓▓ ▓▓▓  ▓▓▓▄    ▓▓▓▓`
            '▀▓▓▓▄      ^▓▓▓  ▓▓▓       └▀▀▀▀ ▀▀ ^▀▀    `▀▀ `▀▀   '▀▀    ▐▓▓▌
               ▀▀▀▀▓▄▄▄   ▓▓▓▓▓▓,                                      ▓▓▓▓▀
                   `▀█▓▓▓▓▓▓▓▓▓▌
                        ¬`▀▀▀█▓


INFO:mlagents.trainers:CommandLineOptions(debug=False, num_runs=1, seed=-1, env_path='3DBall', run_id='ppo', load_model=False, train_model=True, save_freq=50000, keep_checkpoints=5, base_port=5005, num_envs=1, curriculum_folder=None, lesson=0, slow=False, no_graphics=False, multi_gpu=False, trainer_config_path='trainer_config.yaml', sampler_file_path=None, docker_target_name='unity-volume', env_args=None, cpu=False)
INFO:mlagents.envs:
'Ball3DAcademy' started successfully!
Unity Academy name: Ball3DAcademy
        Number of Training Brains : 0
        Reset Parameters :
                gravity -> 9.8100004196167
                scale -> 1.0
                mass -> 1.0

(略)
2019-11-07 05:31:38.593118: I tensorflow/core/platform/cpu_feature_guard.cc:142] Your CPU supports instructions that this TensorFlow binary was not compiled to use: AVX2 FMA
2019-11-07 05:31:38.604956: I tensorflow/core/platform/profile_utils/cpu_utils.cc:94] CPU Frequency: 2400000000 Hz
2019-11-07 05:31:38.607307: I tensorflow/compiler/xla/service/service.cc:168] XLA service 0x39ccf70 executing computations on platform Host. Devices:
2019-11-07 05:31:38.607465: I tensorflow/compiler/xla/service/service.cc:175]   StreamExecutor device (0): <undefined>, <undefined>
(略)
2019-11-07 05:31:40.131532: W tensorflow/compiler/jit/mark_for_compilation_pass.cc:1412] (One-time warning): Not using XLA:CPU for cluster because envvar TF_XLA_FLAGS=--tf_xla_cpu_global_jit was not set.  If you want XLA:CPU, either set that envvar, or use experimental_jit_scope to enable XLA:CPU.  To confirm that XLA is active, pass --vmodule=xla_compilation_cache=1 (as a proper command-line flag, not via TF_XLA_FLAGS) or set the envvar XLA_FLAGS=--xla_hlo_profile.
INFO:mlagents.envs:Hyperparameters for the PPOTrainer of brain 3DBall:
        trainer:        ppo
        batch_size:     64
        beta:   0.001
        buffer_size:    12000
        epsilon:        0.2
        hidden_units:   128
        lambd:  0.99
        learning_rate:  0.0003
        learning_rate_schedule: linear
        max_steps:      5.0e4
        memory_size:    256
        normalize:      True
        num_epoch:      3
        num_layers:     2
        time_horizon:   1000
        sequence_length:        64
        summary_freq:   1000
        use_recurrent:  False
        vis_encode_type:        simple
        reward_signals:
          extrinsic:
            strength:   1.0
            gamma:      0.99
        summary_path:   /unity-volume/summaries/ppo_3DBall
        model_path:     /unity-volume/models/ppo-0/3DBall
        keep_checkpoints:       5
WARNING:tensorflow:From /ml-agents/mlagents/trainers/trainer.py:223: The name tf.summary.text is deprecated. Please use tf.compat.v1.summary.text instead.

WARNING:tensorflow:From /ml-agents/mlagents/trainers/trainer.py:223: The name tf.summary.text is deprecated. Please use tf.compat.v1.summary.text instead.


INFO:mlagents.trainers: ppo: 3DBall: Step: 1000. Time Elapsed: 10.062 s Mean Reward: 1.167. Std of Reward: 0.724. Training.
(略)
INFO:mlagents.trainers: ppo: 3DBall: Step: 10000. Time Elapsed: 109.367 s Mean Reward: 36.292. Std of Reward: 28.127. Training.
(略)
INFO:mlagents.trainers: ppo: 3DBall: Step: 49000. Time Elapsed: 520.514 s Mean Reward: 100.000. Std of Reward: 0.000. Training.
(略)
Converting /unity-volume/models/ppo-0/3DBall/frozen_graph_def.pb to /unity-volume/models/ppo-0/3DBall.nn
IGNORED: Cast unknown layer
IGNORED: StopGradient unknown layer
GLOBALS: 'is_continuous_control', 'version_number', 'memory_size', 'action_output_shape'
IN: 'vector_observation': [-1, 1, 1, 8] => 'sub_3'
IN: 'epsilon': [-1, 1, 1, 2] => 'mul_1'
OUT: 'action', 'action_probs'
DONE: wrote /unity-volume/models/ppo-0/3DBall.nn file.
INFO:mlagents.trainers:Exported /unity-volume/models/ppo-0/3DBall.nn file
INFO:mlagents.envs:Environment shut down with return code 0.
WARNING がかなり出力されますが、学習できました。
TensorBoard を利用して学習の進捗を視覚的に確認することもできます。
> docker exec -it \
  ml-agents-3dball \
  tensorboard \
  --logdir=/unity-volume/summaries \
  --host=0.0.0.0

(略)
  _np_qint32 = np.dtype([("qint32", np.int32, 1)])
/usr/local/lib/python3.6/site-packages/tensorflow/python/framework/dtypes.py:525: FutureWarning: Passing (type, 1) or '1type' as a synonym of type is deprecated; in a future version of numpy, it will be understood as (type, (1,)) / '(1,)type'.
  np_resource = np.dtype([("resource", np.ubyte, 1)])
TensorBoard 1.14.0 at http://0.0.0.0:6006/ (Press CTRL+C to quit)

学習結果をアプリに組み込む
学習結果は、ml-agents/unity-volume フォルダ内に保存されます。
それをUnityアプリに組み込むことで学習結果をUnityアプリに反映できます。
> ls unity-volume/

3DBall.x86_64       3DBall_Data         csharp_timers.json  models              summaries           trainer_config.yaml

> tree unity-volume/models/
unity-volume/models/
└── ppo-0
    ├── 3DBall
    │   ├── checkpoint
    │   ├── frozen_graph_def.pb
    │   ├── model-50000.cptk.data-00000-of-00001
    │   ├── model-50000.cptk.index
    │   ├── model-50000.cptk.meta
    │   ├── model-50001.cptk.data-00000-of-00001
    │   ├── model-50001.cptk.index
    │   ├── model-50001.cptk.meta
    │   └── raw_graph_def.pb
    └── 3DBall.nn

2 directories, 10 files
Unityアプリの設定
Playerの設定を行います。
- Unityアプリの[Edit]メニューから[Project Settings]を選択する
- [Inspector]ビューの[Other Settings]欄で以下を確認・設定する
- Scripting Backendが
Monoになっている - Api Conpatibility Levelが
.NET 4.xになっている
- Scripting Backendが

学習結果ファイルの取り込み
ターミナルかFinderで学習結果を以下フォルダにコピーします。
- 学習結果ファイル:
models/ppo-0/3DBall.nn - 保存先:
UnitySDK/Assets/ML-Agents/Examples/3DBall/TFModels/
※すでに保存先に3DBall.nn ファイルが存在していますので、リネームします。
> cp models/ppo-0/3DBall.nn ml-agents/UnitySDK/Assets/ML-Agents/Examples/3DBall/TFModels/3DBall_new.nn
- Unityアプリの下パネルにある[Project]タブから以下のフォルダまで開く
- [Assets] > [ML-Agents] > [Examples] > [3DBall] > [Scenes]
- 開いたら、[3DBall]ファイルがあるので、ダブルクリックして開く
- [Hierarchy]パネルから[Agent]を選択する
- Unityアプリの[Project]パネルで以下フォルダを選択する
- [Assets] > [ML-Agents] > [Examples] > [3DBall] > [TFModels]
- Unityアプリの[Inspector]パネルにある[Model]という項目に[TFModels]フォルダ内の
3DBall_new.nnファイルをドラッグ&ドロップする

- Unity上部にある[▶]ボタンをクリックする
これで、学習結果が組み込まれた状態でアプリが起動します。
参考
Macでhomebrewを使ってUnityをインストールする(Unity Hub、日本語化対応)
https://qiita.com/kai_kou/items/445e614fb71f2204e033
MacでUnity ML-Agentsの環境を構築する(v0.11.0対応) - Qiita
https://qiita.com/kai_kou/items/0d40157cbc303fb10c22
ml-agents/Using-Docker.md at 0.10.1 · Unity-Technologies/ml-agents
https://github.com/Unity-Technologies/ml-agents/blob/0.10.1/docs/Using-Docker.md