
世界一シンプルなReactNative + Reduxチュートリアル②
フロントエンジニア出身以外のreact-native初心者が戸惑うのはreduxの実装だ。reduxは学習コストが高いけど、アプリのパフォーマンスを上げてくれるので、実務では必須になる。
2018年のreactのstate管理はreduxとmobxが主流だ。
世の中の主流はreduxで、redux-persistなど便利なライブラリがたくさんある。
もしあなたが、スタートアップ/新規開発の人間ならreduxは止めておこう。reduxは学習コストが高い+プロトタイプ開発速度が遅いので辛い。
スタートアップには、global state管理を諦める。またはmobxまたはunstated-nextかcontext apiをおすすめしたい。unstateはreactのstate管理の決定版だ。
わずか400行のライブラリだが、globalState、非同期、といったものを全て解決できる。(react-navigationと使うには一癖あるが)
starもかなり多い。
そこで究極にシンプルなチュートリアルを作ってみた。
アプリを作成する。
expo init helloRedux
cd helloRedux
reduxをインストールする
npm install --save redux react-redux
元からあるApp.jsと以下の2ファイルだけで実装する。
touch home.js redux.js
まず、軽くreduxの概念をおさらいしていこう。
reduxに登場する大きな概念は4つ。
- store
reactのstateを保管する場所。jsonで記述される。storeのstateを変更するには、setStateではなく、reducerメソッドを使う必要がある。 - reducer
storeを書き換えるための関数。jsonを引数としてとり、storeのstateを書き換える。 - action
reducerに渡すjsonのこと。
紛らわしいが、action creatorが情報をjsonに加工する関数。actionがjson - connect
storeに保管されたstateはreact-reduxのconnect関数を経由して、componentに渡される。
完
それでは書いていこう。今回はシンプルにするために、reduxの機能を1ファイルにまとめる。
// redux.js
import {
  combineReducers,
  createStore,
} from 'redux';

// actions.js
// actionはreduxの機能でなく、オブジェクトを作るための純粋なjsの関数です。
// 下のcloseKabayaの3行をchromeを開き、command + option + iでコンソールを開き貼り付けましょう。
// その後、console.log(deleteName())で、{type: "DELETE_NAME", name: ''}というオブジェクトが生成されるのを確かめましょう。
export const deleteName = () => ({
  type: 'DELETE_NAME',
  name: ''
});

// 引数nameをとり、{type: "ADD_NAME", name: name}を返すjsの関数。
export const setName = name => ({
  type: 'ADD_NAME',
  name: name,
});

INITIAL_STATE = {
  name: 'Nanasi'
}

// reducers.js
// reduxではglobal stateを巨大なjson(store)として管理します。stateの変更はjsonの書き換えによってのみ管理します。
// actionは純粋なjsのオブジェクトを作る関数であることを思い出してください。
// reducerはactionで生成されたオブジェクトを受け取り、巨大なjson(store)を書き換える関数です。
const reducer = (state = INITIAL_STATE, action) => {
  switch (action.type) {
    case 'ADD_NAME':
      return {...state, name: action.name}
    case 'DELETE_NAME':
      return {...state, name: ''}
    default:
      return state;
  }
}

export const reducers = combineReducers({
  user: reducer
})

// store.js
export const store = createStore(reducers)

// storeは巨大なjsonです。storeの中身を取り出すにはgetStateメソッドを使います。
// エミュレータでcommand + dを押し、enable remote debugをクリックしましょう。
// debuggerが現れるので、consoleタブをクリックし、エミュレータ上でアプリをcommandd + rで再起動しましょう。
console.log(store.getState())

// arrayやobjectを綺麗に表示したい時はconsole.tableが便利です。
console.table(store.getState())

// storeはjsonです。つまりjsのオブジェクトです。 jsの関数のtypeofでstoreのstateがオブジェクトであることを確かめましょう。
console.log(typeof store.getState)

// storeもまたjsのオブジェクトであり、4つしかメソッドを持たないことを確認しておきましょう。
console.log(store)
次にホーム画面を作る。
理解が難しいAPIは以下。名が体を表していていいネーミングだ。
mapStateToProps = storeのstateをcontainerコンポーネントのpropsに変換する。

mapDispatchToProps = storeから関数を取得したい時、 stateをcontainerコンポーネントのpropsに変換する。

connect = reactで書かれたコンポーネントはそのままではreduxで使えないので、reduxのために新しいコンポーネントを作り出しreduxと結合する。
// home.js
import React, {Component} from 'react'
import { View, Text, Button } from 'react-native'
import { connect } from 'react-redux'
import { setName, deleteName } from './redux'
import {store} from './redux'

export class Home extends Component {
  render() {
    return (
      <View style={{flex: 1, justifyContent: 'space-around', alignItems: 'center'}}>
        <Text style={{marginTop: 100}}>My name is {this.props.name}.</Text>
        <View style={{flexDirection: 'row'}}>
          <Button
            onPress={this.props.deleteName}
            title="deleteName"
          />
          <Button
            onPress={() => this.props.setName('カバヤ')}
            title="setName"
          />
        </View>
        {/* ストアは、以下の様なJSONで記述されています。combine reducerのキーにuserを使ったのでuserプロパティの中に、stateが保存されます。 */}
        {/* stor のstateを取り出すにはgetStateメソッドを使います。JSON.stringifyで文字列へと変換しています。 */}
        <Text style={{marginBottom: 100}}>現在のstore: {JSON.stringify(store.getState())}</Text>
      </View>
    )
  }
}

const mapStateToProps = state => ({
  // storeは巨大なJsonの塊なので、nameにjsonから取って来たデータを代入している。
  name: state.user.name
})

const mapDispatchToProps = {
  // importしたactionCreatorを記述。
  setName,
  deleteName
}

export default connect(
  mapStateToProps,
  mapDispatchToProps
)(Home)
最後に、作った全てのコンポーネントをProviderで囲む。
// index.js
import React, {Component} from 'react'
import { Provider } from 'react-redux'
import { store } from './redux'
import Home from './home'

export default class reduxApp extends Component {
  render() {
    return (
      <Provider store={store}>
        <Home />
      </Provider>
    )
  }
}
完成だ。
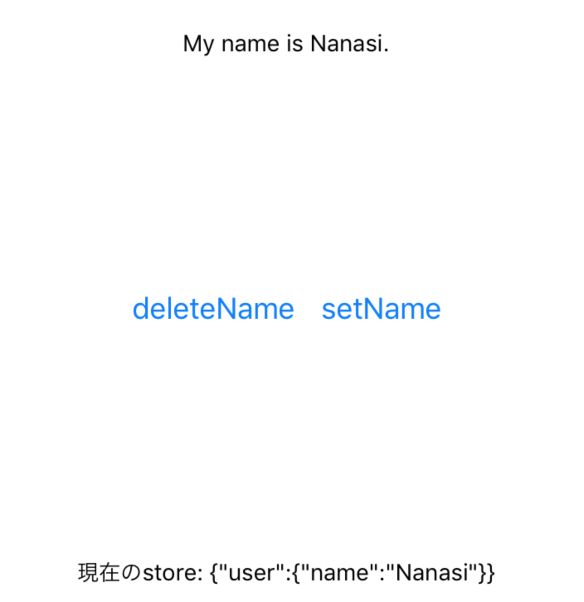
まず、初期のstoreが以下のようになる。
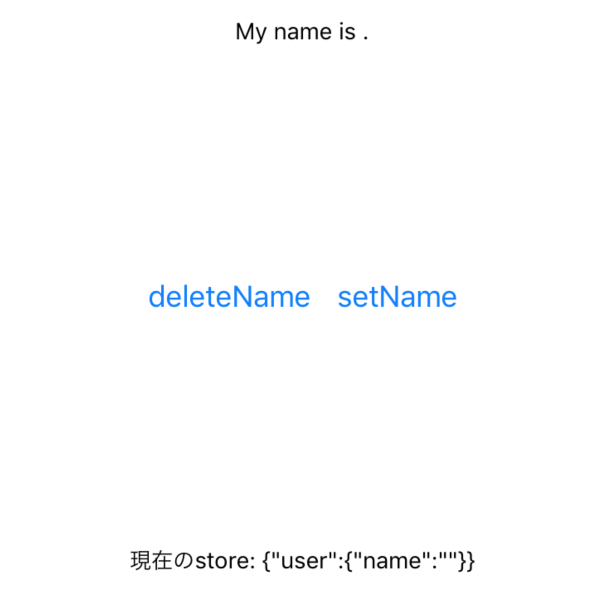
その後、deleteNameを押すと、、、
また、setNameを押すと、
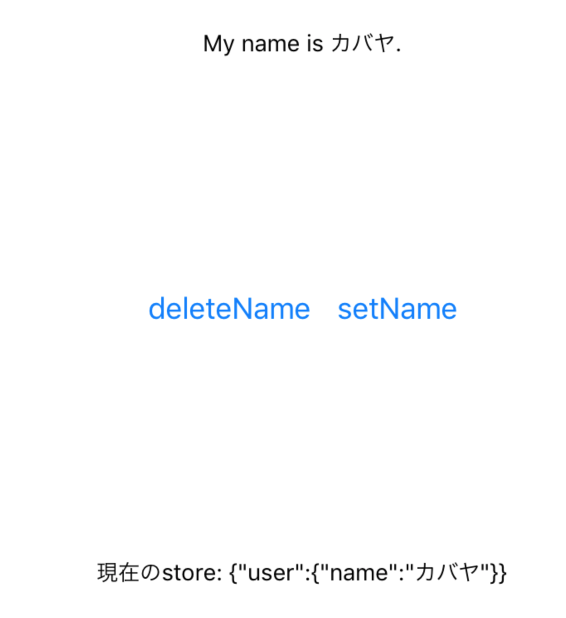
のようになる。
npm start
で確認してみよう。
えっ。redux記述量が多くて学習コストも高いって?
ご安心ください。ES6で記述量を減らせますよ!
爆速Redux ES6だけで現代風コードダイエット