本記事では、GitHub ActionsからGoogle CloudのService Accountの認証情報を利用して、AWSリソースにアクセスする方法について説明します。
これは、複数のクラウドプロバイダーを利用する環境において、認証基盤を一元化するための手法の一つです。
はじめに
AWSとGoogle Cloudの両方を利用する環境では、GitHub Actionsからそれぞれのクラウドプロバイダーへの接続設定が必要になります。
これは以下のような課題を引き起こす可能性があります。
- 各クラウドプロバイダーごとに個別の認証設定が必要
- 許可するGitHubリポジトリの設定を両環境で同期する必要性
- 設定の不一致によるセキュリティリスク
- 認証設定の管理コストの増加
これらの課題に対して、Google Cloudの認証基盤を中心に据えることで、認証の一元管理が可能になります。
この記事では、この構成をTerraformを使用して実装する方法を紹介します。
参考
- 【AWS】【GCP】AWSとGCP間のキーなし認証を試みる(1) GCP→AWS
- Access AWS using a Google Cloud Platform native workload identity
- Google の権限を利用して AWS にアクセスする方法
- Configuration and credential file settings in the AWS CLI
- Assume role with web identity
- Available keys for AWS OIDC federation
- ID トークンからユーザー情報を取得する
- GCPでGitHub Actions用(OIDC)のサービスアカウントをTerraformで作成する
環境
- Terraform v1.10.5
- AWS Provider 5.86.0
- Google Provider 6.19.0
- GitHub Provider 6.5.0
- gh version 2.66.1 (2025-01-31)
- aws-cli 2.23.11
- gcloud 508.0.0
検証に使用したコードは以下のリポジトリにあります。
実践
以下のリソースを用意することで実現できます。
- Google Cloud Service Accountの作成
- こちらはGitHub ActionsからOIDCを利用して認証するためのService Accountです。
- AWS IAM Roleの作成
- 接続用のGitHub Actionsの設定
1. Google Cloud Service Accountの作成
AWS IAM Roleに対し、特定のService Accountからの接続を許可するため、Google Cloud側に接続元のService Accountを指定します。
google-github-actions/auth@v21 ではDirect Workload Identity Federationによる接続が推奨されていますが、その方法ではAWSに接続するための認証情報を作成できません。
Terraformでは以下のように作成できます。GitHub ActionsからOIDC経由で接続する一般的な構成と同じです。
# GitHub ActionsからOIDC認証で使用するService Accountを作成
resource "google_service_account" "account" {
  account_id   = var.iam_id
  display_name = var.iam_name
  description  = "Access from GitHub Actions(${var.github_access_from})"
  disabled     = false
  timeouts {}
}

# Service AccountのEmailをoutputとして出力(GitHub ActionsのSecret作成時に使用)
output "service_account_email" {
  value = google_service_account.account.email
}

# Service AccountにWorkload Identity Userの権限を付与
resource "google_service_account_iam_policy" "policy" {
  policy_data        = data.google_iam_policy.policy.policy_data
  service_account_id = google_service_account.account.name
}

# 許可するGitHubリポジトリの設定
data "google_iam_policy" "policy" {
  binding {
    members = [
      for s in var.github_repositories :
      "principalSet://iam.googleapis.com/${var.workload_identity_pool_name}/attribute.repository/${s}"
    ]
    role = "roles/iam.workloadIdentityUser"
  }
}
google_iam_policy の内容は、用途やセキュリティに合わせて変更してください。
2. AWS IAM Roleの作成
AWS側に接続先のIAM Roleを用意します。
# Google Cloud Service Accountからの接続を許可するIAM Roleを作成
resource "aws_iam_role" "account" {
  name               = var.iam_id
  description        = var.iam_name
  assume_role_policy = data.aws_iam_policy_document.account_assume.json
}

# Google CloudのService Accountからの認証を許可するポリシーを定義
data "aws_iam_policy_document" "account_assume" {
  statement {
    effect  = "Allow"
    actions = ["sts:AssumeRoleWithWebIdentity"]
    principals {
      type        = "Federated"
      identifiers = ["accounts.google.com"]
    }
    condition {
      test     = "StringEquals"
      variable = "accounts.google.com:aud"
      values   = [google_service_account.account.unique_id]
    }
    condition {
      test     = "StringEquals"
      variable = "accounts.google.com:sub"
      values   = [google_service_account.account.unique_id]
    }
    condition {
      test     = "StringEquals"
      variable = "accounts.google.com:oaud"
      values   = ["sts.amazonaws.com"]
    }
  }
}

# IAM RoleのARNをoutputとして出力(GitHub Actions設定時に使用)
output "aws_iam_role_arn" {
  value = aws_iam_role.account.arn
}
assume_role_policy として、Google Cloud側に作成したService Accountからの接続を許可するポリシーを記述します。
コンソールからアイデンティティプロバイダーをGoogleに設定した時とほぼ同じ内容になります。

AudienceにはGoogle Cloud側に設定したService Accountの unique_id を指定します。このIDはアカウントに対し一意なものです。
Service AccountのIDはコンソールから確認できます。

SubjectとしてもAudienceと同じ値を指定しています。
oaudは適当な値を指定してください。今回は sts.amazonaws.com を指定しています。2
3. 接続用のGitHub Actionsの設定
以下のように設定することで、Google Cloudからの認証情報を利用してAWSに接続できます。
jobs:
auth:
runs-on: ubuntu-latest
steps:
# Google Cloud認証を実行
- uses: google-github-actions/auth@v2
id: auth
with:
project_id: ${{env.ACCOUNT_GCP}}
workload_identity_provider: ${{secrets.GCP_IDENTITY_PROVIDER}}
service_account: ${{secrets.GCP_SERVICE_ACCOUNT}}
token_format: "id_token"
id_token_audience: "sts.amazonaws.com"
# 取得したトークンをファイルに保存
- name: Write JWT
run: |
import os
with open(os.environ["DESTINATION"], "w") as f:
f.write(os.environ["ID_TOKEN"])
shell: python
env:
DESTINATION: ${{runner.temp}}/token.txt
ID_TOKEN: ${{steps.auth.outputs.id_token}}
# AWS認証を実行
- uses: aws-actions/configure-aws-credentials@v4
with:
aws-region: 'us-east-1'
mask-aws-account-id: true
role-to-assume: ${{secrets.AWS_IAM_ROLE}}
role-session-name: 'GitHubActions'
web-identity-token-file: ${{runner.temp}}/token.txt
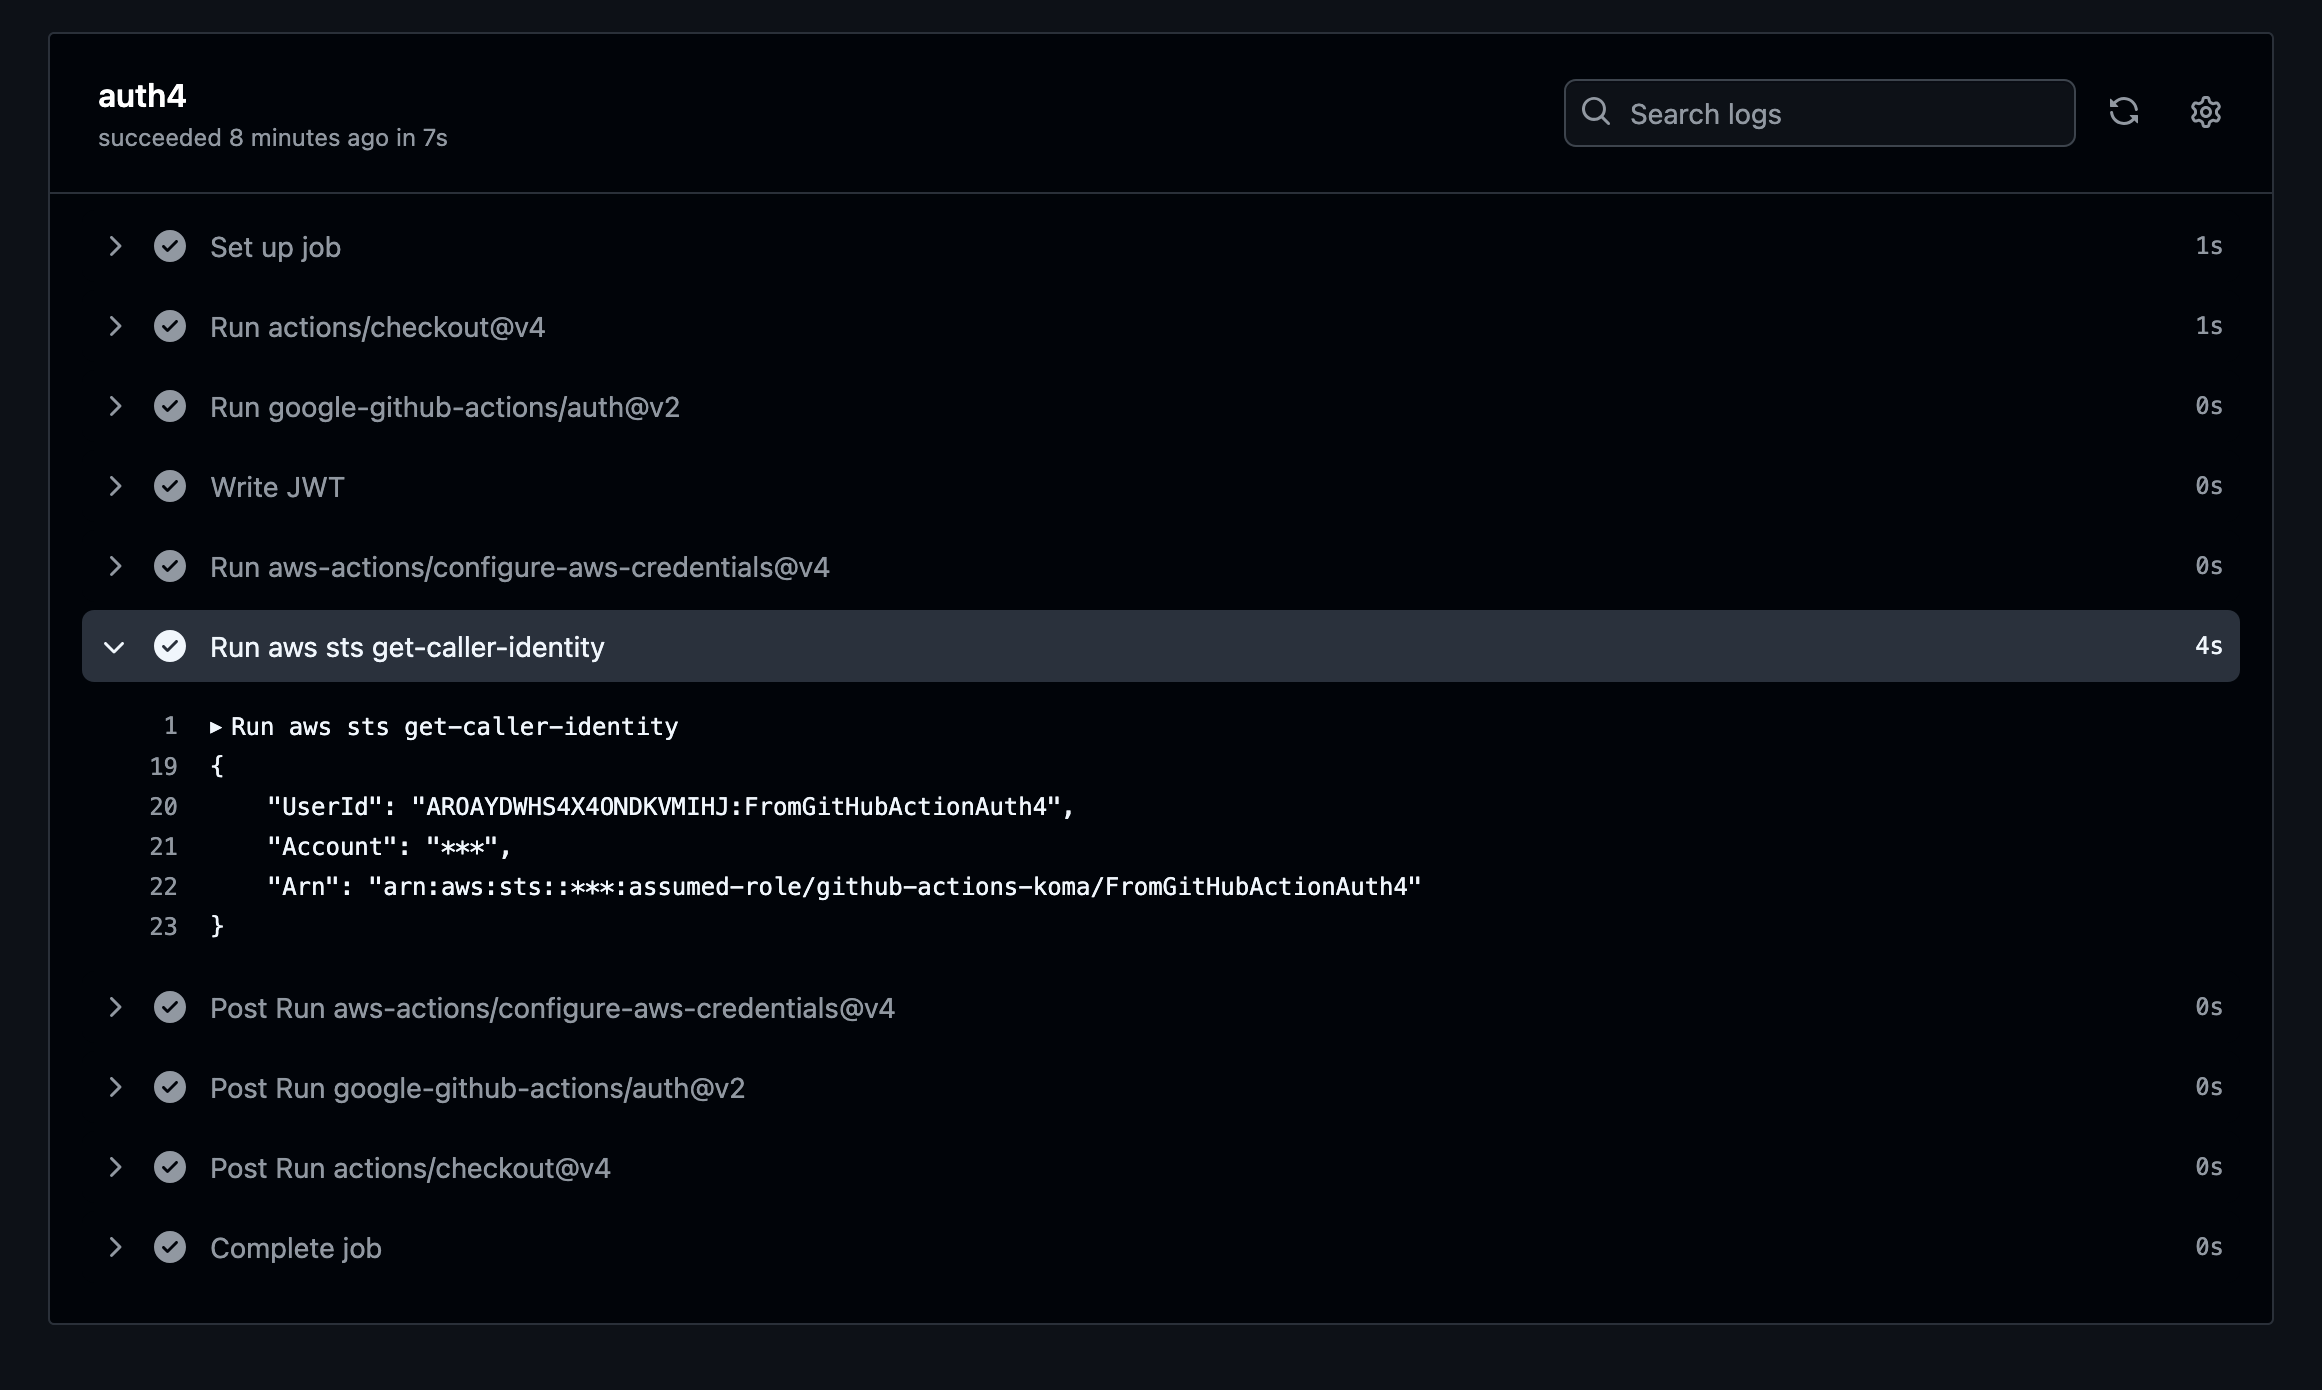
# 認証確認
- run: aws sts get-caller-identity
環境変数やシークレットとして、以下のものを設定しています。
-
env.ACCOUNT_GCP: Google Cloudのプロジェクト名 -
secrets.GCP_IDENTITY_PROVIDER: Google Cloudに設定したIdentity Providerの名前-
google_iam_workload_identity_pool_providerのリソースで作成されるもののnameです。作成方法はこちらのコードや別記事を参照ください
-
-
secrets.GCP_SERVICE_ACCOUNT: Google Cloudに設定したService Accountの名前 -
secrets.AWS_IAM_ROLE: AWSに設定したIAM Roleの名前- 今回GitHub ActionsのSecretに登録していますが、Google CloudのSecret Managerに登録しても良いかと思います
その他パラメータ
-
google-github-actions/auth@v21-
token_format: トークンの形式。id_tokenを指定してしてください。ここで得られるトークンを使ってAWSに接続します -
id_token_audience: トークンのAudience。aws_iam_policy_documentでaccounts.google.com:oaudとして参照している値を指定してください。
-
-
aws-actions/configure-aws-credentials@v43-
web-identity-token-file:google-github-actions/auth@v2で得られるトークンを保存したファイルになります。この例ではWrite JWTのステップでファイルに保存しています。tokenを直接受け渡すオプションはないようです
-
このステップを実行することにより、以下のように認証できます。
補足
Service AcocuntのIDの確認方法
Service AccountのIDはコンソールから確認できますが、CLIでは以下のコマンドで確認できます。
gcloud iam service-accounts describe $SERVICE_ACCOUNT_EMAIL
トークンに含まれる情報の確認
ローカルやCompute Engineでトークンを取得するには gcloud auth print-identity-token を使用します。
jqがインストールされている環境では以下のコマンドでトークンの中身を確認できます。
gcloud auth print-identity-token --audiences 'sts.amazonaws.com' | jq -R 'split(".") | .[1] | @base64d | fromjson'
Service Accountを設定したCompute Engineで実行した結果は以下になります。含まれるIDは隠しています。
{
  "aud": "sts.amazonaws.com",
  "azp": "10-------------------",
  "exp": 1738993320,
  "iat": 1738989720,
  "iss": "https://accounts.google.com",
  "sub": "10-------------------"
}
azpとsubは同じ値です。audとしてはaudiencesで指定された値が含まれます。
aws-actions/configure-aws-credentials@v4 を使用しない接続
今回は aws-actions/configure-aws-credentials@v4 を使用してAWSに接続しました。
これを使用しない場合、以下の環境変数を設定した上でコマンドを実行します。
-
AWS_WEB_IDENTITY_TOKEN_FILE:google-github-actions/auth@v2で得られるトークンを保存したファイル -
AWS_ROLE_ARN: 接続先のIAM RoleのARN -
AWS_ROLE_SESSION_NAME: セッション名
GitHub Actionsでは以下のような記述になります。
- run: aws sts get-caller-identity
  env:
    AWS_WEB_IDENTITY_TOKEN_FILE: ${{runner.temp}}/token.txt
    AWS_ROLE_ARN: ${{secrets.AWS_IAM_ROLE}}
    AWS_ROLE_SESSION_NAME: 'FromGitHubAction'
この方法で実行する場合には aws-actions/configure-aws-credentials@v4 が不要になります。
単にCompute Engineから実行する場合は、 gcloud auth print-identity-token --audiences 'sts.amazonaws.com' の結果をファイルに格納し、 AWS_WEB_IDENTITY_TOKEN_FILE に指定します。
gcloud auth print-identity-token --audiences 'sts.amazonaws.com' > token.txt
export AWS_WEB_IDENTITY_TOKEN_FILE=token.txt
export AWS_ROLE_ARN=arn:aws:iam::123456789012:role/AWSRoleFromGoogleCloud
export AWS_ROLE_SESSION_NAME='FromComputeEngine'
aws sts get-caller-identity
google-github-actions/auth@v2 でOIDC経由の認証をしたGitHub Actionsの環境では、 gcloud auth print-identity-token はエラーになります。
$ gcloud auth print-identity-token
ERROR: (gcloud.auth.print-identity-token) No identity token can be obtained from the current credentials.
まとめ
Google CloudにのみGitHub ActionsのOIDC認証の設定を行い、GitHub ActionsからGoogle Cloud, AWSの両方に接続する方法を紹介しました。
AWSとGoogle Cloudの両方で設定を共有している場合などに簡素化できるかと思います。
-
https://docs.aws.amazon.com/cli/latest/userguide/cli-configure-role.html#cli-configure-role-oidc によれば、
accounts.google.com:audとしてJWTのazpが使用されるとある。azpがない場合にのみaudが設定される。Google Cloudから得られるJWTにはazpが含まれているため、Audienceの値をそのままaccounts.google.com:audとしては参照できない。代わりにaccounts.google.com:oaudとして参照する。 ↩