はじめに
Microsoftの提供する BotFrameworkでは、Bot Builder SDKを使ってBotサーバを書くと、Bot Connector Serviceが仲立ちして各Channel (Facebook Messenger, Slack, Skype etc) を通してbotと会話できるようになるのですが、そのChannelの1つに 「WebChat」(webサイトに導入できるwidget)があります。
本記事では、WebChatの導入方法とカスタマイズ方法について書きます。
(Botサーバ側の開発については他の記事を参照下さい)
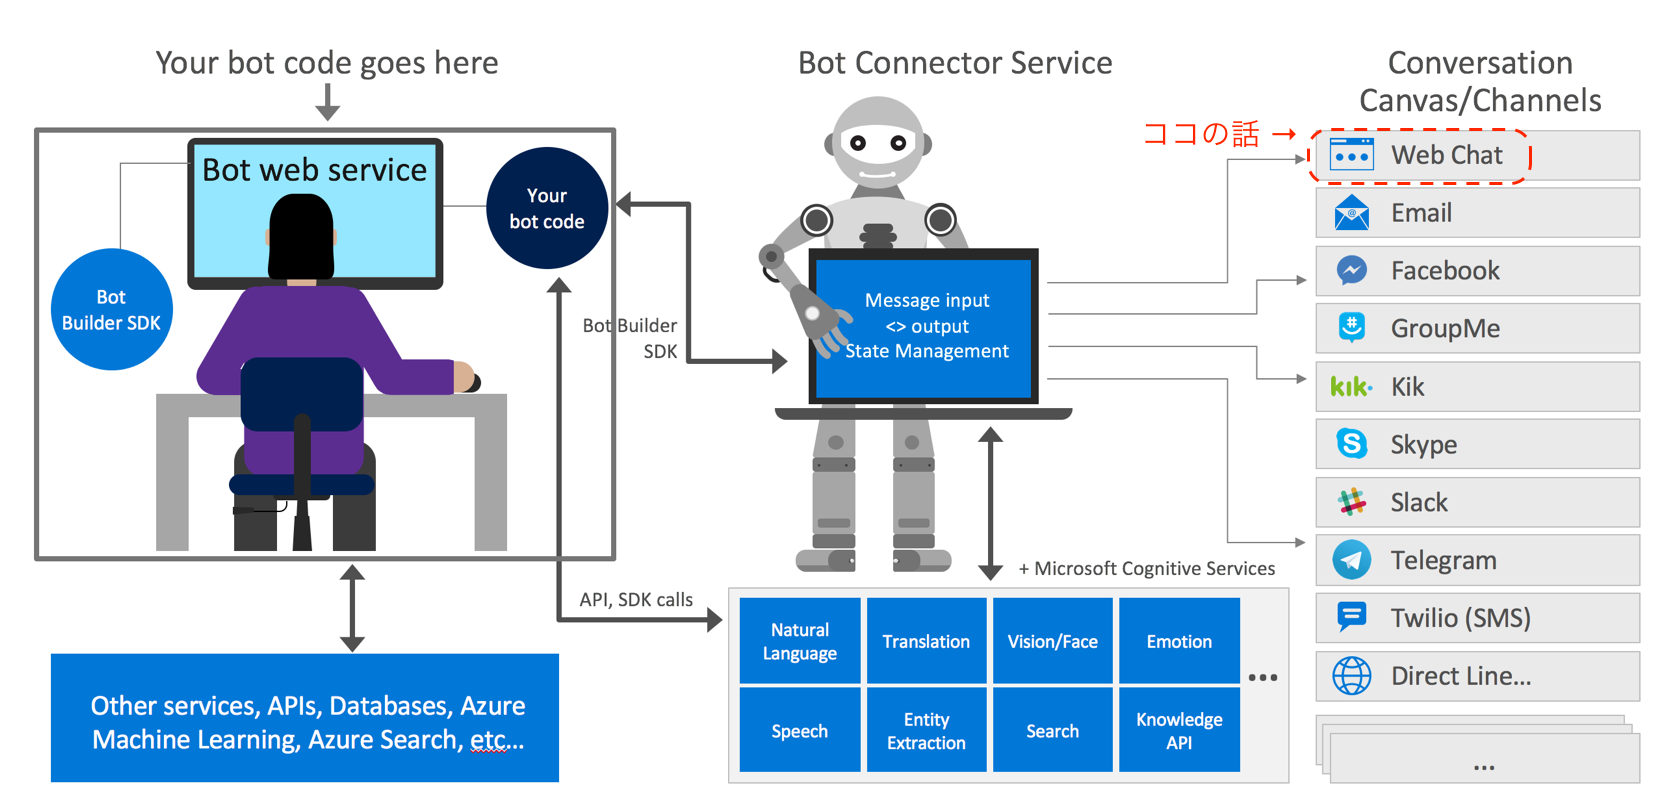
(https://docs.microsoft.com/en-us/bot-framework/media/how-it-works/architecture-resize.png)
WebChatを導入する方法
-
WebChat自体はReact-Redux製のOSSとしてこちら で公開されているのですが、以下に書くように自前でソースをbuild & ホスティングせず、Microsoftがホスティングするものを使って導入することもできます。
-
導入法1: iframeをサイトに埋め込む
- Botの管理ページ に「WebChat」Channelを追加し、表示される「Embed code」をコピーしてサイトに埋め込む
- Embed codeの例 (シークレットはBotの管理ページから確認できます)
<iframe src='https://webchat.botframework.com/embed/{Bot名}?s={シークレット}></iframe>
-
導入法2: iframeは使いたくない場合
- 以下のように、WebChatの描画領域のDOMを渡す方法があります。
<!DOCTYPE html>
<html>
  <head>
    <link href="https://cdn.botframework.com/botframework-webchat/latest/botchat.css" rel="stylesheet" />
  </head>
  <body>
    <div id="bot"/>
    <script src="https://cdn.botframework.com/botframework-webchat/latest/botchat.js"></script>
    <script>
      BotChat.App({
        directLine: { secret: 'シークレット' },
        user: { id: 'userid' },
        bot: { id: 'botid' },
        resize: 'detect'
      }, document.getElementById("bot")); // ★chatを描画させたい領域のDOMを渡す
    </script>
  </body>
</html>
-
導入法3: Reactサイトに導入する
-
npm install botframework-webchatした上で、以下のようにComponentとして追加することが出来ます
-
import { Chat } from 'botframework-webchat';

...

const YourApp = () => {
    <div>
        <YourComponent />
        <Chat directLine={{ secret: 'シークレット' }} user={{ id: 'user_id', name: 'user_name' }}/>
        <YourOtherComponent />
    </div>
}
...
その他詳細は README をご覧ください。
WebChatのカスタマイズ方法
開発フロー
# まずは環境構築
git clone https://github.com/Microsoft/BotFramework-WebChat.git
npm install

# => ソースを修正する

npm run build # => ./botchat.js, ./botchat.cssが吐き出される
npm run start # 開発サーバ起動

# => ブラウザで http://localhost:8000/samples/sidebar/index.html?s={シークレット}
#    にアクセスしすると、 ./botchat.js, ./botchat.css を読み込んでchatが表示される
localのwidgetをlocalのBotサーバに接続させたい場合は?
以下のように、Bot Connector Serviceが参照するBotをngrokでlocalにポートフォワードすることで可能になります
# 上記手順でwidgetのサーバは起動した状態で

# 1. Botサーバを起動(Node.jsの場合)
npm run start # => port:3978でBotサーバが起動する

# 2. 別ターミナルからngrokを起動
ngrok http 3978 # => 「Forwarding  https://aaabbbccc999.ngrok.io -> localhost:3978」をメモっておく

# 3. https://dev.botframework.com/bots から対象のBotを選択 ->
#    右上の「SETTINGS」 -> 「Messaging endpoint」を 2のURLに変更して保存
#    【※注意】2018年3月頃にMS Bot Frameworkは Azure Bot Serviceに統合されることが
#     アナウンスされているため、ここの手順は将来変わると思われます。

# 4. http://localhost:8000/... にアクセスしてBotと会話すると、localのBotサーバにつながります
見た目を変えたい場合
- ヘッダーの色を変えたい、文字サイズを変えたい 程度であれば src/scss/botchat.scss を修正 & buildしたものをホスティングして読み込ませればokです
機能を修正したい場合
- WebChat本体のソースコードを修正することになりますが、Bot Connector Serviceを介してBotサーバとやりとりをするという関係上、通信部分には手を出せない ( Direct Line API の制約を受ける) ことに注意が必要です。
- Bot Connector Serviceを介さず、直接BotサーバのAPIを叩くんや!となれば話は別ですが、WebChat以外のChannelとの機能差異が生まれることになります。
- DirectLineAPIとのやりとりは、BotFramework-DirectLineJSというライブラリとして提供されています。
- ソースを読むにあたっては、TypeScript,React,Redux,redux-observable, RxJSあたりの知識が必要になります。(多い・・)
以下では、WebChat本体を修正するのに必要な知識についてざっくりまとめます。
ファイル構成
.
├── package-lock.json
├── package.json
├── samples # 動作確認用のHTML等が入っている
│   ├── backchannel
│   ├── fullwindow
│   ├── react
│   ├── sidebar
│   └── speech
├── src # コンポーネントの各ファイルは、ここに1階層(フラット)に配置されている
│   ├── ActivityView.tsx
│   :         :
│   ├── SpeechOptions.ts
│   ├── Store.ts   # store
│   ├── Strings.ts # localize文言はここ
│   ├── Timestamp.tsx
│   ├── Types.ts
│   ├── adaptivecards-hostconfig.d.ts
│   ├── getTabIndex.ts
│   └── scss # 見た目を変えたい場合はこの中のscssをいじる
├── test
├── tsconfig.json
├── webpack.config.js
└── webpack.production.config.js
ストア構成
action creator, state, reducerは src/Store.tsに定義
| state名 | 役割 |
|---|---|
| shell | ユーザの入力したテキストを保持 |
| format | locale情報、localize用のテキストマスタを保持 |
| size | widgetのwidth, heightを保持 |
| connection | Bot Connector Serviceへのconnectionや、ユーザ/Botのidentity情報を保持 |
| history | Bot-ユーザ間でやりとりしたActivity(=メッセージや、タイピング中であることを通知するイベントetc)を保持する |
createStoreは以下のようになっており、副作用を伴うものはEpicとして定義してMiddlewareにして混ぜ込む。
(Epic: actionのストリーム(=Observable)を受け取ってaction(Observable)を返す関数。例えば、ユーザがメッセージを入力して送信ボタンを押すと、Shell Actionの Send_Messageが発火 → それをsendMessageEpicでhookして state.history.botConnection.postActivity でBotConnector Serviceに投げる → 成功したら Send_Message_Succeed actionを返す という感じで使われる)
export const createStore = () =>
    reduxCreateStore(
        combineReducers<ChatState>({
            shell,
            format,
            size,
            connection,
            history
        }),
        applyMiddleware(createEpicMiddleware(combineEpics(
            updateSelectedActivityEpic,
            sendMessageEpic,    # <- 上記に書いたメッセージの送信は
            trySendMessageEpic, # <- これらで行う
            retrySendMessageEpic,
            showTypingEpic,
            sendTypingEpic,
            speakSSMLEpic,
            speakOnMessageReceivedEpic,
            startListeningEpic,
            stopListeningEpic,
            stopSpeakingEpic,
            listeningSilenceTimeoutEpic
        )))
    );
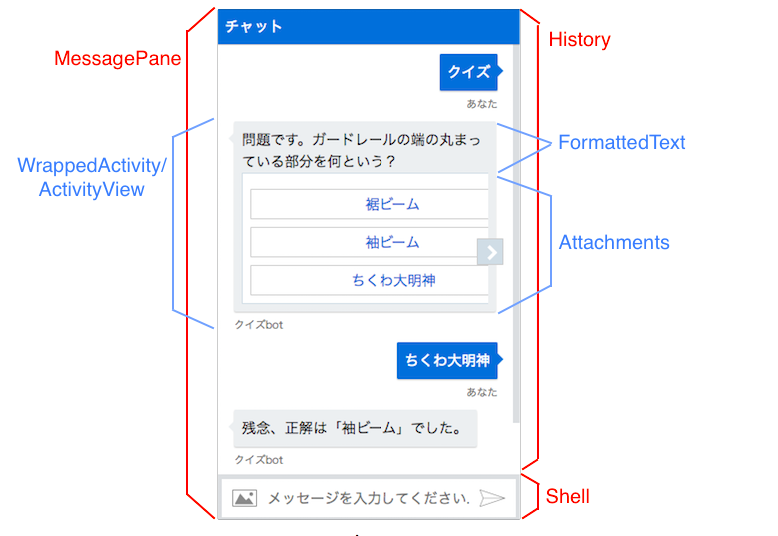
コンポーネント構成
- src/App.tsxがReactアプリケーションを表現、src/Chat.tsxがTopレベルのコンポーネント
- 見た目上はざっくり以下のような対応になる
○○したい時はこうしよう
ページ遷移しても同じ会話を継続したい
BotChat.Appのコンストラクタに渡す directLineオプションに conversationId というものがあり、これにページ遷移前のconversationIdを渡してchatを起動すると、会話を継続することができます。
BotChat.App({
    directLine: {
        secret: params['s'] || envToSecret[env],
        token: params['t'],
        domain: params['domain'],
        webSocket: isWebSocket,
        conversationId: 'hogehoge', // ★ここに渡す
    },
    user: user,
    bot: bot,
        :
(遷移前のページでの)conversationIdはcookie等に保存すると良いかと思います。
保存するタイミングとしては、BotからのActivityを受け取る箇所で行えば良いでしょう。
# https://github.com/Microsoft/BotFramework-WebChat/blob/master/src/Chat.tsx

diff --git a/src/Chat.tsx b/src/Chat.tsx
index 8e6a8c9..af17109 100644
--- a/src/Chat.tsx
+++ b/src/Chat.tsx
@@ -78,7 +78,14 @@ export class Chat extends React.Component<ChatProps, {}> {
         let state = this.store.getState();
         switch (activity.type) {
             case "message":
-                this.store.dispatch<ChatActions>({ type: activity.from.id === state.connection.user.id ? 'Receive_Sent_Message' : 'Receive_Message', activity });
+                let is_sent_message = activity.from.id === state.connection.user.id ? true : false;
+                this.store.dispatch<ChatActions>({ type: is_sent_message ? 'Receive_Sent_Message' : 'Receive_Message', activity });
+                if (is_sent_message) {
+                    break;
+                }
+                // 例えばこんな感じでconversationIdを保存
+                document.cookie = 'conversationId=' + activity.conversation.id;
+
                 break;

             case "typing":
Bot-Widget間で独自のメッセージ交換やイベント通知をしたい
- 両者で交わされるActivityオブジェクト(メッセージやTyping中であることのイベント通知)に
entityというプロパティ(anyの配列)があり、そこは自由に使えるようです。- 使うシーンとしては、entity経由でwidgetからBotに
location.hrefを通知して、chatが起動されたページによってBotの応答を変える、など色々考えられそうです。 - entityはBot Connector Serviceを経由する、かつキャッシュされる(上に書いたconversationIdを渡してchatを起動した際は、キャッシュされたactivityがConnector Serviceから送られてくる)ため、外部サービスに渡して良い情報なのか?という点は考慮が必要かと思います。
- 使うシーンとしては、entity経由でwidgetからBotに
- Bot側(Node.js SDK)のReferenceは これ と これです。 以下のような感じでentityを参照/送信できます。
var builder = require('botbuilder');

function(session, args){
    // ユーザから送られたentitiesを参照
    var entities = session.messsage.entities;
                 :
    // ユーザにentitiesを送る
    var entity = {hoge: 'fuga'};
    var message = new builder.Message(session)
        .text('hoge')
        .addEntity(entity)
    session.send(message)
- widget側では以下のようにして参照します。
// 例. ActivityView
this.props.activity.entities
- widget側からentityを送る方法は未実装のようですが、以下の様な改修すると送ることができます。(本家へのPR検討しよう・・)
diff --git a/src/Store.ts b/src/Store.ts
index 13da314..56963cf 100644
--- a/src/Store.ts
+++ b/src/Store.ts
@@ -9,7 +9,7 @@ import * as konsole from './Konsole';

 import { Reducer } from 'redux';

-export const sendMessage = (text: string, from: User, locale: string) => ({
+export const sendMessage = (text: string, from: User, locale: string, entities: any[] = []) => ({
     type: 'Send_Message',
     activity: {
         type: "message",
@@ -17,7 +17,8 @@ export const sendMessage = (text: string, from: User, locale: string) => ({
         from,
         locale,
         textFormat: 'plain',
-        timestamp: (new Date()).toISOString()
+        timestamp: (new Date()).toISOString(),
+        entities: entities
     }} as ChatActions);

 export const sendFiles = (files: FileList, from: User, locale: string) => ({
- sendMessageを使う側
import 'sendMessage' from 'path/to/Store';

const entities = [{hoge: 'fuga'}];
sendMessage('message', user, locale, entities);
以上です。素敵なchatbot生活をお過ごし下さい ![]()