普段AWSを主に利用しているエンジニアがAlibabaCloudを学習するために調べた情報や手順を紹介します。
今回は前回に引き続き「Serverless DevsとFunction ComputeのGPUインスタンスを使った画像合成」に挑戦してみたいと思います。
本記事は掲載時点の情報であり、最新の情報とは異なる場合があります。
本記事は完全性、正確性、有用性、安全性などを保証するものではありません。
本記事をご利用の場合は自己責任にてお願いします。
■ Prerequisites
- Alibaba Cloudアカウントを作成済みであることを前提とします。
-
AWSエンジニアが学習するAlibaba Cloud【Function Compute編 (9)】を実施済みの環境であることを前提とします。
- Function Computeの実行確認済
- ServerlessDevs用のRAMユーザーを作成済
- 今回の検証では手軽にAI 技術を体験頂くことを優先し、システムポリシーの権限追加にて「AdministratorAccess」を選択していますが、動作確認後は速やかに権限を削除してください
- 本番環境など実環境においてはでは必要最小限の権限のみを選択してください
■ Overview
手順についてはBest practices for AIの記事に掲載されたチュートリアルに基づいています。
Function ComputeのGPUインスタンスを活用したAIアプリケーション開発の効率性やコスト効率の向上についての説明は省きますが詳細について深く理解したい方は、該当記事をご覧ください。
本記事ではチュートリアルを参考に以下の手順を記載します。
- ECSインスタンスへの接続
- 画像合成用プロジェクトの初期設定およびデプロイ
- GPUインスタンスのプロビジョニングおよび画像合成の実行
■ Let’s Get Started
1. ECSインスタンスへの接続
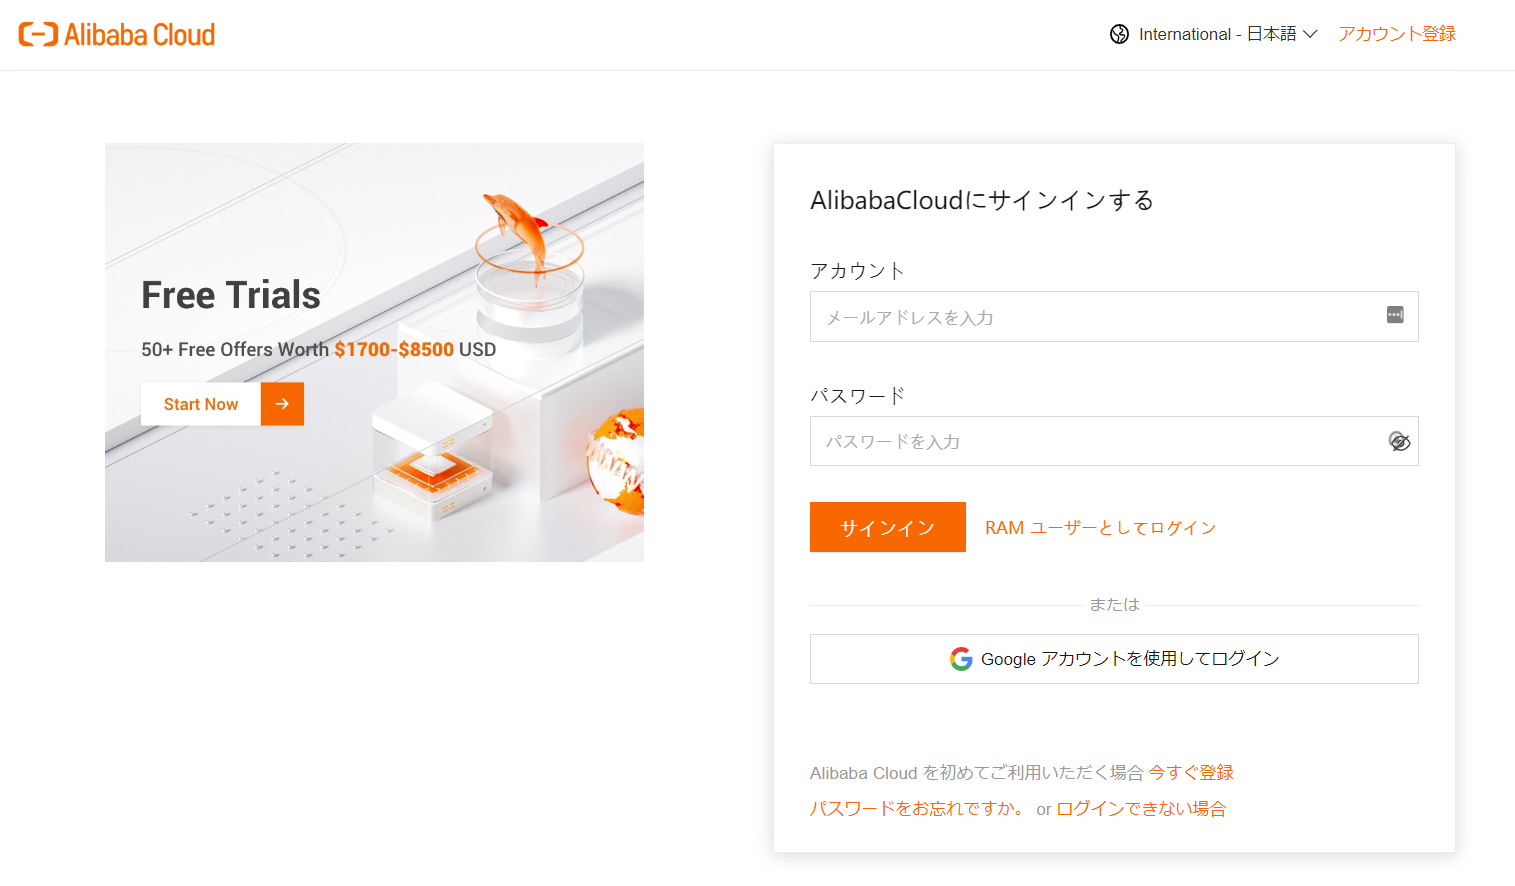
1.1 Alibaba Cloudにサインイン
自分のアカウント(メールアドレス)とパスワードを入力の上、【サインイン】をクリックします。
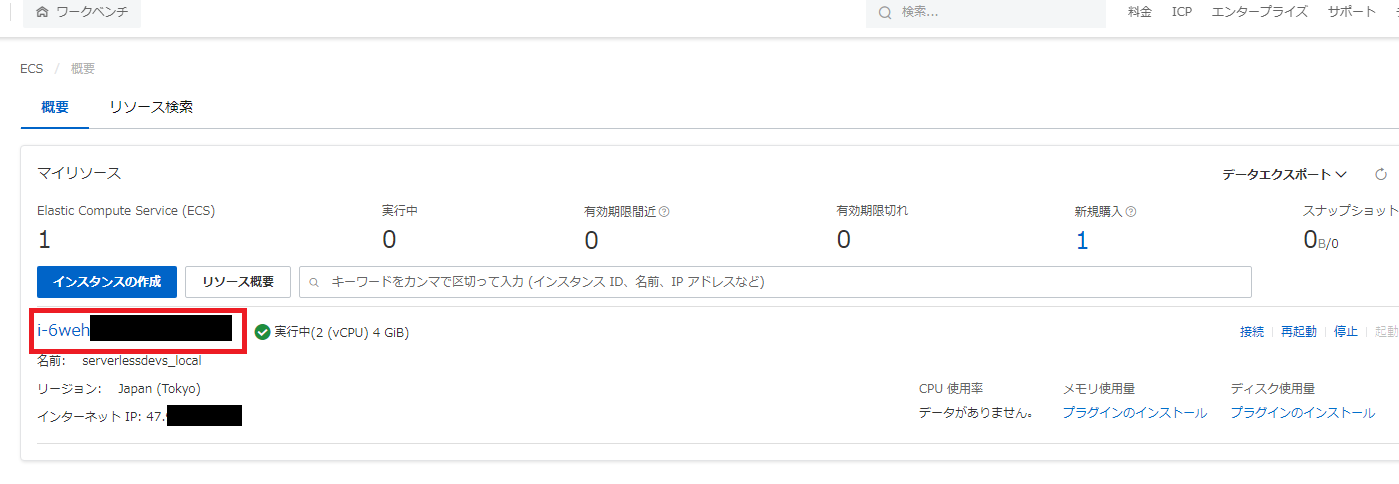
1.2. ECSインスタンスへの接続
ECS管理コンソールへ移動後、前回構築を行った開発用ECSインスタンスを選択します。
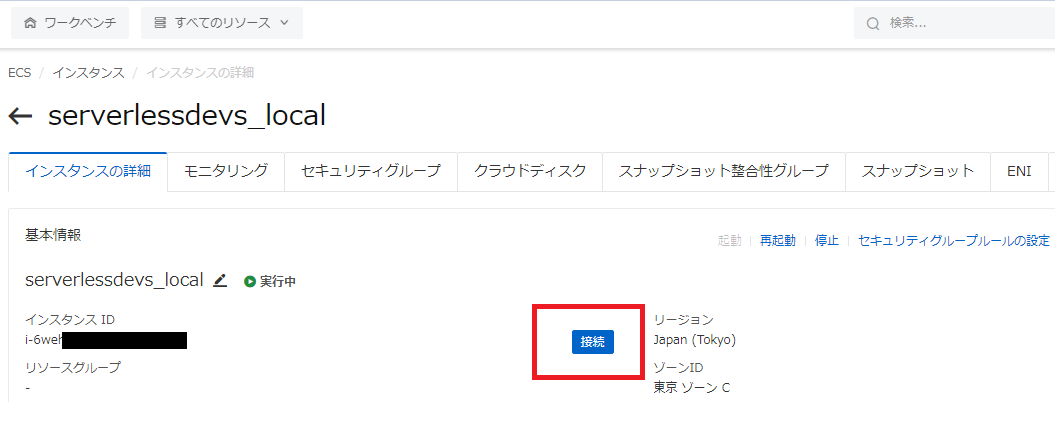
ECS管理コンソールのインスタンス詳細画面にて【接続】を選択します。
開発用ECSインスタンスが停止済みの場合は【起動】を選択後、【接続】を選択してください。
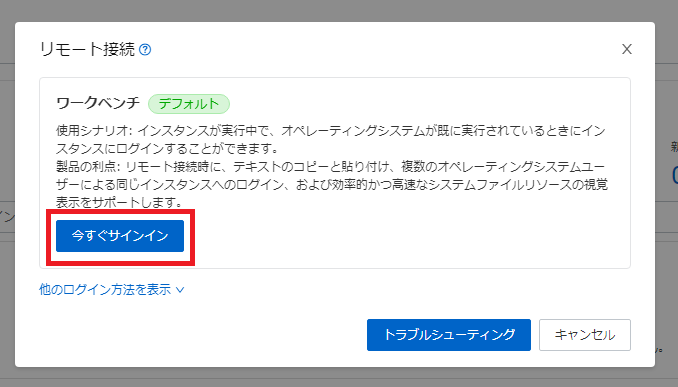
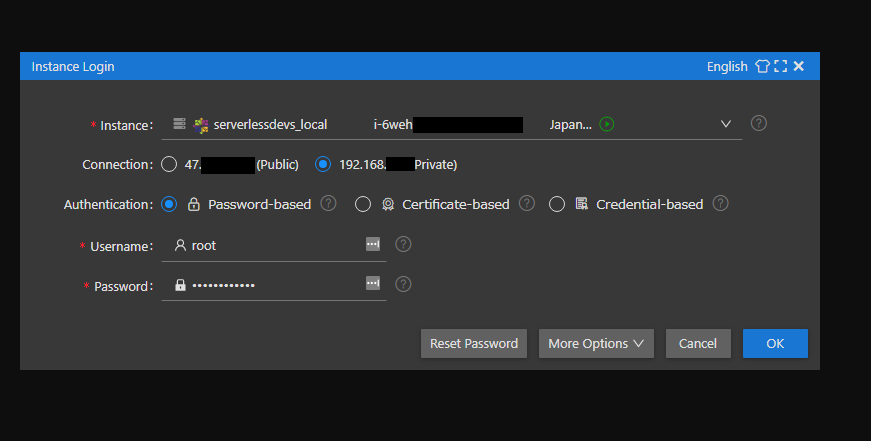
ECS管理コンソールのインスタンス詳細画面にて【接続】を選択後、接続とコマンド画面にて
「ワークベンチ(デフォルト)」の【今すぐサインイン】をクリックします。
InstanceLogin画面にてECSインスタンス立ち上げ時に入力したrootパスワードをPasswordの箇所へ入力後、【OK】を選択します。
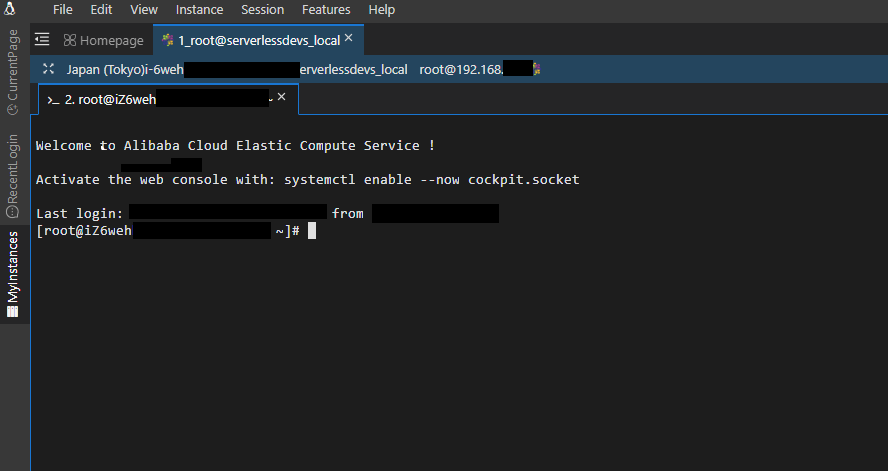
ECS管理コンソールからターミナルへ接続できたことを確認します。
2. 画像合成用プロジェクトの初期設定およびデプロイ
2.1. 画像合成用プロジェクトの初期化
Best practices for AIの記事を参考にプロジェクトを初期化します。
initコマンドの詳細はDocのinit commandをご確認ください。
s init devsapp/start-fc-custom-container-event-python3.9 -d fc-gpu-prj
プロジェクトの初期化画面では以下の項目を入力または選択します。今回は選択画面の一部が中国語で表示されました。
こちらの表示は一時的なもので今後修正される予定のようですが本記事では回避策として画面通りの選択肢を記載します。

-
创建应用所在的地区
(訳:アプリケーションを配置するリージョンを作成する)
=> 東京リージョン(ap-northeast-1)を入力
-
服务名称,只能包含字母、数字、下划线和中划线。不能以数字、中划线开头。长度在 1-128 之间
(訳:サービス名。英字、数字、アンダースコア、下線のみ可。 数字やアンダースコアからの開始は不可。 文字数は1から128 まで)
=> Function Computeのサービス名を入力
(今回は「tgpu_tf_service」と入力)
-
函数名称,只能包含字母、数字、下划线和中划线。不能以数字、中划线开头。长度在 1-64 之间
(訳:関数名。英字、数字、アンダースコア、下線のみ可。 数字やアンダースコアからの開始は不可。 文字数は1から64 まで)
=> Function Computeの関数名を入力
(今回は「tgpu_tf_func」と入力)
-
镜像仓库地址,需要在 https://cr.console.aliyun.com/ 中开通服务、创建仓库以及设置访问凭证
(訳:サービスの有効化、リポジトリの作成、https://cr.console.aliyun.com/ でのアクセス認証情報の設定に必要です)
=> AWSエンジニアが学習するAlibaba Cloud【Function Compute編 (9)】にて作成を行ったレポジトリの「VPC」の値を入力
(今回は「registry-intl-vpc.ap-northeast-1.aliyuncs.com/fc-gpu-prj-[AlibabaアカウントID]/fc-gpu-prj-neural_style_transfer」を入力)
※[AlibabaアカウントID]は自分のAlibabaアカウントIDと置き換えてください
- Please create alias for key pair. if not, please enter to skip
=> default を選択
2.2. プロジェクト定義ファイル(s.yaml)の編集
プロジェクトディレクトリへ移動後、プロジェクト定義ファイル(s.yaml)をBest practices for AIの記事を参考とした下記内容のものに置き換えます。
2.2.1. プロジェクトディレクトリへ移動およびファイル名変更
cd fc-gpu-prj
mv -i s.yaml s.yaml.org
2.2.2. s.yamlの作成
cat << 'EOT' > s.yaml
edition: 1.0.0
name: container-demo
access: default
vars:
  region: ap-northeast-1
services:
  customContainer-demo:
    component: devsapp/fc
    props:
      region: ${vars.region}
      service:
        name: tgpu_tf_service
        internetAccess: true
      function:
        name: tgpu_tf_func
        description: test gpu for tensorflow
        handler: not-used
        timeout: 600
        caPort: 9000
        instanceType: fc.gpu.tesla.1
        gpuMemorySize: 8192
        cpu: 4
        memorySize: 16384
        diskSize: 512
        runtime: custom-container
        customContainerConfig:
          #1. Make sure that the namespace:demo namespace and the repo:gpu-tf-style-transfer_s repository are created in advance in Alibaba Cloud Container Registry.
          #2. Change the tag from v0.1 to v0.2 when you update the function later and run s build && s deploy again.
          image: registry-intl-vpc.ap-northeast-1.aliyuncs.com/fc-gpu-prj-YOUR_ACCOUNT_ID/fc-gpu-prj-neural_style_transfer:v0.1
        codeUri: ./code
      triggers:
        - name: httpTrigger
          type: http
          config:
            authType: anonymous
            methods:
              - GET
EOT
2.2.3. s.yaml内のレポジトリ名変更
export ACCOUNT_ID=[自分のAlibabaアカウントID]
sed -i -e "s/YOUR_ACCOUNT_ID/${ACCOUNT_ID}/g" s.yaml
AWSエンジニアが学習するAlibaba Cloud【Function Compute編 (9)】にて作成済のレポジトリ名へ変更
2.3. 画像合成用アプリケーションファイル(app.py)の編集
codeディレクトリへ移動後、 画像合成用アプリケーションファイル(app.py)を内容を置き換えます。
2.3.1. codeディレクトリへ移動およびファイル名変更
cd code
mv -i app.py app.py.orig
2.3.2. app.pyの作成
cat << 'EOT' > app.py
# -*- coding: utf-8 -*-
# python2 and python3
from __future__ import print_function
from http.server import HTTPServer, BaseHTTPRequestHandler
from tensorflow import keras
from tensorflow.keras import layers
from tensorflow.keras.models import Sequential
import json
import sys
import logging
import os
import matplotlib.pyplot as plt
import matplotlib as mpl
import numpy as np
import os
import PIL
import tensorflow as tf
import pathlib
import urllib.request
import random

class Resquest(BaseHTTPRequestHandler):
    def upload(self, url, path):
        print("enter upload:", url)
        headers = {
            'Content-Type': 'application/octet-stream',
            'Content-Length': os.stat(path).st_size,
        }
        req = urllib.request.Request(url, open(path, 'rb'), headers=headers, method='PUT')
        urllib.request.urlopen(req)

    def tensor_to_image(self, tensor):
        tensor = tensor*255
        tensor = np.array(tensor, dtype=np.uint8)
        if np.ndim(tensor)>3:
            assert tensor.shape[0] == 1
            tensor = tensor[0]
        return PIL.Image.fromarray(tensor)

    def load_img(self, path_to_img):
        max_dim = 512
        img = tf.io.read_file(path_to_img)
        img = tf.image.decode_image(img, channels=3)
        img = tf.image.convert_image_dtype(img, tf.float32)

        shape = tf.cast(tf.shape(img)[:-1], tf.float32)
        long_dim = max(shape)
        scale = max_dim / long_dim

        new_shape = tf.cast(shape * scale, tf.int32)

        img = tf.image.resize(img, new_shape)
        img = img[tf.newaxis, :]
        return img

    def do_style_transfer(self):
        mpl.rcParams['figure.figsize'] = (12,12)
        mpl.rcParams['axes.grid'] = False

        # Use the path of the OSS object under your Alibaba Cloud account. You must have the read and write permissions on the object.
        # Read the content and style images from your OSS buckets.
        content_path = tf.keras.utils.get_file(str(random.randint(0,100000000)) + ".jpg", 'https://your_public_oss/c1.png')
        style_path = tf.keras.utils.get_file(str(random.randint(0,100000000)) + ".jpg",'https://your_public_oss/c2.png')

        content_image = self.load_img(content_path)
        style_image = self.load_img(style_path)
        print("load image ok")

        import tensorflow_hub as hub
        hub_model = hub.load('https://hub.tensorflow.google.cn/google/magenta/arbitrary-image-stylization-v1-256/2')
        # You can package the hub model into an image for loading to accelerate the processing.
        #hub_model = hub.load('/usr/src/app/style_transfer_model')
        stylized_image = hub_model(tf.constant(content_image), tf.constant(style_image))[0]
        print("load model ok")

        path = "/tmp/" + str(random.randint(0,100000000)) + ".png"
        self.tensor_to_image(stylized_image).save(path)
        print("generate stylized image ok")

        # Use the path of the OSS object under your Alibaba Cloud account. You must have the read and write permissions on the object.
        # Save the synthesized images to the OSS bucket.
        self.upload("https://your_public_oss/stylized-image.png" ,path)
        return "transfer ok"

    def style_transfer(self):
        msg = self.do_style_transfer()
        data = {"result": msg}
        self.send_response(200)
        self.send_header("Content-type", "application/json")
        self.end_headers()
        self.wfile.write(json.dumps(data).encode())

    def pong(self):
        data = {"function":"tf_style_transfer"}
        self.send_response(200)
        self.send_header('Content-type', 'application/json')
        self.end_headers()
        self.wfile.write(json.dumps(data).encode())

    def dispatch(self):
        mode = self.headers.get('RUN-MODE')

        if mode == "ping":
            self.pong()
        elif mode == "normal":
            self.style_transfer()
        else:
            self.pong()

    def do_GET(self):
        self.dispatch()

    def do_POST(self):
        self.dispatch()

if __name__ == "__main__":
    host = ("0.0.0.0", 9000)
    server = HTTPServer(host, Resquest)
    print("Starting server, listen at: %s:%s" % host)
    server.serve_forever()
EOT
2.3.3. app.py内のOSSバケット名変更
export OSS_BUCKETNAME="fc-gpu-prj-${ACCOUNT_ID}.oss-ap-northeast-1.aliyuncs.com"
sed -i -e "s/your_public_oss/${OSS_BUCKETNAME}/g" app.py
AWSエンジニアが学習するAlibaba Cloud【Function Compute編 (9)】にて作成済のOSSバケット名へ変更
2.4. Dockerfileの編集およびDockerイメージの作成
DockerfileをBest practices for AIの記事を参考とした下記内容のものに置き換えます。
2.4.1. ファイル名変更
mv -i Dockerfile Dockerfile.orig
2.4.2. Dockerfileの作成
cat << 'EOT' > Dockerfile
FROM registry.cn-shanghai.aliyuncs.com/serverless_devs/tensorflow:2.7.0-gpu
WORKDIR /usr/src/app
RUN apt-key adv --fetch-keys https://developer.download.nvidia.com/compute/cuda/repos/ubuntu1804/x86_64/3bf863cc.pub
RUN apt-key adv --fetch-keys https://developer.download.nvidia.com/compute/cuda/repos/ubuntu1804/x86_64/7fa2af80.pub
RUN apt-get update
RUN apt-get install -y python3
RUN apt-get install -y python3-pip
RUN pip3 install matplotlib
RUN pip3 install tensorflow_hub
RUN pip3 install protobuf==3.20.0
COPY . .
CMD [ "python3", "-u", "/usr/src/app/app.py" ]
EXPOSE 9000
EOT
2.4.3. RAMユーザーの権限確認
Serverless Devsの初期設定にてAccessKeyIDおよびAccessKeySecretの設定を行ったRAMユーザーに「AdministratorAccess」権限が付与されていることを確認してください。
この権限は、FunctionCompute以外の他のリソースへのアクセスを許可するために必要となります。
権限が付与されていない場合はRAMユーザーへの権限追加を参考に「AdministratorAccess」権限を付与してください。
今回の検証では手軽にAI 技術を体験頂くことを優先して「AdministratorAccess」権限を選択していますので、動作確認後は速やかに権限を削除してください
2.4.4. Dockerイメージの作成
cd ../
s build --dockerfile ./code/Dockerfile
ServerlessDevsのコマンドにてプロジェクトで使用するDockerイメージを作成します。
2.5. プロジェクトのデプロイ
プロジェクト配下でデプロイを行います。
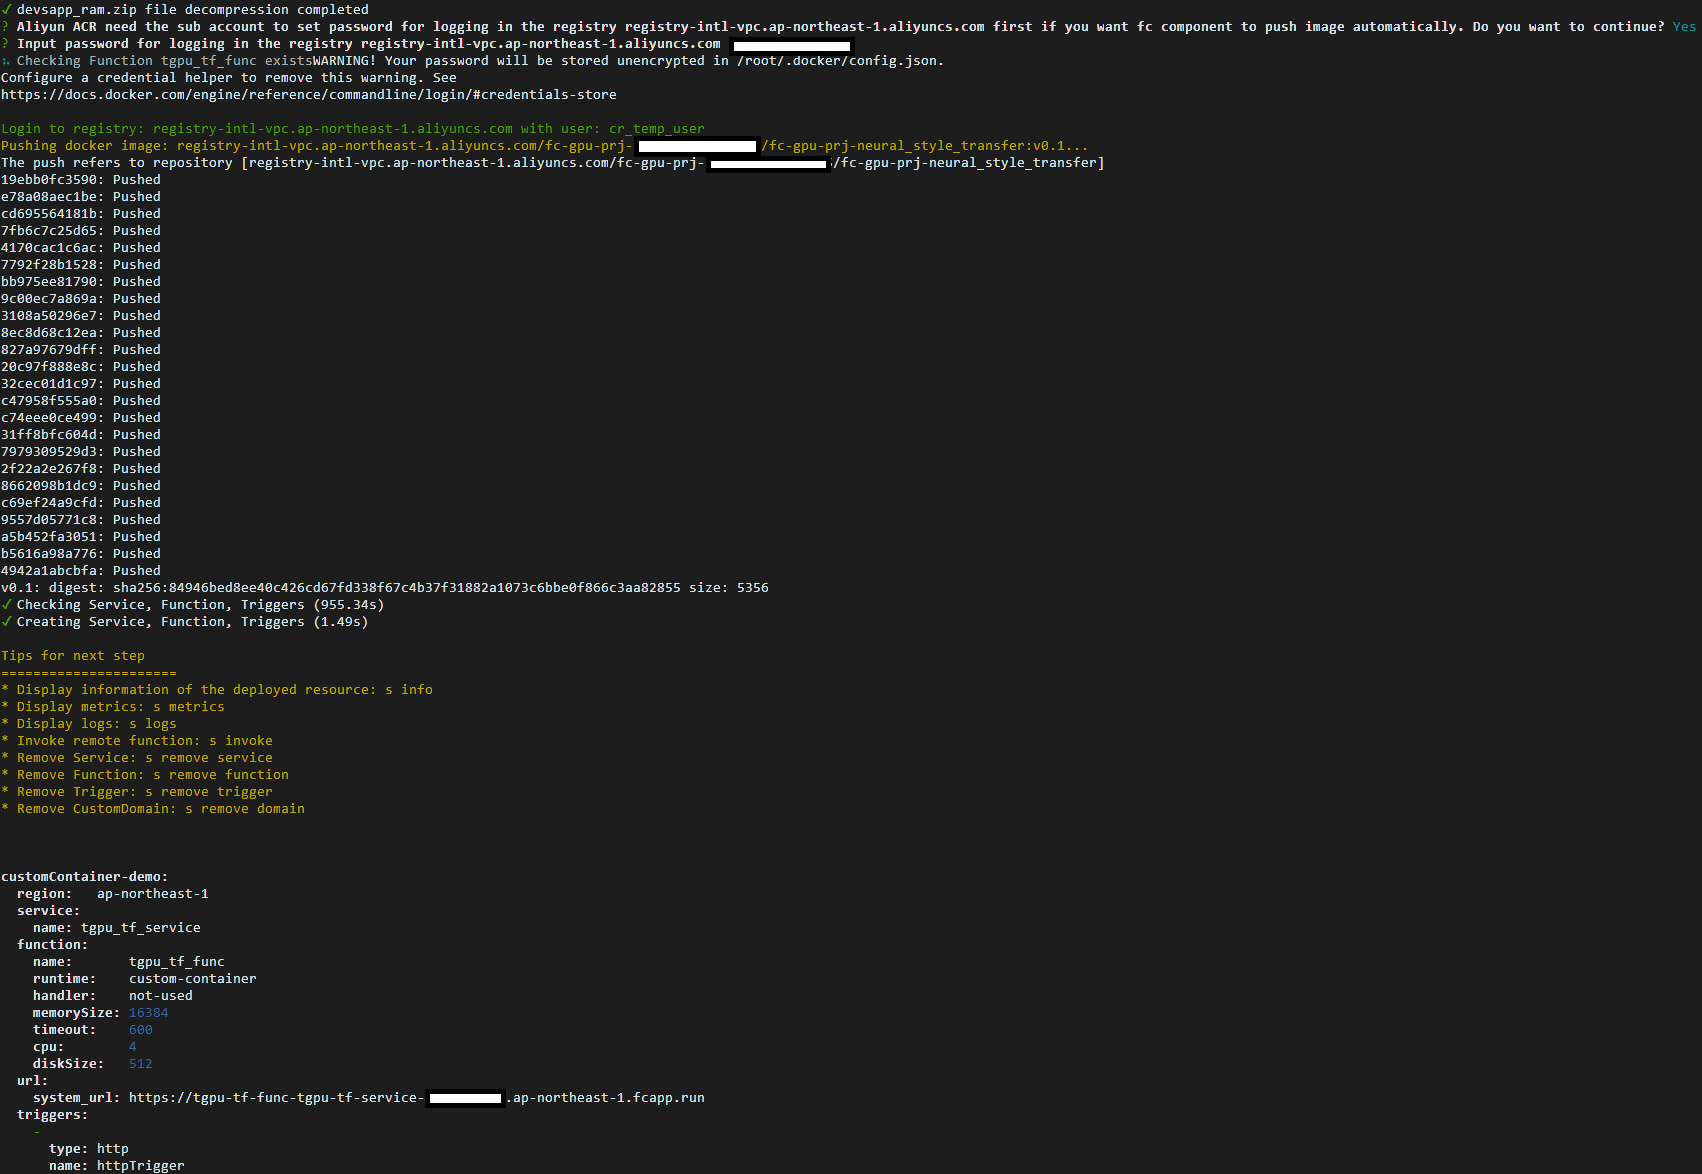
s deploy
Dockerログインパスワードを求められた場合は、以下の項目を入力します。
- **Aliyun ACR need the sub account to set password for logging in the registry registry-intl-vpc.ap-northeast-1.aliyuncs.com first if you want fc component to push image automatically. Do you want to continue? (Y/n) **
(訳:Aliyun ACRは、fcコンポーネントに自動的にイメージをプッシュさせたい場合、まずレジストリregistry-intl-vpc.ap-northeast-1.aliyuncs.comにログインするためのパスワードを設定するサブアカウントが必要です。続けますか?)
=> 「Y」を入力
-
Input password for logging in the registry registry.ap-northeast-1.aliyuncs.com
(訳:レジストリにログインするためのパスワードを入力 registry.ap-northeast-1.aliyuncs.com)
=> AWSエンジニアが学習するAlibaba Cloud【Function Compute編 (9)】の「3.3. アクセス資格情報の設定」にて設定を行った「Dockerログインパスワード」を入力
3. GPUインスタンスのプロビジョニングおよび画像合成の実行
3.1. GPUインスタンスのプロビジョニング
Best practices for AIの記事を参考にプロジェクトにて使用するGPUインスタンスのプロビジョニングを行います。
s provision put --target 1 --qualifier LATEST
customContainer-demo:
  resource:               [自分のAlibabaアカウントID]#tgpu_tf_service#LATEST#tgpu_tf_func
  target:                 1
  scheduledActions:
    (empty array)
  targetTrackingPolicies:
    (empty array)
GPUインスタンスのプロビジョニング完了後の設定確認を行います。
s provision get --qualifier LATEST
出力結果にてcurrentの値がtargetと同様の値となっていることを確認します。
currentが0の場合は、targetと同様の値となるまで設定確認を行います。
customContainer-demo:
  serviceName:            tgpu_tf_service
  functionName:           tgpu_tf_func
  qualifier:              LATEST
  resource:               [自分のAlibabaアカウントID]#tgpu_tf_service#LATEST#tgpu_tf_func
  target:                 1
  current:                1
  scheduledActions:
    (empty array)
  targetTrackingPolicies:
    (empty array)
  currentError:
  alwaysAllocateCPU:      true
3.2. 画像合成の実行
Best practices for AIの記事を参考にServerlessDevsにて画像合成を行うFunction Computeを実行します。
s invoke -e '{"method":"GET","headers":{"RUN-MODE":"normal"}}'
devsapp_fc-remote-invoke.zip file decompression completed

Request url: https://tgpu-tf-func-tgpu-tf-service-******.ap-northeast-1.fcapp.run/

FC Invoke instanceId: c-******-**************

FC Invoke Result:
{"result": "transfer ok"}

End of method: invoke
3.3. 画像合成の確認
3.3.1. OSSコンソール画面へ移動
画面上部の検索窓へ【OSS】と入力して表示される検索結果よりObject Storage Serviceを選択してOSSコンソール画面へ移動します。

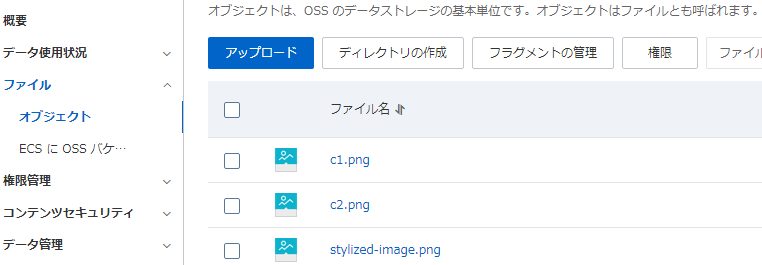
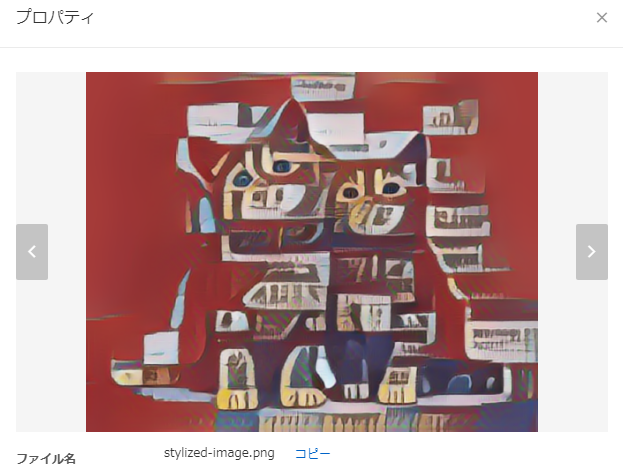
3.3.2. 画像合成ファイルの確認
画面左の「バケットリスト」を選択後、fc-gpu-prj-[AlibabaアカウントID]のバケット名をクリックします。
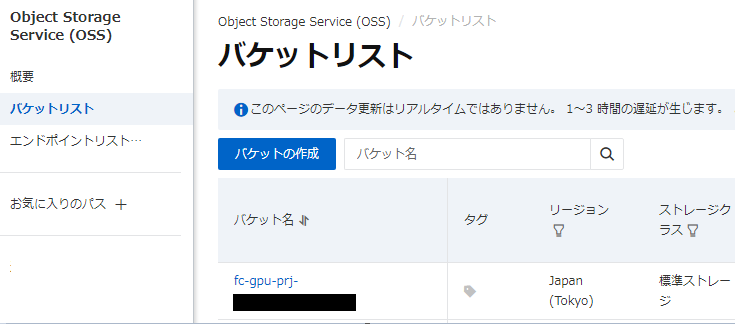
「オブジェクト」にて1.pngおよびc2.pngの他にstylized-image.pngが表示されていることを確認します。
3.3. GPUインスタンスのリリース
Best practices for AIの記事を参考にプロジェクトにて使用するGPUインスタンスのリリースを行います。
s provision put --target 0 --qualifier LATEST
※Targetを0へ変更するとリリースとなります。
customContainer-demo:
  resource:               [自分のAlibabaアカウントID]#tgpu_tf_service#LATEST#tgpu_tf_func
  target:                 0
  scheduledActions:
    (empty array)
  targetTrackingPolicies:
    (empty array)
リリース完了後、GPUインスタンスのプロビジョニング完了後の設定確認を行います。
s provision get --qualifier LATEST
出力結果にてtargetとcurrentの値が0となっていることを確認します。
currentが0以外の場合は、0の値となるまで設定確認を行います。
customContainer-demo:
  serviceName:            tgpu_tf_service
  functionName:           tgpu_tf_func
  qualifier:              LATEST
  resource:
  target:                 0
  current:                0
  scheduledActions:       null
  targetTrackingPolicies: null
  currentError:
  alwaysAllocateCPU:      false
プロビジョニングについてはリリースを行わないと多額の課金が発生する場合がありますので動作確認後は忘れずにリリースを実施してください。課金の詳細は公式ドキュメントをご確認ください
■ Next Time
次回は「Serverless DevsとFunction ComputeのGPUインスタンスを使った物体検出」を実施します。