まさかこの「誰よりも先駆けて使い方を解説!」な記事を書いてから1年半もかかると思ってなかったのですが(笑)、ついにv6出ましたね。
https://github.com/remix-run/react-router/releases/tag/v6.0.0
はじめに
ReactでSPAを作るときのおそらくデファクトスタンダードであろうreact-routerですが現在v6が開発中で、しばらくしたら単純にnpm install react-routerとするとv6がインストールされるようになります。
v6はAPIに破壊的な変更が入ります。つまり、今ある入門記事の通りに書いても動かなくなります。
というわけでこの記事では書き方がどう変わるか、そして個人的により重要な中身がどう変わったのかについて説明します。
第1部:書き方の変更編
v5での書き方
まずは前提知識としてv5での書き方です1。すでに優良な記事があるので詳しくは解説しません。
<Router>
  <Switch>
    <Route path="/about">
      <About />
    </Route>
    <Route path="/users">
      <Users />
    </Route>
    <Route path="/">
      <Home />
    </Route>
  </Switch>
</Router>
Routerの中にRouteを書き、パスとマッチしたときにレンダリングされる要素を指定します。
RouteをSwitchで囲んだ場合は「初めにマッチしたもの」がレンダリングされる、囲まない場合は「マッチするものが全部」レンダリングされます。
なおRouteでレンダリングされる要素を指定する方法は以下の4種類があります。
-
children、つまり、Routeの中に書く(推奨) -
componentで指定する2 -
renderで「要素を返す関数」を渡す -
childrenで関数を渡す。1つ目との違いはpropである点。またrenderとの違いは「マッチしたかに関わらず常にレンダリングされる」点
普通は「普通のchildren」もしくはcomponentを使うと思いますがはっきり言ってややこしいです。
v6ではこうなる
現時点(2020/4/4)でv6を試してみるには以下のようにインストールします。
リリースノートだと@6みたいに書かれていましたがそれだと「そんなバージョンない」エラーになりました3。
npm install history@next react-router@next react-router-dom@next
2020/4/4(早朝)時点で入るバージョンは以下となります。
+ react-router-dom@6.0.0-alpha.2
+ react-router@6.0.0-alpha.2
+ history@5.0.0-beta.7
さて、v6では上で示したルーティングの書き方が以下のようになります。
<Router>
  <Routes>
    <Route path="/about" element={<About />} />
    <Route path="/users" element={<Users />} />
    <Route path="/" element={<Home />} />
  </Routes>
</Router>
-
SwitchはなくなりRoutesになりました。なおv5ではSwitchは「なくてもいい(直接Routeを書いてもいい)」でしたが、v6では必ずRoutesで囲む必要があります - レンダリングされる要素は
elementで指定する。これ以外の方法はない
elementで指定する方法はv5での「普通のchildren」での指定方法と同じです。まあちょっと/が多いのが気になりますが。
Getting Startedによるとv6では単に書き方が変わるだけでなく以下の機能が追加されています。
-
RouteにRouteをネストできるようになった。これは相対パスとして動作します -
Linkも相対パスで書けるようになった。これはmigration guideのbefore(v5) after(v6)を見るととてもシンプルですね
他に注意が必要な点としては、v5ではパスパラメータ(path=/users/:idみたいに指定するやつ)を取得する方法が**useParams関数のみになります。propsでmatchは渡されなくなります**。
第2部:内部構造の変更編
さて(個人的)本題はここからです。
v5の実装
そもそもこの記事を書くきっかけとなったのはreact-routerがどう動いているかを調べようと思ったことでした。
react-router@v5を使ってるプログラムをReact Developer Toolsで見ると以下のようになります。非常にややこしい。
RouterとRouterContext
Routeのような表示対象に依存しないコードはreact-routerに、Linkのように表示対象に依存するコードはreact-router-domに置かれています。リンク張るバージョンは5.1.2です。
BrowserRouterは後で見るので、まずreact-routerパッケージの方のRouter.jsを見ます。するとContextを使っていることがわかります。
import RouterContext from "./RouterContext";
このRouterContextはReact 16で導入されたコンテキストではありません。後々関わってくるのは1行目のコメントです。
// TODO: Replace with React.createContext once we can assume React 16+
import createContext from "mini-create-react-context";

const createNamedContext = name => {
  const context = createContext();
  context.displayName = name;

  return context;
};

const context = /*#__PURE__*/ createNamedContext("Router");
export default context;
ともかくこのContextを使ってレンダリングが行われています。historyとlocationは後で見ます。
  render() {
    return (
      <RouterContext.Provider
        children={this.props.children || null}
        value={{
          history: this.props.history,
          location: this.state.location,
          match: Router.computeRootMatch(this.state.location.pathname),
          staticContext: this.props.staticContext
        }}
      />
    );
  }
Link
次にLink(がレンダリングしてるaタグ)がクリックされたときに何が起こるかLink.jsを見てみましょう。LinkとLinkAnchorに分かれててややこしいですが4全体として以下のように動作します(長くなるのでコードは貼りません。リンク先を見ながら説明を読んでください)
-
Link:Contextとして渡されるhistoryを操作するnavigate関数を定義しLinkAnchorに渡す -
LinkAnchor:aタグがクリックされたら渡されたnavigate関数を実行する
これでクリックされたらhistory(ブラウザ履歴)が変わるところはできました。
再びRouter
ここまでコードを読んで、「ブラウザ履歴が変わるのはわかったけど、React的にはどうやってレンダリングし直してるの?」ということはわからなかったのでもう一度Router.jsを見てみました。
  constructor(props) {
    super(props);

    this.state = {
      location: props.history.location
    };

    // This is a bit of a hack. We have to start listening for location
    // changes here in the constructor in case there are any <Redirect>s
    // on the initial render. If there are, they will replace/push when
    // they mount and since cDM fires in children before parents, we may
    // get a new location before the <Router> is mounted.
    this._isMounted = false;
    this._pendingLocation = null;

    if (!props.staticContext) {
      this.unlisten = props.history.listen(location => {
        if (this._isMounted) {
          this.setState({ location });
        } else {
          this._pendingLocation = location;
        }
      });
    }
  }
最後のif文は普通の使い方であれば実行されます。つまり、下の方でhistoryの操作を行えばそれがRouterに通知され、stateを変え、再レンダリングされるという仕組みのようです。
BrowserRouter
後回しにしていたBrowserRouterです。特に難しいことはしていません。historyオブジェクトを作成してRouterに渡しています。
historyパッケージはreact-routerと同じ開発チームが作っているようです。
import React from "react";
import { Router } from "react-router";
import { createBrowserHistory as createHistory } from "history";

/**
 * The public API for a <Router> that uses HTML5 history.
 */
class BrowserRouter extends React.Component {
  history = createHistory(this.props);

  render() {
    return <Router history={this.history} children={this.props.children} />;
  }
}
Route
v5実装巡りの最後にRoute.jsを見てみましょう。この記事を書くきっかけになったコードです。
  render() {
    return (
      <RouterContext.Consumer>
        {context => {
          // 省略

          return (
            <RouterContext.Provider value={props}>
              {props.match
                ? children
                  ? typeof children === "function"
                    ? __DEV__
                      ? evalChildrenDev(children, props, this.props.path)
                      : children(props)
                    : children
                  : component
                  ? React.createElement(component, props)
                  : render
                  ? render(props)
                  : null
                : typeof children === "function"
                ? __DEV__
                  ? evalChildrenDev(children, props, this.props.path)
                  : children(props)
                : null}
            </RouterContext.Provider>
          );
        }}
      </RouterContext.Consumer>
    );
  }
( ゚д゚)
三項演算子をここまで使いまくったコードは初めて見ました。
このコードがわかりにくいのは中盤のインデントが「わかりにくい」ためです。インデントを「直す」と以下のようになります。
{props.match
  ? children
    ? typeof children === "function"
      ? __DEV__
        ? evalChildrenDev(children, props, this.props.path)
        : children(props)
      : children
    : component // childがfalsyの場合
      ? React.createElement(component, props) // child:fasly, component:truthy
      : render // childもcomponentもfalsyの場合
        ? render(props) // child:fasly, component:falsy, render:truthy
        : null
  : typeof children === "function"
    ? __DEV__
      ? evalChildrenDev(children, props, this.props.path)
      : children(props)
    : null}
いやあんまり変わらねえよ。わかりにくい。
何これ直してpullreq送るべきなの?と思ったらすでにされており、さらに衝撃的な事実が発覚しました。
I've stated before that this form is more readable, but I know Ryan and Michael disagree.
訳:前にこっちの方が読みやすいって言ったんだけど、作者が反対したんだ。
まじですか。
ここで第1部で触れたレンダリングされる要素を指定する4つの方法を振り返りましょう。
-
children、つまり、Routeの中に書く(推奨) -
componentで指定する -
renderで「要素を返す関数」を渡す -
childrenで関数を渡す。1つ目との違いはpropである点。またrenderとの違いは「マッチしたかに関わらず常にレンダリングされる」点
まあ確かにchildrenが多義な点を除けば(これがいけなかったんじゃ)、APIドキュメントに書いてある順に処理されているので「わかりやすい」気がする。
v6の実装
次にv6実装について見ていきましょう。
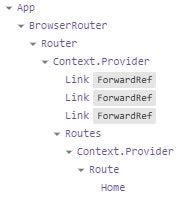
まずはv5との比較としてReact Developer Toolsでのコンポーネント階層です。v5からだいぶシンプルになっていますね。
ファイル構成の変更
v6でもreact-routerとreact-router-domにパッケージが分かれていることは変わりありません。
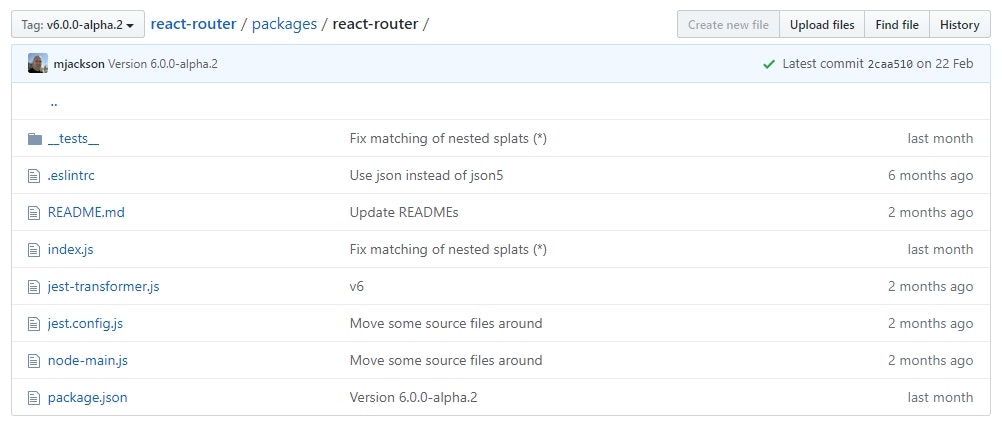
一方、ファイル構成は非常にシンプルになっています。リンク張るバージョンは6.0.0-alpha.2です5。アルファなので以下で説明する実装は変わる可能性がありますが大きく変わることはないでしょう。
react-router内に入ると「あれ?」ってぐらいシンプルになっています。本体のファイルはindex.jsだけです(react-router-domも同様)
RouterとContext
ともかくreact-routerの方のindex.jsを見てみるとシンプルになった理由がわかります。
伏線しておきましたね?そう、v6はReactのコンテキストとフックを使った実装にリライトされています。
const LocationContext = React.createContext();

export function Router({ children = null, history, timeout = 2000 }) {
  let [location, setLocation] = React.useState(history.location);
  let [startTransition, pending] = useTransition({ timeoutMs: timeout });
  let listeningRef = React.useRef(false);

  if (!listeningRef.current) {
    listeningRef.current = true;
    history.listen(({ location }) => {
      startTransition(() => {
        setLocation(location);
      });
    });
  }

  return (
    <LocationContext.Provider
      children={children}
      value={{ history, location, pending }}
    />
  );
}
初め見たときは「え?LocationContextグローバルでいいの?」と思いましたが、Routerを複数使うなんてことはまずないでしょうし実装がシンプルになるのでいいと思います。
なお先に説明しておくと、
Linkがレンダリングするaタグがクリックされることでhistoryが操作される
→上記のlistenで登録されているコールバックが実行される
→setLocationを使用してlocationを更新
→再レンダリング
という流れはv5と違いはありません(クラスとフックという違いを除けば)
LinkとuseNavigate
Linkはreact-router-domの方のindex.jsに書かれています。
export const Link = React.forwardRef(function LinkWithRef(
  {
    as: Component = 'a',
    // 省略
    to,
    ...rest
  },
  ref
) {
  let href = useHref(to);
  let navigate = useNavigate();
  let location = useLocation();
  let toLocation = useResolvedLocation(to);

  function handleClick(event) {
    if (onClick) onClick(event);
    if (
      // 省略。普通の使い方であれば成立します
    ) {
      // 省略

      navigate(to, { replace, state });
    }
  }

  return (
    <Component
      {...rest}
      href={href}
      onClick={handleClick}
      ref={ref}
      target={target}
    />
  );
});
useHref~useResolveLocationはreact-routerパッケージで定義されているフックです。次にuseNavigateに移りましょう。
export function useNavigate() {
  let { history, pending } = React.useContext(LocationContext);
  let { pathname } = React.useContext(RouteContext);

  let navigate = React.useCallback(
    (to, { replace, state } = {}) => {
      if (typeof to === 'number') {
        history.go(to);
      } else {
        let relativeTo = resolveLocation(to, pathname);

        // If we are pending transition, use REPLACE instead of PUSH.
        // This will prevent URLs that we started navigating to but
        // never fully loaded from appearing in the history stack.
        let method = !!replace || pending ? 'replace' : 'push';
        history[method](relativeTo, state);
      }
    },
    [history, pending, pathname]
  );

  return navigate;
}
第1部で紹介した相対パスの処理も行われていますが基本的にはv5のころにLinkコンポーネント内で行われていた処理が抽出されています。その分Linkの方はシンプルになりました。
RouteとRoutes
BrowserRouterは特筆することないので飛ばして、v5実装で魔窟化していたRouteに移ります。
export function Route({ element }) {
  return element;
}
これまた見るところ間違えたかなと思うぐらいシンプルです。が、第1部で見たようにv6ではRouterはelementしか受け付けないのでこれであってます。やはりv5の仕様が単に狂ってただけじゃ
複雑な実装、ってよく思うとv5実装解説ではそこら辺さくっと略しましたが、はどこに行ったかというとRoutesです。
より正確には、
-
createRoutesFromChildrenでchildrenの情報を集めて -
useRoutes(内部でmatchRoutes呼び出し)を使ってlocationに対応するRouteをレンダリング
ということが行われています。ここの部分については淡々とがんばってるだけなので省略。
あとがき
以上、react-router@v5→v6での使い方の変更、内部実装の変更について見てきました。
途中でも書いたように当初はv5の実装理解が目的、そこで見かけた「超絶三項演算子利用例」についてだけ書こうかと思ったのですが、「いや待てそういえばリリースの方見るとそろそろv6出るよな」と見に行ったらフックを使う実装に置き換わっていた(うえにRouteもシンプル化して超絶三項演算子もなくなった)のでこちらも実装解説、さらにもう少し一般向け(?)に「使い方がどう変わるのか」についても書くことにしました。破壊的なAPI変更はOh...ですけど、おそらく売りとなる相対パスはかなり有用そうだと思いました。
ちなみに、フック利用&シンプル化の効果は出ており、v6はかなり「軽く」なっています。
海外の記事だと9.4kbが2.9kbになった(gzippedされてる場合)と書かれていますが、公式ドキュメントではCDN指定としてreact-routerとreact-router-domが分かれているのでその指定で正しいのか?というのが疑問(v5はreact-router-domだけで正しい)、でもunpkg見るとreact-router-dom単体はminifiedのサイズ8.5kbもないしとやや根拠が怪しいですが軽くはなっているようです。
-
react-router公式のQuick Startより引用。リンク張ってもそのうち内容変わりそうですが一応リンク:https://reacttraining.com/react-router/web/guides/quick-start ↩
-
前にQuick Start見たときはこれで書いてあった気がするのだけど記憶違いかな ↩
-
6.0.0-alpha.2のように正確に指定すればインストールできます。 ↩ -
分かれてる理由は「リンク」としてレンダリングされる要素を
componentとして渡せるからのようですがドキュメントには特にその旨ないですね ↩ -
朝のうちにv5実装についてまで書き上げて、桜見物して帰ってきたら6.0.0-alpha.3がリリースされてましたw。主な違いは
Redirectをなくしたことのようですね ↩


