概要
ZedBoardにはUSB OTGとして使える端子が1つ用意されている。
今回はこのUSB OTGをHost Modeで使えるようになるまでの一連の手順について記述する。
なお、本作業はこれまでに行ったZedBoardのセットアップから継続した状態で行っている。
[1] Zedboard-PetaLinux2020.2 セットアップ
[2] Zedboard-PetaLinux2020.2 UARTLITE使用手順
参考
Petalinux Tools Documentation - Reference Guide(v2020.2)
"Creating and Adding Custom Kernel Modules" 参照
手順
ユーザーモジュールの作成
petalinux-create -t modules --name <user-module-name> --enableコマンドにより
プロジェクト内にユーザーモジュールを作成する。
今回はRaspberryPi4をターゲットデバイスとするため、rpiとした。
$ cd cd <plnx-proj-root>
$ petalinux-create -t modules --name rpi --enable
- 下記パスにユーザーモジュール用フォルダが生成される
<plnx-proj-root>/project-spec/meta-user/recipes-modules/rpi
ここからは上記フォルダに有るREADMEを参考に進めた。
ユーザーモジュール用のドライバとして下記ファイルが自動生成される。
<plnx-proj-root>/project-spec/meta-user/recipes-modules/rpi/files/rpi.c
このファイルにはusb-skeleton.cを参考にUSBホストドライバの処理を書き込んだ。
(VendorIDとProductIDを書き換える。)
<plnx-proj-root>/components/yocto/workspace/sources/linux-xlnx/drivers/usb/usb-skeleton.c
RootfsのConfigurationメニューを開いて、ユーザーモジュールが追加されていることを確認。
$ petalinux-config -c rootfs

modules --->
    [*] rpi
ビルドを行う。
$ petalinux-build -c kernel
$ petalinux-build -c rpi
$ petalinux-build -c rootfs
petalinux-buildで全部まとめてビルドしてくれるはずだが、初回は上記コマンドを1つずつ実行しないとrpiが有効にならなかった。
これで生成されたイメージファイル等をいつもどおりSDに書き込んでZedBoardを起動。
USB OTGからラズパイ4のUSB Type-C端子へ接続。
ラズパイ4にはUSB Peripheral Mode Moduleが実装済みの状態。
動作確認
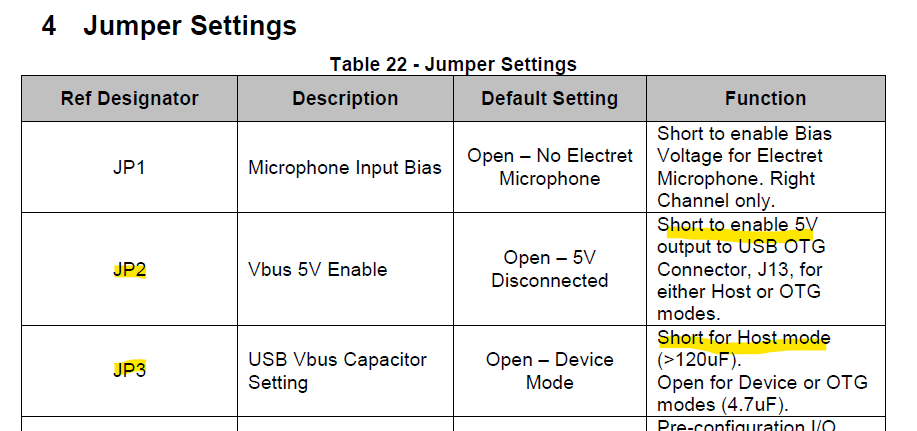
ZedBoardのUSB OTGには2つのジャンパピンが設定用にあり、Host Modeで使う場合はJP3をショートする必要がある。またJP2は接続したデバイスに5V給電するかどうかである。
今回ラズパイ4にZedから給電すると、Low voltageの雷マークが出ていたため、ラズパイ4の電源はGPIOピンから入れることにし、ZedBoard側のJP2のジャンパピンはショートしないことにした。
ZedBoard Hardware User's Guide から抜粋

ZedでOSが立ち上がったらデバイスを確認
$ ls /dev/rpi*
rpi0

$ dmesg | grep rpi
[    6.383296] rpi: loading out-of-tree module taints kernel.
上記メッセージは正常にrpiモジュールが立上げられたことを示す。
通信確認のため簡単なプログラムをPythonで用意。
ZedBoard側をホストとしてメッセージを送り、ラズパイ側はそのメッセージを受けたら返答する。
ZedBoard側のプログラム
import os

if __name__=='__main__':

    f = os.open("/dev/rpi0", os.O_RDWR)

    message = "Hello, I`m ZedBoard!"

    os.write(f, message.encode())

    packet = os.read(f, 30)
    print(packet)

    os.close(f)
ラズパイ4側のプログラム
import os

if __name__=='__main__':

    f = os.open("/dev/<※ZedBoardのデバイスファイル>", os.O_RDWR)

    packet = os.read(f, 30)
    print(packet)

    message = "Hello, I`m RasberryPi4!"

    os.write(f, message.encode())

    os.close(f)
実行結果
$ python3 rpiComMain.py
b'Hello, I`m RasberryPi4!'
$ python3 zedComMain.py
b'Hello, I`m ZedBoard!'
無事に通信できていることが確認できた。
まとめ
意外と簡単にUSBホストを入れることができた。
なお、ただUSBメモリをMass Storageとしてつなげたいだけなら本手順は行わず、ZedBoard BSPを適用してプロジェクト作成してビルドするだけで使える。

