Web画面からJavaScript(TypeScript)を経由してS3へファイルを直接アップロードする処理の作成手順です。
手順の流れ
- アップロード先となる
AWS S3を作成します。 - アップロードURLを作成する
AWS Lambda 関数を作成します。 - クライアントからのアップロード処理を作成します。
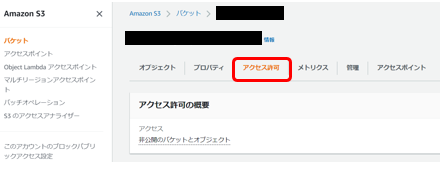
アップロード先となる AWS S3 を作成します
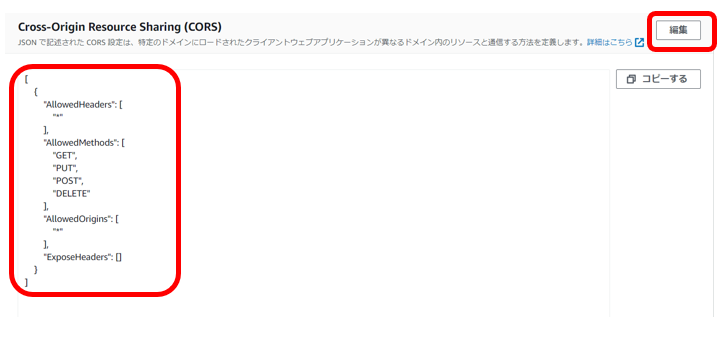
[
    {
        "AllowedHeaders": [
            "*"
        ],
        "AllowedMethods": [
            "GET",
            "PUT",
            "POST",
            "DELETE"
        ],
        "AllowedOrigins": [
            "*"
        ],
        "ExposeHeaders": []
    }
]
これを実施しないとアップロード時にエラーが発生します。
※ 上記例はすべてのサイトからのアクセスを許可してしまうので
実際に運用する際にはAllowedOriginsを適切に設定するなどして下さい。
(私はこのまま運用してたりしますが・・)
アップロードURLを作成する AWS Lambda 関数 を作成します
👇これより先は下記記事の内容を前提とします
REST API としてAWS Lambda関数を呼び出す
- クライアントから送信されるファイル名を取得します。
-
generate_presigned_urlでアップロードURLを生成します。
import json
import boto3
import traceback
import os
from botocore.client import Config

def main_logic(file_name):
    key = "upload_files/" + file_name
    client = boto3.client('s3', region_name="ap-northeast-1", config=Config(signature_version='s3v4'))
    upload_url = client.generate_presigned_url(
        ClientMethod = "put_object",
        Params = {"Bucket" : 'your.bucket.nameXXXXXXXXXX', "Key" : key},
        HttpMethod = "PUT"
    )
    return upload_url

def lambda_handler(event, context):

    if "file_name" in event["queryStringParameters"]:
        file_name = event["queryStringParameters"]["file_name"]

        return_data = main_logic(file_name)

        return {
            'statusCode': 200,
            'headers': {
                'Access-Control-Allow-Origin': '*'
            },
            'body': json.dumps(return_data)
        }
クライアントからのアップロード処理を作成します
👇これより先は下記記事の内容を前提とします
Angular Material 標準コンポーネント構成の作成
- コンポーネント追加
ng generate component uploader
- ファイルアップロードコンポーネントを組み込みます。
main.component.html
<div class="content" role="main">

    <div class="container">
      <app-uploader></app-uploader>
    </div>

</div>
- CSSを定義します。
- せっかくなので少しきれいに整えました。
uploader.component.css
.progress-bar {
  padding: 0;
}
.progress {
  width: 50px;
  height: 30px;
  padding: 0 0 0 15px;
  background-color:white;
}
#fileInput {
  position: absolute;
  cursor: pointer;
  z-index: 10;
  opacity: 0;
  height: 100%;
  left: 0px;
  top: 0px;
}
.mat-toolbar-single-row {
  height: auto !important;
  background: transparent;
  padding: 0;
}
.mat-toolbar-single-row button {
  width: 100px;
}
.mat-form-field {
  width: 100%;
}
.message {
  background-color: #ddd;
  padding: 15px;
  color: #333;
  border: #aaa solid 1px;
  border-radius: 4px;
  margin-bottom: 10px;
}
- APIGateway経由でLambdaへアクセスしアップロードURLを取得
- 取得したURLを使ってファイルオブジェクトをput
- せっかくなのでプログレスバーを描画
uploader.component.ts
import { Component, ElementRef, OnInit, ViewChild,Output, EventEmitter } from '@angular/core';
import { HttpClient, HttpEvent, HttpEventType, HttpHeaders, HttpParams, HttpRequest, HttpResponse } from '@angular/common/http';
import { Observable } from 'rxjs';

@Component({
  selector: 'app-uploader',
  templateUrl: './uploader.component.html',
  styleUrls: ['./uploader.component.css']
})
export class UploaderComponent implements OnInit {

  currentFile?: File;
  progress = 0;
  message = '';
  fd? : FormData;

  fileName = 'Select File';
  fileInfos?: Observable<any>;

  constructor(
    private http: HttpClient,
    ) {}

  selectFile(event: any): void {
    if (event.target.files && event.target.files[0]) {
      const file: File = event.target.files[0];
      this.currentFile = file;
      this.fileName = this.currentFile.name;
      this.fd = new FormData();
      this.fd.append("upfile",this.currentFile);
    } else {
      this.fileName = "Select File";
    }
  }

  upload(): void {
    this.progress = 0;
    this.message = "";

    let file_name : string = String(this.currentFile?.name);
    console.log("file_name:" + file_name);

    const httpHeaders = new HttpHeaders({
      'Content-Type' : 'application/json',
    });

    const options = {
      headers: httpHeaders,
      params: {"file_name":file_name},
      reportProgress: false,
    };

    const url = "https://your.api.urlXXXXXXXXXXXX/v1";

    this.http.get<any>(url, options).subscribe({
      next:(data) => {
        let upload_url = data;
        this.upload_s3(upload_url);
      },
      error:(e) =>{
        console.log("NG");
        console.error(e);
      },
      complete: () => {
        console.log("complete");
      }
    })

  }

  upload_s3(uploadUrl:string){

    this.http.put<any>(uploadUrl,this.currentFile
      ,{reportProgress: true,observe: "events"}).subscribe({
      next:(event) => {
        if (event.type === HttpEventType.UploadProgress && event.total) {
          this.progress = Math.round(100 * event.loaded / event.total);
        } else if (event instanceof HttpResponse) {
        }
      },
      error:(e) =>{
        console.log("NG");
        console.error(e);
      },
      complete: () => {
        console.log("complete");
      }
    })

  }
}
uploader.component.html
<mat-form-field>

  <mat-toolbar *ngIf="currentFile" class="progress-bar">
    <mat-progress-bar color="primary" [value]="progress"></mat-progress-bar>
    <span class="progress">{{ progress }}%</span>
  </mat-toolbar>

  <div>
    <mat-toolbar>
      <input matInput [value]="fileName" />
      <button mat-icon-button *ngIf="currentFile" (click)="upload()">
          <mat-icon>file_upload</mat-icon>
      </button>
    </mat-toolbar>

    <input
      type="file"
      id="fileInput"
      (change)="selectFile($event)"
      name="fileInput"
    />

  </div>

</mat-form-field>
👇前提記事
👇関連記事
- Angular Material datepicker 導入
- Angular Material Progress spinner 導入
- StackBlitzの導入からGitHub同期まで
- Angular Material 動的Tree 導入
👇GitHubはこちら
👇参考URL
[keywords]
Angular S3 upload


