1990年、NHKが「電子立国日本」と持て囃した半導体業界に 30年ぶりにスポットライトが当たっています。舞台に立っているのは最先端製造技術ですが、ここでは裏方として舞台を支えてきた製造+設計の橋渡し役である PDK や半導体の開発コスト構造、レガシー半導体の活用等々、製造技術に偏りがちの半導体を設計やビジネス面からの切り口で論考を上げて来ました。今回は、生業である設計エンジニアから見たオープンソース EDA ツールである KLayout の Python API に関して簡単に紹介したいと思います。設計者だけでなく、製造やプロセス開発畑の方にも参考になる内容に膨らましていますので、ご笑読頂ければ幸いです。
なお、本内容は、過去の業務経験を元にした、個人的意見・見解の表明であり、いかなる組織を代表したものではありません
第一回の「Klayout の Python API を試してみた!」では、Layout と Cell Class に関して解説。第二回では Instance Class に関して解説。第三回では Pcell のパラメーター変更とファイルの保存。第四回では Python API で PCell を作って Library として保存しました。第五回では、本格的に TR-1um 向けの PCell Library を開発します。
Sky130 のディレクトリ構成
efabless がメンテナーになっている Sky130 向けの Klayout GitHub のディレクトリ構成を調べてみます。
- pymacros
- sky130_pcells.lym
- python
- cell
- __init__.py
- bjt.py
- ...
- fet.py
- cell
pymacros/sky130_pcells.lym の中身ですが(gdsfactory を import する部分を除く)、、、
 <text>
import sys
import os

# install the path to the PCell lib unless it is there already
lib_path = os.path.realpath(os.path.join(os.path.dirname(__file__), "..", "python"))
if not lib_path in sys.path:
  sys.path.insert(0, lib_path)

from cells import sky130

# Instantiate and register the library
sky130()

print("Loaded sky130 PCells.")
</text>
Python 記述の Pcell.py のある python ディレクトリを sys.path に追加して sky130() を呼んでいます。ディレクトリ構成が美しいので、TR-1umでも同様の仕組みを踏襲しつつ構築していくことにします。
TR-1um のディレクトリ構成
sky130 の構成に合わせて以下のようにします。
- pymacros
- TR-1um_pcells.lym
- python
- cell
- __init__.py
- fet.py
- z_draw_fet.py
- cell
pymacros/TR-1um_pcells.lym.lym の中身は、前回の load.lym を改造して以下のようにしました。
 <text>
# TR-1um PCell v0.001
# Original version was made by jun1okamura
# LICENSE: Apache License Version 2.0, January 2004,
#          http://www.apache.org/licenses/
# ----- ------ -----
import sys
import os

# install the path to the PCell lib unless it is there already
lib_path = os.path.realpath(os.path.join(os.path.dirname(__file__), "..", "python"))
if not lib_path in sys.path:
    sys.path.insert(0, lib_path)

from cells import TR-1um

# Instantiate and register the library
tr_1um()

print("Loaded TR-1um PCells.")

</text>
Python 記述の Pcell.py のある python ディレクトリを sys.path に追加して TR-1um() を呼んでいます。ディレクトリ構成が美しいので、TR-1umでも同様の仕組みを踏襲することにします。
python ディレクトリ
python module を cell/__init__.py で整理します。各PCell は cell/xxx の namespace を使います。
__init__.py
#
import pya

from .fet     import *
#from .cap     import *
#from .res     import *

# It's a Python class that inherits from the pya.Library class
class tr_1um(pya.Library):

    def __init__(self):
        # Set the description
        self.description = "TR-1um Pcells"

    # Create the PCell declarations
        # MOS DEVICES
        self.layout().register_pcell("pfet", pfet())
        #self.layout().register_pcell("nfet", nfet())

        # CAP Devices
        #self.layout().register_pcell("cap",  cap()) # CSIO device

        # RES Devices
        #self.layout().register_pcell("res_diff", res_diff()) # Diff resistance
        #self.layout().register_pcell("res_poly", res_poly()) # Poly resistance

        # Register us with the name "TR-1um".
        #self.register("TR-1um")
pfet 以外は、順番にコード化する予定ですので、ここではコメントアウトしています。
fet.py
fet.py にて pfet を定義して描画します。
 import pya

fet_lp   = 1.0
fet_wp   = 2.6
AP_layer = pya.LayerInfo( 3, 1)
PG_layer = pya.LayerInfo( 8, 1)
CO_layer = pya.LayerInfo(11, 0)

class pfet(pya.PCellDeclarationHelper):

    def __init__(self):
        # Initialize super class.
        super(pfet, self).__init__()
        #
        self.param("type", self.TypeString, "Type", default="PFET")
        #
        self.param("l", self.TypeDouble, "Length", default=fet_lp, unit="um")
        self.param("w", self.TypeDouble, "Width",  default=fet_wp, unit="um")
        #

    def display_text_impl(self):
        # Provide a descriptive text for the cell
        return "pfet(L=" + ('%.3f' % self.l) + ",W=" + ('%.3f' % self.w) + ")"

    def produce_impl(self):
        end_cap = 1.2       # end cap
        co2g_sp = 1.0       # contact to poly space
        co_w    = 1.0       # contact size
        co_enc  = 0.8       # contact enclosure
        #
        sdg_w   = self.l + 2 * (co2g_sp + co_w + co_enc)
        co_disp = self.l/2.0 + co2g_sp + co_w/2.0
        po_disp = self.w/2.0 + end_cap
        po_path = pya.DPath([pya.DPoint(0, -po_disp), pya.DPoint(0, po_disp)], self.l)
        sdg_box = pya.DBox(-sdg_w/2.0,  -self.w/2.0, sdg_w/2.0, self.w/2.0 )
        co_box  = pya.DBox(-co_w/2.0,   -co_w/2.0,   co_w/2.0,  co_w/2.0)
        #
        self.cell.shapes(PG_layer).insert(po_path)
        self.cell.shapes(AP_layer).insert(sdg_box)
        self.cell.shapes(CO_layer).insert(co_box).transform(pya.DTrans(-co_disp, 0))
        self.cell.shapes(CO_layer).insert(co_box).transform(pya.DTrans( co_disp, 0))
    #
GUI を立ち上げて PCell pfet を配置して見ます。
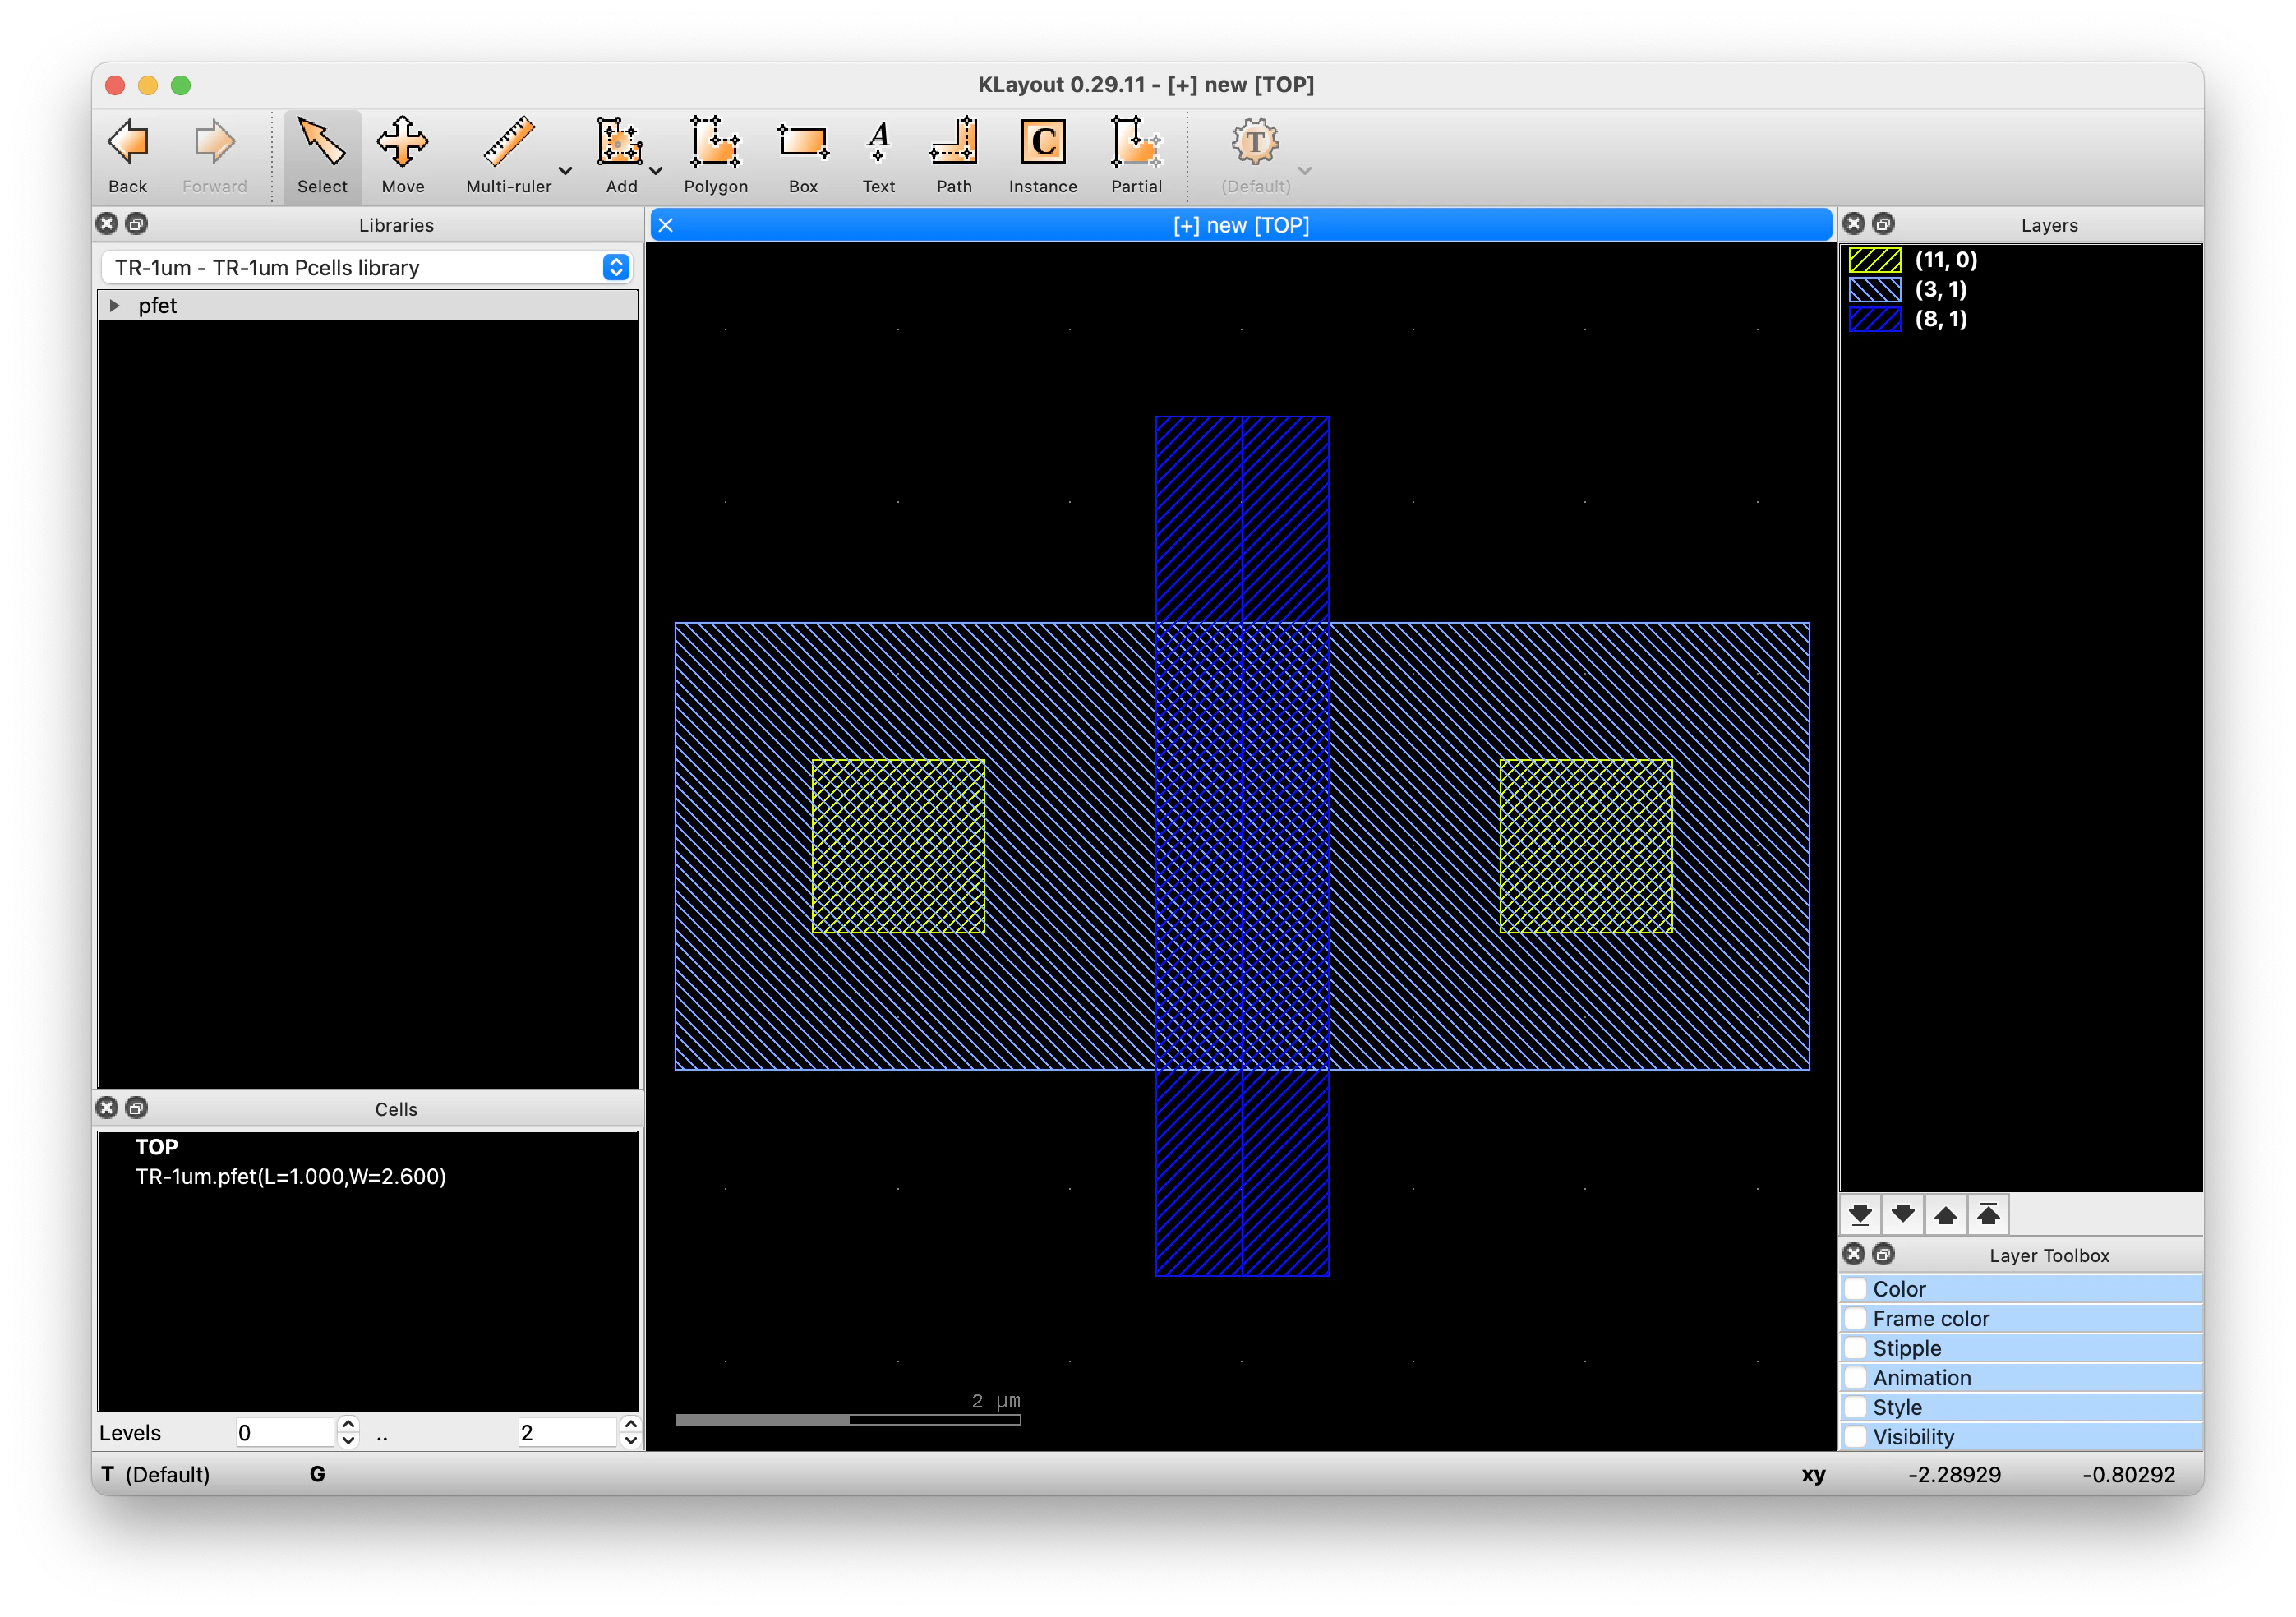
TR-1um PCell Library の雛形が完成です。
まとめ
Python API を使って GDSII ファイルの内部構造へのアクセスを試してみました。Cadence の Skill と同じく、EDA ツールの Layout データに直接アクセスできる手段があると、設計の効率を上げるツールを自ら開発することが可能になります。チュートリアルが乏しいことは、少し残念ではありますが、振り返ると 1987 年に導入した Cadence の前身の SDA 社の Edge ツール で Skill 言語を学んだ時も、資料が乏しい中で Cut & Try だった事を思い出しています。皆さんも是非挑戦して見て下さい。