どんなオブジェクトでも思いのままにセグメント編集できる


Segment Anything
なんでもセグメントできます。
なぜなら、セグメントしたいポイントや範囲を人間が簡単に指定できるから。
これにより、画像編集ソフトのようなセグメントが簡単にできます。
とりあえず以下のデモサイトで試せます。
使い方
インストール
git clone https://github.com/facebookresearch/segment-anything.git
wget https://dl.fbaipublicfiles.com/segment_anything/sam_vit_h_4b8939.pth
モデルのインスタンス化
from segment_anything import sam_model_registry, SamPredictor
import torch

sam_checkpoint = "sam_vit_h_4b8939.pth"
model_type = "vit_h"

device = "cuda"

sam = sam_model_registry[model_type](checkpoint=sam_checkpoint)
sam.to(device=device)

predictor = SamPredictor(sam)
実行
以下の画像で実行してみます。

import cv2
import numpy as np

image = cv2.imread('images/kyoto.jpg')
image = cv2.cvtColor(image, cv2.COLOR_BGR2RGB)
predictor.set_image(image) # 画像をembeddingにする
プロンプトを使ってマスクを取得します。
様々なプロンプトが使えます。
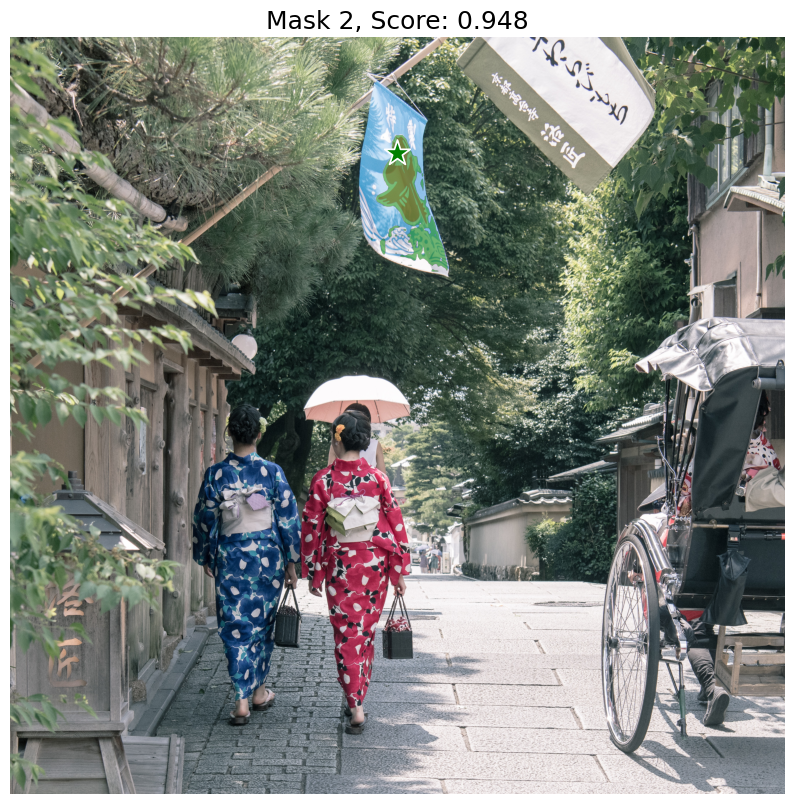
ポイントを一つ指定
画像上のオブジェクトのあるポイントを一つ指定して実行します。
中央上の旗についた星マークが指定したポイントです。

labelは1が前景、0が背景です。
信頼度の高い3つのマスクが得られます。


input_point = np.array([[4200, 2000]])
input_label = np.array([1])

masks, scores, logits = predictor.predict(
    point_coords=input_point,
    point_labels=input_label,
    multimask_output=True,
)
maskは画像と同じ(1, width, height)のshapeのTrue, Falseのnumpy.arrayです。
array([[[False, False, False, ..., False, False, False],
[False, False, False, ..., False, False, False],
[False, False, False, ..., False, False, False],
...,
[False, False, False, ..., False, False, False],
[False, False, False, ..., False, False, False],
[False, False, False, ..., False, False, False]],
multimask_output=Trueにすることで、信頼度の高い3つのマスク候補が得られます。
これにより、結果のmasksは(3, width, height)のshapeのnumpy.arrayになります。
ポイントを複数指定
画像上のオブジェクトのあるポイントを複数指定して実行します。
この際、先ほどの一つのポイントの推論から出力された高いスコアのマスクを入力に与えることで先ほどの推論の結果を今回の推論に使えます。これによりより精度の高いマスクが得られます。

input_point = np.array([[2000, 600], [3000, 400],  [2000, 190], [1000, 1000]])
input_label = np.array([1, 1, 1, 1])

mask_input = logits[np.argmax(scores), :, :]  # Choose the model's best mask

masks, _, _ = predictor.predict(
    point_coords=input_point,
    point_labels=input_label,
    mask_input=mask_input[None, :, :],
    multimask_output=False,
)
背景のポイントを指定することで、前景オブジェクトの範囲を絞り込めます。
以下のように猫全体のマスクから、体を背景(ラベル0)に指定することでしっぽだけをセグメントできます。


input_point = np.array([[390, 1000], [500, 700]])
input_label = np.array([1, 0])

mask_input = logits[np.argmax(scores), :, :]  # Choose the model's best mask

masks, _, _ = predictor.predict(
    point_coords=input_point,
    point_labels=input_label,
    mask_input=mask_input[None, :, :],
    multimask_output=False,
)
ボックスをプロンプトとして与える
画像内のオブジェクトのバウンディングボックスをプロンプトにできます。

input_box = np.array([150, 400, 360, 580]

masks, _, _ = predictor.predict(
    point_coords=None,
    point_labels=None,
    box=input_box[None, :],
    multimask_output=False,
)
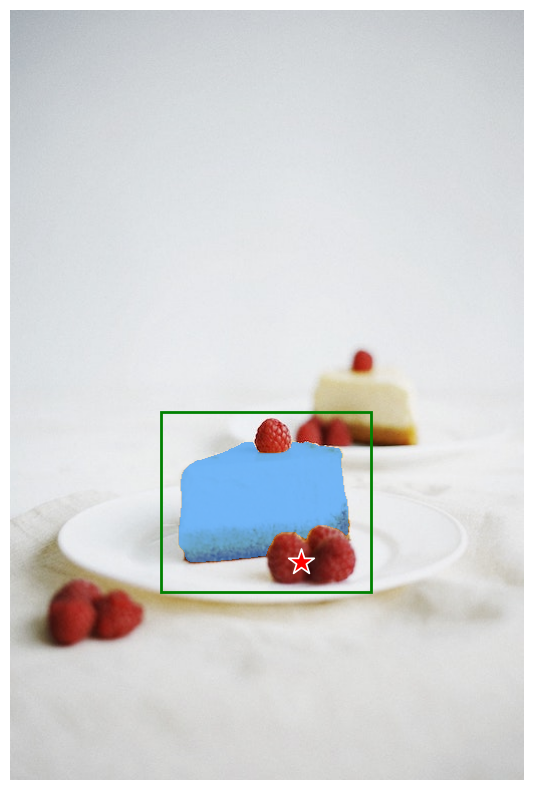
ポイントとボックスを組み合わせて使う
ボックスとネガティブポイントを使用してベリー以外のケーキをマスクできます。
input_box = np.array([150, 400, 360, 580])
input_point = np.array([[290, 550]])
input_label = np.array([0])

masks, _, _ = predictor.predict(
    point_coords=input_point,
    point_labels=input_label,
    box=input_box,
    multimask_output=False,
)
複数ボックスをプロンプトにする

input_boxes = torch.tensor([
    [35,90,300,450],
    [85,250,220,320],
    [90,410,215,550],
    [220,360,420,520],
], device=predictor.device)

transformed_boxes = predictor.transform.apply_boxes_torch(input_boxes, image.shape[:2])
masks, _, _ = predictor.predict_torch(
    point_coords=None,
    point_labels=None,
    boxes=transformed_boxes,
    multimask_output=False,
)
可視化関数
def show_mask(mask, ax, random_color=False):
    if random_color:
        color = np.concatenate([np.random.random(3), np.array([0.6])], axis=0)
    else:
        color = np.array([30/255, 144/255, 255/255, 0.6])
    h, w = mask.shape[-2:]
    mask_image = mask.reshape(h, w, 1) * color.reshape(1, 1, -1)
    ax.imshow(mask_image)

def show_points(coords, labels, ax, marker_size=375):
    pos_points = coords[labels==1]
    neg_points = coords[labels==0]
    ax.scatter(pos_points[:, 0], pos_points[:, 1], color='green', marker='*', s=marker_size, edgecolor='white', linewidth=1.25)
    ax.scatter(neg_points[:, 0], neg_points[:, 1], color='red', marker='*', s=marker_size, edgecolor='white', linewidth=1.25)

def show_box(box, ax):
    x0, y0 = box[0], box[1]
    w, h = box[2] - box[0], box[3] - box[1]
    ax.add_patch(plt.Rectangle((x0, y0), w, h, edgecolor='green', facecolor=(0,0,0,0), lw=2))

for i, (mask, score) in enumerate(zip(masks, scores)):
    plt.figure(figsize=(10,10))
    plt.imshow(image)
    show_mask(mask, plt.gca())
    show_points(input_point, input_label, plt.gca())
    plt.title(f"Mask {i+1}, Score: {score:.3f}", fontsize=18)
    plt.axis('off')
    plt.show()
インペインティングと組み合わせれば、オブジェクト削除機能も簡単に作れます。
🐣
フリーランスエンジニアです。
AIについて色々記事を書いていますのでよかったらプロフィールを見てみてください。
もし以下のようなご要望をお持ちでしたらお気軽にご相談ください。
AIサービスを開発したい、ビジネスにAIを組み込んで効率化したい、AIを使ったスマホアプリを開発したい、
ARを使ったアプリケーションを作りたい、スマホアプリを作りたいけどどこに相談したらいいかわからない…
いずれも中間コストを省いたリーズナブルな価格でお請けできます。
お仕事のご相談はこちらまで
rockyshikoku@gmail.com
機械学習やAR技術を使ったアプリケーションを作っています。
機械学習/AR関連の情報を発信しています。