*論文:サイクルでつながった敵対的ネットワークを使用するペアになっていない画像から画像への変換
CoreMLに変換することでCycleGAN画像変換をiPhoneアプリで使用できます。
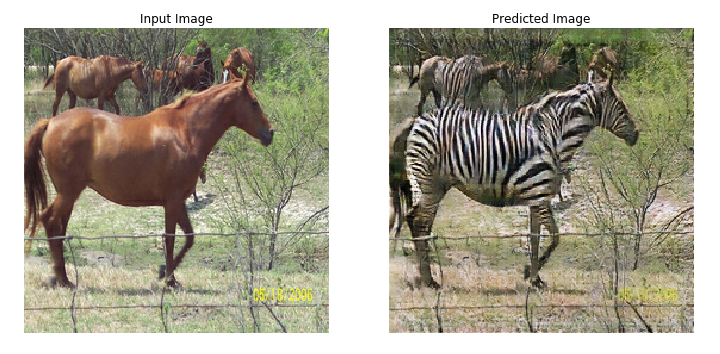
このストーリーでは、TensorFlow CoreのCycleGANチュートリアルモデルを使用します。
最初に、Colaboratoryでチュートリアルモデルをトレーニングします。
colabの以下のセルまでの全てのセルを実行します。
colab
for epoch in range(EPOCHS):
  start = time.time()

  n = 0
  for image_x, image_y in tf.data.Dataset.zip((train_horses, train_zebras)):
    train_step(image_x, image_y)
    if n % 10 == 0:
      print ('.', end='')
    n+=1

  clear_output(wait=True)
  # Using a consistent image (sample_horse) so that the progress of the model
  # is clearly visible.
  generate_images(generator_g, sample_horse)

  if (epoch + 1) % 5 == 0:
    ckpt_save_path = ckpt_manager.save()
    print ('Saving checkpoint for epoch {} at {}'.format(epoch+1,
                                                         ckpt_save_path))

  print ('Time taken for epoch {} is {} sec\n'.format(epoch + 1,
                                                      time.time()-start))
モデルのトレーニングが完了したら、新しいセルを挿入して以下の手順で変換を実行します。
1、TFCoreMLをインストールします。
colab
!pip install --upgrade tfcoreml
2、チェックポイントを復元します。
colab
checkpoint_path = "./checkpoints/train"

ckpt = tf.train.Checkpoint(generator_g=generator_g,
                           generator_f=generator_f,
                           discriminator_x=discriminator_x,
                           discriminator_y=discriminator_y,
                           generator_g_optimizer=generator_g_optimizer,
                           generator_f_optimizer=generator_f_optimizer,
                           discriminator_x_optimizer=discriminator_x_optimizer,
                           discriminator_y_optimizer=discriminator_y_optimizer)

ckpt_manager = tf.train.CheckpointManager(ckpt, checkpoint_path, max_to_keep=5)

# if a checkpoint exists, restore the latest checkpoint.
if ckpt_manager.latest_checkpoint:
  ckpt.restore(ckpt_manager.latest_checkpoint)
  print ('Latest checkpoint restored!!')
3、「saved_model」フォーマットでジェネレータg(これがhorse2zebraジェネレーターです。ジェネレーターfはzebra2horse)を保存します。
colab
generator_g.save( './ savedmodel')
4、変換を実行します。
import tfcoreml
input_name = generator.inputs[0].name.split(':')[0]
print(input_name) #Check input_name.
keras_output_node_name = generator_g.outputs[0].name.split(':')[0]
graph_output_node_name = keras_output_node_name.split('/')[-1]
mlmodel = tfcoreml.convert('./savedmodel',
                       input_name_shape_dict={input_name: (1, 256, 256, 3)},
                       output_feature_names=[graph_output_node_name],
                       minimum_ios_deployment_target='13',
                       image_input_names=input_name,
                       image_scale=2/ 255.0,
                       red_bias=-1,
                       green_bias=-1,
                       blue_bias=-1,
                       )
mlmodel.save('./cyclegan.mlmodel')
これで、iOSプロジェクトでCycleGANを使用できます。
import Vision
lazy var coreMLRequest:VNCoreMLRequest = {
   let model = try! VNCoreMLModel(for: cyclegan().model)
   let request = VNCoreMLRequest(model: mode, completionHandler: self.coreMLCompletionHandler0)
   return request
   }()

let handler = VNImageRequestHandler(ciImage: ciimage,options: [:])

DispatchQueue.global(qos: .userInitiated).async {
  try? handler.perform([coreMLRequest])
}
multiArrayを画像として視覚化するには、Hollance氏のCoreML Helpersが非常に便利です。
MultiArrayからImageへの変換 CoreMLHelper
自分でデータセットを用意してトレーニングすれば何2何でも作れます!
Twitterフォローしてくださいお願いします!
https://twitter.com/JackdeS11