はじめに
例によって暇だったため,FOTS(Fast Oriented Text Spotting with a Unified Network)をPytorchで実装してみました.実装はこちら→https://github.com/jjjkkkjjj/pytorch.dlで,FOTS意外にも気まぐれでいろんなアルゴリズムを実装しています.今回の実装では,学ぶことも多かったので,アウトプットも含めてFOTSを1から解説してみたいと思います.また,FOTSはEAST(An Efficient and Accurate Scene Text Detector)から踏襲した部分も多いので,EASTの解説も含んでいると思います.
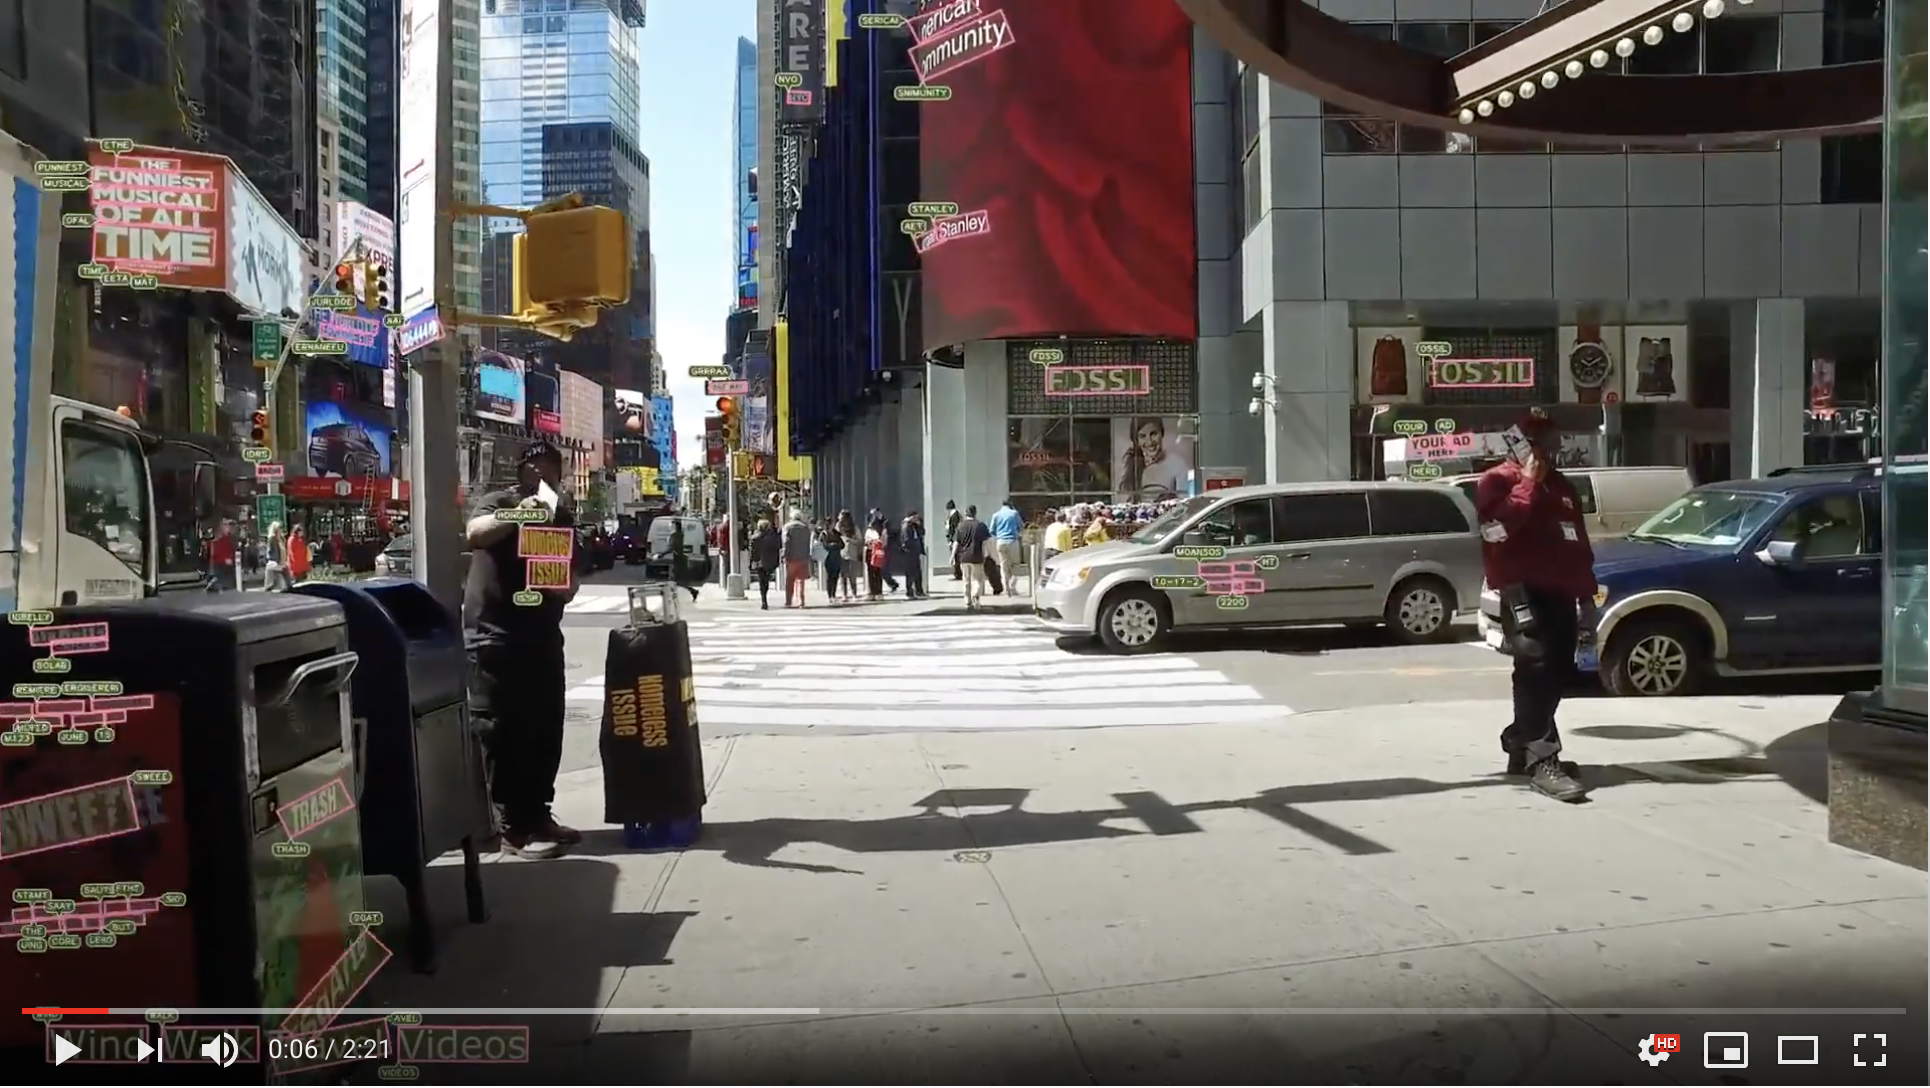
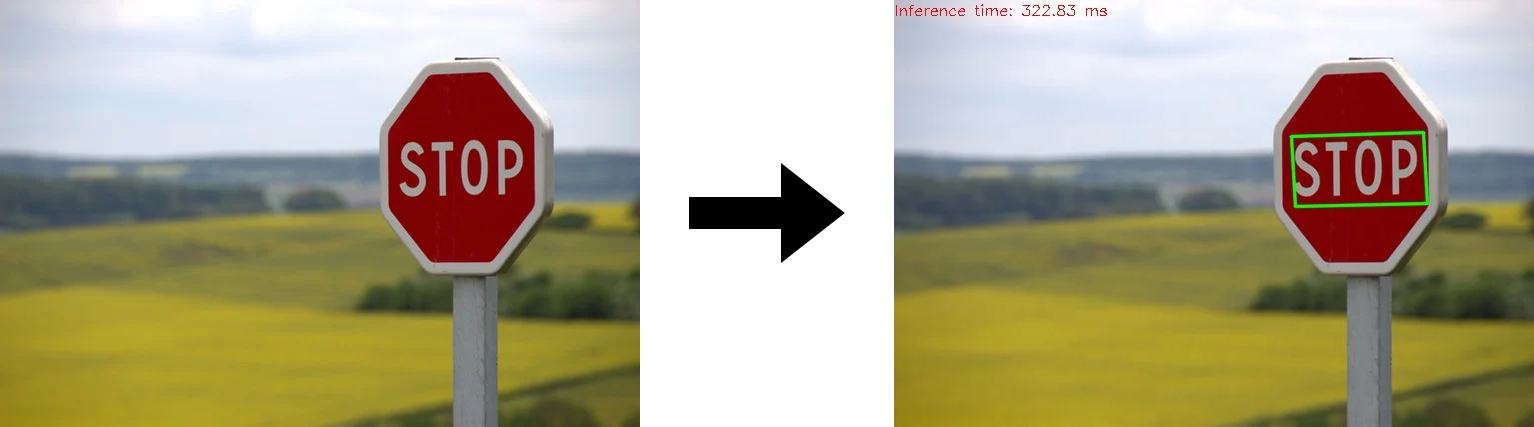
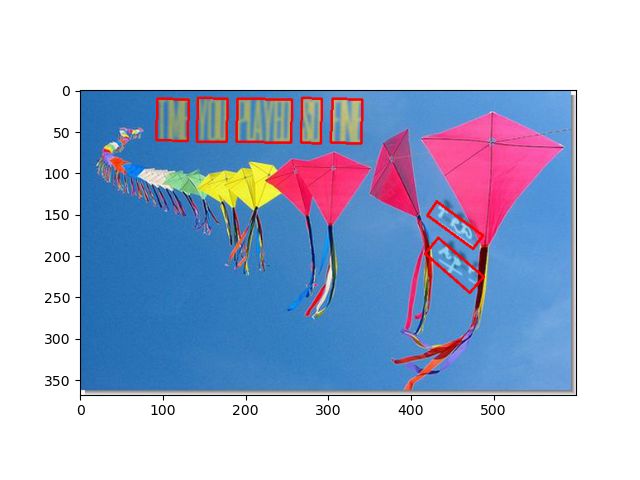
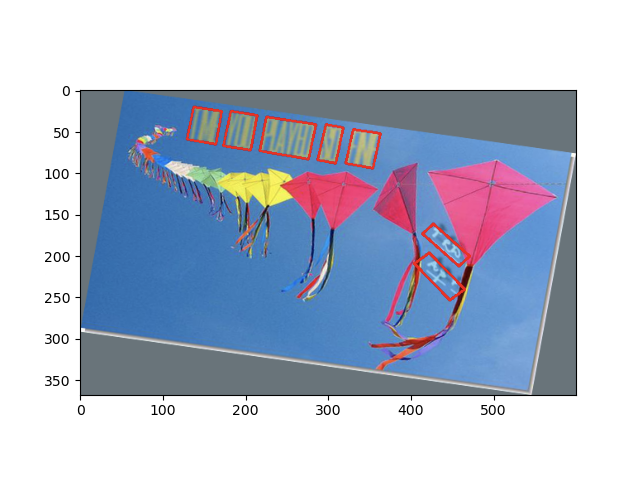
ちなみに,以下が実装したFOTSの出力結果です.ところどころおかしいですが,いい感じですね〜.
- 入力画像
- 出力画像
FOTSとは
FOTSとは,その名(Fast Oriented Text Spotting with a Unified Network)の通り,高速に方向を含めて文字領域を検出し,同時にその文字が何なのかを認識するアルゴリズムです.以下のデモ動画を見ると凄さがよく分かります.
デモ動画はhttps://www.youtube.com/watch?v=F7TTYlFr2QM&t=41s
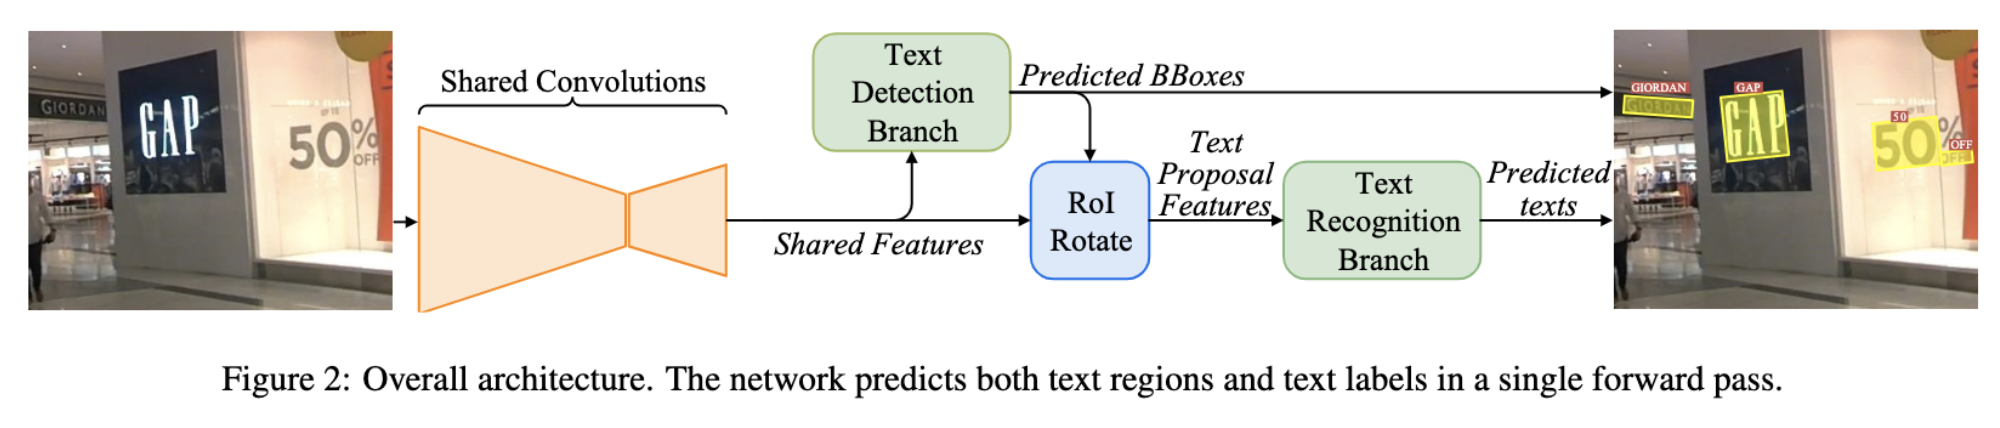
詳細は後述しますが,FOTSは以下の構造になっています.まずShared Convolutionで画像内から文字の特徴を抽出します.その特徴をText Detection Branchに入力し,物体の位置を予測します.次に,その予測した位置と,Text Detection Branchに入力した特徴を用いて,Roi Rotateで方向(回転・傾き)成分を取り除き,Text Recognition Branchの入力とすることで,文字を予測します.最後に予測した位置と文字を返します.この構造により,FOTSは文字の位置の検出から予測までEnd-to-Endで学習できるText Spottingな手法であると言えます.
文字界隈のタスクの種類
先述の通り,FOTSはText Spottingな手法であると書きましたが,文字界隈のタスクの種類は大きく分けると3つになると思います.
Text Detection(文字検出)
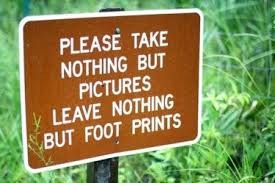
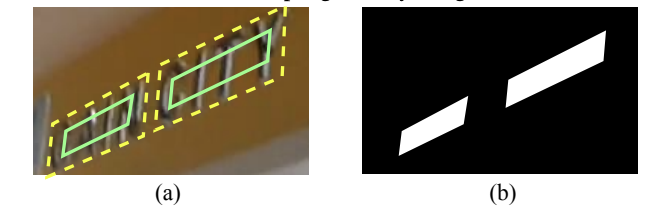
Text Detectionは,以下のように画像から文字の領域(位置)を検出することを言います.長方形に留まらず,任意の形の領域を検出することもこのText Detectionに入ると思います.
※図はこちらから拝借しました.
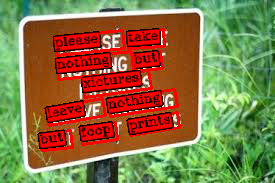
Text Recognition(文字認識)
Text Recognitionは,文字画像からその文字を認識することを言います.CRNN (An End-to-End Trainable Neural Network for Image-based Sequence Recognition and Its Application to Scene Text Recognition)が有名で,よく使われている印象があります.

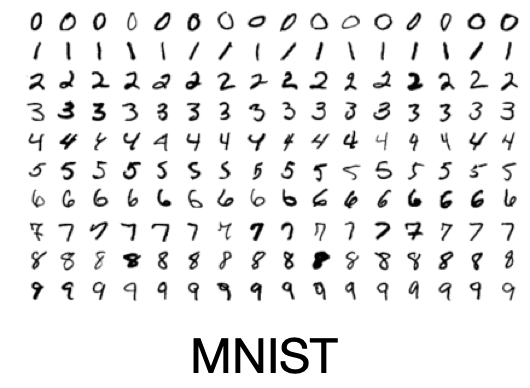
Deep Learningの初学者用タスクとして有名なMNISTもText Recognitionに分類されると思います.
Text Spotting(なんて訳すんだ?)
上述のText DetectionとText Recognitionを一気に行い,画像から文字の位置を予測し,その文字を認識することです.いわゆるEnd-to-Endなタスクだと思います.なんと訳すかは分かりませんが,上述の2つのタスクを同時に行うので,難易度は高いです.

データセット
FOTSは学習用のデータセットとして,以下のデータセットを用いています.学習の際の前処理やAugmentationの方法は各データセットに対して共通なので,今回はSynthTextにのみ触れたいと思います.
- SynthText
- ICDAR2015
- ICDAR2017 MLT
- ICDAR2013
SynthText
概要
文字界隈では,有名なデータセットだと思います.SynthTextは下図のように,普通のなんてことない画像に,人工的にあらゆる単語をあらゆるフォントで付与した画像のデータセットになります.

人工的にというのがポイントで,画像さえあれば無限にデータセットを作れることが強みです.実際,英単語のSynthText(SynthText in the Wild Dataset)は,80万画像(41GB)あります!リンクに飛ぶと,1画像1画像見ることができます.(中には背景と被ってこれは読めないだろというのもあります)
また,英語に限らず日本語・中国語などあらゆる言語のデータセットを作ることができます.コードはこちらになります.
FOTSは上述のSynthText in the Wild DatasetをPre-trainの段階で用います.
中身
SynthTextをこちらからダウンロードすると,ディレクトリの構造は以下のようになっています.
├── license.txt
└── SynthText
    ├── 1
    ├── 2
   ...略
    ├── 198
    ├── 199
    ├── 200
    └── gt.mat
-
license.txt- ライセンス項目が記載されている.
-
SynthText- このディレクトリに画像とアノテーションが入っている.
-
SynthText/1~200- 画像ファイルが1〜200に約4000枚の画像が格納されている.拡張子は
.jpg.
- 画像ファイルが1〜200に約4000枚の画像が格納されている.拡張子は
-
SynthText/gt.mat- アノテーションファイル.上述の画像に対するアノテーションが全て入っている(1.9GB).
SynthText/gt.mat
.matのバイナリ形式で各画像に対して,以下のデータが保存されています.(readme.txtより)
- imnames
- 画像のファイル名.
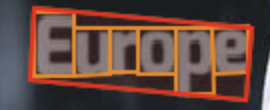
- wordBB
- 単語レベル(下図の赤枠)で区切られたバウンディングボックス(
quad表記:後述).
- 単語レベル(下図の赤枠)で区切られたバウンディングボックス(
- charBB
- 1文字レベル(下図のオレンジ枠)で区切られたバウンディングボックス(
quad表記:後述).
- 1文字レベル(下図のオレンジ枠)で区切られたバウンディングボックス(
- txt
- 対応するバウンディングボックスの単語(文字列).
txtについてですが,SynthTextはアルファベットと数字からなる単語だけではなく,いくつかの記号も含みます.実際,SynthText in the Wild Datasetをよく見ると,単語に変な記号なんかがついている(単語の末尾に"."とピリオドがついていたり,")"がついていたりする.)場合があります.
例:"12."

そこで調べてみると,文字列の種類は全部で,
- alphabetの26種類(
a~z) - numberの10種類(
0~9) - Symbolの32種類(
}&|%_(],$^{+?#@/-`).<=;~['>:\!"*)
68種類あるようでした(Alphabetの大文字小文字は区別していません).
※実際に質問しました
BoundingBoxの表現方法
ここはかなり重要だと思います!
まず,BoundingBoxの表現方法は大きく分けると,下図のように3つに分けることができます.
- ①:回転なしの長方形
-
corners,centroids,minmax
-
- ②:回転ありの長方形
rbox
- ③:任意の四角形
quad

①:回転なしの長方形
内容的には,前記事と同じですが,3つ表現方法があります.長方形なので,4つの情報があれば表現できます.情報が少ない分,問題は簡単になりますが,余分な領域まで含みがちです.
-
centroids表現
- 中心座標$(c_x,c_y)$と幅・高さ$(w,h)$を使います.
$$bbox = (c_x,c_y,w,h)$$
- 中心座標$(c_x,c_y)$と幅・高さ$(w,h)$を使います.
-
corners表現
- 左上の座標$(x_{min},y_{min})$と右下の座標$(x_{max},y_{max})$を使います.
$$bbox = (x_{min},y_{min},x_{max},y_{max})$$
- 左上の座標$(x_{min},y_{min})$と右下の座標$(x_{max},y_{max})$を使います.
-
minmax表現
- 左上の座標$(x_{min},y_{min})$と右下の座標$(x_{max},y_{max})$を使います.
- corners表記と順番が違うだけです.
$$bbox = (x_{min},x_{max},y_{min},y_{max})$$
-
中心座標$(c_x,c_y)$と幅・高さ$(w,h)$,左上の座標$(x_{min},y_{min})$と右下の座標$(x_{max},y_{max})$の関係
\begin{align}
(c_x,c_y) &= (\frac{x_{min}+x_{max}}{2},\frac{y_{min}+y_{max}}{2}) \\
(w,h) &= (x_{max}-x_{min},y_{max}-y_{min})
\end{align}
②:回転ありの長方形
長方形に回転の情報を加えた5つの情報からなるものです.一般的には,この表現はPixel毎の予測に適していて,各Pixelから長方形への上辺・右辺・下辺・左辺への距離($\mathbf{d} =(t,r,b,l)$)と角度($\theta$)で表現されます(EASTのFig.4(c):下図).
$$rbox=(t,r,b,l,\theta)$$

ここで注意したいのが,$\theta$の範囲が,
$$-\frac{\pi}{4}\leq \theta \leq \frac{\pi}{4}$$
となる点です.その理由は回転の基点が,EASTのFig.4(c)のLine angle$=\alpha$が$\frac{\pi}{4}$以上になると変わるからです.
- $0\leq \alpha \lt \frac{\pi}{4}$のとき
この場合は,下図のようにBottom-leftを基点に反時計回りに回転します.
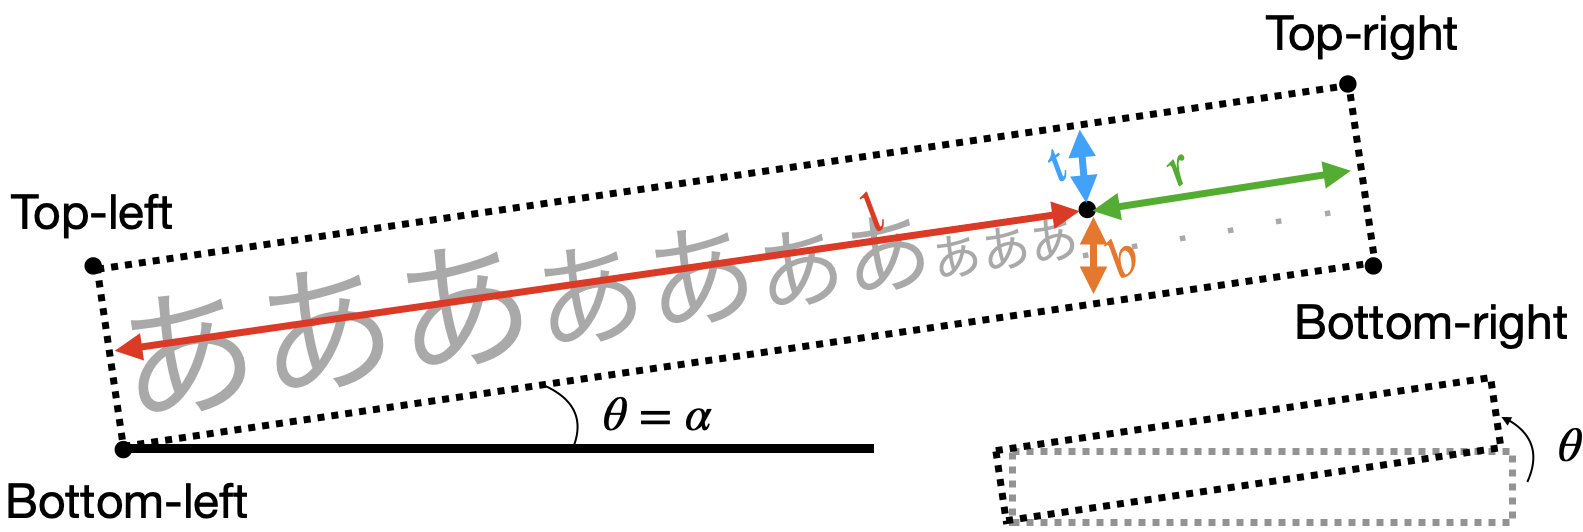
- $\frac{\pi}{4} \leq \alpha \lt \frac{\pi}{2}$のとき
この場合は,下図のようにBottom-rightを基点に時計回りに回転します.このとき,
\begin{align}
\alpha + \frac{\pi}{2} + \theta' &= \pi \\
\theta'&=\frac{\pi}{2}-\alpha
\end{align}
の関係があります.さらに,この回転角$\theta'$で時計回りに回転するので,
$$
\theta = -\theta'
$$
とすれば都合が良さそうです.
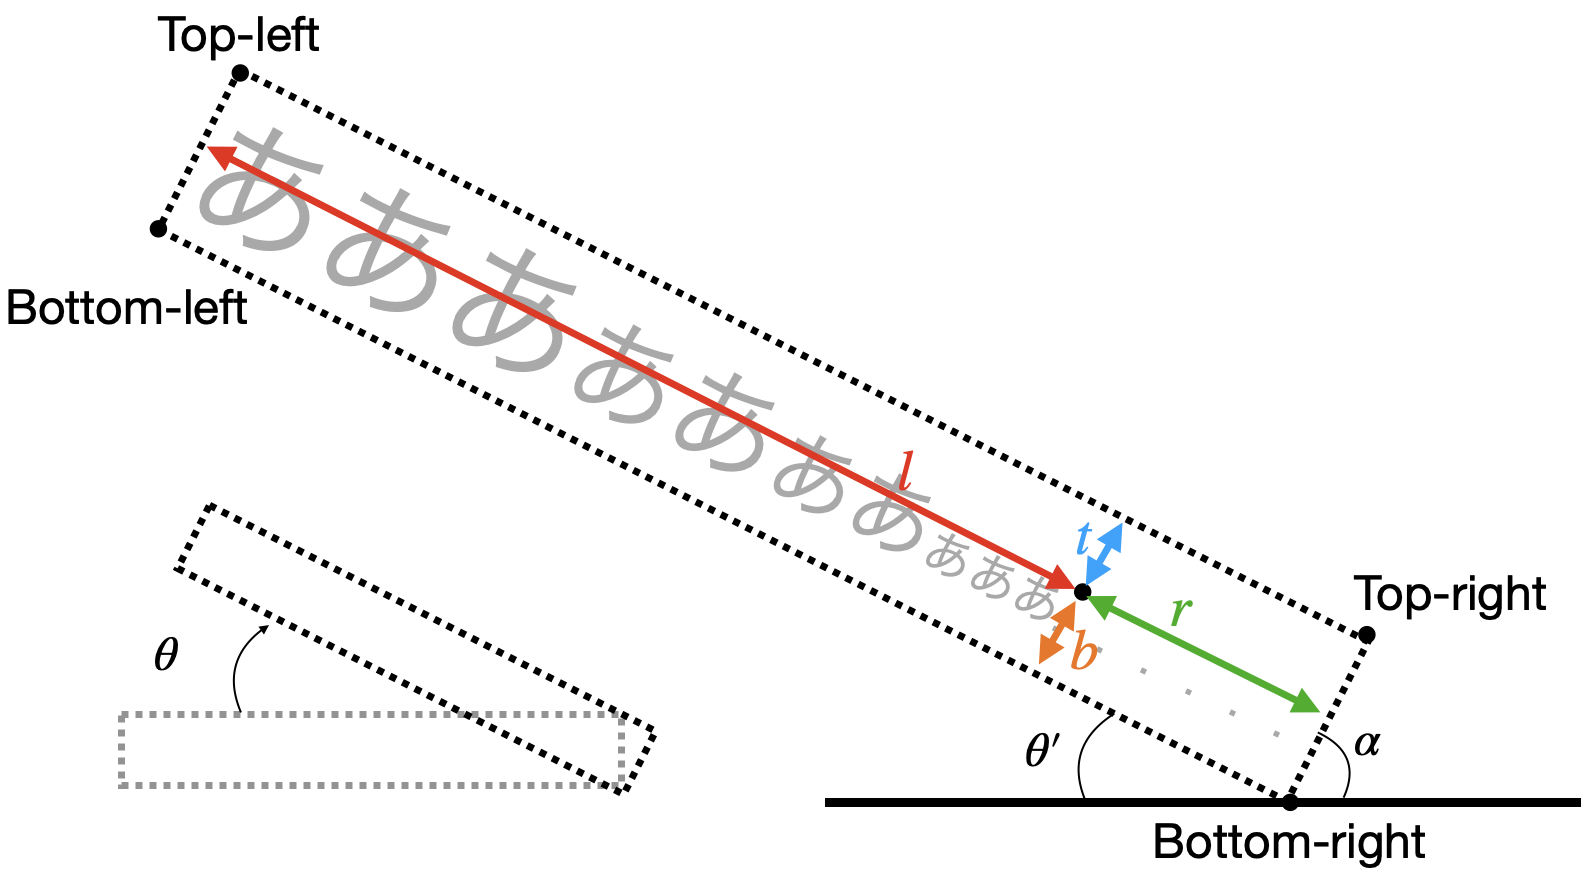
以上より,$-\frac{\pi}{4}\leq \theta \leq \frac{\pi}{4}$となります.
③:任意の四角形
任意の四角形なので,8つの情報からなります.一般的には,Top-left(左上)から時計回りに順に並べたものを用います(Clockwise order).つまり,
$$
quad=(x_{tl},y_{tl},x_{tr},y_{tr},x_{br},y_{br},x_{bl},y_{bl})
$$
こんな感じです.ちなみに,何をもってTop-leftとするかは,$\frac{\pi}{4}$付近では悩ましいところですが,愚直にx座標から順に並び替えたものとします.
def sort_clockwise_topleft_numpy(a):
    """
    Sort corners points (x1, y1, x2, y2, ... clockwise from topleft)
    :ref https://gist.github.com/flashlib/e8261539915426866ae910d55a3f9959
    :param a: Quads ndarray, shape is (box nums, 8=(x1,y1,x2,y2,...))
    :return a: Quads ndarray, shape is (box nums, 8=(x1,y1,x2,y2,... clockwise from topleft))
    """
    reshaped_a = a.reshape((-1, 4, 2))

    # sort the points based on their x-coordinates
    # shape = (box_nums, 4=points_nums, 1), the indices about 4 points
    x_ascend_indices = np.argsort(reshaped_a[..., 0:1], axis=1)
    # that's why take_along_axis's argument: axis is 1
    # shape = (box_nums, 4=(x_ascending), 2=(x,y))
    x_ascend = np.take_along_axis(reshaped_a, x_ascend_indices, axis=1)

    # grab the left-most and right-most points from the sorted
    # x-roodinate points
    # shape = (box_nums, 2, 2=(x,y))
    leftMost = x_ascend[:, :2]
    rightMost = x_ascend[:, 2:]

    # now, sort the left-most coordinates according to their
    # y-coordinates so we can grab the top-left and bottom-left
    # points, respectively
    # shape = (box_nums, 2=points_nums), the indices about 2 points
    leftMost_y_ascend_indices = np.argsort(leftMost[..., 1:2], axis=1)
    # shape = (box_nums, 2, 2=(x,y))
    leftMost_y_ascend = np.take_along_axis(leftMost, leftMost_y_ascend_indices, axis=1)
    # shape = (box_nums, 1, 2=(x,y))
    tl, bl = leftMost_y_ascend[:, 0:1], leftMost_y_ascend[:, 1:2]

    # if use Euclidean distance, it will run in error when the object
    # is trapezoid. So we should use the same simple y-coordinates order method.

    # now, sort the right-most coordinates according to their
    # y-coordinates so we can grab the top-right and bottom-right
    # points, respectively
    # shape = (box_nums, 2=points_nums), the indices about 2 points
    rightMost_y_ascend_indices = np.argsort(rightMost[..., 1:2], axis=1)
    # shape = (box_nums, 2, 2=(x,y))
    rightMost_y_ascend = np.take_along_axis(rightMost, rightMost_y_ascend_indices, axis=1)
    # shape = (box_nums, 1, 2=(x,y))
    tr, br = rightMost_y_ascend[:, 0:1], rightMost_y_ascend[:, 1:2]

    # return the coordinates in top-left, top-right,
    # bottom-right, and bottom-left order
    sorted_a = np.concatenate([tl, tr, br, bl], axis=1).reshape((-1, 8))

    return sorted_a
DataLoader
上記の情報を踏まえてgt.matを読み込むようにします.gt.matをそのまま読み込んでも良いのですが,2GB近いファイルのデータをメモリ内に常に持っておく・都度ファイルを読み込み該当の箇所を探すのはパフォーマンス上よろしくないと思ったので,まずはVOC Styleに倣って.xmlファイルに変換しました.VOC Styleについては前記事を参照してください.
VOC Styleへの変換
import os, logging, re, shutil, sys, csv
from scipy import io as sio
from lxml import etree
import cv2
import numpy as np

〜略〜

    """
    ref: http://www.robots.ox.ac.uk/~vgg/data/scenetext/readme.txt
    gts = dict;
        __header__: bytes
        __version__: str
        __globals__: list
        charBB: object ndarray, shape = (1, image num).
                Character level bounding box. shape = (2=(x,y), 4=(top left,...: clockwise), BBox word num)
        wordBB: object ndarray, shape = (1, image num).
                Word level bounding box. shape = (2=(x,y), 4=(top left,...: clockwise), BBox char num)
        imnames: object ndarray, shape = (1, image num, 1).
        txt: object ndarray, shape = (i, image num).
             Text. shape = (word num)
    """
    logging.info('Loading {} now.\nIt may take a while.'.format(gtpath))
    gts = sio.loadmat(gtpath)
    logging.info('Loaded\n'.format(gtpath))

    charBB = gts['charBB'][0]
    wordBB = gts['wordBB'][0]
    imnames = gts['imnames'][0]
    texts = gts['txt'][0]

    image_num = imnames.size

    for i, (cbb, wBB, imname, txts) in enumerate(zip(charBB, wordBB, imnames, texts)):
        imname = imname[0]
        try:
            xmlgenerator(annodir, imagedir, cbb, wBB, imname, txts, i=i, image_num=image_num, **kwargs)
        except _Skip:
            pass
def xmlgenerator(annodir, imagedir, cbb, wBB, imname, txts, **kwargs):
        imgpath = os.path.join(imagedir, imname)

        if not os.path.exists(imgpath):
            if not skip_missing:
                raise FileNotFoundError('{} was not found'.format(imgpath))
            else:
                logging.warning('Missing image: {}'.format(imgpath))
                raise _Skip()

        root = etree.Element('annotation')

        # folder
        folderET = etree.SubElement(root, 'folder')
        folder = os.path.dirname(imname)
        folderET.text = folder
        # filename
        filenameET = etree.SubElement(root, 'filename')
        filename = os.path.basename(imname)
        filenameET.text = filename

        # read image to get height, width, channel
        img = cv2.imread(imgpath)
        h, w, c = img.shape

        # size
        sizeET = etree.SubElement(root, 'size')

        # width
        widthET = etree.SubElement(sizeET, 'width')
        widthET.text = str(w)
        # height
        heightET = etree.SubElement(sizeET, 'height')
        heightET.text = str(h)
        # depth
        depthET = etree.SubElement(sizeET, 'depth')
        depthET.text = str(c)

        # convert txts to list of str
        # I don't know why texts is
        # ['Lines:\nI lost\nKevin ', 'will                ', 'line\nand            ',
        # 'and\nthe             ', '(and                ', 'the\nout             ',
        # 'you                 ', "don't\n pkg          "]
        # there is strange blank and the length of txts is different from the one of wBB
        txts = ' '.join(txts.tolist()).split()
        text_num = len(txts)

        if wBB.ndim == 2:
            # convert shape=(2, 4,) to (2, 4, 1)
            wBB = np.expand_dims(wBB, 2)

        assert text_num == wBB.shape[2], 'The length of text and wordBB must be same, but got {} and {}'.format(
            text_num, wBB.shape[2])
        for b in range(text_num):
            # object
            objectET = etree.SubElement(root, 'object')

            # difficult
            difficultET = etree.SubElement(objectET, 'difficult')
            difficultET.text = '0'
            # content
            contentET = etree.SubElement(objectET, 'content')
            contentET.text = '###'
            # name
            nameET = etree.SubElement(objectET, 'name')
            nameET.text = txts[b]
            # bndbox
            bndboxET = etree.SubElement(objectET, 'bndbox')

            # quad
            for q in range(4):
                xET = etree.SubElement(bndboxET, 'x{}'.format(q + 1))
                xET.text = str(wBB[0, q, b])
                yET = etree.SubElement(bndboxET, 'y{}'.format(q + 1))
                yET.text = str(wBB[1, q, b])

            # corner
            xminET = etree.SubElement(bndboxET, 'xmin')
            xminET.text = str(np.min(wBB[0, :, b]))
            yminET = etree.SubElement(bndboxET, 'ymin')
            yminET.text = str(np.min(wBB[1, :, b]))
            xmaxET = etree.SubElement(bndboxET, 'xmax')
            xmaxET.text = str(np.max(wBB[0, :, b]))
            ymaxET = etree.SubElement(bndboxET, 'ymax')
            ymaxET.text = str(np.max(wBB[1, :, b]))

        xmlstr = etree.tostring(root, pretty_print=True, encoding=encoding)
        dstpath = os.path.join(annodir, folder, os.path.splitext(filename)[0] + '.xml')

        if not os.path.isdir(os.path.dirname(dstpath)):
            os.mkdir(os.path.dirname(dstpath))

        with open(dstpath, 'wb') as f:
            f.write(xmlstr)
変換後のxmlファイル
変換後のxmlファイルは以下のようになります.
<annotation>
  <folder>2</folder>
  <filename>ant+hill_4_1.jpg</filename>
  <size>
    <width>399</width>
    <height>600</height>
    <depth>3</depth>
  </size>
  <object>
    <difficult>0</difficult>
    <content>###</content>
    <name>for</name>
    <bndbox>
      <x1>135.05939</x1>
      <y1>496.16888</y1>
      <x2>191.08377</x2>
      <y2>466.50043</y2>
      <x3>205.24796</x3>
      <y3>493.2473</y3>
      <x4>149.22357</x4>
      <y4>522.9158</y4>
      <xmin>135.05939</xmin>
      <ymin>466.50043</ymin>
      <xmax>205.24796</xmax>
      <ymax>522.9158</ymax>
    </bndbox>
  </object>
  <object>
    <difficult>0</difficult>
    <content>###</content>
    <name>you</name>
    <bndbox>
      <x1>200.12704</x1>
      <y1>268.45435</y1>
      <x2>238.80331</x2>
 〜略〜
</annotation>
重要なのは,以下です.
-
<filename>- このアノテーションデータが対応する.jpegファイル
-
<object>-
<name>- ラベル名
-
<truncated>- 物体が全体が写っている(0)か,部分的に写っている(1)かどうか.
-
<difficult>- 難しい(1)かそうでない(0)か→基本0です
-
<bndbox>- バウンディングボックス(物体の位置).
-
<x1>,<y1><x2>,<y2>,...は③任意の長方形のquad表記 -
<xmin>,<ymin><xmax>,<ymax>は①回転なしの長方形のcorners表記
-
Augmentation
Augmentationには以下のステップをランダムで行います.今回は例として,以下の画像を用います.
- 画像の縦横の長い方を640〜2560にランダムリサイズ

実装では,バウンディングボックスの座標値は,$x$は幅$w$で,$y$は高さ$h$で正規化されているので,画像の処理のみで良いです.
\begin{align}
bbox^{prev} &= (x_{min},y_{min},x_{max},y_{max}) \\
bbox_n^{prev} &= (\frac{x_{min}}{w}=x'_{min},\frac{y_{min}}{h}=y'_{min},\frac{x_{max}}{w}=x'_{max},\frac{y_{max}}{h}=y'_{max}) \\
bbox^{new} &= (x'_{min}\cdot w_{new},y'_{min}\cdot h_{new},x'_{max}\cdot w_{new},y'_{max}\cdot h_{new})
\end{align}
class RandomLongerResize(object):
    def __init__(self, smin, smax, p=0.5):
        self.smin = smin
        self.smax = smax
        self.p = p

    def __call__(self, img, *targets):
        if decision(self.p):
            h, w, _ = img.shape

            new_size = random.randint(self.smin, self.smax+1)
            if h > w:
                img = cv2.resize(img, (w, new_size))
            else:
                img = cv2.resize(img, (new_size, h))

        return img, (*targets,)
- $[-10°,10°]$のランダム回転
Affine変換(完全に理解するアフィン変換)を使っています.Affine変換めちゃくちゃ便利ですね.昔は知らずに1からごりごり書いていました...無知って怖いですね.また,回転によりquad表記の並びがtopleftでなくなる可能性があるので,先述のsort_clockwise_topleft_numpyを入れてあげることに注意します.
def decision(p=0.5):
    val = np.random.choice(2, 1, p=[1-p, p])[0]
    return val == 1
def pts2homogeneousPts_numpy(pts):
    """
    :param pts: ndarray, shape = (points set num, points num, 2)
    :return pts_homogeneous: ndarray, shape = (points set num, 3=(x,y,1), points num)
    """
    assert pts.shape[-1] == 2, "must be 2d-points"
    assert pts.ndim == 3, "must have 3d"

    set_num, points_num = pts.shape[:2]
    return np.concatenate((np.swapaxes(pts.reshape((set_num, points_num, 2)), -2, -1),
                           np.ones((set_num, 1, points_num))), axis=1)

def apply_affine(affine, src_size, dst_size, *pts):
    """
    :param affine: ndarray, shape = (2, 3)
    :param src_size: tuple = (w, h)
    :param dst_size: tuple = (w, h)
    :param pts: tuple of ndarray, shape = (points set num, points num, 2)
    :return pts_affined: tuple of ndarray, shape = (points set num, points num, 2=(x,y))
    """
    assert len(pts) > 0, "must contain more than one source points"
    R = np.concatenate((affine, np.array([[0, 0, 1]])), axis=0)
    ret_pts = []
    for _pts in pts:
        # _pts: shape = (points set num, points num, 2)
        # reconstruct original coordinates
        _pts[..., 0] *= src_size[0]
        _pts[..., 1] *= src_size[1]

        # shape = (points set num, 3=(x,y,1), points num)
        pts_hom = pts2homogeneousPts_numpy(_pts)
        affined_pts = R @ pts_hom
        # shape = (points set num, points num, 2=(x,y))
        affined_pts = np.swapaxes(affined_pts[..., :2, :], -2, -1).astype(np.float32)

        # to percent
        affined_pts[..., 0] /= dst_size[0]
        affined_pts[..., 1] /= dst_size[1]
        ret_pts += [affined_pts]

    if len(pts) >= 2:
        return tuple(ret_pts)
    else:
        return ret_pts[0]

class RandomRotate(object):
    def __init__(self, fill_rgb=(103.939, 116.779, 123.68), center=(0, 0), amin=-10, amax=10, same=True, p=0.5):
        """
        Rotate randomly
        :param fill_rgb: array-like
        :param center: array-like
        :param amin: int or float
        :param amax: int or float
        :param same: Bool, rotated image to return will be same as original size if True, otherwise, rotated one will be expanded
        :param p: float or int
        """
        self.fill_rgb = fill_rgb
        self.center = center
        self.amin = amin
        self.amax = amax
        self.same = same
        self.p = p

    def __call__(self, img, labels, bboxes, flags, quads, texts):
        """
        :param img: ndarray
        :param bboxes: ndarray, shape = (box num, 4=(xmin, ymin, xmax, ymax))
        :param labels: ndarray, shape = (box num, class num)
        :param flags: list of dict, whose length is box num
        :param quads: ndarray, shape = (box num, 8=(top-left(x,y),... clockwise))
        :param texts: list of str, whose length is box num
        :return:
        """
        if decision(self.p):
            h, w, _ = img.shape

            box_nums = bboxes.shape[0]

            angle = random.uniform(self.amin, self.amax)

            # calculate new height and width
            radian = np.radians(angle)

            # consider rotated rectangle
            sine = np.abs(np.sin(radian))
            cosine = np.abs(np.cos(radian))

            tri_mat = np.array([[cosine, sine], [sine, cosine]], np.float32)
            original_img_size = np.array([w, h], np.float32)
            rotated_img_size = np.ravel(tri_mat @ original_img_size.reshape(-1, 1))

            affine = cv2.getRotationMatrix2D((w / 2.0, h / 2.0), angle, 1.0)
            # move
            affine[:2, 2] += (rotated_img_size - original_img_size) / 2.0

            if self.same:
                # resize
                affine[:2, :] *= (original_img_size / rotated_img_size).reshape(-1, 1)
                new_w, new_h = w, h
            else:
                new_w, new_h = rotated_img_size[0], rotated_img_size[1]

            img = cv2.warpAffine(img, affine, (new_w, new_h), borderValue=self.fill_rgb)

            # shape = (box nums, 4, 2=(x,y))
            affined_quads = apply_affine(affine, (w, h), (new_w, new_h), quads.reshape(-1, 4, 2))

            quads = sort_clockwise_topleft_numpy(affined_quads.reshape(box_nums, 8))

            # xmin and ymin
            bboxes[:, 0] = quads[:, ::2].min(axis=-1)
            bboxes[:, 1] = quads[:, 1::2].min(axis=-1)
            # xmax and ymax
            bboxes[:, 2] = quads[:, ::2].max(axis=-1)
            bboxes[:, 3] = quads[:, 1::2].max(axis=-1)

        return img, (labels, bboxes, flags, quads, texts)
- 高さを0.8~1.2倍にスケーリング(比率は保持)
ランダムリサイズとほぼ同じ処理です.画像は省略.
- 640x640のランダムクロップ
現論文では,640x640にランダムクロップすると記述がありますが,実装では少し違う処理をします.その理由は恐らく,画像のサイズが640x640以下の可能性もあるからだと思います.
なので,
- ボックスと被らないx,y座標をランダムに2つずつ選ぶ
- 元の画像サイズの0.1倍以下(小さすぎる)場合は,やり直す
- 選ばれた座標値でクロップ
1のボックスと被らないようにするには,以下のようにx,y軸のFlagを用意してあげて,候補点からランダムに2点選んで,クロップします.ポイントは,余分にpad_w,pad_hを用意してあげることでいつかは必ず成功するようにしている点です.
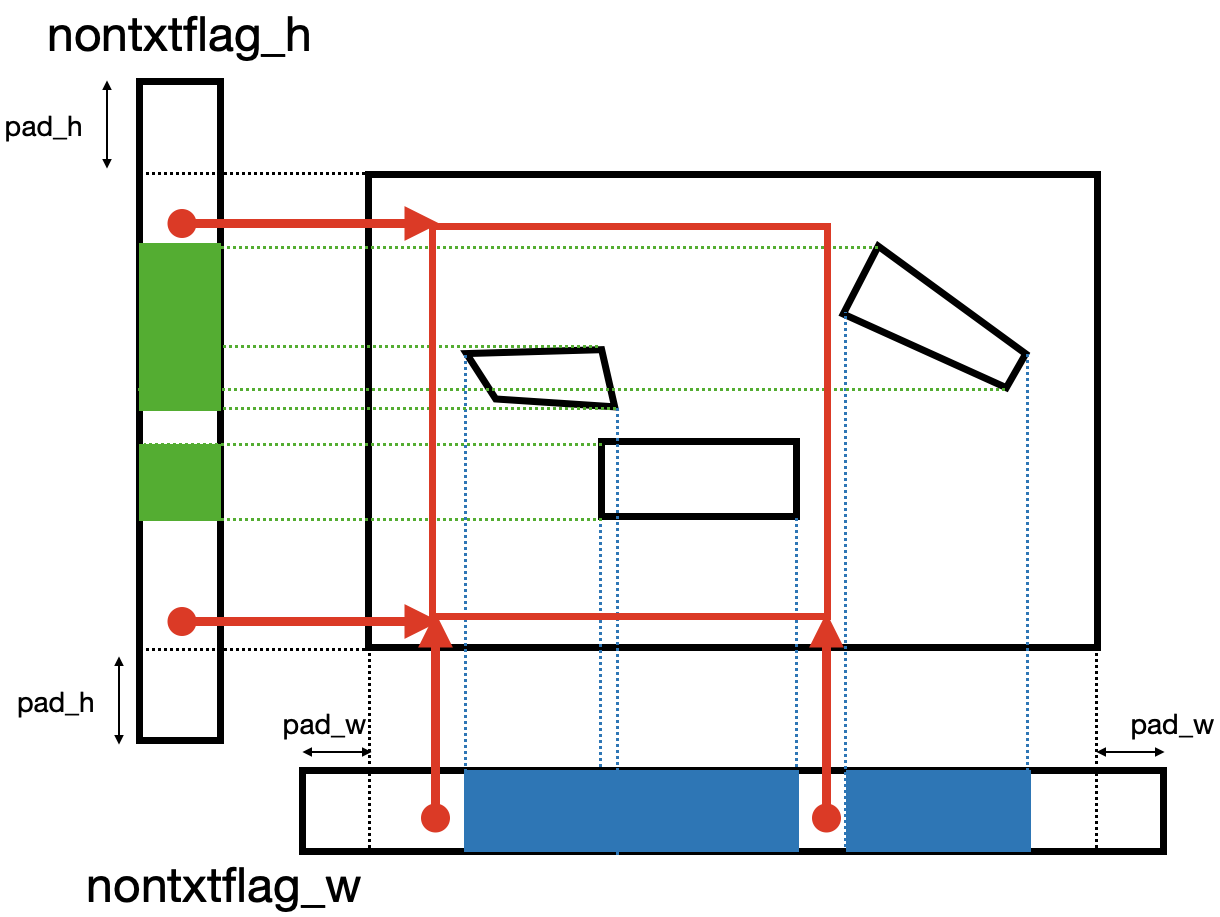
※これもAffineで書けば良かったのですが,当時は知らなかったのでごりごり計算しています...(無知って怖い.(2度目))
こちらも先述のsort_clockwise_topleft_numpyを入れています.位置関係は変わらないので本当は不必要ですが, 実装の都合上(clipの処理のせい?)入れています.
class RandomSimpleCropPatch(_SampledPatchOp):
    def __init__(self, thres_ratio=0.1, padding=None):
        """
        :param thres_ratio: int or float
        :param padding: None or int, this argument means cropping entirely. when this argument is big, cropping entirely is done more easily.
                        padding values are quotient by 10 of h and w respectively if it's None.
        """
        self.thres_ratio = _check_ins('thres_ratio', thres_ratio, (int, float))
        self.padding = _check_ins('padding', padding, int, allow_none=True)

    def __call__(self, img, labels, bboxes, flags, quads, texts):
        h, w, _ = img.shape

        ret_bboxes = bboxes.copy()
        ret_quads = quads.copy()
        ret_flags = np.array(flags)  # convert list to ndarray to mask
        ret_texts = np.array(texts)  # convert list to ndarray to mask

        mask = quads2allmask_numpy(quads, w, h)

        # reconstruct bboxes and quads
        ret_bboxes[:, ::2] *= w
        ret_bboxes[:, 1::2] *= h
        ret_quads[:, ::2] *= w
        ret_quads[:, 1::2] *= h

        # text flag, whose true means non-text flag
        nontxtflag_h = np.logical_not(np.any(mask, axis=1))  # shape = (h,)
        nontxtflag_w = np.logical_not(np.any(mask, axis=0))  # shape = (w,)

        # insert flag for cropping entirely
        if self.padding:
            pad_w, pad_h = self.padding, self.padding
        else:
            pad_w, pad_h = w // 10, h // 10
        nontxtflag_h = np.insert(nontxtflag_h, h, [True] * pad_h)
        nontxtflag_h = np.insert(nontxtflag_h, 0, [True] * pad_h)  # shape = (h+2*pad_h,)
        nontxtflag_w = np.insert(nontxtflag_w, w, [True] * pad_w)
        nontxtflag_w = np.insert(nontxtflag_w, 0, [True] * pad_w)  # shape = (w+2*pad_w,)

        # search non-text coordinates
        nontxt_h_inds = np.where(nontxtflag_h)[0]
        nontxt_w_inds = np.where(nontxtflag_w)[0]

        # select 2 coordinates randomly
        # note that -pad_[h or w] means revert correct coordinates of boxes(quads) for inserting flag previously
        selected_x = random.choice(nontxt_w_inds, size=2) - pad_w
        selected_y = random.choice(nontxt_h_inds, size=2) - pad_h

        selected_x = np.clip(selected_x, 0, w)
        selected_y = np.clip(selected_y, 0, h)

        cropped_xmin, cropped_ymin, cropped_xmax, cropped_ymax = selected_x.min(), selected_y.min(), selected_x.max(), selected_y.max()
        new_w, new_h = cropped_xmax - cropped_xmin, cropped_ymax - cropped_ymin
        if new_w < self.thres_ratio * w or new_h < self.thres_ratio * h:
            # too small
            raise _SampledPatchOp.UnSatisfy

        # avoid tiny error
        ret_bboxes[:, ::2] = np.clip(ret_bboxes[:, ::2], 0, w)
        ret_bboxes[:, 1::2] = np.clip(ret_bboxes[:, 1::2], 0, h)

        # move and convert to percent
        ret_bboxes[:, ::2] = (ret_bboxes[:, ::2] - cropped_xmin)/new_w
        ret_bboxes[:, 1::2] = (ret_bboxes[:, 1::2] - cropped_ymin)/new_h
        ret_quads[:, ::2] = (ret_quads[:, ::2] - cropped_xmin)/new_w
        ret_quads[:, 1::2] = (ret_quads[:, 1::2] - cropped_ymin)/new_h

        ret_bboxes = np.clip(ret_bboxes, 0, 1)
        ret_quads = np.clip(ret_quads, 0, 1)

        # sort to avoid passing invalid quads such like
        # [[  0.   0.]
        #  [  1.   1.]
        #  [  0.   0.]
        #  [  1.   1.]]
        ret_quads = sort_clockwise_topleft_numpy(ret_quads)

        # count up boxes outside(invalid) cropped box
        # outside(invalid) box is satisfied following;
        # (x) tl_x == tr_x or br_x == bl_x or
        # (y) tl_y == bl_y or tr_y == br_y
        insidebox_inds = (ret_quads[:, 0] == ret_quads[:, 2]) | (ret_quads[:, 4] == ret_quads[:, 6]) | \
                         (ret_quads[:, 1] == ret_quads[:, 7]) | (ret_quads[:, 3] == ret_quads[:, 5])
        # convert to inside ones
        insidebox_inds = np.logical_not(insidebox_inds)

        if insidebox_inds.sum() == 0:
            raise _SampledPatchOp.UnSatisfy

        img = img[cropped_ymin:cropped_ymax, cropped_xmin:cropped_xmax]

        # cut off boxes outside cropped box
        ret_bboxes = ret_bboxes[insidebox_inds]
        ret_labels = labels[insidebox_inds]
        ret_quads = ret_quads[insidebox_inds]
        ret_flags = ret_flags[insidebox_inds]
        ret_texts = ret_texts[insidebox_inds]

        return img, (ret_labels, ret_bboxes, ret_flags.tolist(), ret_quads, ret_texts.tolist())
モデル
概要
モデルを再掲すると,以下の図のようになっています.図からわかるように,FOTSは
- Feature Extraction
- Detection Branch
- Roi Rotate
- Recognition Branch
の4段構成になっていることが分かります.
これらの4段構成から予測するものは,
- BBoxes
- バウンディングボックスです.
- 先述のrboxを予測します.
- Texts
- 上述のバウンディングボックスの文字です.
- 68種類(
a-z+0-9+}&|%_(],$^{+?#@/-`).<=;~['>:\!"*)+Blank(空文字)のクラスを予測します.
の2つです.この2つを予測するために4段構成がどのような処理を行うのかを,順を追って説明していきたいと思います.
Feature Extraction
入力画像から,文字の特徴を抽出します.このFeature Extractionでは,ResNetとDeconvを使って,文字らしさをPixel毎に予測します.つまり,特徴マップを生成すると言っても良いかもしれません.出力サイズは入力画像の$\frac{1}{4}$となります.
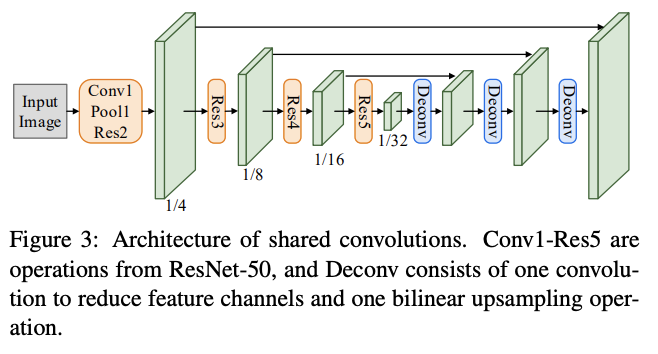
注意点は,Figure3のキャプションにも書いてあるように,Deconvは1つのConv層でChannelsを調整し,Bilinear upsamplingで特徴マップを大きくしている点と,Deconvの後のサイズと同じResNetのサイズの特徴を結合している(Shareしている)点です.
実装は本記事では省略します.ここを参照してください(Deconvで1x1Conv+3x3Convの後にBilinearをかけています.).
Detection
Feature Extractionで得た特徴マップに3つの1x1のConvolution+Sigmoidをかけることで,各Pixel毎に
- 信頼度$p$
- バウンディングボックス(rbox)
- 各Pixelからの上辺・右辺・下辺・左辺への距離$\mathbf{d} =(t,r,b,l)$
- その角度$\theta$
を予測します.
実装はこんな感じです.各値の範囲が,
\begin{align}
0&\leq p \leq 1 \\
(0,0,0,0)&\leq (t,r,b,l) \leq (\frac{h}{4},\frac{w}{4},\frac{h}{4},\frac{w}{4}) \\
-\frac{\pi}{4}&\leq \theta \leq \frac{\pi}{4}
\end{align}
となる点に注意しています.
class Detector(DetectorBase):
    def __init__(self, in_channels, dist_scale=512):
        super().__init__()
        self.in_channels = in_channels
        self.dist_scale = dist_scale

        self.conf_layer = nn.Conv2d(in_channels, 1, kernel_size=(1, 1))
        self.distances_layer = nn.Conv2d(in_channels, 4, kernel_size=(1, 1))
        self.angle_layer = nn.Conv2d(in_channels, 1, kernel_size=(1, 1))

    def forward(self, features):
        """
        :param features: feature Tensor from shared conv, shape = (b, in_channels, h/4, w/4)
        :returns:
            pred_confs: confidence Tensor, shape = (b, h/4, w/4, 1)
            pred_rboxes: predicted Tensor, shape = (b, h/4, w/4, 5=(conf, t, r, b, l, angle))
                distances: distances Tensor, shape = (b, h/4, w/4, 4=(t, r, b, l)) for each pixel to target rectangle boundaries
                angle: angle Tensor, shape = (b, h/4, w/4, 1)
        """
        # shape = (b, 1, h/4, w/4)
        conf = self.conf_layer(features)
        conf = torch.sigmoid(conf)

        # shape = (b, 4=(t, r, b, l), h/4, w/4)
        distances = self.distances_layer(features)
        distances = torch.sigmoid(distances) * self.dist_scale

        # shape = (b, 1, h/4, w/4)
        angle = self.angle_layer(features)
        # angle range is (-pi/4, pi/4)
        angle = (torch.sigmoid(angle) - 0.5) * math.pi / 2

        return conf.permute((0, 2, 3, 1)).contiguous(), torch.cat((distances, angle), dim=1).permute((0, 2, 3, 1)).contiguous()
Roi Rotate
概要
何をやっているかは,以下の図のようなことをやっています.やっていることは同じなのですが,学習時と予測時で使うデータが変わってきます.
- 学習時
- 学習データ(quad表記)を用います.
- 予測時
- Detection Branchでpixel毎に予測したバウンディングボックス(rbox表記)を用います.
- rbox表記(回転ありの長方形)をquad表記に一度直します.
- 学習・予測共通
- quad表記からそれを囲む最小の長方形を導出します.
- そして,①その長方形の左上を原点に移動し,②比率を維持しながら高さ8の画像に変換し,③回転成分を取り除き,④該当部分を取り出します.
ただし,キャプションにも書いてあるように入力画像に対してではなく,Detection Branchで得た入力画像の$\frac{1}{4}$サイズの特徴マップに対してこの処理を行います.
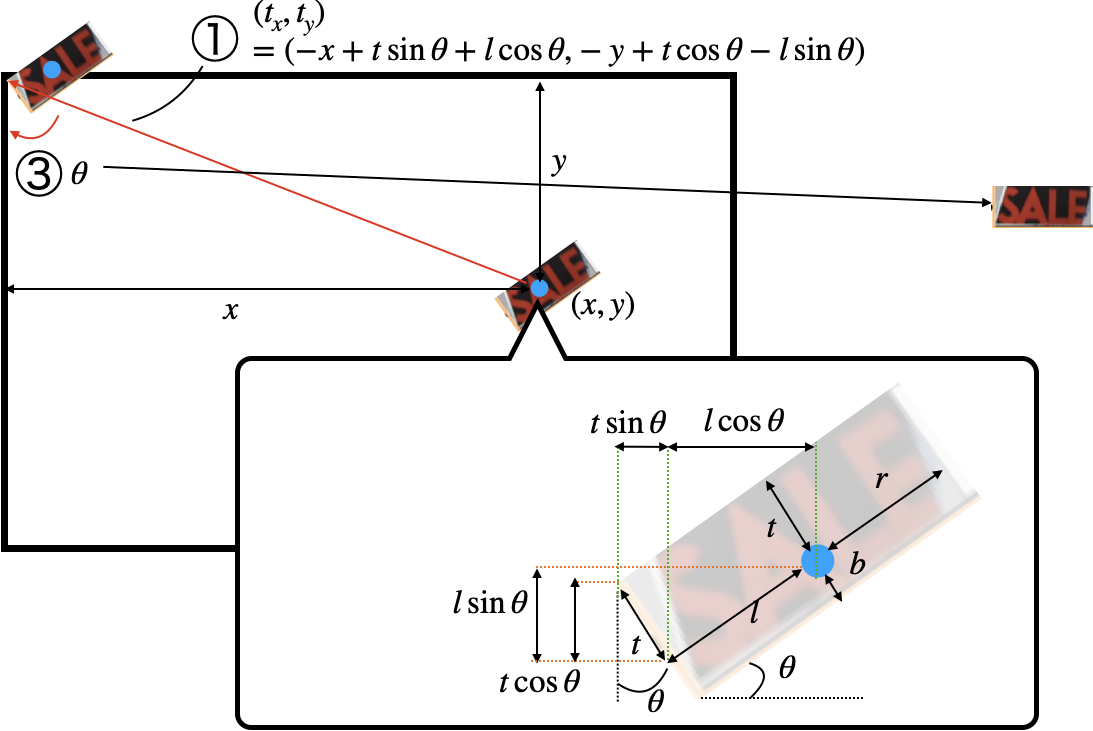
Affine変換
上記①〜④の処理にはAffine変換を使います.Affine変換についての詳しくは「完全に理解するアフィン変換」を参照してください.ちなみに実装では,こんなことを深く考える必要はありません!
- ①長方形の左上を原点に平行移動
上図の通りの式$(t_x,t_y)=(-x+t\sin{\theta}+l\cos{\theta}, -y+t\cos{\theta}-l\sin{\theta})$で平行移動します.平行移動のアフィン変換は,
A_{move} = \left(
      \begin{matrix}
        1 & 0 & t_x \\
        0 & 1 & t_y \\
        0 & 0 & 1
      \end{matrix}
    \right)
なので,これに代入すればOKです.
※現論文と違う式です.こっちが正しいと思いますが,自信はありません...
- ②比率を維持しながら高さ8の画像に変換
$h_t=8$とすると,比率$s=\frac{h_t}{t+b}$なので,スケールを変えるアフィン変換
A_{scale} = \left(
      \begin{matrix}
        1 & 0 & s_x \\
        0 & 1 & s_y \\
        0 & 0 & 1
      \end{matrix}
    \right)
に代入すればOKです.
- ③回転成分を取り除き=回転する
回転のアフィン変換を使えばOKです.画像座標系は下向きが正なので,マイナスの位置に注意してください.
A_{rotate} = \left(
      \begin{matrix}
        \cos{\theta} & \sin{\theta} & 0 \\
        -\sin{\theta} & \cos{\theta} & 0 \\
        0 & 0 & 1
      \end{matrix}
    \right)
- ④該当部分を取り出し
特にありません.
以上のアフィン変換は,行列の積で合成することができるので,
$$
M = A_{rotate}A_{scale}A_{move}
$$
を作用させ,該当するサイズで取り出してあげれば,所望の画像が得られます.
実装については,ここを参照してください.
ちなみに,opencvとpytorchには与える行列の形式(OpenCVは実際の画像サイズから得た行列,Pytorchは-1から1に正規化された座標系で得た行列)が違うので,その変換をする必要があります.
$M',x_1',y_1',x_2',y_2'$をPytorch形式の行列,座標,$M,x_1,y_1,x_2,y_2$をOpenCV形式の行列,座標とします.求めたいのは,以下の$M'$です.
\begin{pmatrix}
    x_2' \\
    y_2' \\
    1
\end{pmatrix}
= M'
\begin{pmatrix}
    x_1' \\
    y_1' \\
    1
\end{pmatrix},
\begin{pmatrix}
    x_2 \\
    y_2 \\
    1
\end{pmatrix}
= M
\begin{pmatrix}
    x_1 \\
    y_1 \\
    1
\end{pmatrix}\tag{1}
また,$x_1',y_1',x_2',y_2'$と$x_1,y_1,x_2,y_2$には,
\begin{align}
x_n' &= \frac{x_n-\frac{w}{2}}{\frac{w}{2}} &= \frac{2x_n}{w}-1 \\
y_n' &= \frac{y_n-\frac{h}{2}}{\frac{h}{2}} &= \frac{2y_n}{h}-1
\end{align}
なので,行列で表すと,
\begin{pmatrix}
    x_n' \\
    y_n' \\
    1
\end{pmatrix}
=\left(
      \begin{matrix}
        \frac{2}{w} & 0 & -1 \\
        0 & \frac{2}{h} & -1 \\
        0 & 0 & 1
      \end{matrix}
    \right)
\begin{pmatrix}
    x_n \\
    y_n \\
    1
\end{pmatrix}
=A^{norm}
\begin{pmatrix}
    x_n \\
    y_n \\
    1
\end{pmatrix}
の関係が成り立ちます.したがって(1)式を用いて,
\begin{align}
A_{norm}
\begin{pmatrix}
    x_2 \\
    y_2 \\
    1
\end{pmatrix}
&=M'A_{norm}
\begin{pmatrix}
    x_1 \\
    y_1 \\
    1
\end{pmatrix} \\

\begin{pmatrix}
    x_2 \\
    y_2 \\
    1
\end{pmatrix}
&=A_{norm}^{-1}M'A_{norm}
\begin{pmatrix}
    x_1 \\
    y_1 \\
    1
\end{pmatrix} \\

M &= A_{norm}^{-1}M'A_{norm} \\
M' &= A_{norm}MA_{norm}^{-1}
\end{align}
$M'$を得ることができます.実装では,$M$ではなく$M^{-1}$である必要があるらしいです(参考).なぜかよくわかっていないので,どなたかわかる方ご教示ください...
def _affine2theta(M, w, h, device):
    # convert affine_matrix into theta
    # formula is;
    # (x'_s, y'_s) = ((x_s - w/2)/(w/2), (y_s - h/2)/(h/2)) # to normalize
    #              = (x_s/(w/2)-1, y_s/(h/2))
    # where (x'_s, y'_s) is normalized source points
    # Therefore, affine matrix is;
    # M' = ( 2/w_d,     0,   -1)^-1        ( 2/w_s,     0,   -1)
    #      (     0, 2/h_d,   -1)    * M *  (     0, 2/h_s,   -1)
    #      (     0,     0,    1)           (     0,     0,    1)

    """
    M = np.vstack([M, [0, 0, 1]])
    M = np.linalg.inv(M)
    theta00 = M[0, 0]
    theta01 = M[0, 1]*h/w
    theta02 = M[0, 2]*2/w + theta00 + theta01 - 1
    theta10 = M[1, 0]*w/h
    theta11 = M[1, 1]
    theta12 = M[1, 2]*2/h + theta10 + theta11 - 1
    return torch.tensor(((theta00, theta01, theta02),
                         (theta10, theta11, theta12)), device=device)
    """
    def norm_mat(W, H):
        return np.array(((2.0/W,     0,   -1),
                         (    0, 2.0/H,   -1),
                         (    0,     0,    1)))

    M = np.vstack([M, [0, 0, 1]])
    M = np.linalg.inv(M)

    theta = norm_mat(w, h) @ M @ np.linalg.inv(norm_mat(w, h))
    return torch.from_numpy(theta[:2, :]).to(dtype=torch.float, device=device)
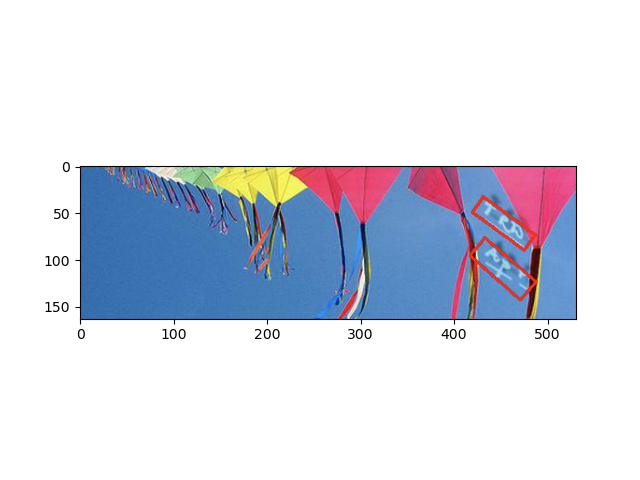
先述の通り,実際には特徴マップに対してですが,入力画像に対してこのRoi Rotateを作用させるとこんな感じになります.
- 元画像
- 変換後
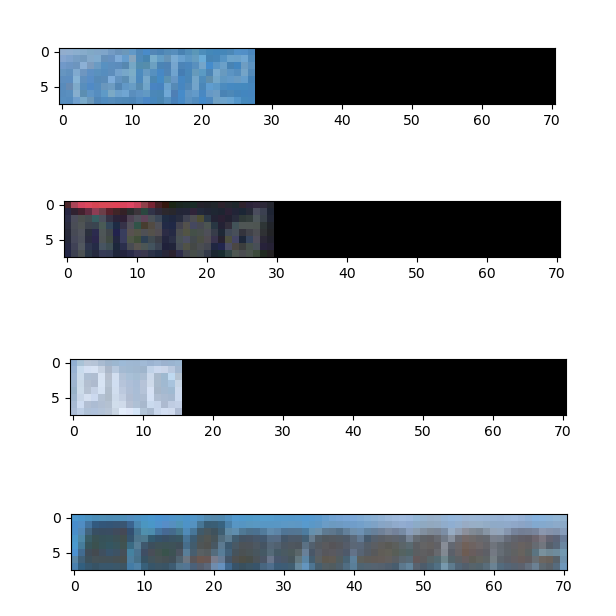
いい感じですね!横幅は最長のReferences:に合わせていて,余剰分はゼロ埋めしています.(rgb=(103.939, 116.779, 123.68)で埋めても良いかなあとも思っています.
Recognition
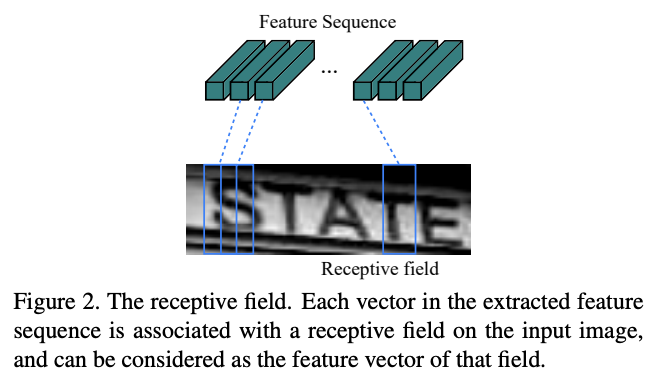
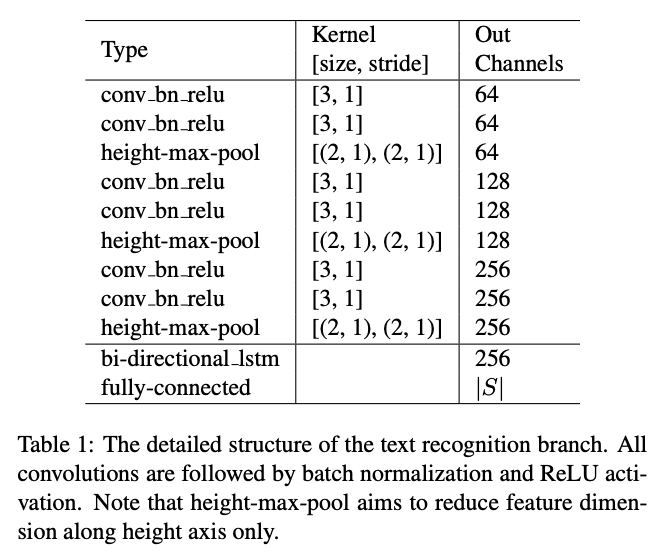
特徴マップからRoi Rotateで該当するバウンディングボックス部分を抽出したものをCRNNに入力し,その文字が何かを予測します.CRNNが何をしているかは,現論文のFigure 1と2が分かりやすいと思います.まず,入力画像をConvolutional Layersで一定区間ごとの特徴を抽出します(Figure 2).次に,その一定区間毎の特徴をSequenceとしてRecurrent Layers(Bidirectional LSTM)で文字を予測します.そして,予測された文字には空白と重複があるので,それを覗く処理をTranscription Layerで行い最終的にその画像の文字列を予測するという流れになっています.
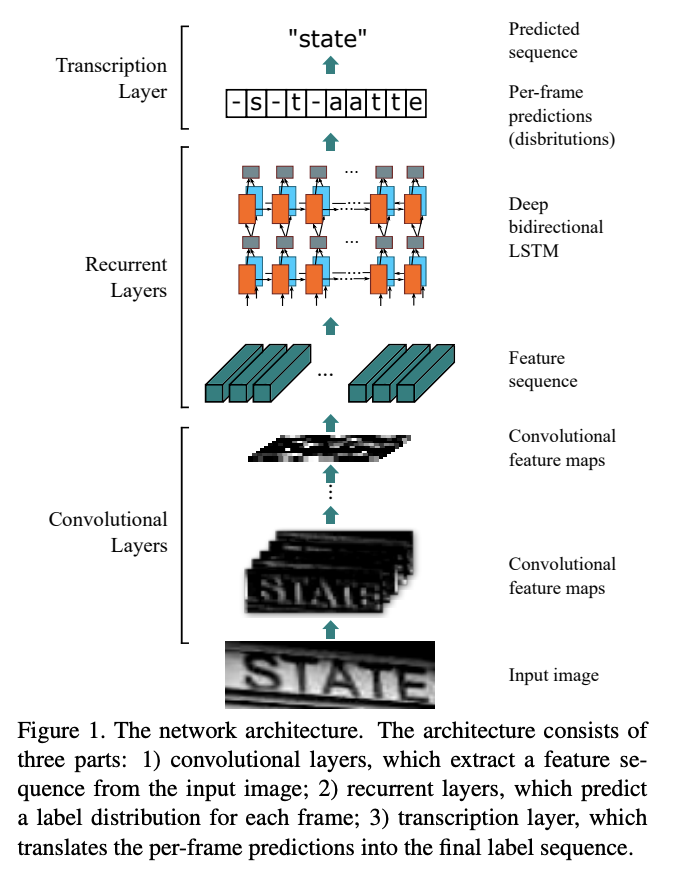
FOTSでは,画像ではなく,Feature Extraction→Detection→Roi Rotateを通した特徴マップを入力とします.なので,特徴マップで得た文字らしさの特徴をConvolutiona Layersでをさらに洗練させて,Recurrent・Transcriptionに投げるみたいなイメージだと思います.具体的なCRNNの構造は以下のようになっています.
Transcription Layerについては,空白と重複を除去すると書きましたが,具体的にはこんな感じです.(-は空白を意味します)
- 予測されたRaw文字列
--hh-e-l-ll-oo--
- 変換後の最終出力となる文字列
hello
つまり,
- 空白までの同一の文字は一つにまとめる
- 空白を除く
という処理を行っています.具体的な実装はこんな感じです.
    def decoder(self, predicts):
        """
        :param predicts: Tensor, shape = (times, b, class_nums)
        :return:
            raw_strings: list of str, raw strings
            decoded_strings: list of str, decoded strings
        """
        _, inds = predicts.max(dim=2)
        # inds' shape = (b, times)
        inds = inds.permute((1, 0)).contiguous().cpu().tolist()
        batch_num = len(inds)

        raw_strings = []
        decoded_strings = []
        for b in range(batch_num):
            # convert raw string
            raw = ''.join(self.class_labels[ind] for ind in inds[b])
            # re.sub(r'(.)\1{1,}', r'\1', 'bbb---bbas00aacc')
            # b-bas0ac

            # gather multiple characters
            decoded = re.sub(r'(.)\1{1,}', r'\1', raw)
            # remove blank
            decoded = str(decoded).replace(self.blank, '')

            raw_strings += [raw]
            decoded_strings += [decoded]

        return raw_strings, decoded_strings
学習
モデルの構造が分かったので,いよいよ学習です.FOTSはText Spottingな手法ですので,End-to-endで学習が可能です.
予測するものの再整理
念のため,FOTSが最終的に予測するものをまとめたいと思います.
- Detection Branchで予測したpixel毎の文字であるかどうかの信頼度$p_{x,y}$:$(0\leq p_{x,y} \leq 1)$
- Detection Branchで予測したpixel毎のバウンディングボックス(rbox表記)$t,r,b,l,\theta$:$(0,0,0,0)\leq (t,r,b,l) \leq (\frac{h}{4},\frac{w}{4},\frac{h}{4},\frac{w}{4}), -\frac{\pi}{4}\leq \theta \leq \frac{\pi}{4}$
- Recognition Branchで予測した各バウンディングボックスの文字列の確率${y_1,\dots,y_T}$:$0\leq y_1,\dots,y_T \leq 1$
Loss
Lossについては,現論文の数式通りだと思います.
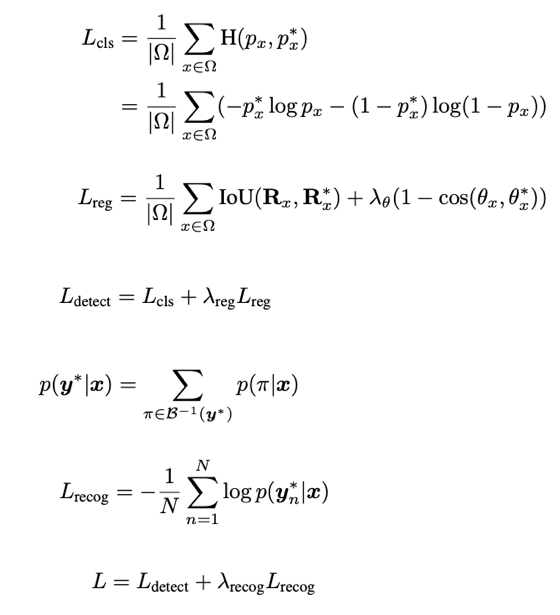
各種係数は,$\lambda_{\theta},\lambda_{reg},\lambda_{recog}=10,1,1$となっています.$\Omega$は次節のOHEMで得られる文字領域の集合です.$L_{cls}$はBinary Cross Entropy,$L_{reg}$はIoUとCosine類似度,$L_{recog}$はCTCLossを使っています.IoUについては,物体の重なり度を表す指標で,
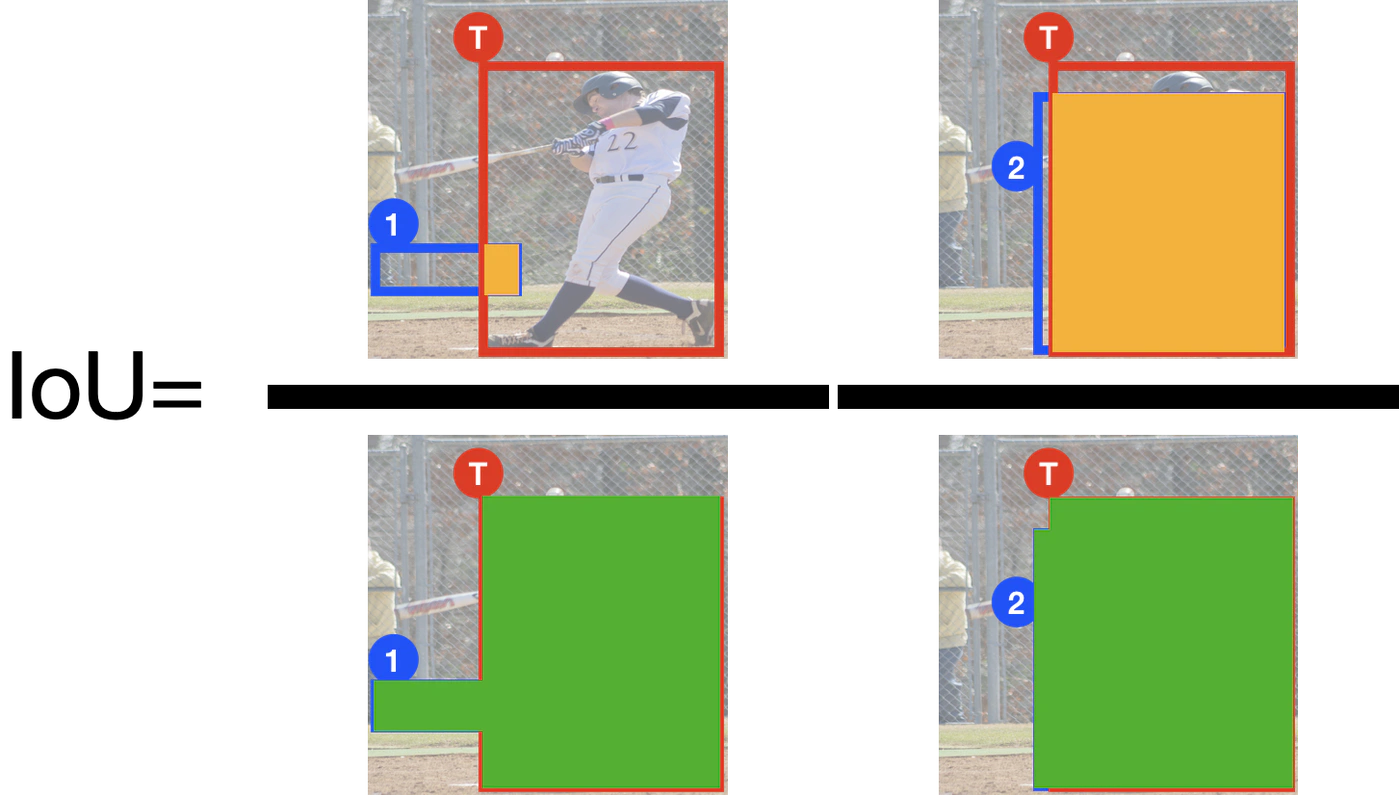
上図のようにして得られます.CTCLossについては,Connectionist Temporal Classificationの理論と実装についてがすごく分かりやすいと思うので,そちらを参照してください.
OHEM
学習をより最適化するために,FOTSではOHEM(Online Hard Example Mining)を使います.OHEMでは,信頼度$p_{x,y}$をソートして高いものから指定数$N_{hard}$選び(Hard sample),その次にランダムに指定数$N_{random}$選びます(Random sample).そして選ばれた$p_{x,y}$のインデックス$(x,y)$の集合を$\Omega$とするという処理になっています.
def ohem(confs, hard_sample_nums, random_sample_nums=None):
    """
    :param confs: Tensor, shape = (num, 1)
    :param dim: int, confs will be sorted with descending order along given dim
    :param hard_sample_nums: int
    :param random_sample_nums: int or None, if it's None, random sampling will not be done
    :returns:
        hard_indices: Long Tensor, shape = (num, 1)
        rand_indices: Long Tensor, shape = (num, 1). Note: if random indices doesn't exist, return empty long tensor
        sample_nums: int, total sampling number
        ~~Usage~~
        if rand_indices.numel() > 0:
            ~~~
    """
    assert confs.ndim == 2 and confs.numel() == confs.shape[0], "confs must be 2-dim with (num, 1) "
    hard_sample_nums = _check_ins('hard_sample_nums', hard_sample_nums, int, allow_none=False)
    random_sample_nums = _check_ins('random_sample_nums', random_sample_nums, int, allow_none=True, default=None)

    device = confs.device
    # hard sampling
    _, indices = torch.sort(confs, dim=0, descending=True)
    hard_indices = indices[:hard_sample_nums]

    # random sampling
    indices = indices[hard_sample_nums:]
    if indices.numel() > 0 and random_sample_nums is not None:
        # permute indices order randomly
        _rand_inds = torch.randperm(indices.numel()).unsqueeze(-1)
        indices = indices[_rand_inds]
        rand_indices = indices[:random_sample_nums]
    else:
        # empty indices
        rand_indices = torch.tensor([], dtype=torch.long, device=device)

    return hard_indices, rand_indices, hard_indices.numel() + rand_indices.numel()
数式を見ると$L_{cls}$と$L_{reg}$にOHEMが使われているのが分かります.$L_{cls}$では,Negativeなデータに対して(0.3倍に縮小した※バウンディングボックスの領域外)$N_{hard}=N_{random}=512$のOHEMの結果と全てのPositiveデータ(0.3倍に縮小した※バウンディングボックス※の領域内)を$\Omega$とします.また,$L_{reg}$では,Positiveデータ(0.3倍に縮小した※バウンディングボックス※の領域内)に対して$N_{hard}=N_{random}=128$のOHEMの結果を$\Omega$とします.
※純粋なバウンディングボックスではなく,次節で述べる0.3倍に縮小したバウンディングボックスを用います.
Shrink Quad
このShrink Quadは,EASTで使われているバウンディングボックスを縮小する処理です.EASTのFigure 4の(a),(b)の処理を行うことになります.この処理をする理由は,恐らく特徴抽出で文字らしさを抽出する際に,特徴が中心に圧縮されるからではないかと思っています(ここも自信がないので,どなたかわかる方はご教示ください).
やっていることは,図を見れば一目瞭然ですが,実装となるとまあまあ大変です.
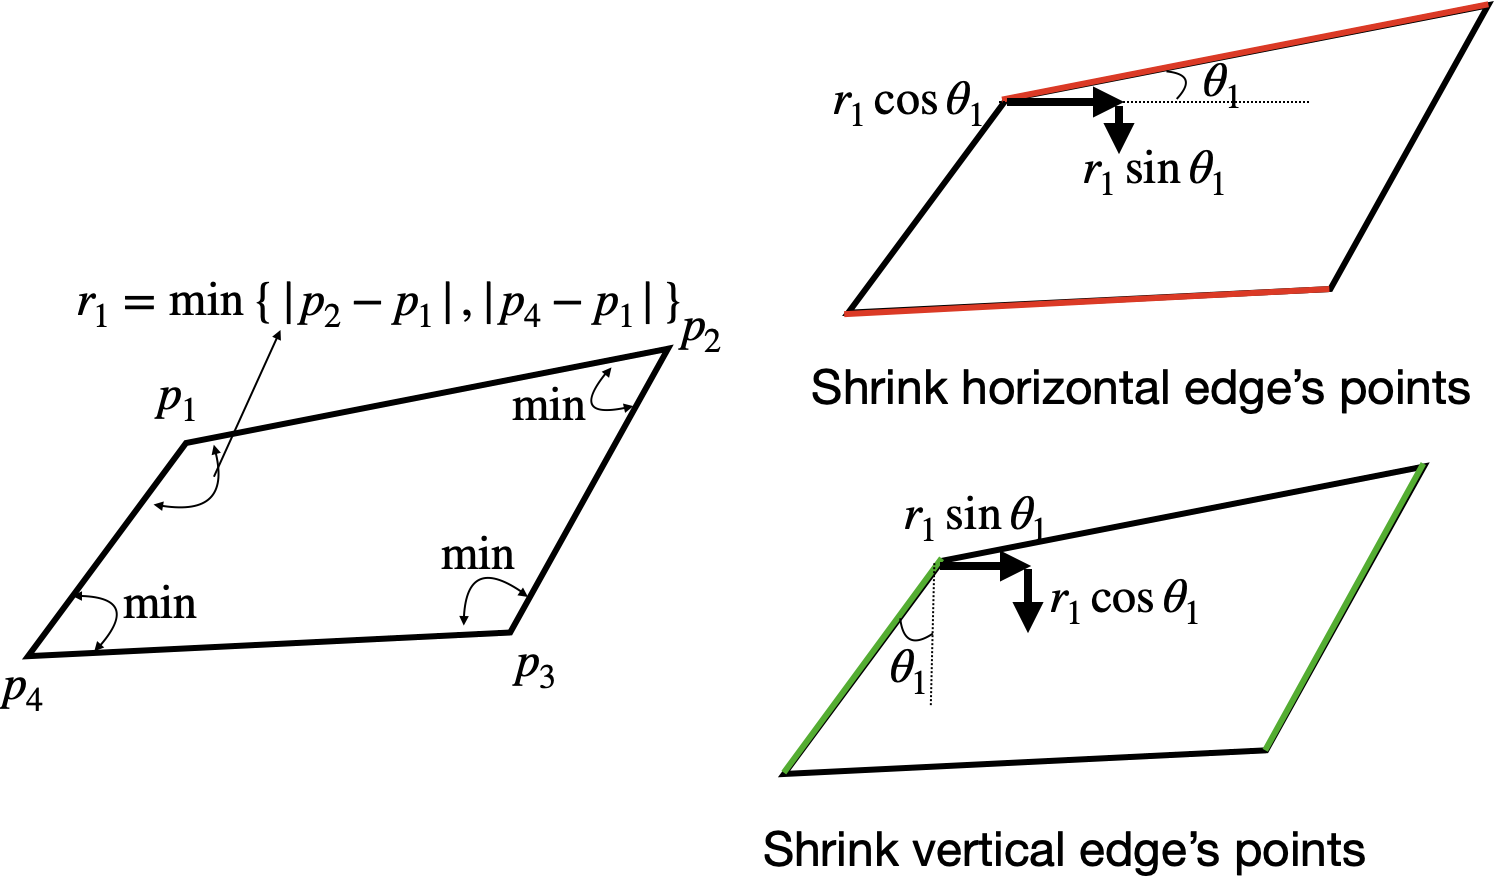
- quad表記の4点$(x_1,y_1,dots,x_4,y_4)$それぞれに隣接する辺の最小を計算する.その最小辺を
reference lengths$=r_i$とする. - (上辺+下辺)=水平辺と(左辺+右辺)=垂直辺の長い方を先に指定されたスケール$s$で縮小し,その次に短い方を縮小する.
- 水平辺の縮小
- $(x_i, y_i)$ += $s(r_i\cos{\theta_i}+r_j\sin{\theta_j})$ただし,$j=(i\mod{4})+1$
- 垂直辺の縮小
- $(x_i, y_i)$ += $s(r_i\sin{\theta_i}+r_j\cos{\theta_j})$ただし,$j=(i\mod{4})+1$
def shrink_quads_numpy(quads, scale=0.3):
    """
    convert quads into rbox, see fig4 in EAST paper
    Brief summary of rbox creation from quads
    1. compute reference lengths (ref_lengths) by getting shorter edge adjacent one point
    2. shrink longer edge pair* with scale value
        *: longer pair is got by comparing between two opposing edges following;
            (vertical edge1 + 2)ave <=> (horizontal edge1 + 2)ave
        Note that shrinking way is different between vertical edges pair and horizontal one
        horizontal: (x_i, y_i) += scale*(ref_lengths_i*cos + ref_lengths_(i mod 4 + 1)*sin)
        vertical:   (x_i, y_i) += scale*(ref_lengths_i*sin + ref_lengths_(i mod 4 + 1)*cos)
    :param quads: ndarray, shape = (box nums, 8=(x1,y1,...clockwise order))
    :param scale: int, shrink scale
    :return: shrinked_quads: ndarray, shape = (box nums, 8=(x1,y1,...clockwise order))
    """
    reshaped_quads = quads.reshape((-1, 4, 2))

    # reference lengths, clockwise from horizontal top edge
    # shape = (box nums, 4)
    ref_lengths = np.minimum(np.linalg.norm(reshaped_quads - np.roll(reshaped_quads, 1, axis=1), axis=-1),
                             np.linalg.norm(reshaped_quads - np.roll(reshaped_quads, -1, axis=1), axis=-1))

    def _shrink_h(quad, ref_len):
        """
        :param quad: ndarray, shape = (4, 2)
        :param ref_len: ndarray, shape = (4,)
        """
        # get angle
        adj_quad = np.roll(quad[::-1], 2, axis=0)  # adjacent points
        # shape = (4,)
        angles = np.arctan2(adj_quad[:, 1] - quad[:, 1], adj_quad[:, 0] - quad[:, 0])

        # shape = (4,2)
        trigonometric = np.array([np.cos(angles),
                                  np.sin(angles)]).T

        quad += np.expand_dims(ref_len, axis=-1) * trigonometric * scale

        return quad

    def _shrink_v(quad, ref_len):
        """
        :param quad: ndarray, shape = (4, 2)
        :param ref_len: ndarray, shape = (4,)
        """
        # get angle
        adj_quad = quad[::-1]  # adjacent points
        # shape = (4,)
        angles = np.arctan2(adj_quad[:, 0] - quad[:, 0], adj_quad[:, 1] - quad[:, 1])

        # shape = (4,2)
        trigonometric = np.array([np.sin(angles),
                                  np.cos(angles)]).T

        quad += np.expand_dims(ref_len, axis=-1) * trigonometric * scale

        return quad

    def _shrink(quad, ref_len, horizontal_first):
        """
        :param quad: ndarray, shape = (4, 2)
        :param ref_len: ndarray, shape = (4,)
        :param horizontal_first: boolean, if True, horizontal edges will be shrunk first, otherwise vertical ones will be shrunk first
        :return:
        """
        if horizontal_first:
            quad = _shrink_h(quad, ref_len)
            quad = _shrink_v(quad, ref_len)
        else:
            quad = _shrink_v(quad, ref_len)
            quad = _shrink_h(quad, ref_len)

        return quad

    box_nums = reshaped_quads.shape[0]

    # lengths, clockwise from horizontal top edge
    # shape = (box nums, 4)
    lengths = np.linalg.norm(reshaped_quads - np.roll(reshaped_quads, 1, axis=1), axis=-1)

    h_lens, v_lens = np.mean(lengths[:, ::2], axis=-1), np.mean(lengths[:, 1::2], axis=-1)
    horizontal_firsts = h_lens > v_lens

    shrinked_quads = np.array([_shrink(reshaped_quads[b], ref_lengths[b], horizontal_firsts[b]) for b in range(box_nums)])
    return shrinked_quads.reshape((-1, 8))
これも本来なら特徴マップのバウンディングボックスに対してこの処理を行いますが,入力画像に対してこの処理を行うと,
- 縮小前
- 縮小後

こんな感じです.縮小されていますね!
予測
いよいよ予測です.基本的には学習時とデータの流れは同じですが,Roi Rotateでの処理が異なります.
- 予測時
- Detection Branchでpixel毎に予測したバウンディングボックス(rbox表記)を用います.
- rbox表記(回転ありの長方形)をquad表記に一度直します.
Locally Aware NMS
上述のように,予測時にRoi Rotateに入力するのは,pixel毎に予測したバウンディングボックス(quad表記)になります.pixel毎に予測しているので,重複を多く含んでいます.そこで,その重複を取り除くのにNon-maximum-suppression(NMS)を行います.FOTSでは,計算量を削減するためにNMSを行う前にLocally Aware NMS(これもEASTと同じ処理です)を行います.NMSについては,「Non-Maximum Suppressionを世界一わかりやすく解説する」を参照してください.
Locally Aware NMSというのは,近傍のPixelは非常に強い相関があるという仮定のもと,近傍のPixel同士を比較して,閾値以上の場合は対応する信頼度で加重平均をとって一つにまとめてしまうことで,変数を削減するというものです.その削減した変数を通常のNMSに通せば,最小で$O(n)$に削減することができるというものです.(通常のNMSの場合,$O(n^2)$の計算コスト)
def non_maximum_suppression(confs, values, topk, threshold, compare_func, **funckwargs):
    """
    :param confs: Tensor, shape = (val num,)
    :param values: Tensor, shape = (val num, ?)
        Note that val num must be more than 1
    :param topk: int
    :param threshold: float
    :param compare_func: function,
            arguments: (a: Tensor, shape=(a_nums, ?), b: Tensor, shape=(b_nums, ?))
            return: ret: Tensor, shape=(a_nums, b_nums)
    :return inferred_indices: Tensor, shape = (inferred box num,)
    """
    topk = _check_ins('topk', topk, int)
    threshold = _check_ins('threshold', threshold, float)

    # sort confidence and default boxes with descending order
    c, conf_descending_inds = confs.sort(dim=0, descending=True)
    # get topk indices
    conf_descending_inds = conf_descending_inds[:topk]

    inferred_indices = []
    while conf_descending_inds.nelement() > 0:
        largest_conf_index = conf_descending_inds[0]

        largest_conf_val = values[largest_conf_index, :].unsqueeze(0)  # shape = (1, ?)
        # append to result
        inferred_indices.append(largest_conf_index)

        # remove largest element
        conf_descending_inds = conf_descending_inds[1:]

        if conf_descending_inds.nelement() == 0:
            break

        # get iou, shape = (1, conf_descending_inds num)
        overlap = compare_func(largest_conf_val, values[conf_descending_inds], **funckwargs)
        # filter out overlapped boxes for box with largest conf, shape = (conf_descending_inds num)
        indicator = overlap.reshape((overlap.nelement())) <= threshold

        conf_descending_inds = conf_descending_inds[indicator]

    inferred_indices = torch.Tensor(inferred_indices).long()
    return inferred_indices


def weighted_merge(conf1, values1, conf2, values2):
    """
    :param conf1: Tensor, shape=(1,)
    :param values1: Tensor, shape=(?,)
    :param conf2: Tensor, shape=(1,)
    :param values2: Tensor, shape=(?,)
    :return:
    """
    weighted_values = (conf1 * values1 + conf2 * values2) / (conf1 + conf2)
    weighted_conf = conf1 + conf2
    return weighted_conf, weighted_values

def locally_aware_nms(confs, values, topk, threshold, compare_func, **funckwargs):
    """
    :param confs: Tensor, shape=(num,)
    :param values: Tensor, shape=(num, ?)
    :param topk: int
    :param threshold: float
    :param compare_func: function,
            arguments: (a: Tensor, shape=(a_nums, ?), b: Tensor, shape=(b_nums, ?))
            return: ret: Tensor, shape=(a_nums, b_nums)
    :param funckwargs:
    :return inferred_indices: Tensor, shape = (inferred box num,)
    """
    topk = _check_ins('topk', topk, int)
    threshold = _check_ins('threshold', threshold, float)
    val_nums = confs.shape[0]

    if val_nums == 0:
        return torch.Tensor([]).bool()

    new_confs, new_values, indices = [], [], []
    prev_conf, prev_value = confs[0], values[0]
    for n in range(1, val_nums):
        if compare_func(prev_value.unsqueeze(0), values[n].unsqueeze(0), **funckwargs).item() > threshold:
            prev_conf, prev_value = weighted_merge(prev_conf, prev_value, confs[n], values[n])
        else:
            new_confs += [confs[n]]
            new_values += [values[n].unsqueeze(0)]
            indices += [n]
            prev_conf, prev_value = confs[n], values[n]

    new_confs, new_values, inferred_indices = torch.tensor(new_confs, dtype=torch.float), torch.cat(new_values, dim=0), torch.tensor(indices, dtype=torch.long)

    if inferred_indices.numel() == 0:
        return torch.Tensor([]).bool()


    standard_inds = non_maximum_suppression(new_confs, new_values, topk, threshold, compare_func, **funckwargs)
    inferred_indices = inferred_indices[standard_inds]

    return inferred_indices
以上の処理により,重複を取り除いたバウンディングボックスと特徴マップをRoi Rotate→Recognitionにデータを流していけば,所望の結果(バウンディングボックスとその文字列)が得られます!
終わりに
さすがに疲れました...例によって今回も分かりづらい点が多いかもしれませんが,どれかが参考になれば幸いです.