この記事は、nRF52でBLEデバイスを開発する(4)サービスを追加するの続きです。
はじめに
今回はGATTとCharacteristicを追加します。
GATTの追加
以下の呼び出しで、UUIDを指定してサービスハンドルを取得します。
static uint16_t service_handle;
    ble_uuid_t            ble_uuid;

    ble_uuid.type = uuid_type;
    ble_uuid.uuid = AB_BLE_UUID_SERVICE;

    err_code = sd_ble_gatts_service_add(BLE_GATTS_SRVC_TYPE_PRIMARY, &ble_uuid, &service_handle);
    APP_ERROR_CHECK(err_code);
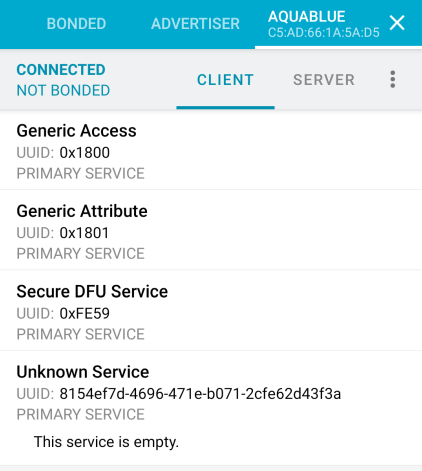
nRF ConnectでCONNECTすると、指定のUUIDでGATTサービスが出ていることが分かります。Characteristicを追加していないので、This service is empty.となっています。
Characteristicの追加
以下の呼び出しでCharacteristicを追加します。
三つ分のUUIDとハンドルを用意します。
# define AB_BLE_UUID_COMMAND_CHAR  0xef70
# define AB_BLE_UUID_RESPONSE_CHAR 0xef71
# define AB_BLE_UUID_DATA_CHAR   0xef72

static ble_gatts_char_handles_t    command_char_handles;
static ble_gatts_char_handles_t    response_char_handles;
static ble_gatts_char_handles_t    data_char_handles;
    ble_add_char_params_t add_char_params;

    // Add Command characteristic.
    memset(&add_char_params, 0, sizeof(add_char_params));
    add_char_params.uuid              = AB_BLE_UUID_COMMAND_CHAR;
    add_char_params.uuid_type         = uuid_type;
    add_char_params.init_len          = sizeof(uint8_t);
    add_char_params.max_len           = AB_BLE_MAX_DATA_LEN;
    add_char_params.is_var_len        = true;
    add_char_params.char_props.write_wo_resp  = 1;

    add_char_params.write_access      = SEC_OPEN;

    err_code = characteristic_add(service_handle,
                                  &add_char_params,
                                  &command_char_handles);
    APP_ERROR_CHECK(err_code);
これが下りのコマンド用。
通知用は、パラメータが変わります。
    add_char_params.char_props.read   = 1;
    add_char_params.char_props.notify = 1;

    add_char_params.read_access       = SEC_OPEN;
    add_char_params.cccd_write_access = SEC_OPEN;
これでデータの送受信チャネルが開きました。
データ受信のイベントハンドラ
サンプルに入っているble_lbs.c/hを元に作り込んでいきます。
まず受信ハンドラの割り込みレベル。
# define AB_BLE_OBSERVER_PRIO 2
関連構造体とオブザーバー定義のためのマクロ。
# define AB_BLE_SERVICE_DEF(_name)                                                                 \
static ab_ble_t _name;                                                                            \
NRF_SDH_BLE_OBSERVER(_name ## _obs,                                                               \
                     AB_BLE_OBSERVER_PRIO,                                                    \
                     ab_ble_on_ble_evt, &_name)
構造体。
typedef struct ab_ble_s
{
    uint8_t                     uuid_type;
    uint16_t                    service_handle;
    ble_gatts_char_handles_t    command_char_handles;
    ble_gatts_char_handles_t    response_char_handles;
    ble_gatts_char_handles_t    data_char_handles;
    ab_ble_command_write_handler_t command_write_handler;
    ab_ble_tx_complete_handler_t tx_complete_handler;
} ab_ble_t;
受信ハンドラと送信完了ハンドラ。
typedef void (*ab_ble_command_write_handler_t) (const uint8_t *commands, uint8_t length);
typedef void (*ab_ble_tx_complete_handler_t)(void);

static void on_write(ab_ble_t * p_abs, ble_evt_t const * p_ble_evt)
{
    ble_gatts_evt_write_t const * p_evt_write = &p_ble_evt->evt.gatts_evt.params.write;

    if (p_evt_write->handle == p_abs->command_char_handles.value_handle)
    {
        p_abs->command_write_handler(p_evt_write->data , p_evt_write->len );
    }
}


void ab_ble_on_ble_evt(ble_evt_t const * p_ble_evt, void * p_context)
{
    ab_ble_t * p_abs = (ab_ble_t *)p_context;

    switch (p_ble_evt->header.evt_id)
    {
        case BLE_GATTS_EVT_WRITE:
            on_write(p_abs, p_ble_evt);
            break;

        case BLE_GATTS_EVT_HVN_TX_COMPLETE:
            p_abs->tx_complete_handler();
            break;

       default:
            // No implementation needed.
            break;
    }
}
これらをこの一行でm_absという変数に定義します。
AB_BLE_SERVICE_DEF(m_abs);
この後は、m_absという変数に関連するデータを代入します。
NRF_SDH_BLE_OBSERVER()マクロでハンドラab_ble_on_ble_evt()が関連付けられます。ここから、データ受信時にonWrite()、送信完了イベントでtx_complete_handler()に分岐します。onWriteの中では、データ送信元を識別して、さらに適切なハンドラへと分岐を行います。
void ble_command_write_handler(const uint8_t *commands, uint8_t length)
{
  NRF_LOG_HEXDUMP_INFO(commands, length);
}


void ble_tx_complete_handler(void)
{
  NRF_LOG_INFO("TX COMPLETED.");
}

    m_abs.command_write_handler = ble_command_write_handler;
    m_abs.tx_complete_handler = ble_tx_complete_handler;
それぞれ、上記の様なハンドラを用意して受信します。
試してみましょう。nRF-ConnectでAuqaBlueデバイスに接続し、command用のCharacteristicを開きます。

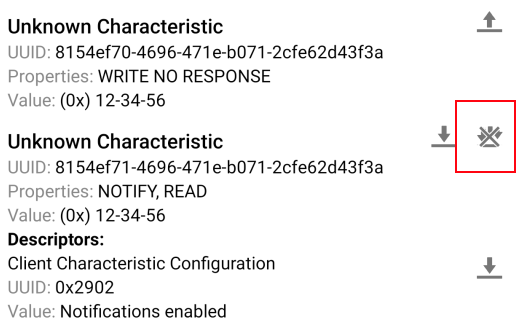
ここの赤枠のアイコンを押すと、書き込み画面になります。

ダイアログのデフォルトはバイト配列モードなので偶数個の数値を入れて、SENDボタンを押します。nRF-Connect上で書き込めたことが分かります。

SESのログ画面に以下のログが出ます。
<info> app: Buttonless DFU Application started.
<info> app:  12 34 56               |.4V
データの送信
データの送信には、sd_ble_gatts_hvx()APIを使用します。
以下の様な関数を用意しておき、
uint32_t ble_service_send_response(uint16_t conn_handle, ab_ble_t * p_abs, const uint8_t* data , uint16_t len )
{
ble_gatts_hvx_params_t params;
memset(¶ms, 0, sizeof(params));
params.type = BLE_GATT_HVX_NOTIFICATION;
params.handle = p_abs->response_char_handles.value_handle;
params.p_data = data;
params.p_len = &len;
return sd_ble_gatts_hvx(conn_handle, ¶ms);
}
以下の様に呼び出します。ここでは、受信したデータをそのままエコーバックします。
void ble_command_write_handler(const uint8_t *commands, uint8_t length)
{
  NRF_LOG_HEXDUMP_INFO(commands, length);

  ble_service_send_response(m_conn_handle, &m_abs , commands, length );
}
先ほどと同様にAquaBlueに接続し、response用Characteristicの赤枠部分をクリックして通知を有効にしてから、0x123456を書き込みます。

エコーバックされていることが確認できます。
SESのログは以下の様になります。
<info> app: Buttonless DFU Application started.
<info> app:  12 34 56               |.4V
<info> app: TX COMPLETED.
送信完了イベントが上がっていることが分かります。
今回は以上となります。
ソース一式はいつものようにgithub(https://github.com/jiro-aqua/nrf52-ota-example )においてあります。

