おことわり
EC2(Amazon Linux 2)にzshを入れる時のためのメモです。
「本番環境だよ!」という情報などを誰にでもわかりやすくするためにzshのテーマも設定します。
便利にするための設定も行います。
前提
- 使用しているEC2インスタンスにGitがインストールされていること。
- 作業は全てssh接続したEC2内で行う。
手順
流れ
- zshインストール
- zshのテーマと設定変更
- ログイン時のシェルをbash→zshに変更
zshをインストールする
存在するシェルの一覧を表示し、zshがないことを確認する。
$ cat /etc/shells

# 結果
/bin/sh
/bin/bash
/usr/bin/sh
/usr/bin/bash
/bin/tcsh
/bin/csh
zshをインストールする。
$ sudo yum install zsh
zshのテーマを変える
インストールしたzshを使う。
$ zsh
下記が出るので(0)を選択する。
This is the Z Shell configuration function for new users,
zsh-newuser-install.
You are seeing this message because you have no zsh startup files
(the files .zshenv, .zprofile, .zshrc, .zlogin in the directory
~).  This function can help you with a few settings that should
make your use of the shell easier.

You can:

(q)  Quit and do nothing.  The function will be run again next time.

(0)  Exit, creating the file ~/.zshrc containing just a comment.
     That will prevent this function being run again.

(1)  Continue to the main menu.

--- Type one of the keys in parentheses ---
ホームディレクトリに.zshrcが作られたけど要らないので削除する。
$ rm ~/.zshrc
Preztoを入れる。zshを使っている状態で、下記のコマンドを打つ。
$ git clone --recursive https://github.com/sorin-ionescu/prezto.git "${ZDOTDIR:-$HOME}/.zprezto"

$ setopt EXTENDED_GLOB
for rcfile in "${ZDOTDIR:-$HOME}"/.zprezto/runcoms/^README.md(.N); do
  ln -s "$rcfile" "${ZDOTDIR:-$HOME}/.${rcfile:t}"
done
zshを再起動する。
$ exit
$ zsh

zshのテーマが変わっていることが分かる。この画像のテーマはsorinというテーマ。
prompt -pでテーマの一覧を参照し、良さげなテーマの名前を覚えておく。
[注意] ここでprompt -pが出てこない場合は、インストールされたzshが古い可能性があります。
preztoのissueにこんなのがあります。
ここでpromptが出てこなくても大きな問題はありませんが、気になる方はより新しいzshをインストールし直すとよいかもしれません。シェルを変える際はバックアップ用のセッションを残しておくなどして、ログインできなくならないよう慎重に作業をしましょう。
$ prompt -p
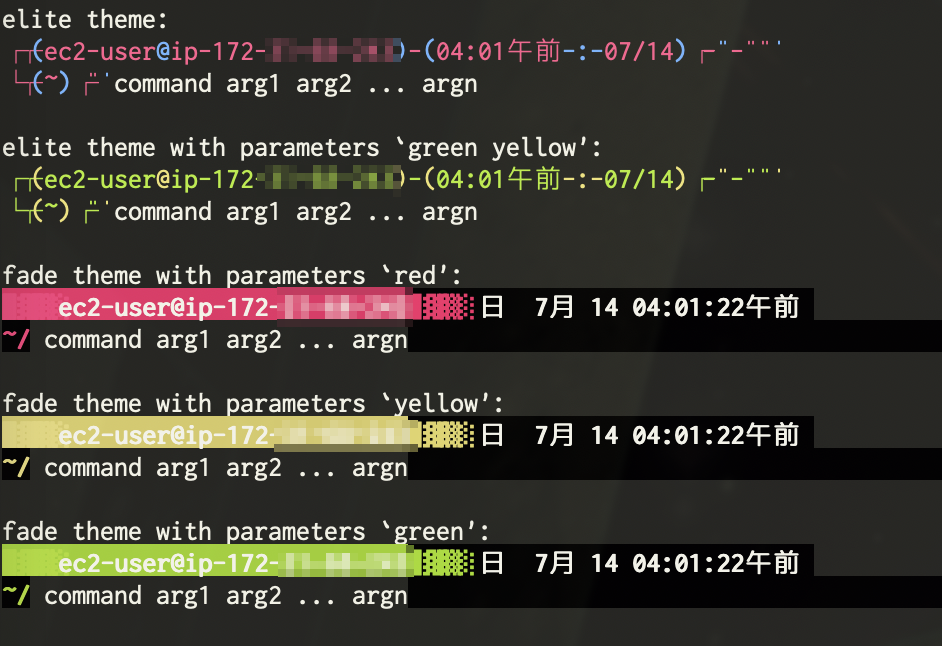
今回は、fadeのredにする。なんとなく本番環境っぽさが出ていて誰にでも分かりやすい気がしたため。
ホームディレクトリにいつの間にやらできている.zpreztorcを編集する。
vi ~/.zpreztorc
テーマをsorinからfade redに変更する。
# before
# zstyle ':prezto:module:prompt' theme 'sorin'

# after
zstyle ':prezto:module:prompt' theme 'fade' 'red'
補完とシンタックスハイライトを有効にする。
zstyle ':prezto:load' pmodule \
  'environment' \
  'terminal' \
  'editor' \
  'history' \
  'directory' \
  'spectrum' \
  'utility' \
  'completion' \
  'syntax-highlighting' \  # 追加
  'autosuggestions' \  # 追加
  'prompt'
保存して閉じる。
zshを再起動すると、設定が有効になっている。
$ exit
$ zsh
ログイン時のシェルを変更する
これでzshの準備は完了したので、ログイン時のシェルをbashからzshに変更する。
けれどもAmazon Linux 2はデフォルトでchshが使えないので、最初にインストールする必要がある。
sudo yum install util-linux-user
chshが使えるようになったので、シェルを変える。
# zshのパスを確認する
$ cat /etc/shells

$ sudo chsh ec2-user

# フルパスを入力する
/bin/zsh
参考
Amazon AWS EC2 でzshを使ってみよう
お前らのターミナルはダサい
【EC2】Amazon Linux2でchshコマンドを使えるようにする