はじめに
Model Context Protocol(MCP)はAnthropic社が提唱した、生成大規模言語モデル(LLM)が外部ツールを利用するためのインターフェースです。
今年(2025年)に入って、OpenAIやGoogle Geminiなど大手AIプロバイダーも次々とMCP規格に対応していました。
シリーズ記事
| № | 記事 | 内容 |
|---|---|---|
| 1 | MCPサーバーの最小構成を作ってみる(Node.js版) | 本編 |
| 2 | 複数MCPツールを同時に利用可能なChatbotを最小構成で作ってみる(Google Gemini版) | Node.jsを使ってGeminiを利用したAI Agentの製作 |
| 3 | MCPサーバーの最小構成を作ってみる(Python版) | Coming Soon |
| 4 | 複数MCPツールを同時に利用可能なChatbotを最小構成で作ってみる(Azure OpenAI版) | Coming Soon |
| 5 | RAGをMCPサーバーとして利用し、簡単な映画推薦Chatbotを作ってみる(Azure OpenAI版) | Coming Soon |
| 6 | MCPを活用してAI Agentで定期タスクを実行できるように | 自分自身に指向するMCPサーバーを使って、定期タスクを実装する方法 |
実装
実行環境
- Node.js (v20以上)
STDIOを使ったMCPサーバー
最も簡単なMCPサーバーはstandard input/output(標準入出力/stdio)を使った実装です。
パッケージのインストール
npm i @modelcontextprotocol/sdk zod
STDIO MCPサーバーの実装
add.mjsを作成し、下記のコードを入力します。
import { McpServer } from "@modelcontextprotocol/sdk/server/mcp.js";
import { StdioServerTransport } from "@modelcontextprotocol/sdk/server/stdio.js";
import { z } from "zod";

const server = new McpServer({
  name: "Demo Stdio MCP",
  version: "1.0.0",
});

server.tool(
  "add_test",
  "与えられた数値の足し算をする(さらに10を足す)",
  { a: z.number(), b: z.number() },
  async ({ a, b }) => ({
    content: [{ type: "text", text: String(a + b + 10) }],
  })
);

const transport = new StdioServerTransport();
await server.connect(transport);
上記のコードだけで一つのMCPサーバーが作られました。
検証
Anthropic社本家はご丁寧にLLMなしで、手動でMCPサーバーの検証ができる inspector というツールを提供しています。
下記のコマンドで実行すれば、ブラウザ画面でMCPサーバーの操作ができます。
npx -y @modelcontextprotocol/inspector
すると、以下の画面が http://localhost:6274 に立ち上がります。
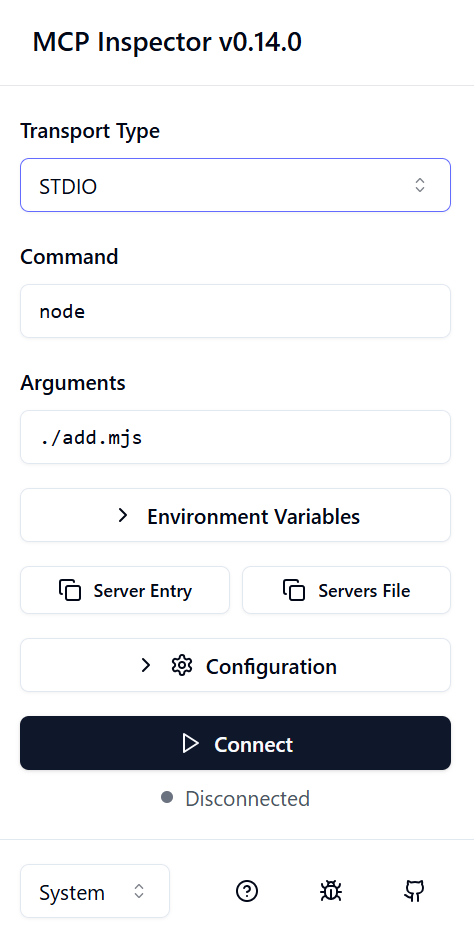
下記のように設定をします。
-
「Transport Type」:
STDIO -
「Command」:
node -
「Arguments」:
./add.mjs(inspectorが起動した時のフォルダに対する相対Path)
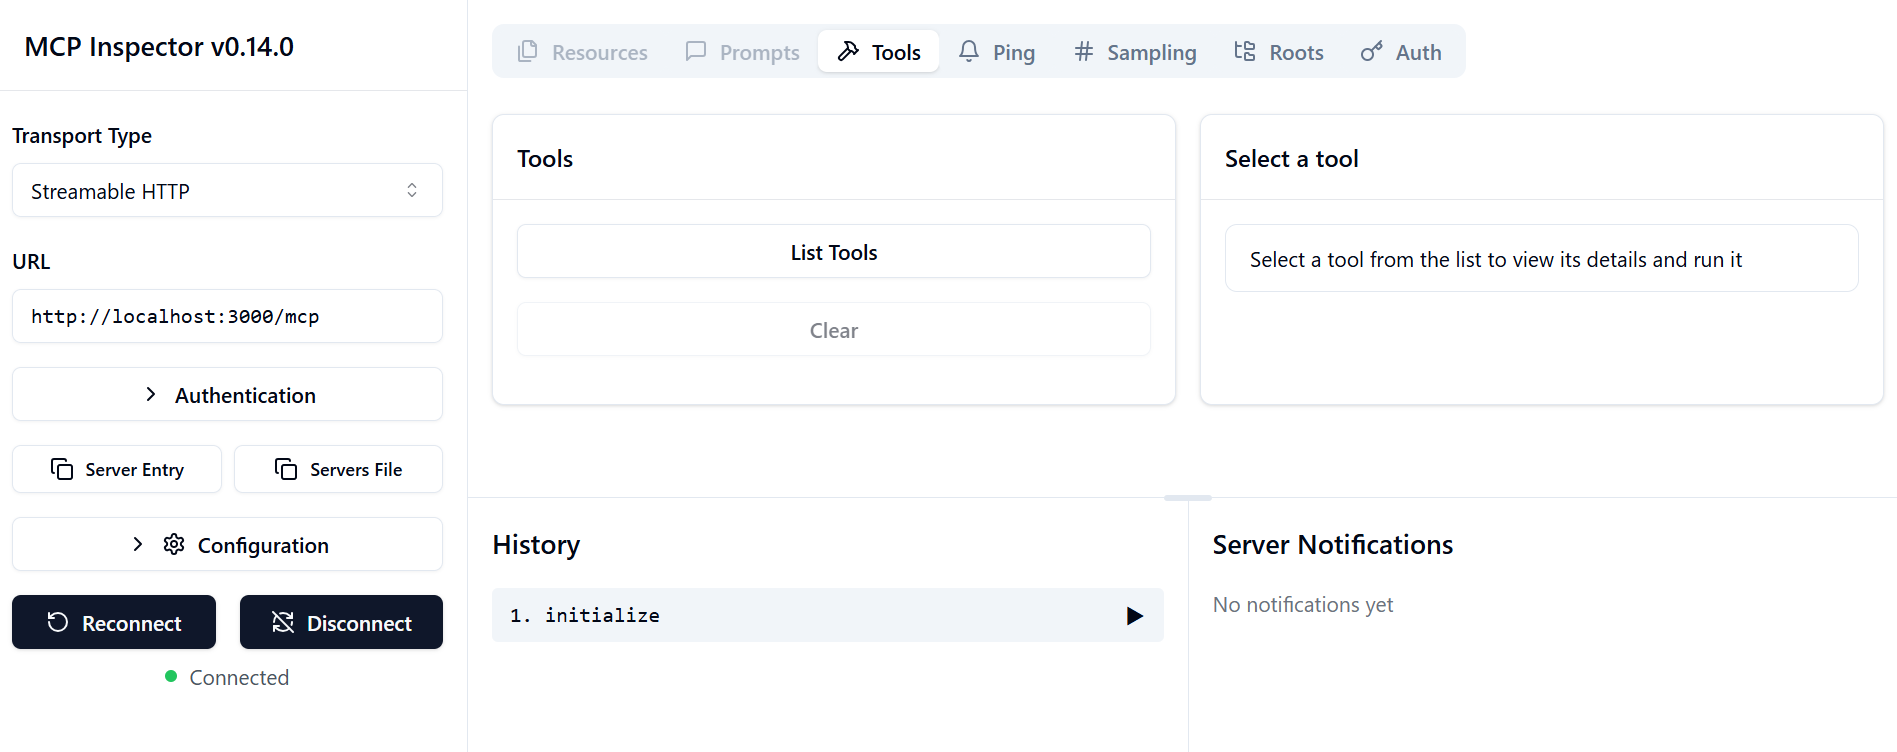
そして 「Connect」 ボタンを押します。
接続成功したら、次のように右の画面に操作パネルが現れます。
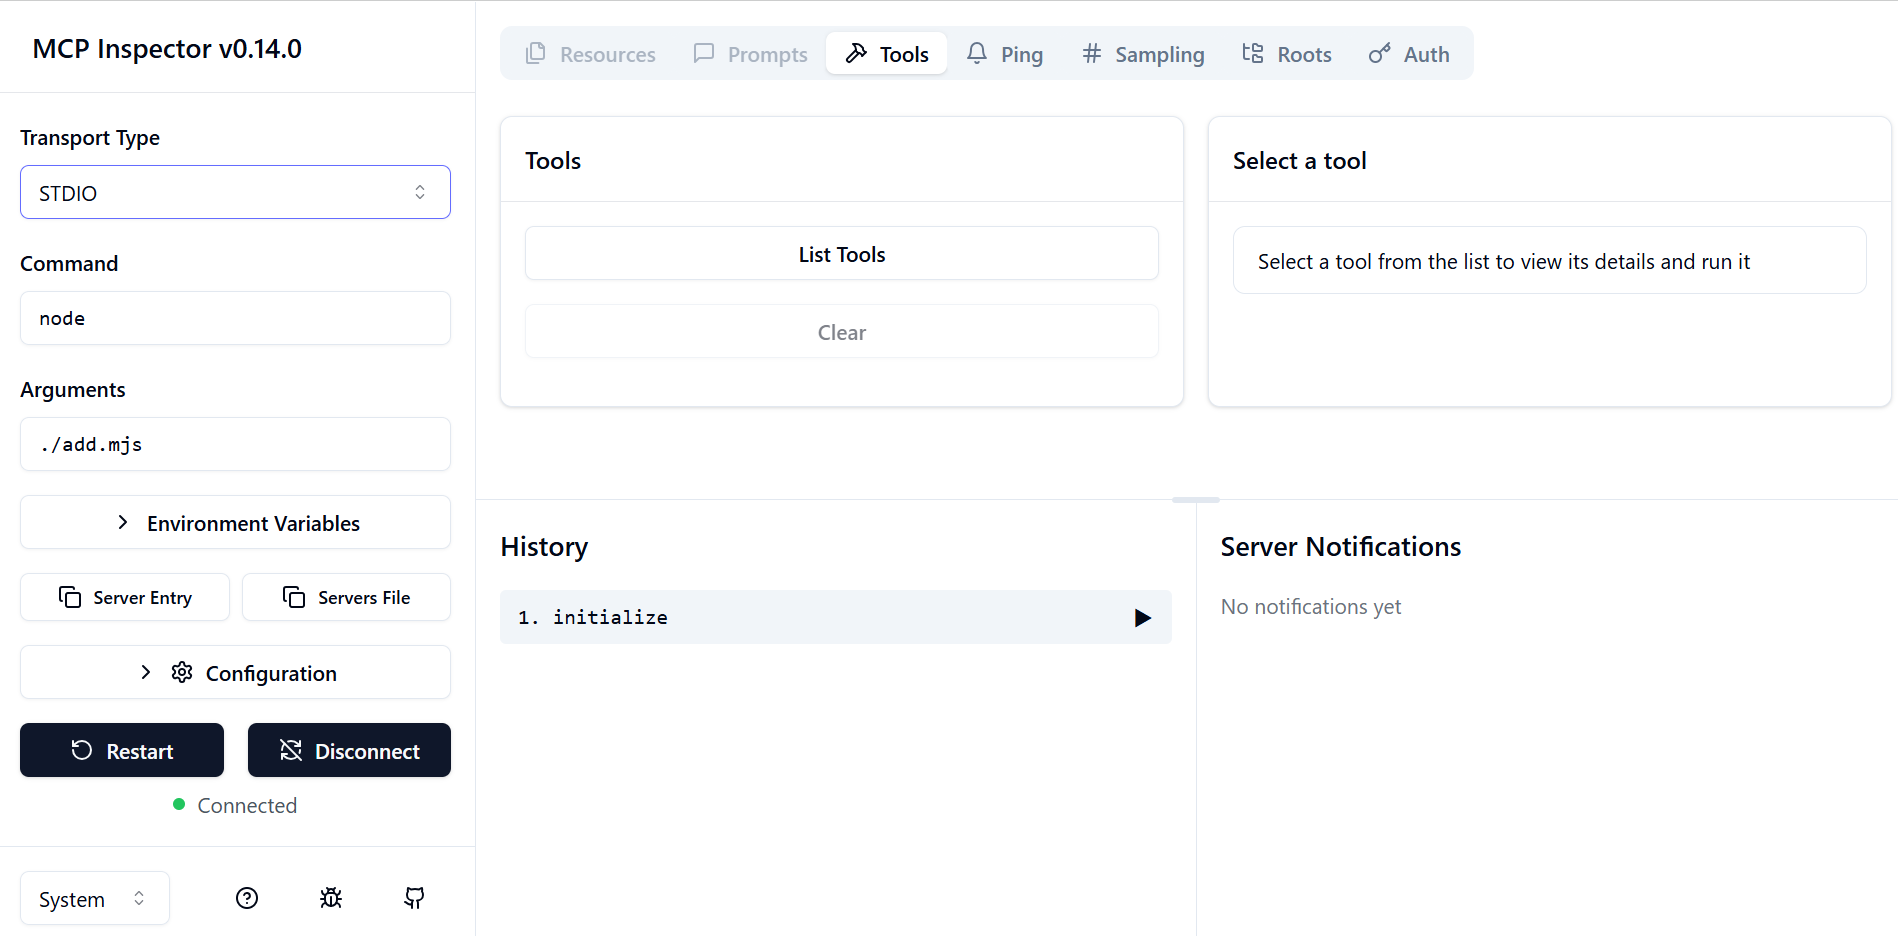
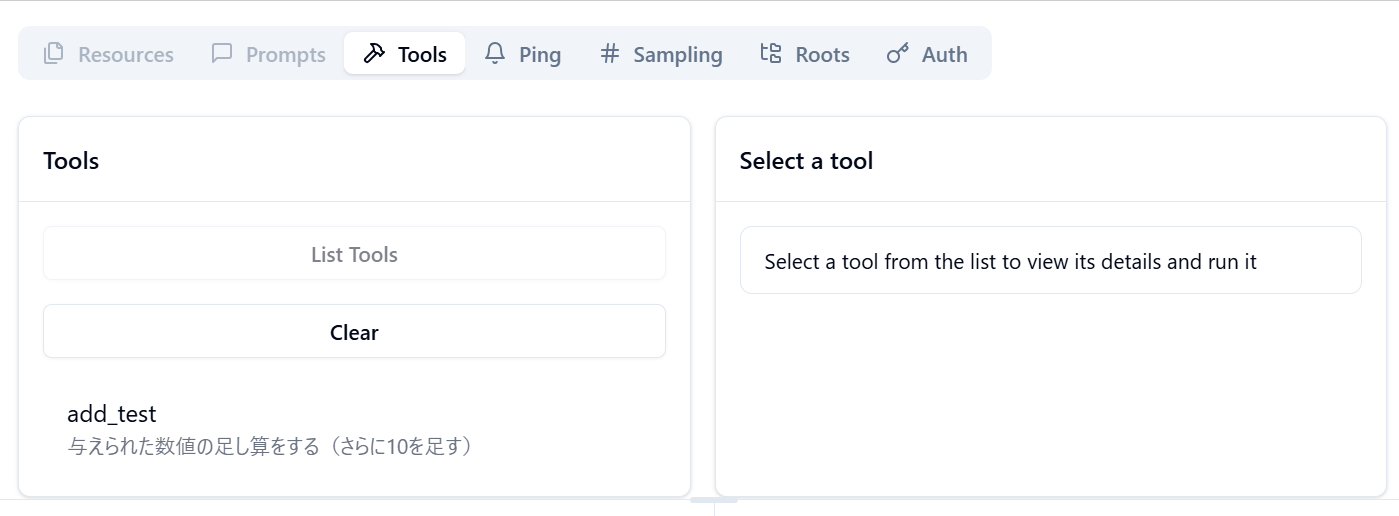
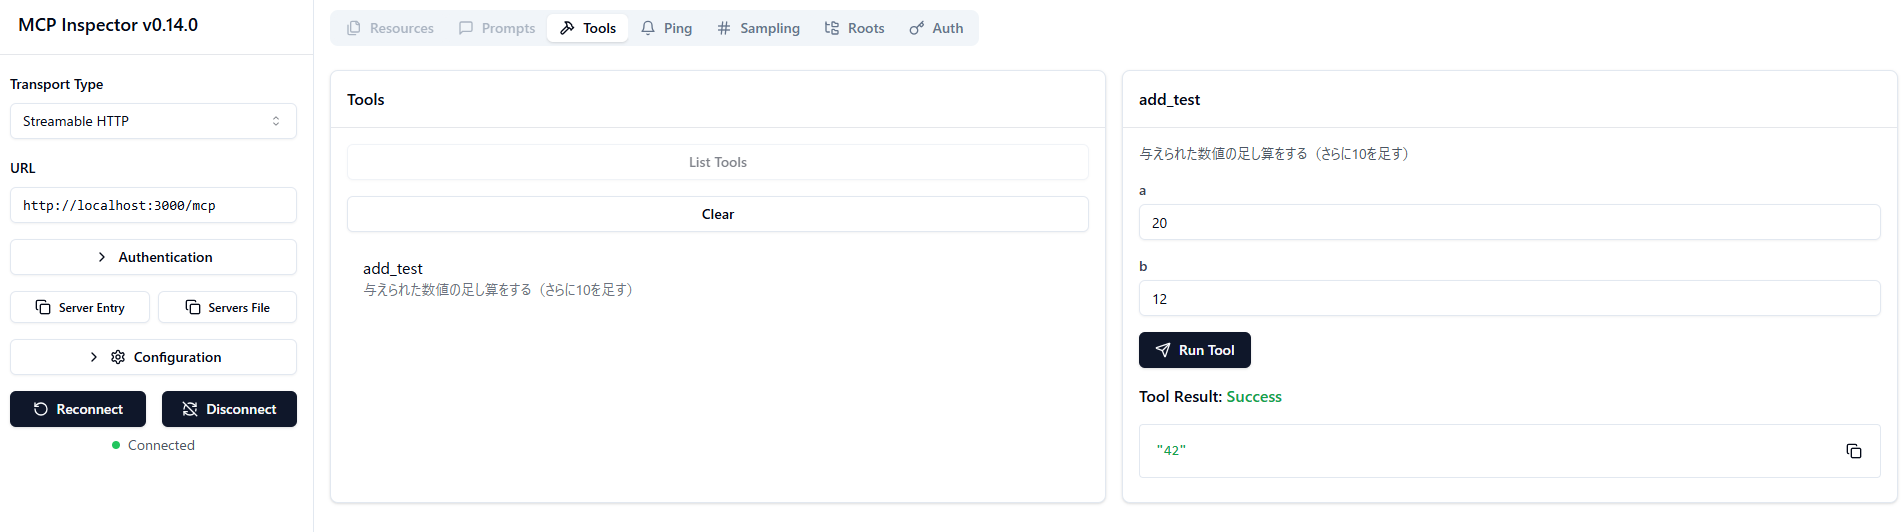
一番上の 「Tool」 画面を開き、 「List Tools」 を押すと、先ほど作った add_testというMCPツールが表示されます
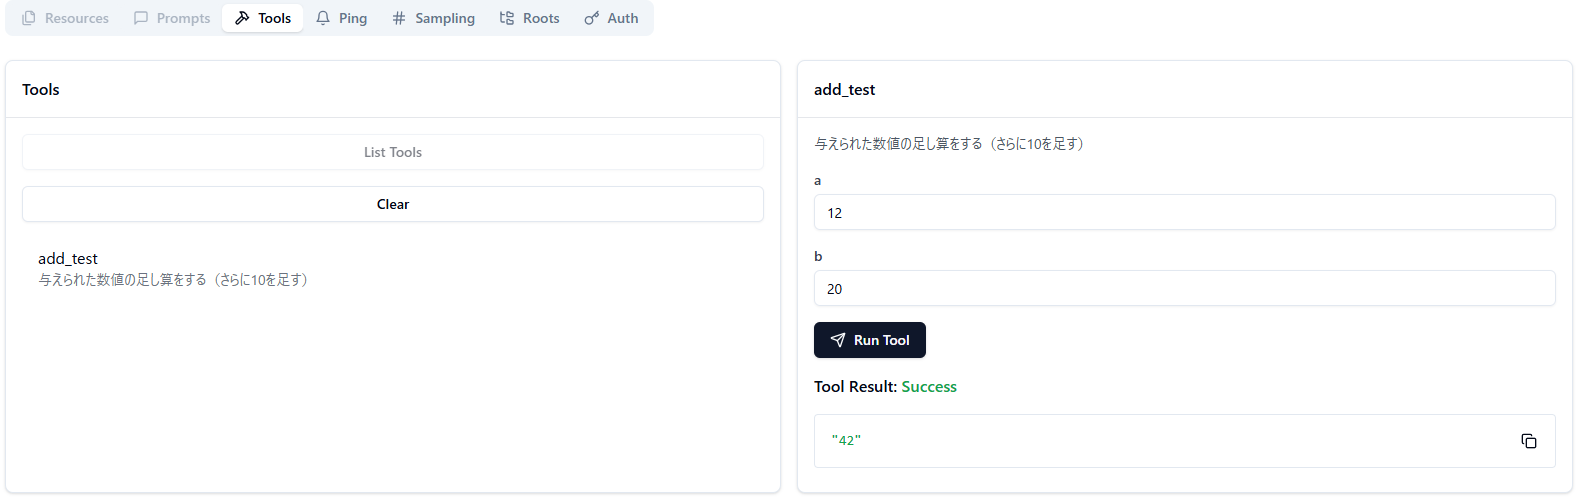
add_testをクリックすると、隣のパネルに入力欄が現れ、そこに数値を入力して 「Run Tool」 を押すと、実行されます。
通信内容の確認
MCPの通信規格はJSON-RPCというプロトコルを用いています。
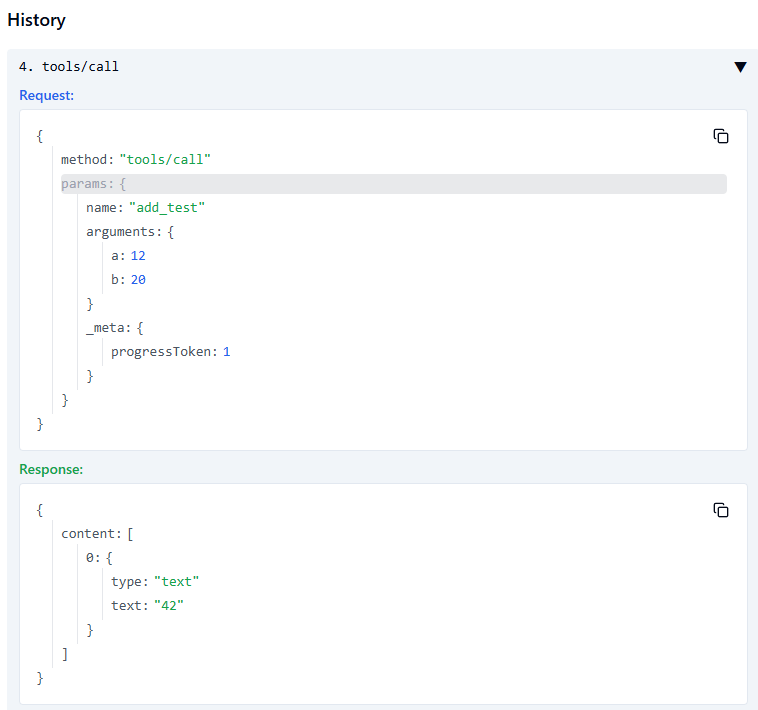
上記inspectorツールの 「History」 パネルは一応一部の通信内容を表示していますが、RAWデータを見たい場合、megmogmog1965/mcp-server-loggerのようなMiddleWareを挟んで、MCPサーバーを実行すれば観察できます。
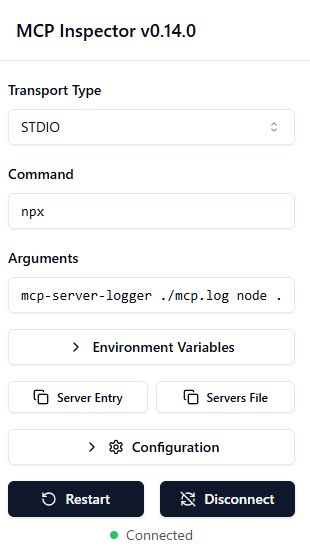
下記のように設定をします。
-
「Transport Type」:
STDIO -
「Command」:
npx -
「Arguments」:
mcp-server-logger ./mcp.log node ./add.mjs
Connectすると、mcp.logが作成され、中にアクセスログが記録されています。

initializeの通信
Client:
{
  "jsonrpc": "2.0",
  "id": 0,
  "method": "initialize",
  "params": {
    "protocolVersion": "2025-03-26",
    "capabilities": {
      "sampling": {},
      "roots": {
        "listChanged": true
      }
    },
    "clientInfo": {
      "name": "mcp-inspector",
      "version": "0.14.0"
    }
  }
}
Server:
{
  "result": {
    "protocolVersion": "2025-03-26",
    "capabilities": {
      "tools": {
        "listChanged": true
      }
    },
    "serverInfo": {
      "name": "Demo Stdio MCP",
      "version": "1.0.0"
    }
  },
  "jsonrpc": "2.0",
  "id": 0
}
tools/listの通信
Client:
{
  "jsonrpc": "2.0",
  "id": 1,
  "method": "tools/list",
  "params": {
    "_meta": {
      "progressToken": 1
    }
  }
}
Server:
{
  "result": {
    "tools": [
      {
        "name": "add_test",
        "description": "与えられた数値の足し算をする(さらに10を足す)",
        "inputSchema": {
          "type": "object",
          "properties": {
            "a": {
              "type": "number"
            },
            "b": {
              "type": "number"
            }
          },
          "required": [
            "a",
            "b"
          ],
          "additionalProperties": false,
          "$schema": "http://json-schema.org/draft-07/schema#"
        }
      }
    ]
  },
  "jsonrpc": "2.0",
  "id": 1
}
tools/callの通信
Client:
{
  "jsonrpc": "2.0",
  "id": 2,
  "method": "tools/call",
  "params": {
    "_meta": {
      "progressToken": 2
    },
    "name": "add_test",
    "arguments": {
      "a": 12,
      "b": 20
    }
  }
}
Server:
{
  "result": {
    "content": [
      {
        "type": "text",
        "text": "42"
      }
    ]
  },
  "jsonrpc": "2.0",
  "id": 2
}
Streamable HTTPを使ったMCPサーバー
インタネット越しでMCPサーバーを利用したい場合、現在提供された方法は SSE(Server-Sent Events) と Streamable HTTP2種類があります。2025年4月以降、SSE が非推奨となったため、本文はStreamable HTTPの実装のみ説明します。
Streamable HTTP実はMCPのために独自実装したSSEであるため、同じ通信規格を使った別のサービスはまだほとんどありません。
パッケージのインストール
npm i @modelcontextprotocol/sdk zod express
Streamable HTTP MCPサーバーの実装
add_http.mjsを作成し、下記のコードを入力します。
import { McpServer } from "@modelcontextprotocol/sdk/server/mcp.js";
import { StreamableHTTPServerTransport } from "@modelcontextprotocol/sdk/server/streamableHttp.js";
import { z } from "zod";
import express from "express";

const app = express();
app.use(express.json());

app.all("/mcp", async (req, res) => {
  const transport = new StreamableHTTPServerTransport({
    sessionIdGenerator: undefined,
  });

  // POSTメソッド以外は受付ない
  if (req.method !== "POST") {
    return res.status(405).json({
      jsonrpc: "2.0",
      error: {
        code: -32000,
        message: `Method not allowed: ${req.method}`,
      },
      id: null
    });
  }

  const server = new McpServer({
    name: "Demo HTTP MCP Server",
    version: "1.0.0",
  });

  try {
    server.tool(
      "add_test",
      "与えられた数値の足し算をする(さらに10を足す)",
      { a: z.number(), b: z.number() },
      async ({ a, b }) => ({
        content: [{ type: "text", text: String(a + b + 10) }],
      })
    );

    res.on('close', () => {
      console.log('Request closed');
      transport.close();
      server.close();
    });

    await server.connect(transport);
    await transport.handleRequest(req, res, req.body);
  } catch (error) {
    console.error('Error handling MCP request:', error);
    if (!res.headersSent) {
      res.status(500).json({
        jsonrpc: '2.0',
        error: {
          code: -32603,
          message: 'Internal server error',
        },
        id: null,
      });
    }
  }
});

app.listen(3000, () => {
  console.log('MCP HTTP server is running on http://localhost:3000/mcp');
});

// graceful shutdown
process.on("SIGINT", async () => {
  console.log("Shutting down server...");

  process.exit(0);
});
コアのロジックはSTDIO版MCPサーバーとほとんど一緒で、STDIOと変わってアクセスをexpressを使って、/mcpに出しています。(Python版は暗黙の了解で入口を/mcpにしているので、js版もそれに合わせて/mcpにしています)
検証
まずはMCPサーバーを起動します。
node add_http.mjs
そしてinspectorツールを下記のように設定をし、 「Connect」 ボタンを押して、前述STDIO版と同じようにアクセスできます。
-
「Transport Type」:
Streamable HTTP -
「Url」:
http://localhost:3000/mcp
手動送信で通信内容を確認
Postmanなどを使って、下記の内容を手動で送信すると通信内容が確認できます。
initialize
送信内容:
POST http://localhost:3000/mcp
Content-Type: application/json
Accept: application/json, text/event-stream
Connection: keep-alive

{
  "jsonrpc": "2.0",
  "id": 0,
  "method": "initialize",
  "params": {
    "protocolVersion": "2025-03-26",
    "capabilities": {
      "sampling": {},
      "roots": {
        "listChanged": true
      }
    },
    "clientInfo": {
      "name": "mcp-http",
      "version": "0.1.0"
    }
  }
}
受信内容:
event: message
data: {
  "result": {
    "protocolVersion": "2025-03-26",
    "capabilities": {
      "tools": {
        "listChanged": true
      }
    },
    "serverInfo": {
      "name": "Demo HTTP MCP Server",
      "version": "1.0.0"
    }
  },
  "jsonrpc": "2.0",
  "id": 0
}
tools/list
送信内容:
POST http://localhost:3000/mcp
Content-Type: application/json
Accept: application/json, text/event-stream
Connection: keep-alive

{
  "jsonrpc": "2.0",
  "id": 1,
  "method": "tools/list",
  "params": {
    "_meta": {
      "progressToken": 1
    }
  }
}
受信内容:
event: message
data: {
  "result": {
    "tools": [
      {
        "name": "add_test",
        "description": "与えられた数値の足し算をする(さらに10を足す)",
        "inputSchema": {
          "type": "object",
          "properties": {
            "a": {
              "type": "number"
            },
            "b": {
              "type": "number"
            }
          },
          "required": [
            "a",
            "b"
          ],
          "additionalProperties": false,
          "$schema": "http://json-schema.org/draft-07/schema#"
        }
      }
    ]
  },
  "jsonrpc": "2.0",
  "id": 1
}
tools/call
送信内容:
POST http://localhost:3000/mcp
Content-Type: application/json
Accept: application/json, text/event-stream
Connection: keep-alive

{
  "jsonrpc": "2.0",
  "id": 2,
  "method": "tools/call",
  "params": {
    "_meta": {
      "progressToken": 2
    },
    "name": "add_test",
    "arguments": {
      "a": 2,
      "b": 30
    }
  }
}
受信内容:
event: message
data: {
  "result": {
    "content": [
      {
        "type": "text",
        "text": "42"
      }
    ]
  },
  "jsonrpc": "2.0",
  "id": 2
}
[Optional]本物のAI Agent(VSCode GitHub Copilot Agent)に繋ぐ
VSCodeが最新版に更新され、かつGitHub Copilotのアカウントを持つことが前提です。
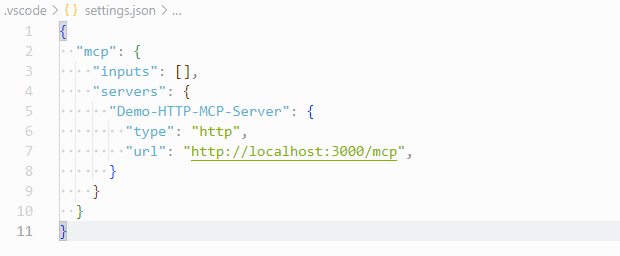
任意のフォルダをVS Codeのプロジェクトとして開き、 下記の内容で.vscode/settings.jsonファイルを作ります。
{
  "mcp": {
    "inputs": [],
    "servers": {
      "Demo-HTTP-MCP-Server": {
        "type": "http",
        "url": "http://localhost:3000/mcp",
      }
    }
  }
}
前文で作ったStreamable HTTP版のMCPサーバーを起動し、VS CodeのCopilotをAgentモードにします。
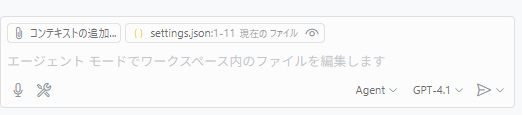
ツールのマークをクリックすると、いっぱいのMCPツールの中に、先ほど自作したものも出ています。

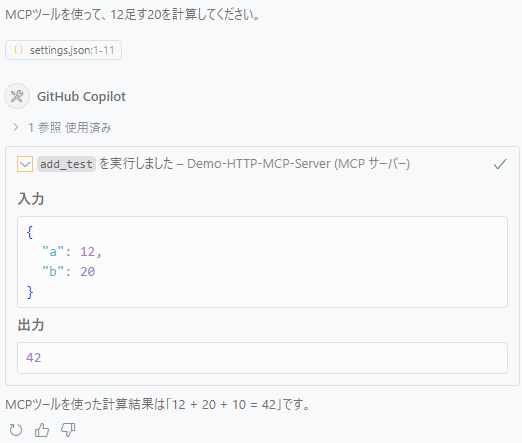
試しに「MCPツールを使って、12足す20を計算してください。」と聞くと、MCPツールのアクセス申請が表示されます。
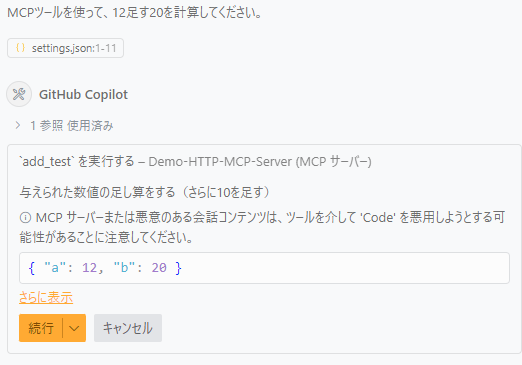
「続行」を押すと、ちゃんとMCPツールで計算されます。