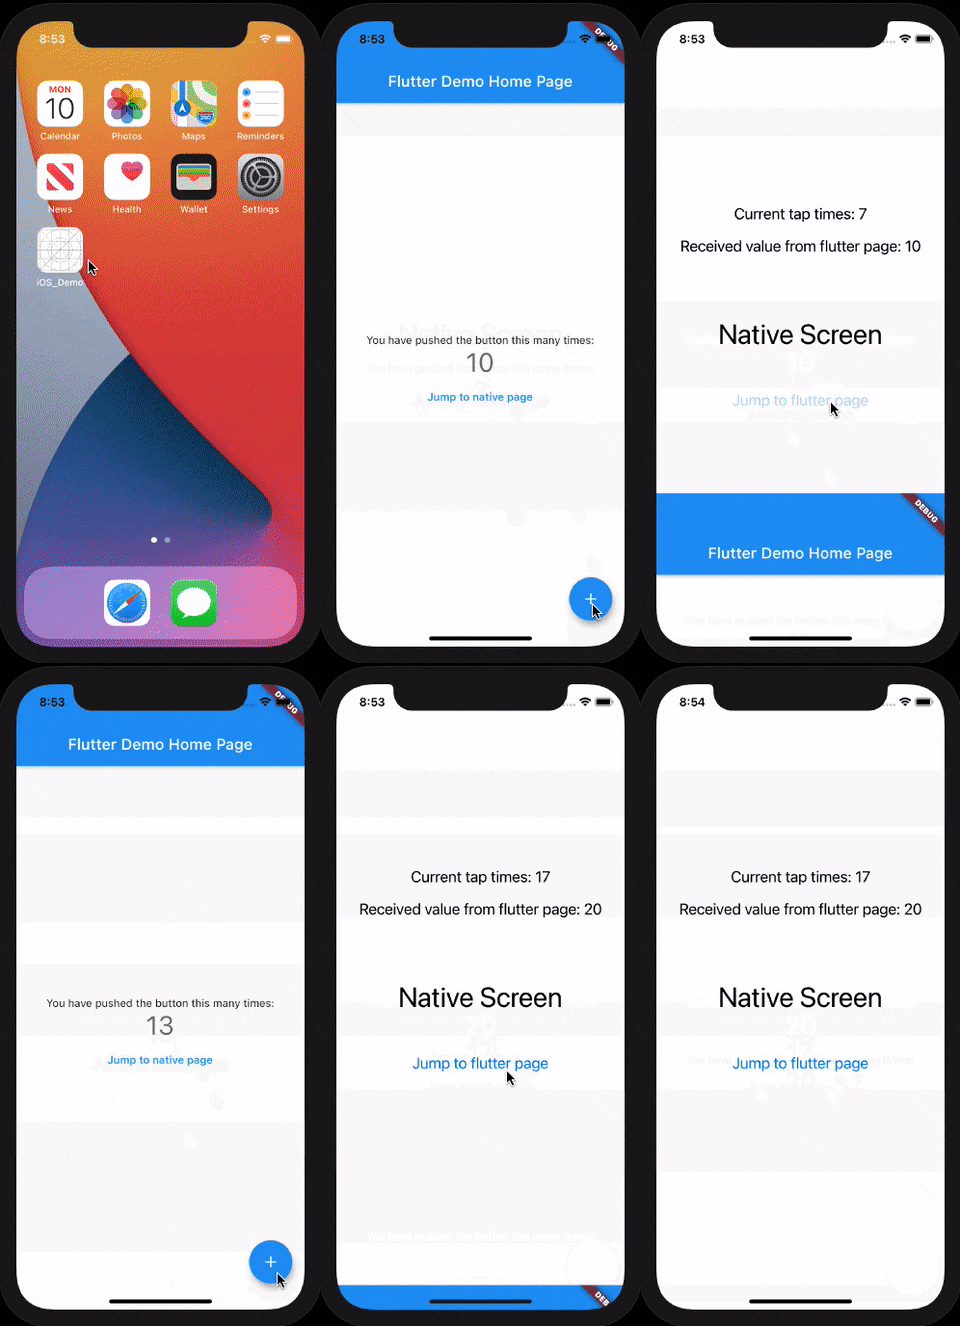
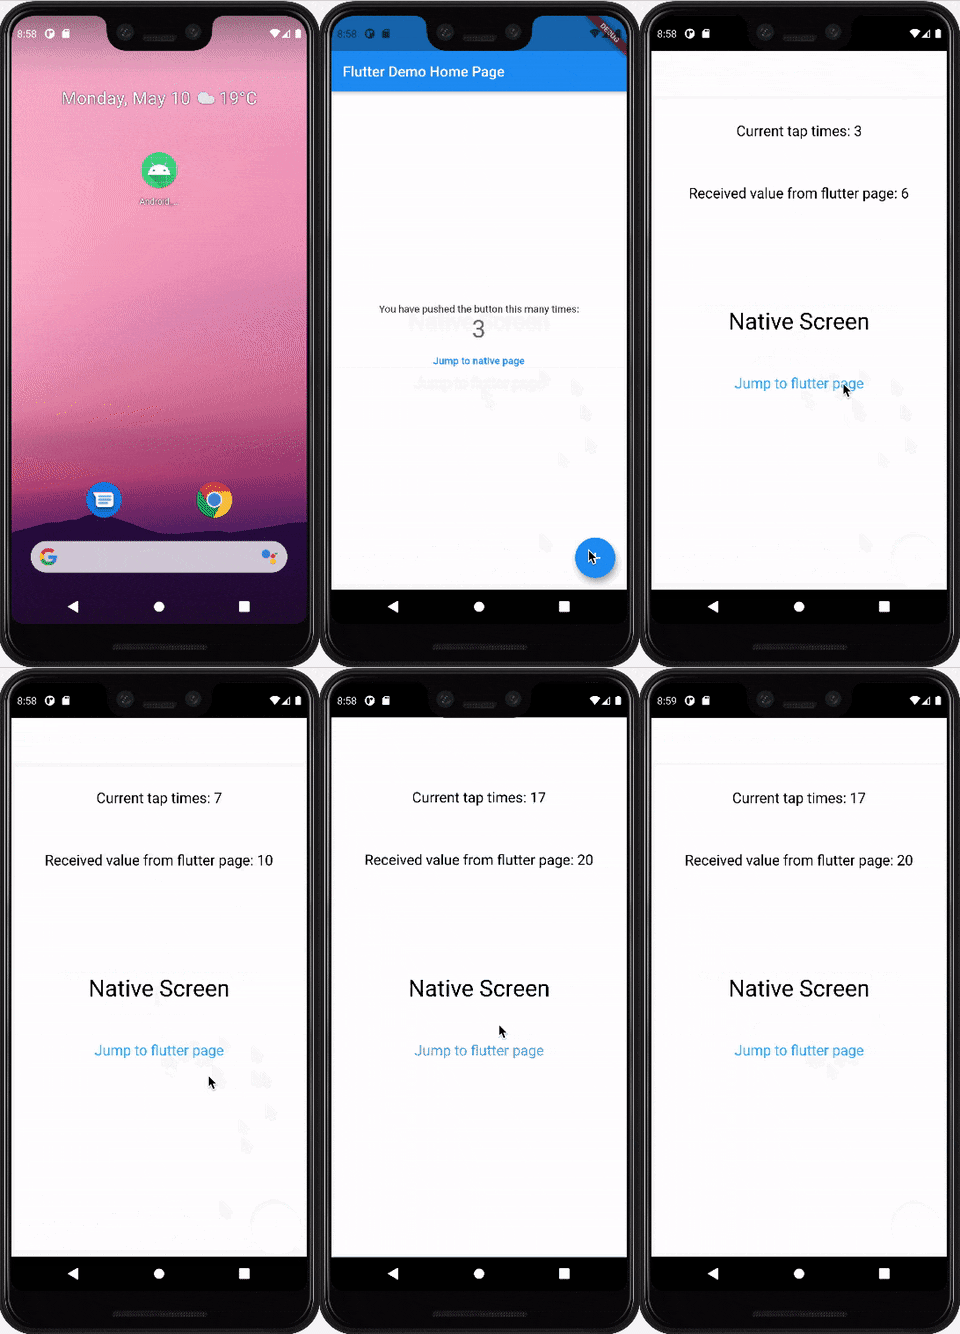
Flutterを試したい、でも既存のアプリはネイティブで構築しており、全部Flutterに置き換えたらなんか怖い。。。といった思いを持っている開発者は少なくないでしょう。今回は既存のiOS、Androidプロジェクトを維持したままアプリの一部の画面をFlutterで作成します。
環境
OS: macOs Big Sur 11.1
flutter: 2.0.4
flutterとネイティブ間の画面遷移に伴う値渡しも実現できます。


1、公式のやり方
Flutterのオフィシャルソリューションです。
Native ⇄ Flutter画面遷移の時、Flutter Engineの数は同時に増加し、アプリのメモリ消費量が膨大化になりかねなかったが、Flutter 2.0では新たにFlutterEngineGroup APIが開放され、最初のEngineを除き、新しいEngineが生成する度にメモリは最大でも180kbしか増えないとなります。但し、多数のEngineの間にisolate層のメモリが共用できないといったことはクールではないです😭 。
1.1 flutter moduleを作る
まず、共通化した部分を作成します。
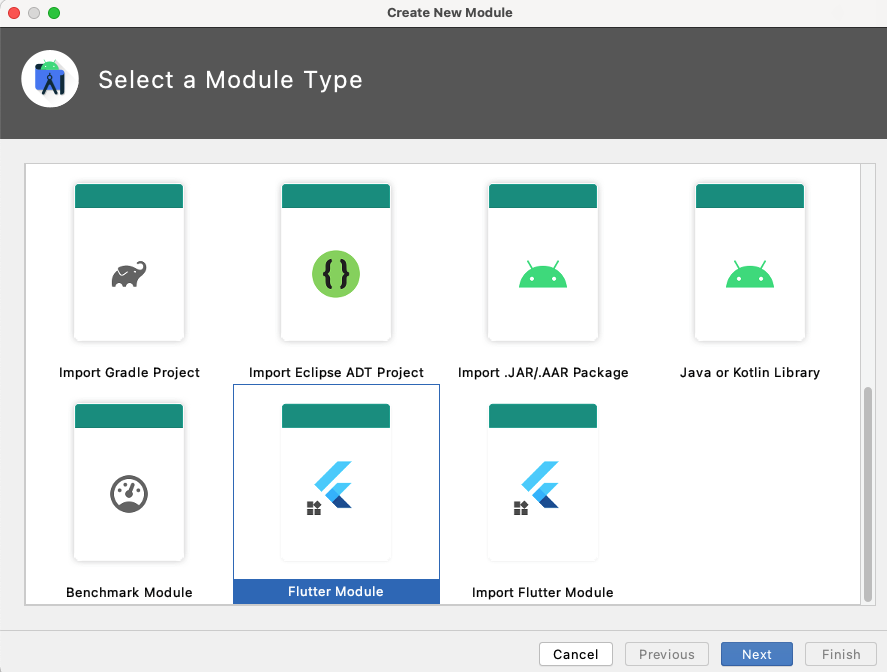
1.1.1 モジュールタイプを作成する
flutter部分Projectではなく、moduleとして存在します。

↑CLIベースでのモジュール生成や移動もできますので、ぜひ見てみてください。
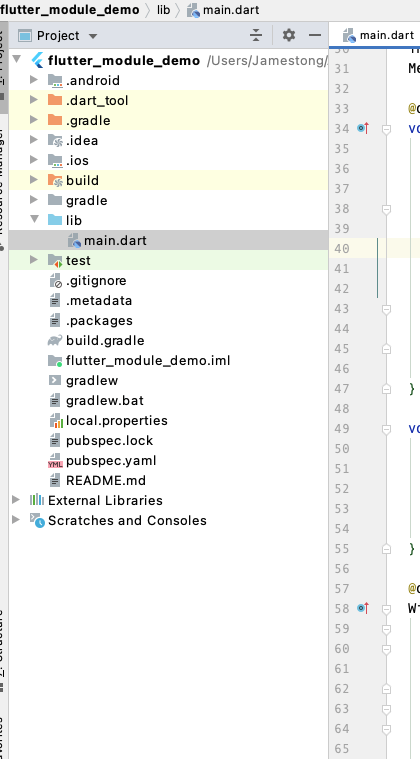
ファイルロケーションやモジュール名を決めた後、以下のような構成になります。

Android, iosフォルダは通常のAndroid、iosではなく、.Android、.iosとなっています。
1.1.2 main.dartを編集
以下のflutterサンプルは一画面しかないが、複数のflutter画面を作成することも可能です。
import 'package:flutter/material.dart';
import 'package:flutter/services.dart';

void main() => runApp(MyApp());

class MyApp extends StatelessWidget {
  // This widget is the root of your application.
  @override
  Widget build(BuildContext context) {
    return MaterialApp(
      title: 'Flutter Demo',
      initialRoute: "/",
      theme: ThemeData(
        primarySwatch: Colors.blue,
      ),
      home: MyHomePage(title: 'Flutter Demo Home Page'),
    );
  }
}

class MyHomePage extends StatefulWidget {
  MyHomePage({Key key, this.title}) : super(key: key);
  final String title;

  @override
  _MyHomePageState createState() => _MyHomePageState();
}

class _MyHomePageState extends State<MyHomePage> {
  int _counter = 0;
  MethodChannel _channel;

  @override
  void initState() {
    super.initState();
    _channel = MethodChannel('multiple-flutters');
    _channel.setMethodCallHandler((MethodCall call) async {
      if (call.method == "setCount") {
        setState(() {
          _counter = call.arguments as int;
        });
      } else {
        throw Exception('not implemented ${call.method}');
      }
    });
  }

  void _incrementCounter() {
    setState(() {
      _counter++;
    });
    _channel.invokeMethod("tapCounter", _counter);
  }

  @override
  Widget build(BuildContext context) {
    return Scaffold(
      appBar: AppBar(
        title: Text(widget.title),
      ),
      body: Center(
        child: Column(
          mainAxisAlignment: MainAxisAlignment.center,
          children: <Widget>[
            Text(
              'You have pushed the button this many times:',
            ),
            Text(
              '$_counter',
              style: Theme.of(context).textTheme.headline4,
            ),
            TextButton(
              onPressed: () {
                _channel.invokeMethod("jump2Native", _counter);
                SystemNavigator.pop(animated: true);
              },
              child: Text('Jump to native page'),
            ),
          ],
        ),
      ),
      floatingActionButton: FloatingActionButton(
        onPressed: _incrementCounter,
        tooltip: 'Increment',
        child: Icon(Icons.add),
      ), // This trailing comma makes auto-formatting nicer for build methods.
    );
  }
}
1.2 iOS
iosアプリの画面レイアウトやUIコンポーネントの配置は
Storyboardで作成済
1.2.1 flutter moduleフォルダを移動する
ホストアプリのルートに flutter_module_demo フォルダを置きます。

1.2.2 Podfileを編集する
iosネイティブプロジェクトにはPodfileがない場合、新たに生成してください。
下記のように編集完了したら、$ pod installをすることでFlutterモジュールがiosアプリにインポートできるようになります。
flutter_application_path = '../flutter_module_demo'
load File.join(flutter_application_path, '.ios', 'Flutter', 'podhelper.rb')

target 'iOS_Demo' do
  # Comment the next line if you don't want to use dynamic frameworks
  use_frameworks!
  install_all_flutter_pods(flutter_application_path)

  # Pods for iOS_Demo

  target 'iOS_DemoTests' do
    inherit! :search_paths
    # Pods for testing
  end

  target 'iOS_DemoUITests' do
    # Pods for testing
  end

end
####1.2.3 iOSアプリにflutter画面を表示させる
AppDelegate.swiftクラスにに以下のコードを追加します。
lazy var flutterEngine = FlutterEngine(name: "demo engine")

    func application(_ application: UIApplication, didFinishLaunchingWithOptions launchOptions: [UIApplication.LaunchOptionsKey: Any]?) -> Bool {
        flutterEngine.run();
        //splash page show time
        sleep(2)
        // Override point for customization after application launch.
        return true
    }
iosネイティブViewControllerとflutter moduleの連携:
import UIKit
import Flutter

class ViewController: UIViewController {

    @IBOutlet weak var countView: UILabel!
    @IBOutlet weak var receivedValueView: UILabel!
    private var channel: FlutterMethodChannel?
    var count = 0
    let flutterEngine = (UIApplication.shared.delegate as! AppDelegate).flutterEngine

    override func viewDidLoad() {
        super.viewDidLoad()
        // Do any additional setup after loading the view.
        channel = FlutterMethodChannel(
            name: "multiple-flutters", binaryMessenger: flutterEngine.binaryMessenger)
        channel?.invokeMethod("setCount", arguments: count + 3)
        channel?.setMethodCallHandler { [weak self] (call: FlutterMethodCall, result: @escaping FlutterResult) in
            if let strongSelf = self {
                switch(call.method) {
                case "tapCounter":
                    strongSelf.count += 1
                    strongSelf.countView.text = "Current tap times: \(strongSelf.count)"
                case "jump2Native":
                    strongSelf.receivedValueView.text = "Received value from flutter page: \(call.arguments as! Int)"
                default:
                    // Unrecognized method name
                    print("Unrecognized method name: \(call.method)")
                }
            }
        }
    }

    @IBAction func jump2Flutter(_ sender: Any) {
        let flutterViewController =
            FlutterViewController(engine: flutterEngine, nibName: nil, bundle: nil)
        flutterViewController.modalPresentationStyle = .fullScreen
        present(flutterViewController, animated: true, completion: nil)
    }

}
1.3 Android
Androidアプリの画面レイアウトやUIコンポーネントの配置は
Designで作成済
1.3.1 flutter moduleフォルダを移動する
iosと同じようにホストアプリのルートに flutter_module_demo フォルダを置きます。
1.3.2 既存のAndroidアプリに統合する
settings.gradle を以下のように設定します。
rootProject.name = "Android_Demo"
include ':app'
+ setBinding(new Binding([gradle: this]))
+ evaluate(new File(
+         settingsDir.parentFile,
+         'flutter_module_demo/.android/include_flutter.groovy'
+ ))
合わせてapp/build.gradle で以下のようにインポートします。
dependencies {
    implementation 'androidx.multidex:multidex:2.0.1'
    // ......
+   implementation project(':flutter')
}
これでflutter module はAndroidアプリに統合しました。
1.3.3 Androidアプリにflutter画面を表示させる
AndroidManifest.xmlの記述:
<?xml version="1.0" encoding="utf-8"?>
<manifest xmlns:android="http://schemas.android.com/apk/res/android"
    package="com.android_demo">

    <application
        android:name=".MyApplication"
        android:allowBackup="true"
        android:icon="@mipmap/ic_launcher"
        android:label="@string/app_name"
        android:roundIcon="@mipmap/ic_launcher_round"
        android:supportsRtl="true"
        android:theme="@style/Theme.Android_Demo">
        <activity android:name=".SplashActivity">
            <intent-filter>
                <action android:name="android.intent.action.MAIN" />
                <category android:name="android.intent.category.LAUNCHER" />
            </intent-filter>
        </activity>
        <activity android:name=".MainActivity">
            <intent-filter>
                <action android:name="android.intent.action.MAIN" />
            </intent-filter>
        </activity>
        <activity
            android:name="io.flutter.embedding.android.FlutterActivity"
            android:theme="@style/Theme.Android_Demo"
            android:configChanges="orientation|keyboardHidden|keyboard|screenSize|locale|layoutDirection|fontScale|screenLayout|density|uiMode"
            android:hardwareAccelerated="true"
            android:windowSoftInputMode="adjustResize"
            />
    </application>

</manifest>
MyApplication.ktの記述:
flutter engine をキャッシュできる仕組みを設けます。
package com.android_demo

import androidx.multidex.MultiDexApplication
import io.flutter.embedding.engine.FlutterEngine
import io.flutter.embedding.engine.FlutterEngineCache
import io.flutter.embedding.engine.dart.DartExecutor
import io.flutter.plugin.common.MethodChannel

const val ENGINE_ID = "1"

class MyApplication : MultiDexApplication() {
    var count = 0
    var receivedValue = 0

    private lateinit var channel: MethodChannel

    override fun onCreate() {
        super.onCreate()

        val flutterEngine = FlutterEngine(this)
        flutterEngine
            .dartExecutor
            .executeDartEntrypoint(
                DartExecutor.DartEntrypoint.createDefault()
            )

        FlutterEngineCache.getInstance().put(ENGINE_ID, flutterEngine)

        channel = MethodChannel(flutterEngine.dartExecutor, "multiple-flutters")
        channel.invokeMethod("setCount",count + 3)
        channel.setMethodCallHandler { call, _ ->
            when (call.method) {
                "tapCounter" -> {
                    count++
                }
                "jump2Native" -> {
                    receivedValue = call.arguments as Int
                }
            }
        }
    }
}
スプラッシュ画面:
package com.android_demo

import android.content.Intent
import androidx.appcompat.app.AppCompatActivity
import android.os.Bundle
import android.os.Handler
import android.os.Looper

class SplashActivity : AppCompatActivity() {

    private val SPLASH_DISPLAY_LENGHT = 2000L //splash page show time
    private val handler = Handler(Looper.getMainLooper())
    private val runnable = Runnable {
        val intent = Intent(this, MainActivity::class.java)
        startActivity(intent)
    }

    override fun onCreate(savedInstanceState: Bundle?) {
        super.onCreate(savedInstanceState)
        setContentView(R.layout.activity_splash)
        handler.postDelayed(runnable,SPLASH_DISPLAY_LENGHT)
    }
    override fun onStop() {
        super.onStop()
        handler.removeCallbacks(runnable)
    }

}
メイン画面:
package com.android_demo

import androidx.appcompat.app.AppCompatActivity
import android.os.Bundle
import android.util.Log
import android.view.View
import android.widget.TextView
import io.flutter.embedding.android.FlutterActivity
import io.flutter.embedding.engine.FlutterEngine
import io.flutter.embedding.engine.dart.DartExecutor
import io.flutter.plugin.common.MethodChannel

class MainActivity : AppCompatActivity() {

    private lateinit var counterLabel: TextView
    private lateinit var receivedValueLable: TextView

    override fun onCreate(savedInstanceState: Bundle?) {
        super.onCreate(savedInstanceState)
        setContentView(R.layout.activity_main)
        counterLabel = findViewById(R.id.textViewCount)
        receivedValueLable = findViewById(R.id.textViewReceivedValue)
    }

    fun onClickJump2Flutter(v:View){
        Log.d("MainActivity","onClickJump2Flutter clicked")
        val intent = FlutterActivity
                .withCachedEngine(ENGINE_ID)
                .build(this)
        startActivity(intent)
    }

    override fun onResume() {
        super.onResume()
        val app = application as MyApplication
        if (app.count != 0) {
            counterLabel.text = "Current tap times: ${app.count}"
        }
        if (app.receivedValue != 0){
            receivedValueLable.text = "Received value from flutter page: ${app.receivedValue}"
        }
    }
}
2、シェアエンジン(シングルエンジン)のやり方
オフィシャルソリューションでFlutterを既存のAppに組み込むことが実現できました。しかしながら、未解決の技術課題がたくさんあります。flutter ⇄ native間の遷移に伴うFlutter Engine数の増加で、アプリのメモリ消費がどんどん増えます。また、flutter各ページ、flutter ⇄ native各ページの遷移の管理方式はバラバラになるため、ソースコードをきれいに書けない等。
それらを改善するための外部プラグインが存在しそうです。興味があれば、ぜひ下記のFlutterBoostを使ってみてください。
A next-generation Flutter-Native hybrid solution. FlutterBoost is a Flutter plugin which enables hybrid integration of Flutter for your existing native apps with minimum efforts.The philosophy of FlutterBoost is to use Flutter as easy as using a WebView. Managing Native pages and Flutter pages at the same time is non-trivial in an existing App. FlutterBoost takes care of page resolution for you. The only thing you need to care about is the name of the page(usually could be an URL).
このプラグインの使い方に関する説明は割愛します。