■はじめに
.NET Core 3.0のWPFでGUIアプリ(アプリケーションランチャー)を作ります。

■環境
- Windows 10
- .NET Core 3.0~
- Visual Studio Code
■準備
◇SDKのインストール
SDK 3.x - Windows - .NET Core Installerのx64をダウンロードします。

インストールします。

◇Visual Studio Codeのインストール
Visual Studio Codeをインストールします。
エクスプローラーのディレクトリコンテキストメニューはチェックを入れておいてください。

◇作業フォルダの作成、Visual Studio Codeの起動
エクスプローラーでプロジェクトを格納するフォルダを作成します。
そして起点となるフォルダ内で右クリックし、Visual Studio Codeを起動します。

■プロジェクトの作成
ターミナルが表示されていない場合はメニューの表示 - ターミナルでターミナルを表示します。
ターミナルのコンボボックスはPowershellまたはpwshを選択します。

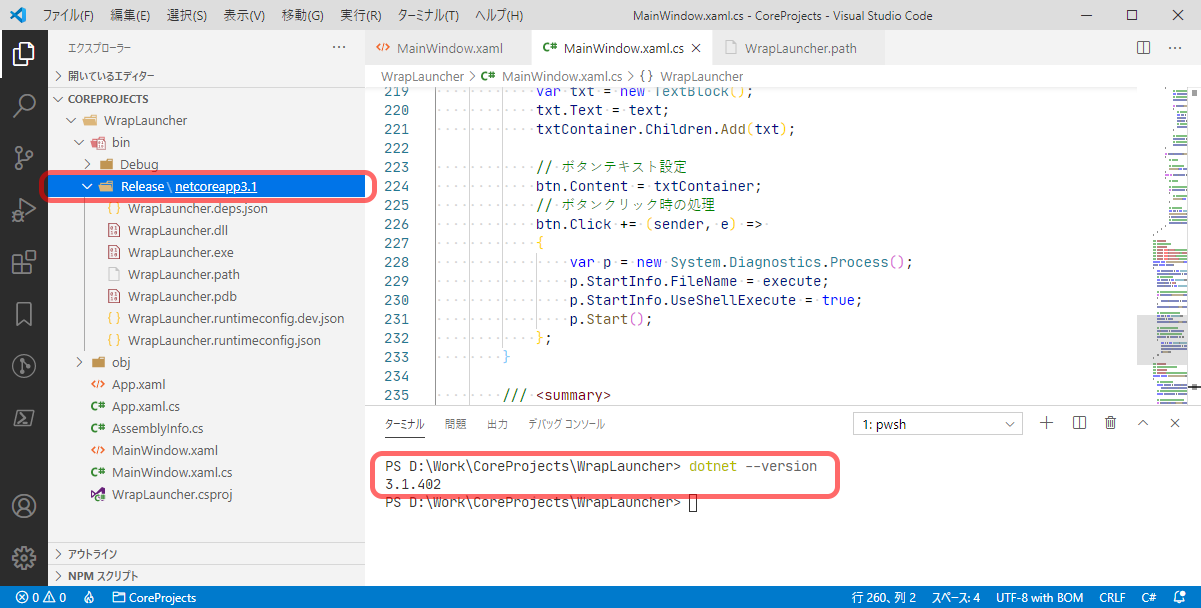
ターミナルに以下のコマンドを入力し、バージョンが3.xであることを確認します。
dotnet --version
以下のコマンドでプロジェクトを生成します。
--nameの後にプロジェクト名を指定します。
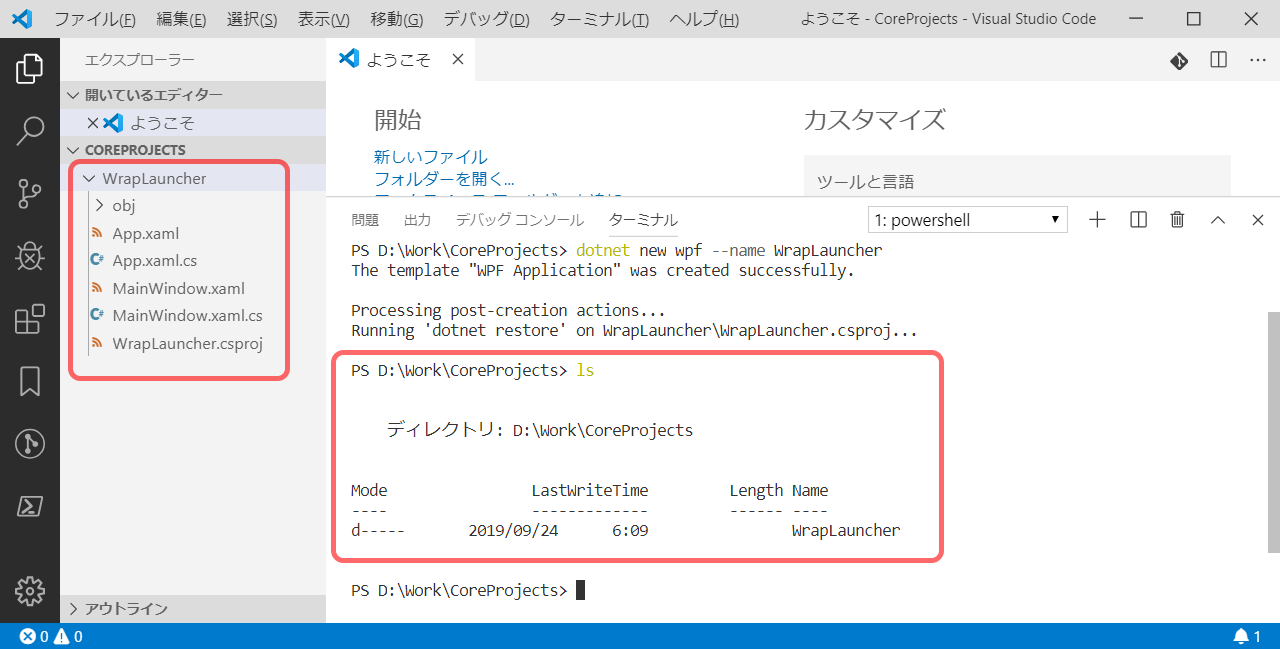
dotnet new wpf --name WrapLauncher
以下のコマンドでプロジェクトのディレクトリが作成されていることを確認します。
ls
Visual Studio CodeにC#の拡張機能を入れていない場合はインストールしておきます。

■とりあえず実行
以下のコマンドでプロジェクトのディレクトリに移動します。
cd .\WrapLauncher
以下のコマンドでプロジェクトをリリースビルド、実行します。
dotnet run -c Release

空の画面が表示されました。
■画面の作成
MainWindow.xamlを以下のように編集します。
<Window x:Class="WrapLauncher.MainWindow"
        xmlns="http://schemas.microsoft.com/winfx/2006/xaml/presentation"
        xmlns:x="http://schemas.microsoft.com/winfx/2006/xaml"
        xmlns:d="http://schemas.microsoft.com/expression/blend/2008"
        xmlns:mc="http://schemas.openxmlformats.org/markup-compatibility/2006"
        xmlns:local="clr-namespace:WrapLauncher"
        mc:Ignorable="d"
        Title="ランチャー" Height="450" Width="800" ResizeMode="CanResizeWithGrip"
        Loaded="Window_Loaded">
    <Window.Resources>
        <!-- 起動ボタンのスタイル -->
        <Style TargetType="Button">
            <Setter Property="Margin" Value="5"/>
            <Setter Property="Padding" Value="3"/>
        </Style>
        <!-- 見出しラベルのスタイル -->
        <Style x:Key="TitleLabel" TargetType="TextBlock">
            <Setter Property="Margin" Value="5,10,5,0"/>
            <Setter Property="FontWeight" Value="Bold"/>
            <Setter Property="Foreground" Value="DarkBlue"/>
        </Style>

        <!-- コンテキストメニュー -->
        <ContextMenu x:Key="CtxMenu">
            <MenuItem Header="設定再読み込み(_R)" Click="MenuReload_Click"/>
            <Separator />
            <MenuItem Header="ヘルプ(_H)" Click="MenuHelp_Click"/>
        </ContextMenu>
    </Window.Resources>

    <!-- この中にボタン等を追加していく -->
    <StackPanel x:Name="mainContainer" />
</Window>
■ロジックの作成
MainWindow.xaml.csを以下のように編集します。
using System.Windows;
using System.Windows.Controls;
using System.Collections.Generic;
using System.Windows.Media;

namespace WrapLauncher
{
    /// <summary>
    /// Interaction logic for MainWindow.xaml
    /// </summary>
    public partial class MainWindow : Window
    {
        // パスファイル(BOMなしUTF8)
        private const string ConfigFileName = "WrapLauncher.path";
        // 見出しテキストのカラム位置
        private const int IdxTitle = 0;
        // 色記号のカラム位置
        private const int IdxColor = 0;
        // ボタンテキストのカラム位置
        private const int IdxBtnText = 1;
        // 起動フォルダパスのカラム位置
        private const int IdxLaunchPath = 2;
        // 色テーブル
        private static readonly Dictionary<string, SolidColorBrush>ColorTable = new Dictionary<string, SolidColorBrush>
        {
            { "bla", new SolidColorBrush(Color.FromArgb(0xff, 0x00, 0x00, 0x00)) },
            { "gra", new SolidColorBrush(Color.FromArgb(0xff, 0x80, 0x80, 0x80)) },
            { "yel", new SolidColorBrush(Color.FromArgb(0xff, 0xff, 0xd7, 0x00)) },
            { "gre", new SolidColorBrush(Color.FromArgb(0xff, 0x00, 0x80, 0x00)) },
            { "blu", new SolidColorBrush(Color.FromArgb(0xff, 0x00, 0x00, 0xff)) },
            { "sky", new SolidColorBrush(Color.FromArgb(0xff, 0x87, 0xce, 0xeb)) },
            { "red", new SolidColorBrush(Color.FromArgb(0xff, 0xff, 0x00, 0x00)) },
            { "ora", new SolidColorBrush(Color.FromArgb(0xff, 0xff, 0x8c, 0x00)) },
            { "pur", new SolidColorBrush(Color.FromArgb(0xff, 0x80, 0x00, 0x80)) },
            { "whi", new SolidColorBrush(Color.FromArgb(0xff, 0xff, 0xff, 0xff)) },
        };
        // ヘルプテキスト
        private const string HelpText = @"設定ファイルはEXEと同じ場所に「WrapLauncher.path」のファイル名で配置する。
文字コードはBOM無しのUTF8。

データ構造
------------------------------
//見出し
色記号  ボタンテキスト   起動プログラム/フォルダのフルパス
色記号  ボタンテキスト   起動プログラム/フォルダのフルパス
:
//見出し
色記号  ボタンテキスト   起動プログラム/フォルダのフルパス
:
------------------------------
見出しは先頭「//」で始める。
色記号、ボタンテキスト、起動するパスはTABで区切る。
使用できる色記号は
bla:黒、gra:灰色、yel:黄色、gre:緑、blu:青
sky:水色、red:赤、ora:オレンジ、pur:紫、whi:白
";


        /// <summary>
        /// コンストラクタ
        /// </summary>
        public MainWindow()
        {
            InitializeComponent();
            // コンテキストメニュー設定
            this.ContextMenu = (ContextMenu)(this.Resources["CtxMenu"]);
        }

        /// <summary>
        /// 起動時
        /// </summary>
        private void Window_Loaded(object sender, RoutedEventArgs e)
        {
            // 設定読み込み、画面に反映
            LoadConfig();
        }

        /// <summary>
        /// コンテキストメニュー「設定再読み込み」
        /// </summary>
        private void MenuReload_Click(object sender, RoutedEventArgs e)
        {
            // 画面クリア
            mainContainer.Children.Clear();

            // 設定読み込み、画面に反映
            LoadConfig();
        }

        /// <summary>
        /// コンテキストメニュー「ヘルプ」
        /// </summary>
        private void MenuHelp_Click(object sender, RoutedEventArgs e)
        {
            MessageBox.Show(HelpText);
        }

        /// <summary>
        /// 設定読み込み、画面に反映
        /// </summary>
        private void LoadConfig()
        {
            // 設定ファイルのフルパス取得
            string cfgFilePath = GetConfigFilePath();

            // 設定ファイルが見つからなければ終了
            if (string.IsNullOrEmpty(cfgFilePath))
            {
                return;
            }

            // 設定ファイル読み込み
            using (var reader = new System.IO.StreamReader(cfgFilePath))
            {
                WrapPanel btnContainer = null;

                while (!reader.EndOfStream)
                {
                    // TABで分解
                    var item = reader.ReadLine().Split('\t');
                    if (item.Length < 1)
                    {
                        // データなしの行
                        continue;
                    }

                    /*
                    mainContainer           ..... StackPanel
                        grpContainer        ..... StackPanel
                            見出し          ..... TextBlock
                            btnContainer    ..... WrapPanel
                                ボタン
                                ボタン
                                :
                        grpContainer        ..... StackPanel
                            見出し          ..... TextBlock
                            btnContainer    ..... WrapPanel
                                ボタン
                                ボタン
                                :
                    */

                    // グループ作成するローカル関数
                    void MakeGroup(ref WrapPanel btnContainer, string grpTitle = "")
                    {
                            // グループコンテナ作成
                            var grpContainer = new StackPanel();
                            // グループコンテナをメインコンテナに追加
                            mainContainer.Children.Add(grpContainer);

                            if (string.IsNullOrEmpty(grpTitle) == false)
                            {
                                // 見出し作成
                                var txt = new TextBlock();
                                txt.Style = (Style)(this.Resources["TitleLabel"]);
                                txt.Text = grpTitle;
                                // 見出しをグループコンテナに追加
                                grpContainer.Children.Add(txt);
                            }

                            // ボタンコンテナを作成
                            btnContainer = new WrapPanel();
                            // ボタンコンテナをグループコンテナに追加
                            grpContainer.Children.Add(btnContainer);
                    }

                    if (item[IdxTitle].StartsWith("//"))
                    {
                        // 見出し

                        // グループ作成
                        MakeGroup(ref btnContainer, item[IdxTitle].Substring(2));
                    }
                    else if (item.Length == 3)
                    {
                        // ボタン

                        // まだボタンコンテナが作成されていない?
                        if (btnContainer == null)
                        {
                            // グループ作成(見出し無し)
                            MakeGroup(ref btnContainer);
                        }

                        // ボタン作成
                        var btn = new Button();
                        SetButtonProperty(btn, item[IdxColor], item[IdxBtnText], item[IdxLaunchPath]);
                        // ボタンコンテナにボタンを追加
                        btnContainer.Children.Add(btn);
                    }
                }
            }
        }

        /// <summary>
        /// ボタン属性設定
        /// </summary>
        /// <param name="btn">ボタンオブジェクト</param>
        /// <param name="colorKey">色</param>
        /// <param name="text">ボタンテキスト</param>
        /// <param name="execute">起動プログラムのファイルパス</param>
        private void SetButtonProperty(Button btn, string colorKey, string text, string execute)
        {
            var txtContainer = new StackPanel();
            txtContainer.Orientation = Orientation.Horizontal;
            // ■テキスト作成
            var txtMark = new TextBlock();
            txtMark.Text = "■";
            txtMark.Margin = new Thickness(0,0,2,0);

            // 色指定が有効なら■の色を変える
            if (ColorTable.ContainsKey(colorKey))
            {
                txtMark.Foreground = ColorTable[colorKey];
            }
            txtContainer.Children.Add(txtMark);

            // ボタン名テキスト作成
            var txt = new TextBlock();
            txt.Text = text;
            txtContainer.Children.Add(txt);

            // ボタンテキスト設定
            btn.Content = txtContainer;
            // ボタンクリック時の処理
            btn.Click += (sender, e) =>
            {
                var p = new System.Diagnostics.Process();
                p.StartInfo.FileName = execute;
                p.StartInfo.UseShellExecute = true;
                p.Start();
            };
        }

        /// <summary>
        /// 設定ファイルパス取得
        /// </summary>
        /// <returns>設定ファイルのフルパス。存在しない場合は空文字列を返す。</returns>
        private string GetConfigFilePath()
        {
            // EXEのパス取得
            string appPath = System.IO.Path.GetDirectoryName(
                System.Reflection.Assembly.GetExecutingAssembly().Location);
            // 設定ファイルのフルパス組み立て
            string cfgFilePath = System.IO.Path.Combine(appPath, ConfigFileName);

            // 設定ファイル存在チェック
            if (System.IO.File.Exists(cfgFilePath))
            {
                return cfgFilePath;
            }
            else
            {
                // 設定ファイルなし
                return string.Empty;
            }
        }

    }
}
■設定ファイルの作成
WrapLauncher\bin\Release\netcoreapp3.0に新規ファイルを作成します。

WrapLauncher.pathというファイル名にします。

設定ファイルに起動したいフォルダパスやドキュメントファイルパス、プログラムパスなどを記述します。
ファイルの文字コードはBOM無しUTF-8。
色、ボタン名、パスの間はTAB区切りです。
//見出し名A
色	ボタン名1	パス1
色	ボタン名2	パス2
:
//見出し名B
色	ボタン名3	パス3
:
| 色 | 説明 |
|---|---|
| bla | [■] 黒 |
| gra | [■] 灰色 |
| yel | [■] 黄色 |
| gre | [■] 緑 |
| blu | [■] 青 |
| sky | [■] 水色 |
| red | [■] 赤 |
| ora | [■] 橙 |
| pur | [■] 紫 |
| whi | [■] 白 |
TAB入力でSPACEになってしまう場合は、ファイル - ユーザー設定 - 設定で検索ボックスに
insertを入力し、Editor:Insert Spacesのチェックを外してください。

■実行
設定ファイルを編集し、ソースファイルと設定ファイルを保存したら
dotnet run -c Releaseでビルド・実行してみます。

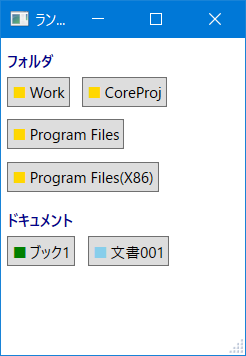
ウィンドウの幅を狭めるとボタンが折り返して表示されます。
ビルド後はEXEを直接起動してもよいです。

■おまけ
◇dotnetコマンド
使用頻度が高そうなコマンドを載せておきます。
◎バージョン表示
# .NET Coreバージョン表示
dotnet --version
◎プロジェクト作成
# カレントディレクトリにコンソールアプリケーションのプロジェクトを作成
dotnet new console

# カレントディレクトリにWPF(GUI)アプリケーションのプロジェクトを作成
dotnet new wpf
--name(省略形は-n)オプションを指定しない場合は、カレントディレクトリ名がプロジェクト名になります。オプションを指定した場合は、その名前でディレクトリが作成され、その中にプロジェクトが作成されます。
◎ビルド
# カレントディレクトリのプロジェクトをビルド
dotnet build

# カレントディレクトリのプロジェクトをビルド・実行
dotnet run
--configuration(省略形は-c)オプションを指定しない場合は、既定値のDebugビルドになります。
◇SDKを.NET Core 3.1にアップデート
SDKをアップデート後、プロジェクトファイル(*.csproj)のTargetFrameworkをnetcoreapp3.1に修正し、ビルドしてください。
生成される実行ファイルのフォルダが3.1になっているので、設定ファイル(WrapLauncher.path)を3.0から持ってきてください。
◇SDKを.NET 5.0にアップデート
SDKをアップデート後、プロジェクトファイル(*.csproj)のProject SdkをMicrosoft.NET.Sdkに修正し、TargetFrameworkをnet5.0-windowsに修正し、ビルドしてください。
TargetFrameworkで指定したフォルダに実行ファイルが生成されるので、設定ファイルを以前の場所から持ってきてください。
※.NET 5で新規に作る場合はこちら↓の記事を参照してください。
◇アイコンの設定
実行ファイルとウィンドウ左上のアイコンを設定します。

やり方は、アイコンを用意(参考)し、プロジェクトのフォルダに配置、プロジェクトファイルに記述を追加します。

  <PropertyGroup>
    <ApplicationIcon>appIcon.ico</ApplicationIcon>
  </PropertyGroup>
◇マルチディスプレイの高DPI対応
プロジェクトにapp.manifestファイルを追加し、プロジェクトファイルに記述を追加します。

<?xml version="1.0" encoding="utf-8"?>
<assembly manifestVersion="1.0" xmlns="urn:schemas-microsoft-com:asm.v1">

  <compatibility xmlns="urn:schemas-microsoft-com:compatibility.v1">
    <application>
      <!-- Windows Vista -->
      <supportedOS Id="{e2011457-1546-43c5-a5fe-008deee3d3f0}" />

      <!-- Windows 7 -->
      <supportedOS Id="{35138b9a-5d96-4fbd-8e2d-a2440225f93a}" />

      <!-- Windows 8 -->
      <supportedOS Id="{4a2f28e3-53b9-4441-ba9c-d69d4a4a6e38}" />

      <!-- Windows 8.1 -->
      <supportedOS Id="{1f676c76-80e1-4239-95bb-83d0f6d0da78}" />

      <!-- Windows 10 -->
      <supportedOS Id="{8e0f7a12-bfb3-4fe8-b9a5-48fd50a15a9a}" />

    </application>
  </compatibility>

  <application xmlns="urn:schemas-microsoft-com:asm.v3">
    <windowsSettings>
      <dpiAware xmlns="http://schemas.microsoft.com/SMI/2005/WindowsSettings">True/PM</dpiAware>
      <dpiAwareness xmlns="http://schemas.microsoft.com/SMI/2016/WindowsSettings">PerMonitorV2, PerMonitor</dpiAwareness>
    </windowsSettings>
  </application>

</assembly>
  <PropertyGroup>
    <ApplicationManifest>app.manifest</ApplicationManifest>
  </PropertyGroup>