注意
macOS Catalina から、Mac は zsh をデフォルトのログインシェルおよびインタラクティブシェルとして使うようになりました。
https://support.apple.com/ja-jp/HT208050
なので macOS Catalina 以降をご使用の方は、zsh を導入する必要はありません。
概要
エンジニアとして働くと、ターミナルやiTerm2でシェルを毎日使います。
最初はMac標準のbashを使っていたのですが、zshが良いと聞き、乗り換えてみました。
使い始めてから、6ヶ月以上経過していますが、今のところ便利さで使い続けています。
zshの導入と、それに付随してoh-my-zshの導入を紹介します。
便利さ
見やすいプロンプト
・zsh + oh-my-zshを導入すれば、このような見やすいプロンプトがすぐに使えるようになります。
・個人的に、ブランチ名が表示されるのが非常に助かります。
補完機能
・ディレクトリを移動する時、Tabキーを連打するだけで、ディレクトリを指定できます。
・入力の手間が省けるので便利です。
コマンドに色付け
・こちらはzshのシンタックスハイライト機能をしようしています。
・上記2枚のスクショを見て頂ければわかりますが、使用できるコマンドは緑、使用できないコマンドは赤で表示されます。
・これで打ち間違いなどをすぐに見分けることができます。
欠点
oh-my-zshを導入するとシェルの起動が遅くなります。
- ターミナルなどで新しくタブを開き、シェルを起動する時に起動が遅いです。
- なので、vimでコードを書いている方などはoh-my-zshは使わずに純粋なzshを使った方が良いと思います。
- 自分の場合、コードはRubyMineを使って書いているので、起動の遅さは問題になっていません。
導入手順
zsh
・Homebrewを使ってzshをインストールします。
Homebrew自体を導入していない方はこちらを参照
- zshをインストールします。
$ brew install zsh
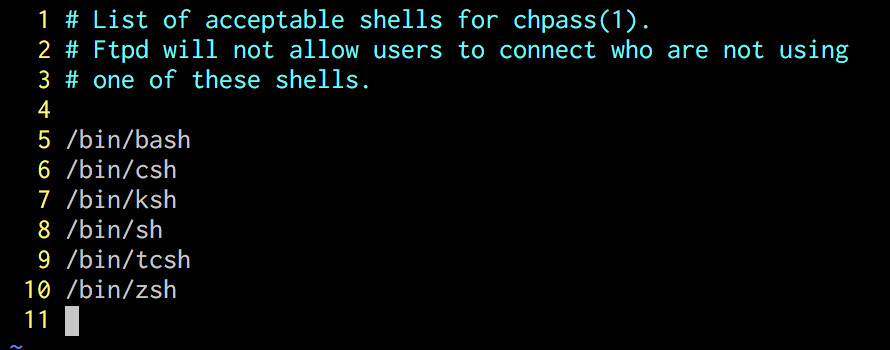
- 使用できるシェルを確認します。
$ sudo vi /etc/shells
Password:
- 以下が表示されます。
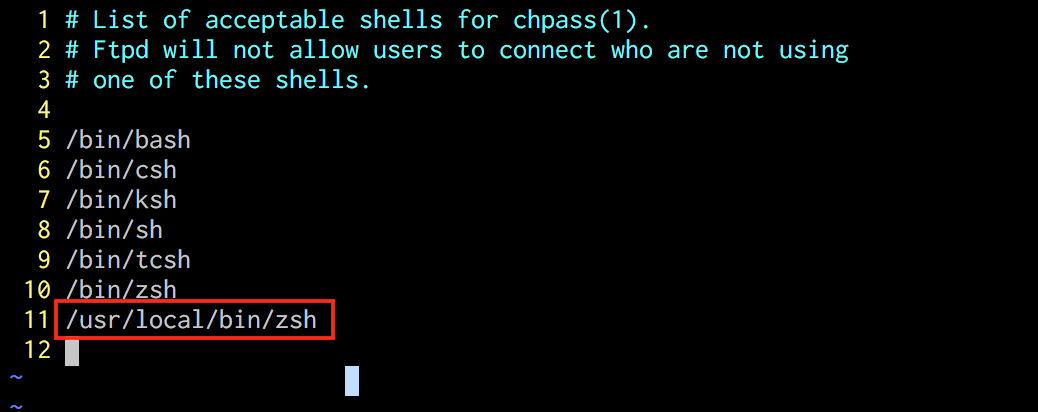
- 以下を追記して保存します。
/usr/local/bin/zsh
- ログインシェルを変更します。
$ chsh -s /usr/local/bin/zsh
Changing shell for test_user.
Password for test_user:
新しいタブを開き、zshを起動
- ターミナルなどで新しくタブを開きます。
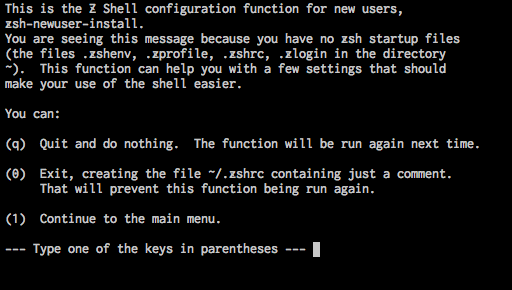
- すると、以下のように表示されます。
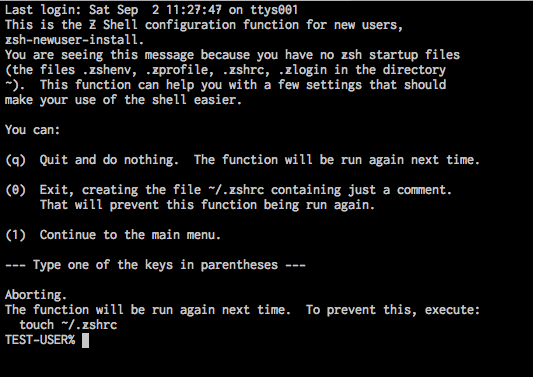
- そのままEnterを押します。
- Homebrewでインストールしたzshが使われているか確認します。
TEST-USER% echo $SHELL
/usr/local/bin/zsh
- 以上で、zshの導入が完了です。
oh-my-zsh
・zshのフレームワークです。
・様々なプラグインを使用できます。
- 以下のコマンドで導入します。
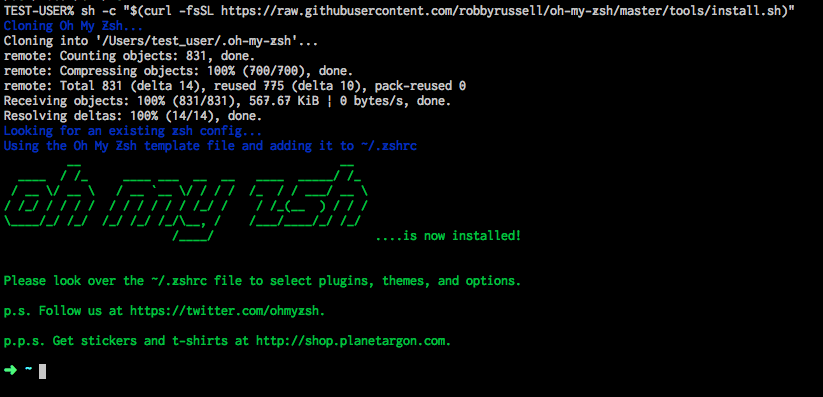
$ sh -c "$(curl -fsSL https://raw.githubusercontent.com/robbyrussell/oh-my-zsh/master/tools/install.sh)"
- 以下のように表示されます。
- これでoh-my-zsh自体の導入は完了です。
zshrcを編集してカスタマイズ
プロンプトの変更
- zshの設定を確認します。
$ vim ~/.zshrc
- まずテーマを
robbyrussellからcandy変更してみます。 - 10行目にテーマの設定があります。
ZSH_THEME="candy"
- 保存した後、以下のコマンドを入力して反映します。
$ source ~/.zshrc
- 以下のように表示が変更されます。
シンタックスハイライトの設定
- 以下のコマンドを実行し、zsh-syntax-highlightingをgit cloneします。
$ git clone https://github.com/zsh-users/zsh-syntax-highlighting.git ${ZSH_CUSTOM:-~/.oh-my-zsh/custom}/plugins/zsh-syntax-highlighting
- zshの設定を変更します。
$ vim ~/.zshrc
- 54行目に
zsh-syntax-highlightingを追記します。
plugins=(git zsh-syntax-highlighting)
- 保存して、設定を反映します。
$ source ~/.zshrc
- これで冒頭で紹介した、コマンドの色付けが完了です。
コマンド補完の設定
- 以下のコマンドを実行し、
zsh-completionsをgit cloneします。
$ git clone https://github.com/zsh-users/zsh-completions ~/.oh-my-zsh/custom/plugins/zsh-completions
- zshの設定を変更します。
$ vim ~/.zshrc
- 54行目に
zsh-completionsを追記し、その下に補完をリロードする設定を記載します。
plugins=(git zsh-syntax-highlighting zsh-completions)

# zsh-completionsの設定
autoload -U compinit && compinit -u
- 保存して、設定を反映します。
$ source ~/.zshrc
- これでコマンド補完が完了です。
以上で基本的な設定は出来ました。
その他の設定
- 自分は以下のように設定を変更しています。
- ご参考ください。
# 追加したソフトやパッケージ用のコマンドのパスを通す
export PATH=/usr/local/bin:$PATH

# rbenvのパスを通す
eval "$(rbenv init -)"

# zplugを導入するPATH
# export ZPLUG_HOME=/usr/local/opt/zplug
# source $ZPLUG_HOME/init.zsh

# Path to your oh-my-zsh installation.
export ZSH=/Users/test_user/.oh-my-zsh

# Set name of the theme to load. Optionally, if you set this to "random"
# it'll load a random theme each time that oh-my-zsh is loaded.
# See https://github.com/robbyrussell/oh-my-zsh/wiki/Themes
# oh-my-zshで利用できるテーマを指定
ZSH_THEME="candy"

# Which plugins would you like to load? (plugins can be found in ~/.oh-my-zsh/plugins/*)
# Custom plugins may be added to ~/.oh-my-zsh/custom/plugins/
# Example format: plugins=(rails git textmate ruby lighthouse)
# Add wisely, as too many plugins slow down shell startup.
# oh my zshで利用できるプラグインを指定
plugins=(brew brew-cask cdd gem git rbenv vagrant zsh-syntax-highlighting zsh-completions)

# zsh-completionsの設定
autoload -U compinit && compinit -u

source $ZSH/oh-my-zsh.sh

# Set personal aliases, overriding those provided by oh-my-zsh libs,
# plugins, and themes. Aliases can be placed here, though oh-my-zsh
# users are encouraged to define aliases within the ZSH_CUSTOM folder.
# For a full list of active aliases, run `alias`.
#
# Example aliases
# alias zshconfig="mate ~/.zshrc"
# alias ohmyzsh="mate ~/.oh-my-zsh"
alias g='git'
alias gs='git status'
alias gb='git branch'
alias gc='git checkout'
alias gct='git commit'
alias gg='git grep'
alias ga='git add'
alias gd='git diff'
alias gl='git log'
alias gcma='git checkout master'
alias gfu='git fetch upstream'
alias gfo='git fetch origin'
alias gmod='git merge origin/develop'
alias gmud='git merge upstream/develop'
alias gmom='git merge origin/master'
alias gcm='git commit -m'
alias gpo='git push origin'
alias gpom='git push origin master'
alias gst='git stash'
alias gsl='git stash list'
alias gsu='git stash -u'
alias gsp='git stash pop'
alias v='vim'
alias vi='vim'
alias r='ruby'
alias mss='mysql.server start'
alias so='source'
alias be='bundle exec'
alias ber='bundle exec ruby'
alias rs='rails s'
alias rc='rails c'
alias bers='bundle exec rails s'
alias berc='bundle exec rails c'
alias sberc='sudo bundle exec rails c'
alias Kobito='cd ~/Library/Containers/com.qiita.Kobito/Data/Library/Kobito/'

# 文字コードの指定
export LANG=ja_JP.UTF-8

# 色を使用出来るようにする
autoload -Uz colors
colors

# 日本語ファイル名を表示可能にする
setopt print_eight_bit

# cdなしでディレクトリ移動
setopt auto_cd

# ビープ音の停止
setopt no_beep

# ビープ音の停止(補完時)
setopt nolistbeep

# cd -<tab>で以前移動したディレクトリを表示
setopt auto_pushd

# ヒストリ(履歴)を保存、数を増やす
HISTFILE=~/.zsh_history
HISTSIZE=100000
SAVEHIST=100000

# 同時に起動したzshの間でヒストリを共有する
setopt share_history

# 直前と同じコマンドの場合は履歴に追加しない
setopt hist_ignore_dups

# 同じコマンドをヒストリに残さない
setopt hist_ignore_all_dups

# スペースから始まるコマンド行はヒストリに残さない
setopt hist_ignore_space

# ヒストリに保存するときに余分なスペースを削除する
setopt hist_reduce_blanks

# キーバインディングをemacs風にする
bindkey -d
bindkey -e

# 補完で小文字でも大文字にマッチさせる
zstyle ':completion:*' matcher-list 'm:{a-z}={A-Z}'


