こんにちは、UEFNエンジニアのイワケンです。QiitaにUEFN/Verseの役立つ記事を書いています。
前回の記事
非同期処理のロジックをSubscribeで書くと超大変
Unreal Festのタイムフローに関する講演でも
- 「Subscribeは可能な限り使うな」
- 「awaitと並列表現のsync,raceなどを使おう」
という推奨がされていました。
今回の記事でも脱Subscribeに向けて、次のようなタイムフローの実装をしてみましょう。

- ボタンAを押す
- 上下に動くアニメーションを再生 (非同期処理)
- 再生が終わったら風が吹く
- ボタンBを押す
- 回転するアニメーションを再生 (非同期処理)
- 再生が終わったら風が吹く
- 2つの風が起動したら「2つ起動した!」というメッセージ
- ↑の状態でリセットボタンを押すと
- 風がリセットされる
Subscribeで実装すると、次のような実装になります
using { /Fortnite.com/Devices }
using { /Verse.org/Simulation }
using { /UnrealEngine.com/Temporary/Diagnostics }
using { IwakenVerseToolkit.extensions }

event_device := class(creative_device):

    @editable
    MyButtonA : button_device = button_device{}
    @editable
    MyButtonB : button_device = button_device{}

    @editable
    AirVentA : air_vent_device = air_vent_device{}
    @editable
    AirVentB : air_vent_device = air_vent_device{}

    @editable
    SeqA : cinematic_sequence_device = cinematic_sequence_device{}
    @editable
    SeqB : cinematic_sequence_device = cinematic_sequence_device{}

    @editable
    MessageDevice: hud_message_device = hud_message_device{}


    @editable
    ResetButton : button_device = button_device{}

    var IsPlayingA:logic = false
    var IsPlayingB:logic = false
    var IsFinishedA:logic = false
    var IsFinishedB:logic = false

    OnBegin<override>()<suspends>:void=
        DisableAllAirVents()
        MyButtonA.InteractedWithEvent.Subscribe(OnPushButtonA)
        MyButtonB.InteractedWithEvent.Subscribe(OnPushButtonB)
        ResetButton.InteractedWithEvent.Subscribe(OnPushResetButton)
        SeqA.StoppedEvent.Subscribe(OnStopAnimationA)
        SeqB.StoppedEvent.Subscribe(OnStopAnimationB)

    OnPushButtonA(Agent:agent):void=
        if(IsPlayingA?):
            return
        if(IsFinishedA?):
            return
        else:
            set IsPlayingA = true
            AirVentA.Disable()
            SeqA.Play()
    OnPushButtonB(Agent:agent):void=
        if(IsPlayingB?):
            return
        if(IsFinishedB?):
            return
        else:
            set IsPlayingB = true
            AirVentB.Disable()
            SeqB.Play()
    OnPushResetButton(Agent:agent):void=
        if(IsFinishedA? and IsFinishedB?):
            Print("Reset")
            MessageDevice.Hide()
            DisableAllAirVents()
            set IsPlayingA = false
            set IsPlayingB = false
            set IsFinishedA = false
            set IsFinishedB = false
    OnStopAnimationA():void=
        set IsPlayingA = false
        set IsFinishedA = true
        AirVentA.Enable()
        OnStop()
    OnStopAnimationB():void=
        set IsPlayingB = false
        set IsFinishedB = true
        AirVentB.Enable()
        OnStop()

    OnStop():void=
        if(IsFinishedA? and IsFinishedB?):
            Print("Finished")
            MessageDevice.Show()

    DisableAllAirVents():void=
        AirVentA.Disable()
        AirVentB.Disable()
上記のコードは以下の点で大変です。
- フローの順番が直感的でない
- アニメーションの状態を変数で持ち、変える必要がある (enumの方がきれいに実装できたかもしれない)
イベント駆動のフローを状態を管理しながら実装していくと大変さがあります。
await+syncを使うことで以下のようなコードにすることができます。
using { /Fortnite.com/Devices }
using { /Verse.org/Simulation }
using { /UnrealEngine.com/Temporary/Diagnostics }

await_device := class(creative_device):

    @editable
    MyButtonA : button_device = button_device{}
    @editable
    MyButtonB : button_device = button_device{}

    @editable
    AirVentA : air_vent_device = air_vent_device{}
    @editable
    AirVentB : air_vent_device = air_vent_device{}

    @editable
    SeqA : cinematic_sequence_device = cinematic_sequence_device{}
    @editable
    SeqB : cinematic_sequence_device = cinematic_sequence_device{}

    @editable
    MessageDevice: hud_message_device = hud_message_device{}

    @editable
    ResetButton : button_device = button_device{}

    OnBegin<override>()<suspends>:void=
        DisableAllAirVents()
        spawn{AwaitSequence()}

    AwaitSequence()<suspends>:void=
        loop:
            Print("Start")
            sync:
                block:
                    MyButtonA.InteractedWithEvent.Await()
                    SeqA.AwaitPlay()
                    AirVentA.Enable()
                block:
                    MyButtonB.InteractedWithEvent.Await()
                    SeqB.AwaitPlay()
                    AirVentB.Enable()
            block:
                Print("Finished")
                MessageDevice.Show()
            block:
                ResetButton.InteractedWithEvent.Await()
                Print("Reset")
                MessageDevice.Hide()
                DisableAllAirVents()

    DisableAllAirVents():void=
        AirVentA.Disable()
        AirVentB.Disable()

    (Sequencer:cinematic_sequence_device).AwaitPlay<public>()<suspends>:void=
        Sequencer.Play()
        Sequencer.StoppedEvent.Await()
注目すべきはこの部分です。
    AwaitSequence()<suspends>:void=
        loop:
            Print("Start")
            sync: # andロジック
                block: #ボタンAを押した時の一連の流れ
                    MyButtonA.InteractedWithEvent.Await() #ボタンAを押したら
                    SeqA.AwaitPlay() #アニメーションAを再生
                    AirVentA.Enable() #終了したら風を吹かす
                block: #ボタンBを押した時の一連の流れ
                    MyButtonB.InteractedWithEvent.Await()
                    SeqB.AwaitPlay()
                    AirVentB.Enable()
            block: #ボタンA and ボタンBの一連の処理が終わったら
                Print("Finished")
                MessageDevice.Show() #メッセージを表示
            block:
                MyButtonC.InteractedWithEvent.Await() #リセットボタンを押したら
                Print("Reset")
                MessageDevice.Hide()
                DisableAllAirVents() #風を止める
この書き方のいいところは
- フローの順番が上から下に書かれているので直感的に理解できる
- アニメーションの状態を変数で保持せず実装している
という点です。
非同期式の文法を理解する
さて、不可解なのは sync,block,loopといった非同期式でしょう。これらに慣れることができれば、非同期処理のロジックを簡潔に書くことができます。
awaitの解説については、前回の記事「[UEFN][Verse]脱Subscribe①。シーケンス再生の終了タイミングをawaitする拡張メソッドを活用しよう。」に書いたので確認お願いします。
用語の整理
本ブログでは、公式ドキュメントと土屋さんのブログを参考に、以下のような用語を使用します。
| 原文 | 公式訳 | このブログ |
|---|---|---|
| Async Expression | async式 | 非同期式 |
| Async Functions | async関数 | 非同期関数 |
| Async Context | asyncコンテキスト | 非同期コンテキスト |
| Concurrency | 並列処理 | 並行処理 |
非同期とは、asyncという用語に対応しています。
非同期式を書ける場所は非同期関数< suspends >の中身が基本
Verseの式は、「イミディエイト式(immediate expressions)」と「非同期式(async expressions)」のいずれかに分類されます。
ざっくり言うと、処理が1フレーム中に終わる式がイミディエイト式、処理が2フレーム以上にまたがる可能性がある式が非同期式です。
参考: https://zenn.dev/t_tutiya/articles/3fd04df5af4160
非同期式を書くことができる場所は非同期関数の中身が基本です。
なので AwaitSequence()<suspends>:void=のように<suspends>を装飾した関数にする必要があります。Verseではエフェクト指定子と呼びます。
非同期式をマスターする
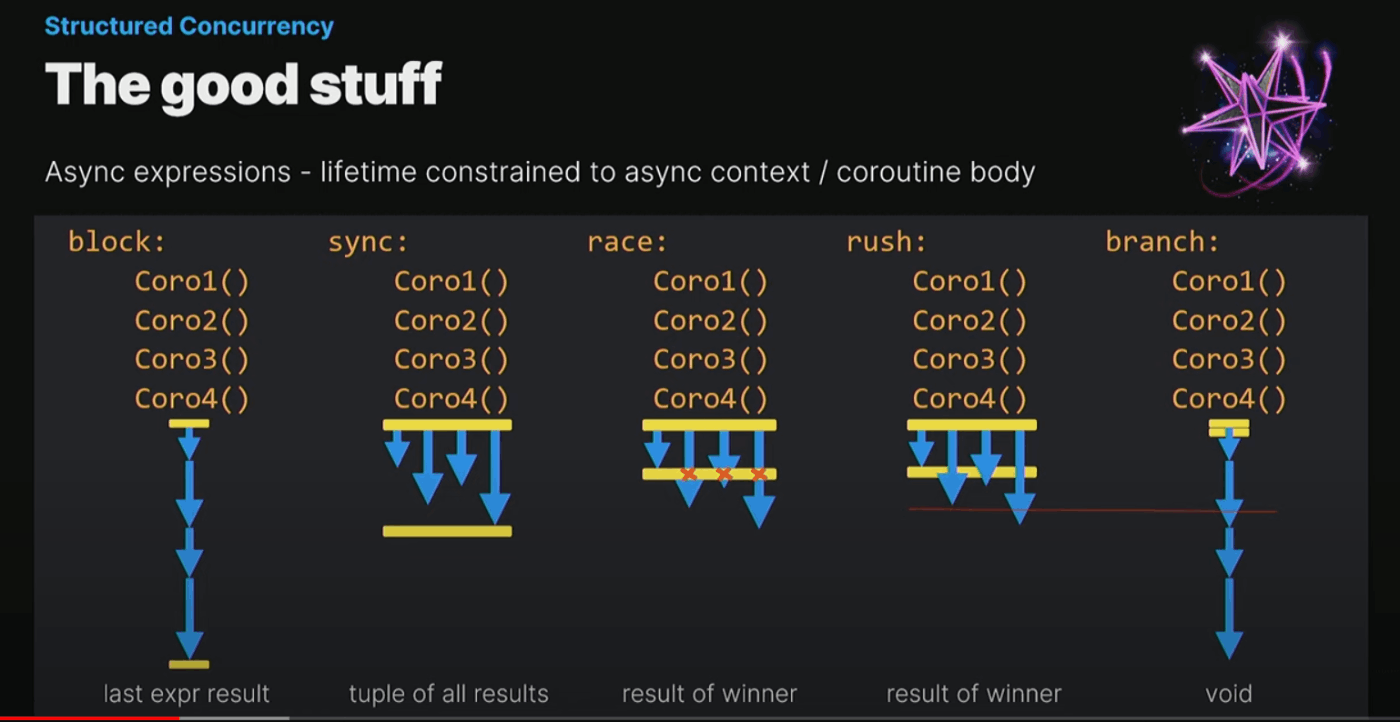
この図をまず見てみましょう。
 https://youtu.be/B3WiSgKXsrg?t=394
それぞれの非同期式
- block
- sync
- race
- rush
- branch
が
- 処理が直列か並行か
- 完了のタイミングをいつまで待つか
というのが直感的にわかります。
特に重要なのがsyncとraceです。この二つは「論理積(and)」「論理和(or)」の関係に似ています。
分類すると
- フロー制御表現 (今記事ではこちらを使いこなす)
- block, sync, race
- 制御構造
- loop, if, for, case
- 非同期タスクの生成
- spawn, rush, branch
blockは直列
blockは
- 上から順番に完了を待ちながら直列に処理します。
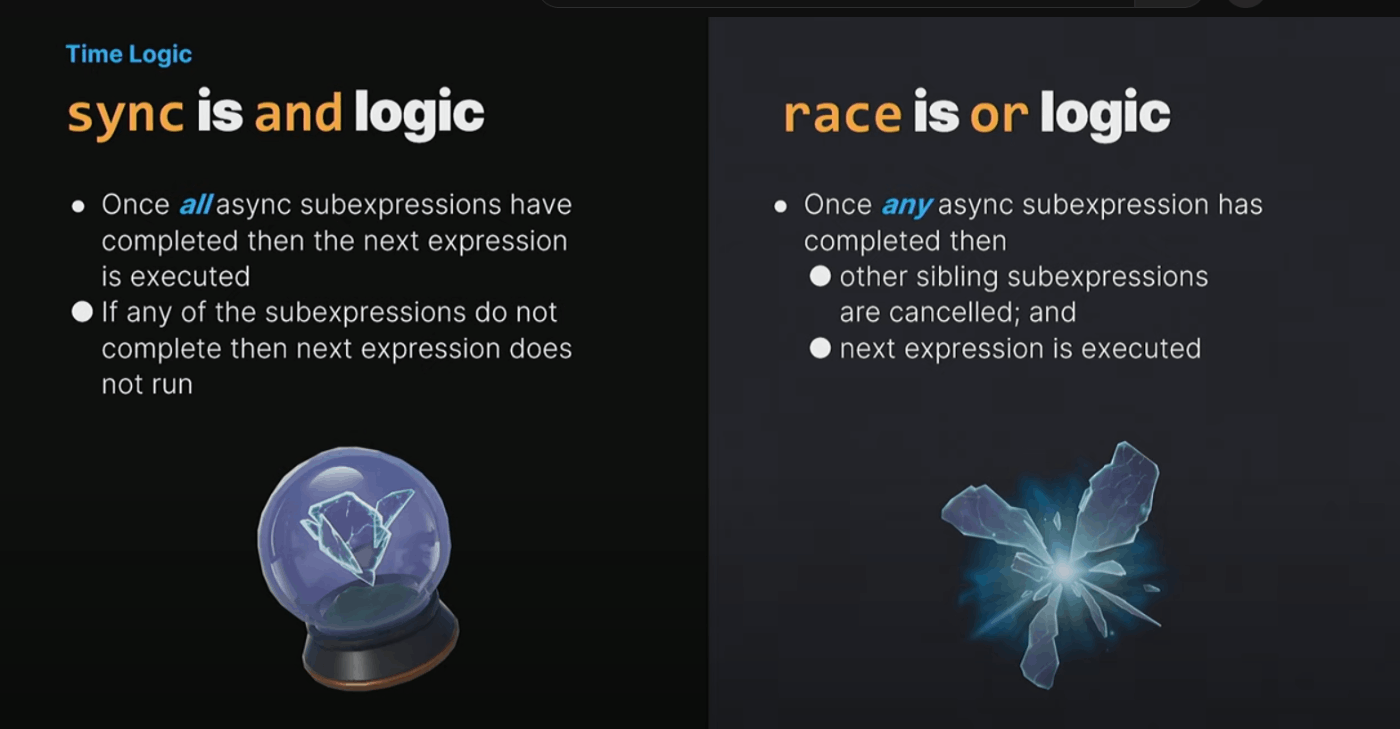
syncは「論理積(and)」的ロジック
syncは
- すべての非同期サブ表現が、 並行 (not 直列) に実行されます。
-
すべての処理が完了するまで次のステップに進みません
- これは論理積(and)に似ています
raceは「論理和(or)」的ロジック
raceは
- すべての非同期サブ表現が、並行 (not 直列) に実行されます。
- いずれかの処理が完了したら、その他の処理はキャンセルされ、次の表現が実行されます。
- 最初に完了したものが、全体の結果を決定するという意味です。
- これは論理和(or)に似ています。
コード解説
これを踏まえてコードを眺めると
    AwaitSequence()<suspends>:void=
        loop:
            Print("Start")
            sync: # andロジック
                block: #ボタンAを押した時の一連の流れ
                    MyButtonA.InteractedWithEvent.Await() #ボタンAを押したら
                    SeqA.AwaitPlay() #アニメーションAを再生
                    AirVentA.Enable() #終了したら風を吹かす
                block: #ボタンBを押した時の一連の流れ
                    MyButtonB.InteractedWithEvent.Await()
                    SeqB.AwaitPlay()
                    AirVentB.Enable()
            block: #ボタンA and ボタンBの一連の処理が終わったら
                Print("Finished")
                MessageDevice.Show() #メッセージを表示
            block:
                MyButtonC.InteractedWithEvent.Await() #リセットボタンを押したら
                Print("Reset")
                MessageDevice.Hide()
                DisableAllAirVents() #風を止める
syncの文は
- ボタンAとボタンBを同時に待つ
- どちらも押されて完了したら、メッセージを表示
という意味を持ちます。
これを 「どちらか一方が押されて完了したら」という条件に変えたい場合は、syncの部分をraceに変更します。
    AwaitSequence()<suspends>:void=
        loop:
            Print("Start")
            race: # orロジック
                block: #ボタンAを押した時の一連の流れ
                    MyButtonA.InteractedWithEvent.Await() #ボタンAを押したら
                    SeqA.AwaitPlay() #アニメーションAを再生
                    AirVentA.Enable() #終了したら風を吹かす
                block: #ボタンBを押した時の一連の流れ
                    MyButtonB.InteractedWithEvent.Await()
                    SeqB.AwaitPlay()
                    AirVentB.Enable()
            block: #ボタンA and ボタンBの一連の処理が終わったら
                Print("Finished")
                MessageDevice.Show() #メッセージを表示
            block:
                MyButtonC.InteractedWithEvent.Await() #リセットボタンを押したら
                Print("Reset")
                MessageDevice.Hide()
                DisableAllAirVents() #風を止める
このようにblock,sync,raceを使うことによって、タイムフローを制御することができます。
まとめ
本記事では、await+block,sync,raceを使用することでSubscribeを使用せずに非同期処理のロジックを直感的に実装することができました。
しかし、まだ使われていない非同期式があり、まだマスターしたとは言えないでしょう。
今後の記事でも、引き続き非同期処理の記述について書いていきたいと思います。
いいねと思った方は「いいね」ボタンお願いします!