こんにちはUEFNエンジニアのイワケンです。QiitaにUEFN/Verseの役立つ記事を書いています。
シーケンサーは便利!しかし終了を待つ実装がめんどうくさい
UEFNでの演出作りで便利なのが「Level Sequence」と、その再生機構の「Cinematic Sequence Device」です。
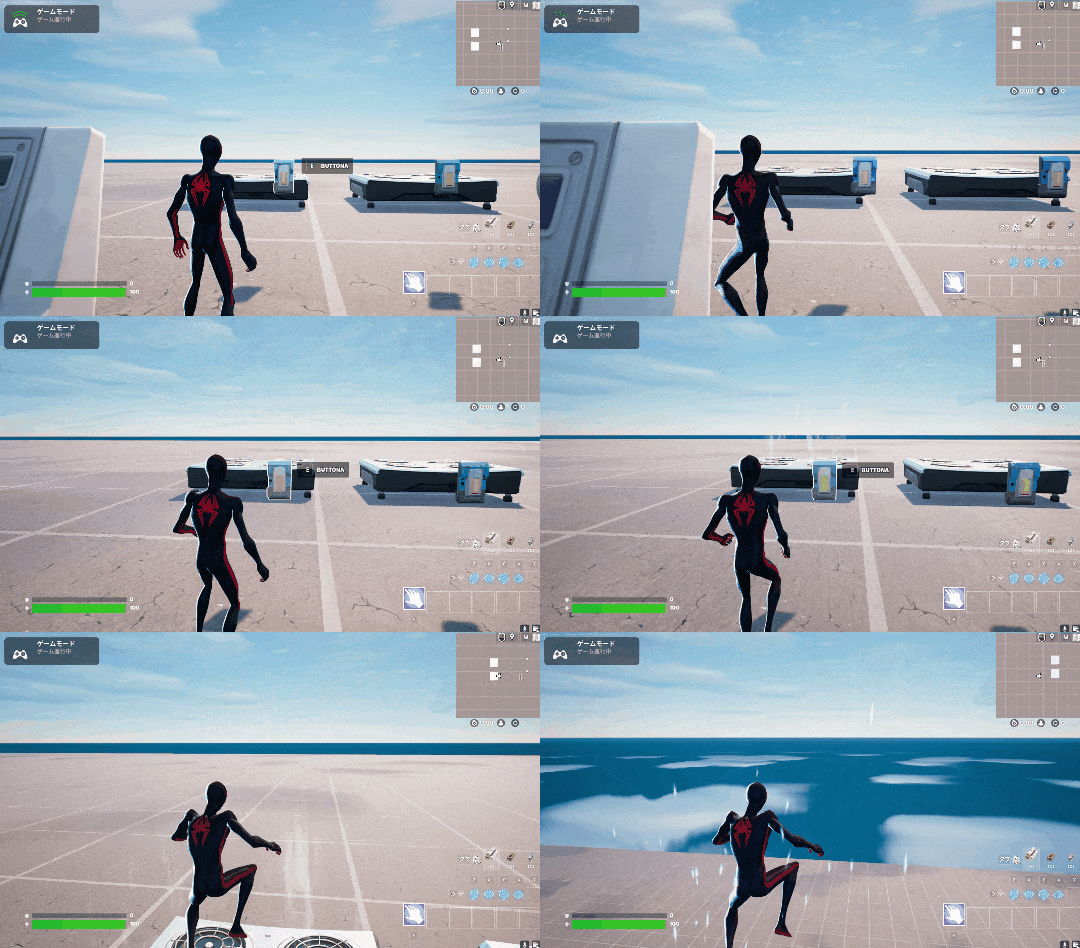
例えば、このようなアニメーションの再生を行うことができます。
- ボタンを押す
- 上下に動くアニメーションを再生
- 再生が終わったら風が吹く
このアニメーションの再生自体はPlayメソッドを実行するだけですので、そこまで難しくないのですが「再生が終わったら〇〇する」という、再生が終わるまで待つ処理 を書くためには工夫が必要です。
例えば、StoppedEvent.Subscribeを使用すると、次のように書けるでしょう。
using { /Fortnite.com/Devices }
using { /Verse.org/Simulation }
using { /UnrealEngine.com/Temporary/Diagnostics }

event_device := class(creative_device):

    @editable
    MyButtonA : button_device = button_device{}
    @editable
    SeqA : cinematic_sequence_device = cinematic_sequence_device{}
    @editable
    AirVentA : air_vent_device = air_vent_device{}

    var IsPlaying:logic = false

    OnBegin<override>()<suspends>:void=
        AirVentA.Disable()
        MyButtonA.InteractedWithEvent.Subscribe(OnPushButton)
        SeqA.StoppedEvent.Subscribe(OnStopAnimation)

    OnPushButton(Agent:agent):void=
        if(IsPlaying?):
            return
        else:
            set IsPlaying = true
            AirVentA.Disable()
            SeqA.Play()
    OnStopAnimation():void=
        set IsPlaying = false
        AirVentA.Enable()
しかし、このような書き方では、処理の流れが直感的ではありません。
アニメーションの再生が終わったらどうなるのか、というのは OnStopAnimation() の中身を見なくてはいけません。
また、再生中にボタンの処理が走らないように IsPlayingというlogic型の変数を定義し、制御しています。
このような分岐が1個ならまだしも、5個10個あったら大変な処理になってしまいます。(cinematic_sequence_deviceのPlayは再生中には実行されないため、今回の処理ではIsPlayingは不要ですが、Subscribeでの実装時にありそうなパターンとしてあえて記述しました。)
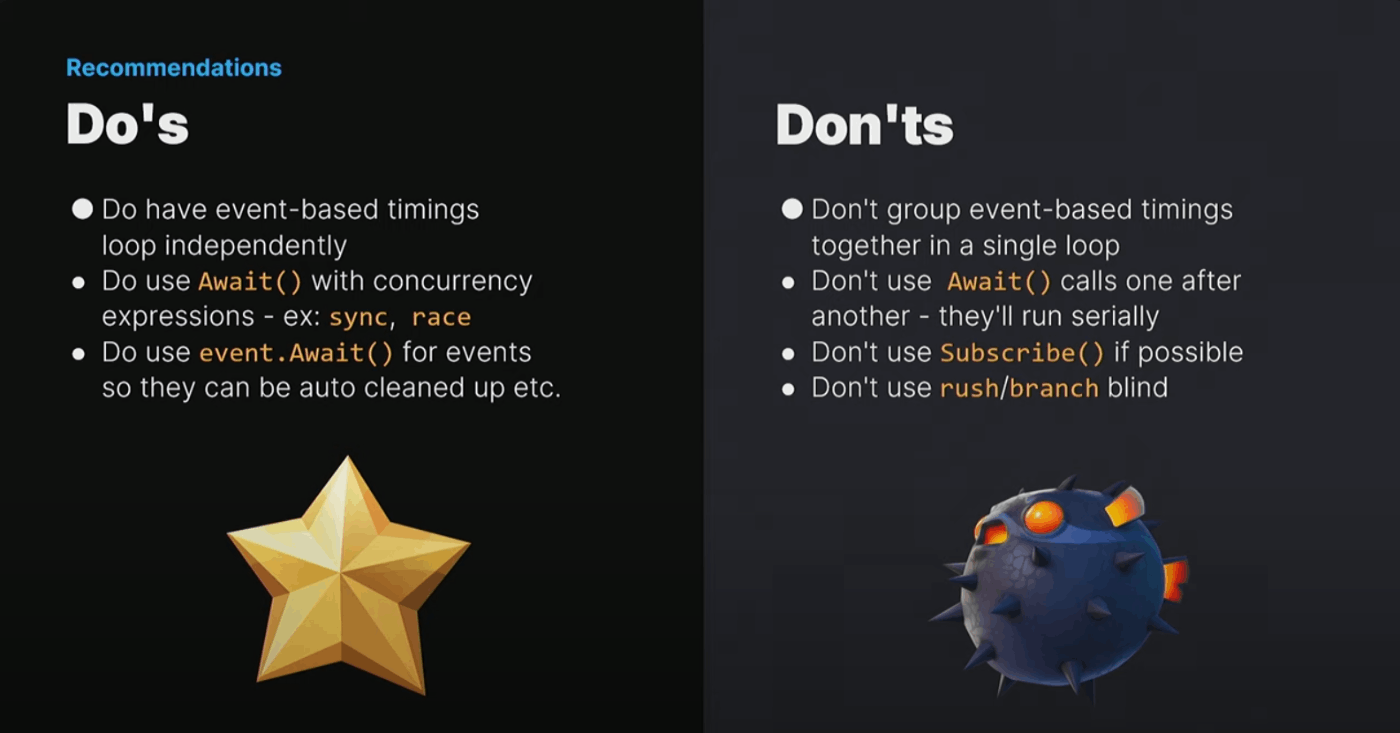
Unreal FestのVerse Concurrency—Time Flow: Everything, Everywhere in UEFN, All at Onceという非同期処理に関する講演でも「Subscribeは可能な限り使うな」とアナウンスされています。なぜなら、イベントのライフサイクルの管理が困難になるからです。
日本語訳はこちらのZenn Scrapにまとめましたので、もしよかったら参考にしてください。
そこで、この記事ではawaitによるイベントの流れの書き方を紹介しつつ、さらに便利にする拡張メソッドの活用法についてご紹介します。
Subscribeではなく、awaitで書くとこのように実装できます。
脱Subscribeということで、awaitを活用した実装をしてみましょう。
using { /Fortnite.com/Devices }
using { /Verse.org/Simulation }
using { /UnrealEngine.com/Temporary/Diagnostics }

event_device := class(creative_device):

    @editable
    MyButtonA : button_device = button_device{}
    @editable
    SeqA : cinematic_sequence_device = cinematic_sequence_device{}
    @editable
    AirVentA : air_vent_device = air_vent_device{}

    OnBegin<override>()<suspends>:void=
        AirVentA.Disable()
        loop:
            MyButtonA.InteractedWithEvent.Await() # ボタンが押されるまで待ちます
            AirVentA.Disable() # AirVentの風を止める
            SeqA.Play() # アニメーションを再生する
            SeqA.StoppedEvent.Await() # アニメーションが終了するまで待ちます
            AirVentA.Enable() #AirVentから風が出るようにします。
この書き方では、OnBeginメソッドの中に、処理の順番が明確に書かれています
- ボタンが押されるまで待つ (Await)
- 風を止める
- アニメーションを再生
- アニメーションが終了するまで待つ (Await)
- 風を吹かす
と、非同期処理 (1フレーム以上かかる処理) を順番に処理することができます。
loopしているのは2回目以降も実行したいからです・
このコードだけで、脱Subscribeは成功していますが、さらにシーケンスの再生/終了をひとまとめで処理するメソッドを追加してみましょう。
Sequenceを再生させる&終了を待つを同時に行うメソッドを作りたい
下記の処理はセットで行うことが多いです。
    SeqA.Play() # アニメーションを再生する
    SeqA.StoppedEvent.Await() # アニメーションが終了するまで待ちます
これらをAwaitPlay()という名前でまとめることで、一つのメソッドで使用できるようにしたいです。
SeqA.AwaitPlay()を拡張メソッドで定義する
cinematic_sequence_deviceクラスにはAwaitPlay()というメソッドは存在しません。
したがって、自分でメソッドとして定義することで使用することができます。
通常のメソッド化するとこちら
AwaitSequencePlay<public>(Sequence:cinematic_sequence_device)<suspends>:void=
    Sequence.Play()
    Sequence.StoppedEvent.Await()
これで、まとめることができました。しかしVerse コードのスタイルガイドにもあるように
4.3 単一パラメータ メソッドよりも拡張メソッドを優先する
ということで、拡張メソッドで以下のように書きます。
(Sequence:cinematic_sequence_device).AwaitPlay<public>()<suspends>:void=
    Sequence.Play()
    Sequence.StoppedEvent.Await()
こうすることによって 次のようにSeqA.AwaitPlay()という書き方ができます。
    OnBegin<override>()<suspends>:void=
        AirVentA.Disable()
        loop:
            MyButtonA.InteractedWithEvent.Await() # ボタンが押されるまで待ちます
            AirVentA.Disable() # AirVentの風を止める
            SeqA.AwaitPlay() # アニメーションを再生し、終了するまで待つ
            AirVentA.Enable() # AirVentから風が出るようにします。
    (Sequence:cinematic_sequence_device).AwaitPlay<public>()<suspends>:void=
        Sequence.Play()
        Sequence.StoppedEvent.Await()
モジュール化することで、usingすることで気軽にAwaitPlay()拡張メソッドを使えるようにする。
拡張メソッドのAwaitPlay()は、どのクラスからでも使用したいのですが、今のままでは定義したクラスの中でしか使用できません。
モジュール化することで、using {IwakenVerseToolKit.extension}などとすれば、どのファイルでも使用できるようにします。
-
IwakenVerseToolKitという名前でSubmoduleを作る- この名前は好きな名前でOK
- 拡張メソッド専用のverseファイルを作る
- 拡張メソッドの定義をモジュール化する
- モジュール名はスネークケース。すなわち小文字&アンダーバー (大文字NG)
- 拡張メソッドを使用する
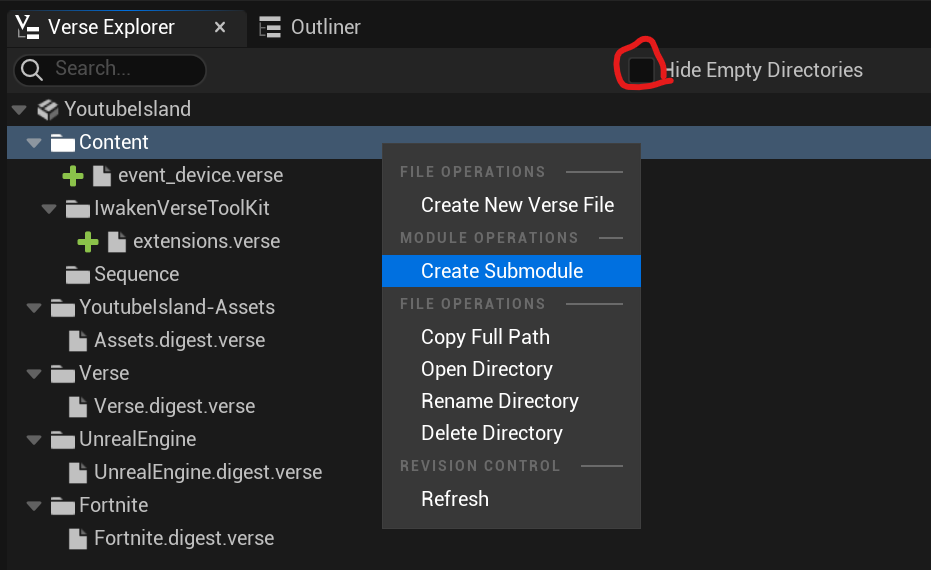
IwakenVerseToolKitという名前でSubmoduleを作る
- Verse ExplorerのContentフォルダを右クリック
- Create Submoduleをクリック
- Hide Empty Directoriesのチェックを外す
- NewModuleという名前のフォルダを右クリックし[Rename Directory]を選択
- 名前を「
IwakenVerseToolKit」に変更- 好みの名前に変えてOK
- 名前を「
拡張メソッド専用のverseファイルを作る
-
IwakenVerseToolKitフォルダを右クリック- [Create New Verse File]を選択
-
extensionsという名前にする
拡張メソッドの定義をモジュール化する
using { /Fortnite.com/Devices }

# See https://dev.epicgames.com/documentation/en-us/uefn/create-your-own-device-in-verse for how to create a verse device.
extensions<public> := module:

    (Sequencer:cinematic_sequence_device).AwaitPlay<public>()<suspends>:void=
        Sequencer.Play()
        Sequencer.StoppedEvent.Await()
ここで外から使用できるように
extensions<public> := module:
と、publicにすることを忘れずに
また、モジュール名はスネークケース、すなわち小文字+アンダーバー (大文字NG) です。
拡張メソッドを使用する
using { IwakenVerseToolKit.extensions }
を書く。これは
using {フォルダ名.モジュール名}という文法で書きます。
最後に、loop処理もメソッド化することで見やすくしましょう。
using { /Fortnite.com/Devices }
using { /Verse.org/Simulation }
using { /UnrealEngine.com/Temporary/Diagnostics }
using { IwakenVerseToolKit.extensions } #追加

event_device := class(creative_device):

    @editable
    MyButtonA : button_device = button_device{}
    @editable
    SeqA : cinematic_sequence_device = cinematic_sequence_device{}
    @editable
    AirVentA : air_vent_device = air_vent_device{}

    OnBegin<override>()<suspends>:void=
        AirVentA.Disable()
        spawn{SampleSequence()}


    SampleSequence()<suspends>:void=
        loop:
            MyButtonA.InteractedWithEvent.Await() # ボタンが押されるまで待ちます
            AirVentA.Disable()
            SeqA.AwaitPlay() # アニメーションを再生し、終わるまで待ちます
            AirVentA.Enable() # AirVentから風が出るようにします。
まとめ
本記事では、awaitを使用することでSubscribeを使用せずに非同期なイベントの流れを直感的に実装することができました。
また拡張メソッドを使うことで、再生と終了といったひとまとめしたい処理を簡単にまとめることができました。
しかし、これだけではイベント処理をマスターしたことにはなりません。調べていくとVerse言語では非同期処理を記述する様々な文法とプラクティスが存在します。
今後の記事では、非同期処理の記述について書いていきたいと思います。
いいねと思った方は「いいね」ボタンお願いします!
次の記事


