概要
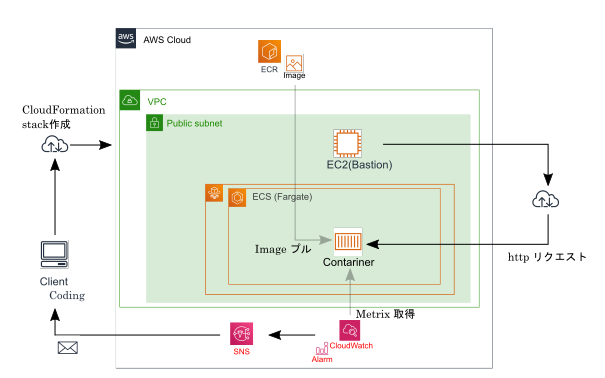
今回の投稿における達成目標と構成図を記載します。
達成目標
本投稿は#2 ~コンテナのデプロイ~編の続きになります。
デプロイしたECSのタスクにおけるコンテナのリソース状況のモニタリングについて、設定してみます。
大きく以下のことができることを確認します。
- コンテナのリソース状況(CPU使用率など)を確認できること
- リソースの高騰を検知し、イベント(メール通知)を発出できること
環境構成図
コンテナリソースモニタリング
Cloudwatch Container Insights の有効化
タスク実行されているコンテナのリソース状況を取得するマネージドサービスとして、Cloudwatch Container Insightsが提供されています。
コンテナの起動状況(クラスターやサービスで起動している数など)から、CPU/MEMORY/NW関連情報などの情報が取得可能です。
詳細はAmazon ECS Container Insights Metricsを参照ください。
Cloudwatch Container Insightsはアカウント、クラスターの単位で有効/無効を設定可能です。
クラスター単位で設定しなければ、アカウントの設定が採用され、クラスター単位で設定するとオーバーライドされるといった仕様です。
では、さっそく#2 ~コンテナのデプロイ~でデプロイしたコンテナのCloudwatch Container Insightsを有効化し、リソース状況を確認してみます。
クラスターに関するCFnのテンプレートに下記追記をし、スタック更新をします。
      ClusterSettings:
        - Name: containerInsights
          Value: enabled
Cloudwatch Container Insights有効化 更新用テンプレート
AWSTemplateFormatVersion: "2010-09-09"
Description:
   Create Container with ECS on Fargate

Metadata:
  "AWS::CloudFormation::Interface":
    ParameterGroups:
      - Label:
          default: "Project Name Prefix"
        Parameters:
          - PJPrefix

      - Label:
          default: "ECS Configuration"
        Parameters:
          - ECSTaskCPUUnit
          - ECSTaskMemory
          - HTTPLocation
          - IAMRoleParameter

    ParameterLabels:
      ECSTaskCPUUnit:
        default: "ECSTaskCPUUnit"
      ECSTaskMemory:
        default: "ECSTaskMemory"
      HTTPLocation:
        default: "Permit HTTP Src IP Address"
      IAMRoleParameter:
        default: "IAM Role"

# ------------------------------------------------------------#
# Input Parameters
# ------------------------------------------------------------#
Parameters:
  PJPrefix:
    Type: String

  ECSTaskCPUUnit:
    AllowedValues: [ 256, 512, 1024, 2048, 4096  ]
    Type: String
    Default: "256"

  ECSTaskMemory:
    AllowedValues: [ 512, 1024, 2048, 4096  ]
    Type: String
    Default: "512"

  HTTPLocation:
    Default: 127.0.0.0/32
    Type: String
    MinLength: 9
    MaxLength: 18
    AllowedPattern: (\d{1,3})\.(\d{1,3})\.(\d{1,3})\.(\d{1,3})/(\d{1,2})

  IAMRoleParameter:
    Type: String

# ------------------------------------------------------------#
#  ECS Create
# ------------------------------------------------------------#
Resources:
## ECS Cluster
  ECSCluster:
    Type: AWS::ECS::Cluster
    Properties:
      ClusterName: !Sub ${PJPrefix}-Cluster
      ### Enable CloudWatch Container Insights
      ClusterSettings:
        - Name: containerInsights
          Value: enabled
## ECS LogGroup
  ECSLogGroup:
    Type: AWS::Logs::LogGroup
    Properties:
      LogGroupName: !Sub /ecs/logs/${PJPrefix}
## ECS TaskDefinition
  ECSTaskDefinition:
    Type: AWS::ECS::TaskDefinition
    Properties:
      Cpu: !Ref ECSTaskCPUUnit
      ExecutionRoleArn: !Ref IAMRoleParameter
      Family: !Sub ${PJPrefix}-task
      Memory: !Ref ECSTaskMemory
      NetworkMode: awsvpc
      RequiresCompatibilities:
        - FARGATE
      ContainerDefinitions:
        - Name: !Sub ${PJPrefix}-ecscontainer
          Image: !Sub ${AWS::AccountId}.dkr.ecr.ap-northeast-1.amazonaws.com/myrepository
          LogConfiguration:
            LogDriver: awslogs
            Options:
              awslogs-group: !Ref ECSLogGroup
              awslogs-region: !Ref "AWS::Region"
              awslogs-stream-prefix: !Ref PJPrefix
          MemoryReservation: 128
          PortMappings:
            - HostPort: 80
              Protocol: tcp
              ContainerPort: 80
## ECS Service
  ECSService:
    Type: AWS::ECS::Service
    Properties:
      Cluster: !Ref ECSCluster
      DesiredCount: 1
      LaunchType: FARGATE
      NetworkConfiguration:
       AwsvpcConfiguration:
           AssignPublicIp: ENABLED
           SecurityGroups:
             - !Ref ECSSG
           Subnets:
             - { "Fn::ImportValue": !Sub "${PJPrefix}-public-subnet-a" }
      ServiceName: !Sub ${PJPrefix}-ecsservice
      TaskDefinition: !Ref ECSTaskDefinition

## ECS SecurityGroup Create
  ECSSG:
    Type: AWS::EC2::SecurityGroup
    Properties:
      GroupName: ecs-http-permit
      GroupDescription: Allow HTTP access only MyIP
      VpcId:  { "Fn::ImportValue": !Sub "${PJPrefix}-vpc" }
      SecurityGroupIngress:
        #
        - IpProtocol: tcp
          FromPort: 80
          ToPort: 80
          CidrIp: !Ref HTTPLocation
コンソール上でCloudwatchのContainer Insightsを選択すると、クラスター/サービス/タスクの単位で各リソース状況がモニタリングできました。
CloudwatchAlarmの設定
少しおまけになりますが、CloudwatchAlarmを設定し、コンテナに対するアクセスが閾値を超えたことをイベント検知し、メール通知まで設定してみます。
メール通知用SNS作成
Cloudwatchで異常状態を検知した際にSNSに連携することでメール通知する仕組みにします。
下記テンプレートを実行することでメール通知用のSNS設定を作成できます。
SNSはSubscriptionにメールアドレスを設定した場合、該当アドレス宛に承認メールが届くので、Confirmを忘れないようにしましょう。
メール通知用SNS作成テンプレート
AWSTemplateFormatVersion: "2010-09-09"
Description:
   Create sns for E-mail notification

Metadata:
  "AWS::CloudFormation::Interface":
    ParameterGroups:
      - Label:
          default: "Project Name Prefix"
        Parameters:
          - PJPrefix

      - Label:
          default: "Notification Configuration"
        Parameters:
          - EmailAddress

# ------------------------------------------------------------#
# Input Parameters
# ------------------------------------------------------------#
Parameters:
  PJPrefix:
    Type: String

  EmailAddress:
   Type: String
# ------------------------------------------------------------#
#  SNS Create
# ------------------------------------------------------------#
Resources:
## topic
  Topic:
    Type: AWS::SNS::Topic
    Properties:
      DisplayName: !Sub ${PJPrefix}-topic
      TopicName: !Sub ${PJPrefix}-topic
## subscription
  Subscription:
    Type: AWS::SNS::Subscription
    Properties:
      Endpoint: !Sub ${EmailAddress}
      Protocol: email
      Region: ap-northeast-1
      TopicArn: !Ref Topic
# ------------------------------------------------------------#
# Output Parameters
# ------------------------------------------------------------#
Outputs:
# Topic
  Topic:
    Value: !Ref Topic
    Export:
      Name: !Sub "${PJPrefix}-topic"
Alarm設定
どのメトリクスがどのような状態となるときを異常とするかはCloudwatchAlarmで設定します。
今回は確認試験がしやすいようCPU使用率を対象に閾値をかなり低くして設定します。
CloudwatchAlarm設定用テンプレート
AWSTemplateFormatVersion: "2010-09-09"
Description:
   Create CloudwatchAlarm of ecs-resource

Metadata:
  "AWS::CloudFormation::Interface":
    ParameterGroups:
      - Label:
          default: "Project Name Prefix"
        Parameters:
          - PJPrefix
      - Label:
          default: "Alarm Configuration"
        Parameters:
          - Threshold
# ------------------------------------------------------------#
# Input Parameters
# ------------------------------------------------------------#
Parameters:
  PJPrefix:
    Type: String
  Threshold:
    Type: String
    Default: "0.1"
# ------------------------------------------------------------#
#  CloudWatchAlarm of ECS-Resource
# ------------------------------------------------------------#
Resources:
## CloudwatchAlarm of ECS Resource
  CloudWatchAlarmECSResource:
    Type: 'AWS::CloudWatch::Alarm'
    Properties:
      AlarmActions:
        - Fn::ImportValue:
            !Sub "${PJPrefix}-topic"
      AlarmDescription: !Sub ${PJPrefix}-ecsresource-alarm
      AlarmName: !Sub ${PJPrefix}-ecsresource-alarm
      ComparisonOperator: GreaterThanOrEqualToThreshold
      EvaluationPeriods: 1
      Dimensions:
        - Name:  ServiceName
          Value: !Sub "${PJPrefix}-ecsservice"
        - Name:  ClusterName
          Value: !Sub "${PJPrefix}-Cluster"
      MetricName: "CpuUtilized"
      Namespace: "ECS/ContainerInsights"
      Period: 300
      Statistic: Sum
      Threshold: 1
      TreatMissingData: ignore
LoadTest確認
siegeコマンドを利用して一定量のアクセスを掛けてみます。
#2 ~コンテナのデプロイ~編で構築したEC2のユーザデータに下記を追加して更新し、再作成します。
          #Siege Install
          sudo yum install -y https://dl.fedoraproject.org/pub/epel/epel-release-latest-7.noarch.rpm
          sudo yum install -y siege
siegeインストール追加踏み台EC2構築用テンプレート
AWSTemplateFormatVersion: "2010-09-09"
Description:
   Create Bastion-EC2

Metadata:
  "AWS::CloudFormation::Interface":
    ParameterGroups:
      - Label:
          default: "Project Name Prefix"
        Parameters:
          - PJPrefix

      - Label:
          default: "EC2 Configuration"
        Parameters:
          - ImageId
          - InstanceTypeParameter
          - DiskSize
          - SSHLocation
          - KeyName
          - IAMRoleParameter

    ParameterLabels:
      ImageId:
        default: "AMI ID"
      InstanceTypeParameter:
        default: "Instance Type"
      DiskSize:
        default: "Disk Size(GiB)"
      SSHLocation:
        default: "Permit SSH Src IP Address"
      KeyName:
        default: "SSH Key Name"
      IAMRoleParameter:
        default: "IAM Role"

# ------------------------------------------------------------#
# Input Parameters
# ------------------------------------------------------------#
Parameters:
  PJPrefix:
    Type: String

  ImageId:
    Type: AWS::EC2::Image::Id
    Default: ami-0f310fced6141e627


  InstanceTypeParameter:
    Default: t2.small
    Type: String

  DiskSize:
    Default: 8
    Type: String

  SSHLocation:
    Default: 127.0.0.0/32
    Type: String
    MinLength: 9
    MaxLength: 18
    AllowedPattern: (\d{1,3})\.(\d{1,3})\.(\d{1,3})\.(\d{1,3})/(\d{1,2})

  KeyName:
    Type: AWS::EC2::KeyPair::KeyName

  IAMRoleParameter:
    Type: String

# ------------------------------------------------------------#
#  EC2 Create
# ------------------------------------------------------------#
Resources:
  EC2:
    Type: AWS::EC2::Instance
    Properties:
      DisableApiTermination: "true"
      InstanceInitiatedShutdownBehavior: stop
      ImageId: !Ref ImageId
      KeyName: !Ref KeyName
      InstanceType: !Ref InstanceTypeParameter

      BlockDeviceMappings:
      - DeviceName: "/dev/xvda"
        Ebs:
          DeleteOnTermination: "false"
          VolumeSize: !Ref DiskSize
          VolumeType: "gp2"

      NetworkInterfaces:
        - AssociatePublicIpAddress: "true"
          DeleteOnTermination: "true"
          DeviceIndex: "0"
          SubnetId:  { "Fn::ImportValue": !Sub "${PJPrefix}-public-subnet-a" }
          GroupSet:
            - !Ref EC2SG

      IamInstanceProfile:
        !Ref IAMRoleParameter

      UserData:
        Fn::Base64: |
          #!/bin/sh
          #TimeZone Setting JST
          sudo timedatectl set-timezone Asia/Tokyo
          #Docker Install and Boot
          sudo yum update -y
          sudo yum -y install docker
          sudo systemctl start docker
          sudo systemctl enable docker
          #Siege Install
          sudo yum install -y https://dl.fedoraproject.org/pub/epel/epel-release-latest-7.noarch.rpm
          sudo yum -y install siege

      Tags:
          - Key: Name
            Value: !Sub ${PJPrefix}-BastionEC2

## EIP Create
  ElasticIp:
    Type: AWS::EC2::EIP
    Properties:
      InstanceId: !Ref EC2
      Domain: vpc


## EC2 SecurityGroup Create
  EC2SG:
    Type: AWS::EC2::SecurityGroup
    Properties:
      GroupName: ec2-ssh-permit
      GroupDescription: Allow SSH and HTTP access only MyIP
      VpcId:  { "Fn::ImportValue": !Sub "${PJPrefix}-vpc" }
      SecurityGroupIngress:
        # ssh
        - IpProtocol: tcp
          FromPort: 22
          ToPort: 22
          CidrIp: !Ref SSHLocation


# ------------------------------------------------------------#
#  EC2 Output
# ------------------------------------------------------------#

Outputs:
  ElasticIp:
    Value: !GetAtt EC2.PublicIp
    Description: Public IP of EC2 instance
下記コマンドでパフォーマンステストをしてみます。
siege -c 50 -i {{デプロイされているコンテナのIP}}
しばらく待機しているとメールを受信し、CPUの高騰を検知しました。
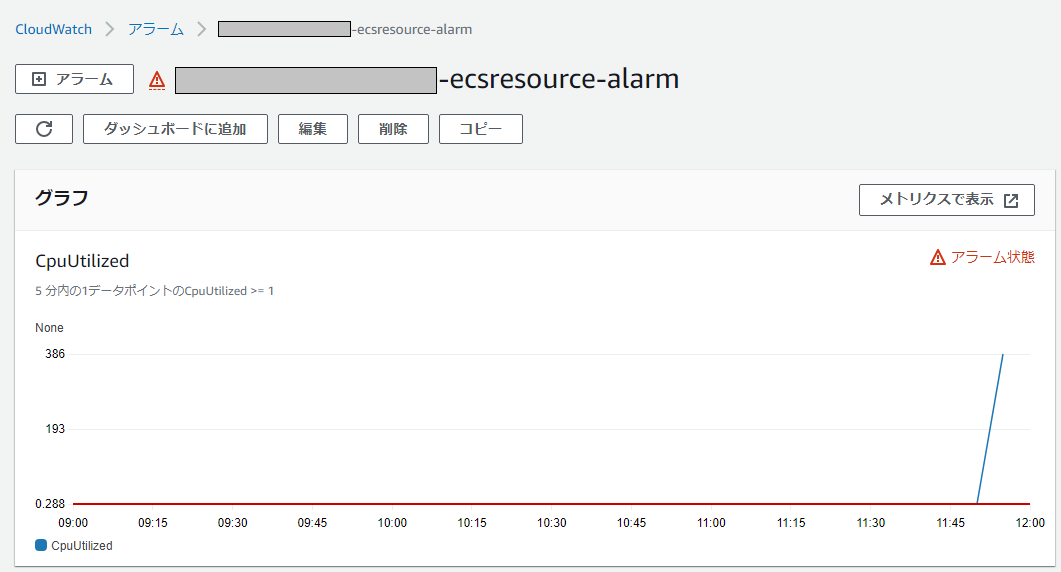
念のためコンソールで確認すると下記のようにCPU使用率が上昇して、異常状態となっていることが分かります。
まとめ
今回はCloudwatch→SNSを設定し、起動しているコンテナのCPU高騰を検知し、メール発報する部分を構築してみました。
今回はSNSでメール通知のサブスクリプションのみを連携させましたが、
実運用を考えると、Lambdaをキックさせ、Serviceの必要台数を変化させることで自動拡張させるといったことが考えられます。
次回はこちらにチャレンジしたいと思います。


