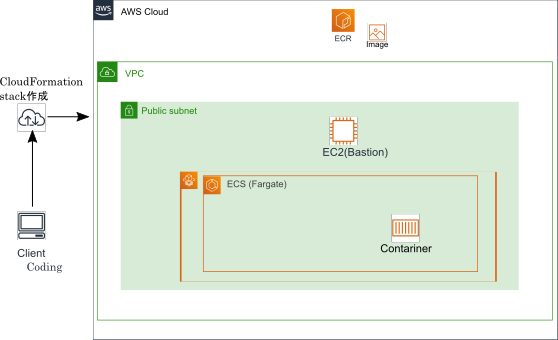
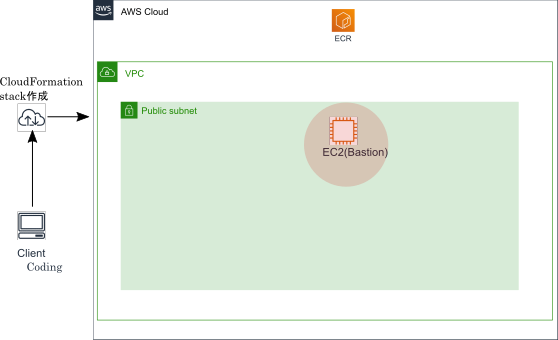
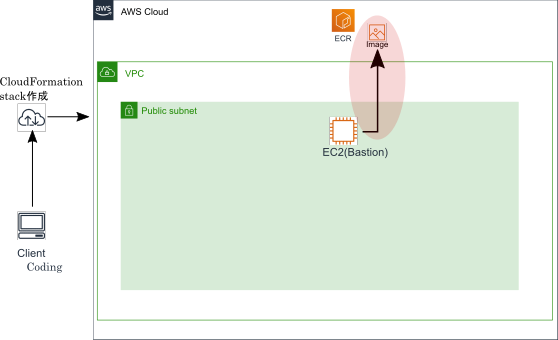
環境構成図
タイトルにあるコンテナのデプロイに進む前の環境準備部分がかなり多くなりますが、ご了承ください。
※IAM周りの権限は適宜付与している前提で進めていきます。
コンテナ&ECSに関する各コンポーネントの簡単な説明は下記をご参照ください。
introduction編
環境準備
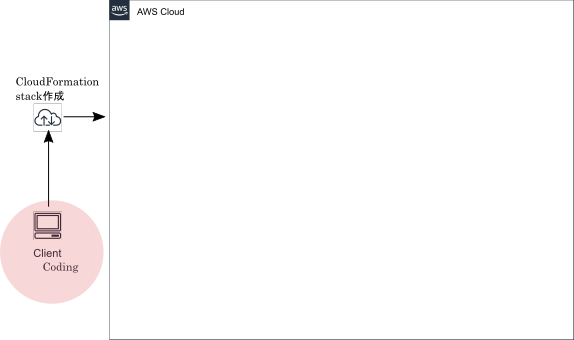
CloudFormation実行環境
本投稿内で作成するリソースは基本的にCloudFormation(以下CFn)を利用して構築していきます。
CFnのテンプレートのコーディング環境として、クライアント端末に下記を準備します。
※テンプレートはコンソール操作からアップロードし、スタック作成しません。エディタにこだわりありません。
- エディタ:Visual Studio Code
拡張パッケージ:CloudFormation(コード補完), CloudFormation Linter(エラーチェック)
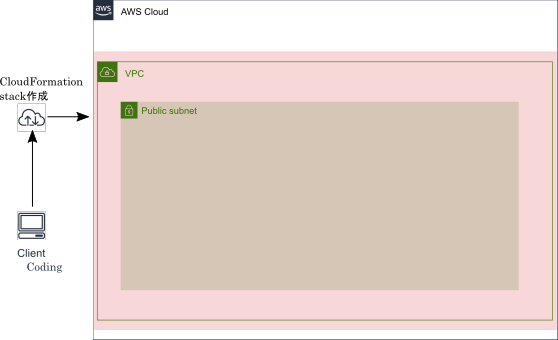
VPC/Subnet作成
とりあえずのSubnetを作成します。本来であればLB-コンテナの構成を意識して、LB用のPublicなSubnetとコンテナ配置用のPrivateなSubnetを作るところですが、まずはコンテナ配置できたことをコンソール上から確認できることを目標に1Subnetの構成にしています。
構築用のCFnテンプレートは下記に貼っておきます。
VPC&Subnet構築テンプレート
AWSTemplateFormatVersion: "2010-09-09"
Description:
  VPC and Subnet Create

Metadata:
  "AWS::CloudFormation::Interface":
    ParameterGroups:
      - Label:
          default: "Project Name Prefix"
        Parameters:
          - PJPrefix
      - Label:
          default: "Network Configuration"
        Parameters:
          - VPCCIDR
          - PublicSubnetACIDR
    ParameterLabels:
      VPCCIDR:
        default: "VPC CIDR"
      PublicSubnetACIDR:
        default: "PublicSubnetA CIDR"
# ------------------------------------------------------------#
# Input Parameters
# ------------------------------------------------------------#
Parameters:
  PJPrefix:
    Type: String

  VPCCIDR:
    Type: String
    Default: "10.65.0.0/16"

  PublicSubnetACIDR:
    Type: String
    Default: "10.65.1.0/24"

Resources:
# ------------------------------------------------------------#
#  VPC
# ------------------------------------------------------------#
# VPC Create
  VPC:
    Type: "AWS::EC2::VPC"
    Properties:
      CidrBlock: !Ref VPCCIDR
      EnableDnsSupport: "true"
      EnableDnsHostnames: "true"
      InstanceTenancy: default
      Tags:
        - Key: Name
          Value: !Sub "${PJPrefix}-vpc"

# InternetGateway Create
  InternetGateway:
    Type: "AWS::EC2::InternetGateway"
    Properties:
      Tags:
        - Key: Name
          Value: !Sub "${PJPrefix}-igw"

# IGW Attach
  InternetGatewayAttachment:
    Type: "AWS::EC2::VPCGatewayAttachment"
    Properties:
      InternetGatewayId: !Ref InternetGateway
      VpcId: !Ref VPC

# ------------------------------------------------------------#
#  Subnet
# ------------------------------------------------------------#
# Public SubnetA Create
  PublicSubnetA:
    Type: "AWS::EC2::Subnet"
    Properties:
      AvailabilityZone: "ap-northeast-1a"
      CidrBlock: !Ref PublicSubnetACIDR
      VpcId: !Ref VPC
      Tags:
        - Key: Name
          Value: !Sub "${PJPrefix}-public-subnet-a"

# ------------------------------------------------------------#
#  RouteTable
# ------------------------------------------------------------#
# Public RouteTableA Create
  PublicRouteTableA:
    Type: "AWS::EC2::RouteTable"
    Properties:
      VpcId: !Ref VPC
      Tags:
        - Key: Name
          Value: !Sub "${PJPrefix}-public-route-a"

# ------------------------------------------------------------#
# Routing
# ------------------------------------------------------------#
# PublicRouteA Create
  PublicRouteA:
    Type: "AWS::EC2::Route"
    Properties:
      RouteTableId: !Ref PublicRouteTableA
      DestinationCidrBlock: "0.0.0.0/0"
      GatewayId: !Ref InternetGateway

# ------------------------------------------------------------#
# RouteTable Associate
# ------------------------------------------------------------#
# PublicRouteTable Associate SubnetA
  PublicSubnetARouteTableAssociation:
    Type: "AWS::EC2::SubnetRouteTableAssociation"
    Properties:
      SubnetId: !Ref PublicSubnetA
      RouteTableId: !Ref PublicRouteTableA

# ------------------------------------------------------------#
# Output Parameters
# ------------------------------------------------------------#
Outputs:
# VPC
  VPC:
    Value: !Ref VPC
    Export:
      Name: !Sub "${PJPrefix}-vpc"

  VPCCIDR:
    Value: !Ref VPCCIDR
    Export:
      Name: !Sub "${PJPrefix}-vpc-cidr"

# Subnet
  PublicSubnetA:
    Value: !Ref PublicSubnetA
    Export:
      Name: !Sub "${PJPrefix}-public-subnet-a"

  PublicSubnetACIDR:
    Value: !Ref PublicSubnetACIDR
    Export:
      Name: !Sub "${PJPrefix}-public-subnet-a-cidr"

# Route
  PublicRouteTableA:
    Value: !Ref PublicRouteTableA
    Export:
      Name: !Sub "${PJPrefix}-public-route-a"
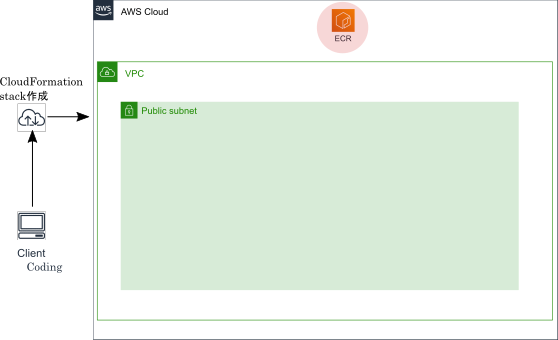
ECR作成
こちらもとりあえずのイメージ格納用のレポジトリを作成します。
ライフサイクルポリシーなどは設定していないレポジトリです。
ECR構築テンプレート
AWSTemplateFormatVersion: "2010-09-09"
Description:
  Create ECR

Resources:
# ------------------------------------------------------------#
#  ECR
# ------------------------------------------------------------#
# ECR Create
  MyRepository:
    Type: AWS::ECR::Repository
    Properties:
      RepositoryName: "myrepository"

# ------------------------------------------------------------#
# Output Parameters
# ------------------------------------------------------------#
Outputs:
# ECR
  MyRepository:
    Value: !Ref MyRepository
    Export:
      Name: !Sub "myrepository"
踏み台EC2作成
ECRにイメージをpushするための踏み台Serverを構築します。
Userdataを利用してDockerのインストールまで済ませておきます。
構築用のテンプレートは下記の通りです。
踏み台EC2構築テンプレート
AWSTemplateFormatVersion: "2010-09-09"
Description:
   Create Bastion-EC2

Metadata:
  "AWS::CloudFormation::Interface":
    ParameterGroups:
      - Label:
          default: "Project Name Prefix"
        Parameters:
          - PJPrefix

      - Label:
          default: "EC2 Configuration"
        Parameters:
          - ImageId
          - InstanceTypeParameter
          - DiskSize
          - SSHLocation
          - KeyName
          - IAMRoleParameter

    ParameterLabels:
      ImageId:
        default: "AMI ID"
      InstanceTypeParameter:
        default: "Instance Type"
      DiskSize:
        default: "Disk Size(GiB)"
      SSHLocation:
        default: "Permit SSH Src IP Address"
      KeyName:
        default: "SSH Key Name"
      IAMRoleParameter:
        default: "IAM Role"

# ------------------------------------------------------------#
# Input Parameters
# ------------------------------------------------------------#
Parameters:
  PJPrefix:
    Type: String

  ImageId:
    Type: AWS::EC2::Image::Id
    Default: ami-0f310fced6141e627


  InstanceTypeParameter:
    Default: t2.small
    Type: String

  DiskSize:
    Default: 8
    Type: String

  SSHLocation:
    Default: 127.0.0.0/32
    Type: String
    MinLength: 9
    MaxLength: 18
    AllowedPattern: (\d{1,3})\.(\d{1,3})\.(\d{1,3})\.(\d{1,3})/(\d{1,2})

  KeyName:
    Type: AWS::EC2::KeyPair::KeyName

  IAMRoleParameter:
    Type: String

# ------------------------------------------------------------#
#  EC2 Create
# ------------------------------------------------------------#
Resources:
  EC2:
    Type: AWS::EC2::Instance
    Properties:
      DisableApiTermination: "true"
      InstanceInitiatedShutdownBehavior: stop
      ImageId: !Ref ImageId
      KeyName: !Ref KeyName
      InstanceType: !Ref InstanceTypeParameter

      BlockDeviceMappings:
      - DeviceName: "/dev/xvda"
        Ebs:
          DeleteOnTermination: "false"
          VolumeSize: !Ref DiskSize
          VolumeType: "gp2"

      NetworkInterfaces:
        - AssociatePublicIpAddress: "true"
          DeleteOnTermination: "true"
          DeviceIndex: "0"
          SubnetId:  { "Fn::ImportValue": !Sub "${PJPrefix}-public-subnet-a" }
          GroupSet:
            - !Ref EC2SG

      IamInstanceProfile:
        !Ref IAMRoleParameter

      UserData:
        Fn::Base64: |
          #!/bin/sh
          #TimeZone Setting JST
          sudo timedatectl set-timezone Asia/Tokyo
          #Docker Install and Boot
          sudo yum update -y
          sudo yum -y install docker
          sudo systemctl start docker
          sudo systemctl enable docker

      Tags:
          - Key: Name
            Value: !Sub ${PJPrefix}-BastionEC2

## EIP Create
  ElasticIp:
    Type: AWS::EC2::EIP
    Properties:
      InstanceId: !Ref EC2
      Domain: vpc


## EC2 SecurityGroup Create
  EC2SG:
    Type: AWS::EC2::SecurityGroup
    Properties:
      GroupName: ec2-ssh-permit
      GroupDescription: Allow SSH and HTTP access only MyIP
      VpcId:  { "Fn::ImportValue": !Sub "${PJPrefix}-vpc" }
      SecurityGroupIngress:
        # ssh
        - IpProtocol: tcp
          FromPort: 22
          ToPort: 22
          CidrIp: !Ref SSHLocation


# ------------------------------------------------------------#
#  EC2 Output
# ------------------------------------------------------------#

Outputs:
  ElasticIp:
    Value: !GetAtt EC2.PublicIp
    Description: Public IP of EC2 instance
イメージのプッシュ
1. ECRログイン
aws ecr get-login --region ap-northeast-1 --no-include-email
※上記コマンドのレスポンスコードを入力することでログインが完了する
docker login -u AWS -p XXXXXXXXX
2. イメージ用のDockerfile生成
Dockerfileの内容は下記の通り。
FROM ubuntu:18.04

# Install dependencies
RUN apt-get update && \
 apt-get -y install apache2

# Install apache and write hello world message
RUN echo 'Test Ver1' > /var/www/html/index.html

# Configure apache
RUN echo '. /etc/apache2/envvars' > /root/run_apache.sh && \
 echo 'mkdir -p /var/run/apache2' >> /root/run_apache.sh && \
 echo 'mkdir -p /var/lock/apache2' >> /root/run_apache.sh && \
 echo '/usr/sbin/apache2 -D FOREGROUND' >> /root/run_apache.sh && \
 chmod 755 /root/run_apache.sh

EXPOSE 80

CMD /root/run_apache.sh
3. ビルド~プッシュ
docker build -t test-ver1 .
docker tag test-ver1 XXXXXXXXX.dkr.ecr.ap-northeast-1.amazonaws.com/myrepository
docker push XXXXXXXXX.dkr.ecr.ap-northeast-1.amazonaws.com/myrepository:latest
やっとイメージのプッシュが完了しました。ここまでが長かったです…w

ECSに対するデプロイ
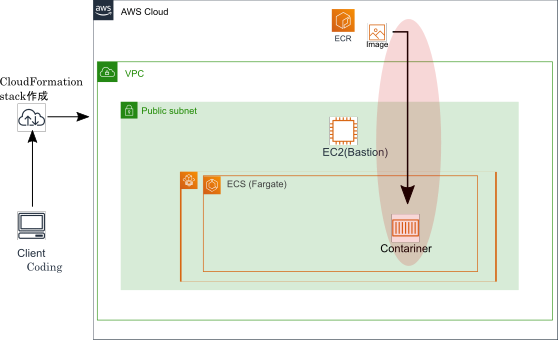
ようやくになりましたが、ECRにプッシュされたイメージをECS on Fargateでデプロイします。
下記Cfnテンプレートを利用して、ECSCluster/タスク定義/Serviceといった各コンポーネントを構築します。
AWSTemplateFormatVersion: "2010-09-09"
Description:
   Create Container with ECS on Fargate

Metadata:
  "AWS::CloudFormation::Interface":
    ParameterGroups:
      - Label:
          default: "Project Name Prefix"
        Parameters:
          - PJPrefix

      - Label:
          default: "ECS Configuration"
        Parameters:
          - ECSTaskCPUUnit
          - ECSTaskMemory
          - HTTPLocation
          - IAMRoleParameter

    ParameterLabels:
      ECSTaskCPUUnit:
        default: "ECSTaskCPUUnit"
      ECSTaskMemory:
        default: "ECSTaskMemory"
      HTTPLocation:
        default: "Permit HTTP Src IP Address"
      IAMRoleParameter:
        default: "IAM Role"

# ------------------------------------------------------------#
# Input Parameters
# ------------------------------------------------------------#
Parameters:
  PJPrefix:
    Type: String

  ECSTaskCPUUnit:
    AllowedValues: [ 256, 512, 1024, 2048, 4096  ]
    Type: String
    Default: "256"

  ECSTaskMemory:
    AllowedValues: [ 512, 1024, 2048, 4096  ]
    Type: String
    Default: "512"

  HTTPLocation:
    Default: 127.0.0.0/32
    Type: String
    MinLength: 9
    MaxLength: 18
    AllowedPattern: (\d{1,3})\.(\d{1,3})\.(\d{1,3})\.(\d{1,3})/(\d{1,2})

  IAMRoleParameter:
    Type: String

# ------------------------------------------------------------#
#  ECS Create
# ------------------------------------------------------------#
Resources:
## ECS Cluster
  ECSCluster:
    Type: AWS::ECS::Cluster
    Properties:
      ClusterName: !Sub ${PJPrefix}-Cluster
## ECS LogGroup
  ECSLogGroup:
    Type: AWS::Logs::LogGroup
    Properties:
      LogGroupName: !Sub /ecs/logs/${PJPrefix}
## ECS TaskDefinition
  ECSTaskDefinition:
    Type: AWS::ECS::TaskDefinition
    Properties:
      Cpu: !Ref ECSTaskCPUUnit
      ExecutionRoleArn: !Ref IAMRoleParameter
      Family: !Sub ${PJPrefix}-task
      Memory: !Ref ECSTaskMemory
      NetworkMode: awsvpc
      RequiresCompatibilities:
        - FARGATE
      ContainerDefinitions:
        - Name: !Sub ${PJPrefix}-ecscontainer
          Image: !Sub ${AWS::AccountId}.dkr.ecr.ap-northeast-1.amazonaws.com/myrepository
          LogConfiguration:
            LogDriver: awslogs
            Options:
              awslogs-group: !Ref ECSLogGroup
              awslogs-region: !Ref "AWS::Region"
              awslogs-stream-prefix: !Ref PJPrefix
          MemoryReservation: 128
          PortMappings:
            - HostPort: 80
              Protocol: tcp
              ContainerPort: 80
## ECS Service
  ECSService:
    Type: AWS::ECS::Service
    Properties:
      Cluster: !Ref ECSCluster
      DesiredCount: 1
      LaunchType: FARGATE
      NetworkConfiguration:
       AwsvpcConfiguration:
           AssignPublicIp: ENABLED
           SecurityGroups:
             - !Ref ECSSG
           Subnets:
             - { "Fn::ImportValue": !Sub "${PJPrefix}-public-subnet-a" }
      ServiceName: !Sub ${PJPrefix}-ecsservice
      TaskDefinition: !Ref ECSTaskDefinition

## ECS SecurityGroup Create
  ECSSG:
    Type: AWS::EC2::SecurityGroup
    Properties:
      GroupName: ecs-http-permit
      GroupDescription: Allow HTTP access only MyIP
      VpcId:  { "Fn::ImportValue": !Sub "${PJPrefix}-vpc" }
      SecurityGroupIngress:
        #
        - IpProtocol: tcp
          FromPort: 80
          ToPort: 80
          CidrIp: !Ref HTTPLocation
コンソール画面からデプロイされていることを確認します。
定義したクラスタ名やタスク定義に従ってタスク(今回は1コンテナ)が起動していることが分かります。
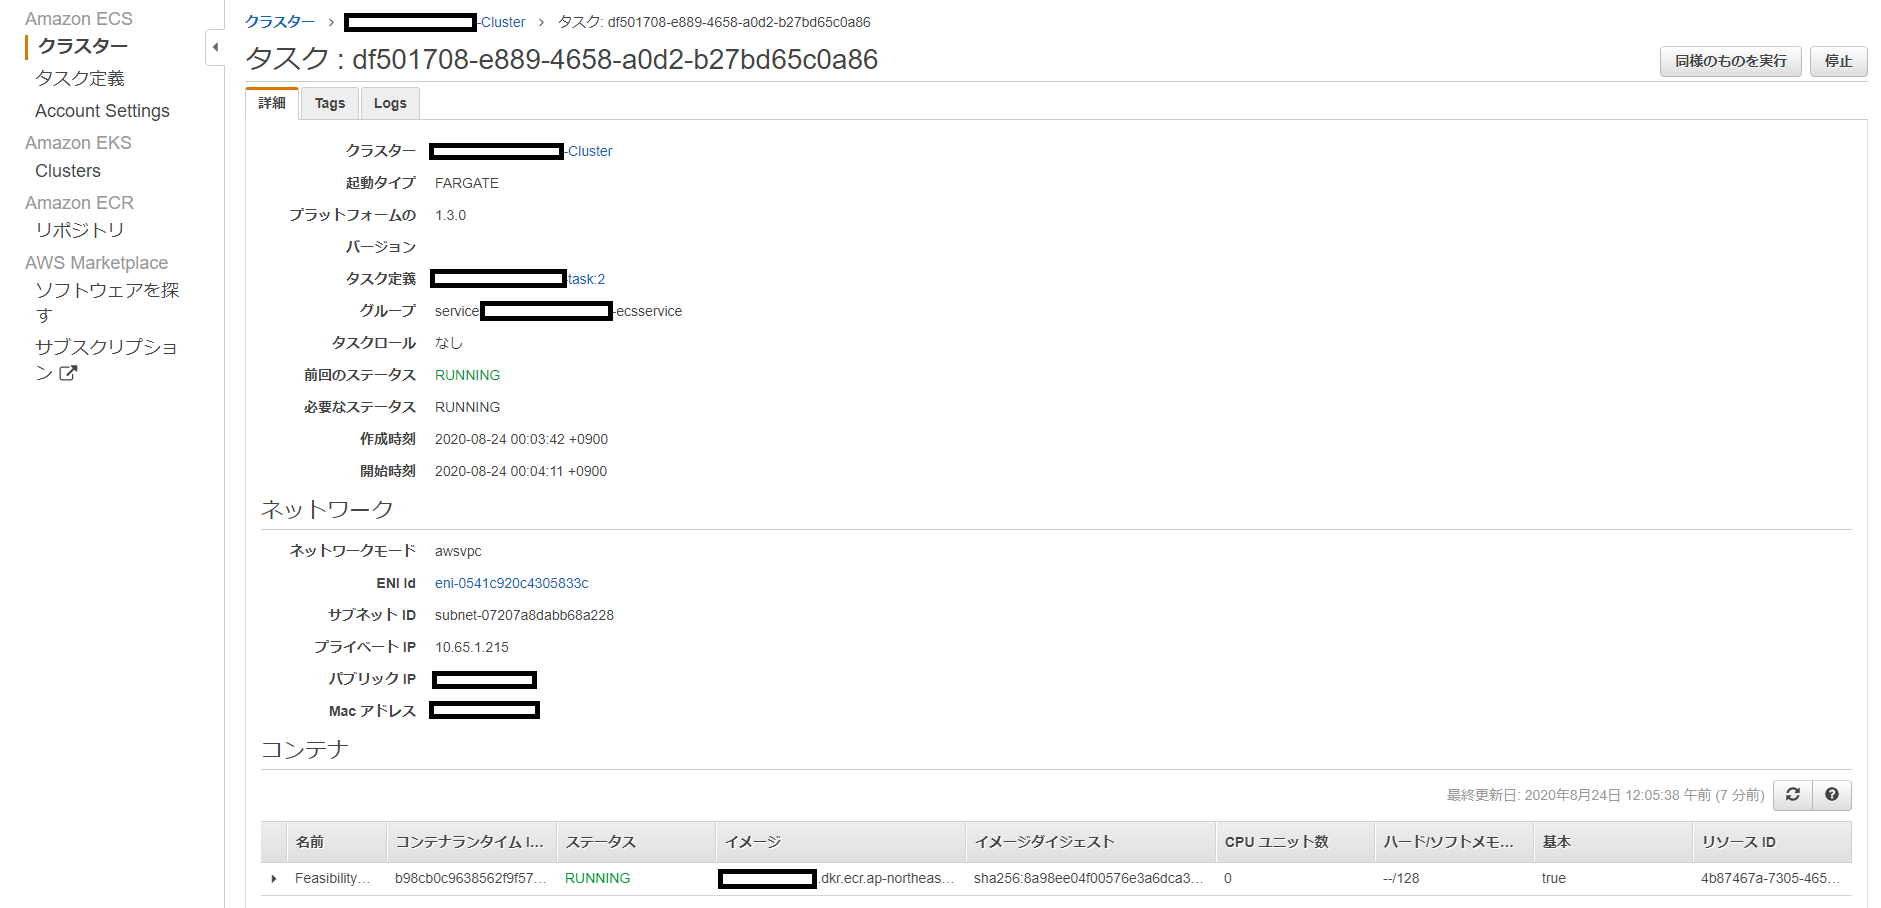
最後にデプロイしたコンテナに踏み台EC2よりアクセスしてみます。(一時的にSGのインバウンドを開けています)

コンソールで確認したPublic IPに対して、curlでリクエストを投げたところ「Test Ver1」でレスポンスが返却されており、
ECRにpushしたイメージ(Dockerfile内でindex.htmlを書き換えています。)がデプロイされていることが分かります。
まとめ
今回はコンテナをECS on Fargateにデプロイできるところまで実施しました。
CFnのテンプレートを参考にしていただければ、アカウントしかない状況からかなり簡単に構築まで進むかと思います。
次回はコンテナのリソース状況のモニタリングをCloudwatchを利用してやってみようと思います!
