このドキュメントは、Apple Music APIのユーザーの再生履歴を取得するためのエンドポイント v1/me/recent/played/tracks の使い方を解説します。
公式ドキュメントでは情報が分散していて、具体的なレスポンスの形を想像することが難しかったため、実際にさまざまなクエリでAPIを叩き、そのresponseの形を確認しました。
認証:APIの種類と必要なトークン
Apple Music APIには/catalog系統のAPIと/me系のAPIが存在します。
/me系の方が必要なトークンが一つ多い形になっています。
APIの2つの系統: /catalog vs /me
-
/catalogAPI (カタログ系)
これは、Apple Musicの公開されている音楽データベースにアクセスするためのAPIです。
誰でも見ることができるアーティスト情報や楽曲情報を取得するためのもので、必要なのはDeveloper Tokenのみです。 -
/meAPI (me系)
これは、ユーザー個人のプライベートな情報にアクセスするためのAPIです。
Apple Musicでのユーザーの楽曲の再生履歴を取得するAPIなどがこれに含まれます。
今回解説する recent/played/tracks は、URLに/meが含まれる通り、me系のAPIです。
そのため、ユーザーのプライバシーを保護するために、以下の2種類のトークンが両方とも必須となります。
| トークンの種類 | 役割・例え |
|---|---|
| Developer Token |
開発者の身分証明書 。/catalogと/meの両方で必要。 |
| Music User Token |
ユーザーの許可証 。/meのアクセスにのみ必要。 |
Apple Music APIの基本構造を理解する
ここで、これから先の理解を助けるために、recent/played/tracksエンドポイントの詳細に入る前に、API全体の基本的なデータ構造と、リソースの取得方法について軽く触れておきます。
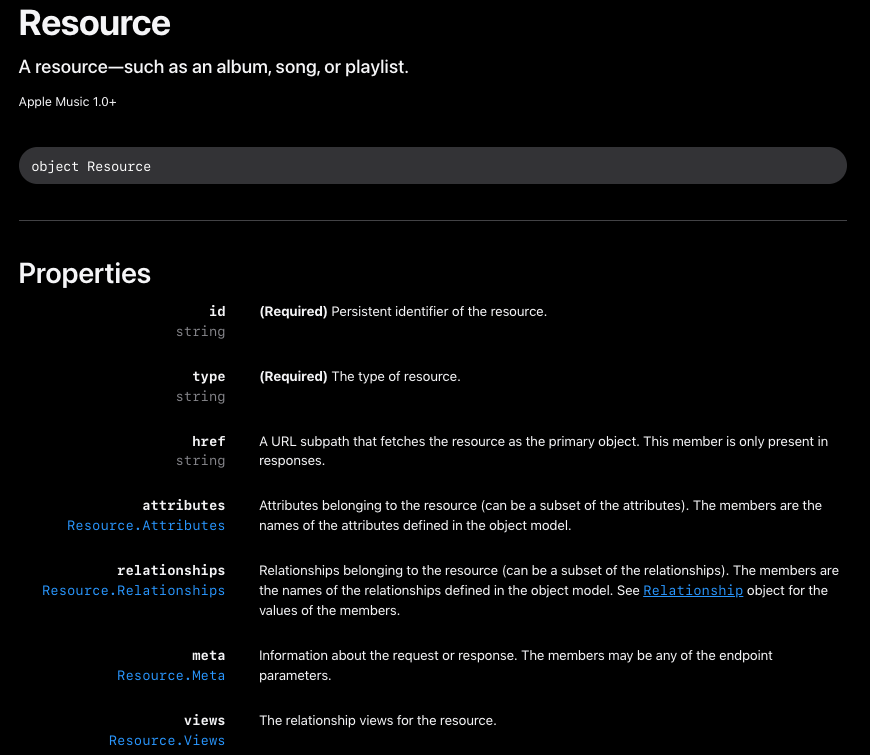
Apple Music APIでは、楽曲(song)、アルバム(album)、プレイリスト(playlist)といった全てのデータが、「Resourceオブジェクト」という共通のJSON構造で表現されます。
Resourceオブジェクト
https://developer.apple.com/documentation/applemusicapi/resource
| プロパティ | 型 | 日本語解説 |
|---|---|---|
| id | string | (必須) リソースの一意で永続的な識別子。 |
| type | string | (必須) リソースの種類 (songs, albumsなど)。 |
| href | string | このリソースを単体で取得するためのAPIパス。レスポンスにのみ含まれます。 |
| attributes | object | リソースの属性情報(曲名、アーティスト名など)が含まれるオブジェクト。 |
| relationships | object | 他のリソースとの関連情報(アルバムに含まれる曲など)が含まれるオブジェクト。 |
| meta | object | リクエストやレスポンスに関するメタ情報。 |
| views | object | リソースの関連情報を異なる視点でまとめたもの。 |
リソースの取得とレスポンスの拡張
基本的なリソース取得
クエリパラメータを何も指定せずにリソースを取得するAPI(例: GET /v1/catalog/{storefront}/songs/{id})を呼び出すと、data配列の中に指定したResourceオブジェクトが返されます。
この時、relationshipsオブジェクトは返り値に含まれません。
また、resource.attributeには一部のフィールドのみがセットされています。
リクエスト例
GET https://api.music.apple.com/v1/catalog/us/songs/1613600188
JSON例
{"data":[{"id":"1613600188","type":"songs","href":"/v1/catalog/us/songs/1613600188","attributes":{"albumName":"Emotional Creature","artistName":"Beach Bunny","artwork":{"bgColor":"202020","height":3000,"textColor1":"aea6f6","textColor2":"b68ef6","textColor3":"918bcb","textColor4":"9878cb","url":"https://is1-ssl.mzstatic.com/image/thumb/Music112/v4/df/4e/68/df4e6833-9828-51d7-cdeb-71ecf6d3a23d/810090090962.png/{w}x{h}bb.jpg","width":3000},"composerName":"Anthony Vaccaro, Jon Alvarado, Lili Trifilio & Matt Henkels","discNumber":1,"durationInMillis":221000,"genreNames":["Alternative","Music"],"hasLyrics":true,"isAppleDigitalMaster":true,"isrc":"USQE92100257","name":"Entropy","playParams":{"id":"1613600188","kind":"song"},"previews":[{"url":"https://audio-ssl.itunes.apple.com/itunes-assets/AudioPreview122/v4/72/a3/ab/72a3ab79-0066-f773-6618-7a53adc250b3/mzaf_17921540907592750976.plus.aac.p.m4a"}],"releaseDate":"2022-06-09","trackNumber":1,"url":"https://music.apple.com/us/album/entropy/1613600183?i=1613600188"},"relationships":{"albums":{"href":"/v1/catalog/us/songs/1613600188/albums","data":[{"id":"1613600183","type":"albums","href":"/v1/catalog/us/albums/1613600183"}]},"artists":{"href":"/v1/catalog/us/songs/1613600188/artists","data":[{"id":"1147783278","type":"artists","href":"/v1/catalog/us/artists/1147783278"}]}}}]}%
includeによる関連情報の追加
関連する情報が含まれるrelationshipsオブジェクトを返り値に含めたい場合は、includeクエリパラメータを使用します。
例えば、songsを取得する際にinclude=albumsと指定すれば、relationships内にアルバムのアートワークやリリース日といった詳細情報も一度に取得できます。
includeで指定できる値は、各Resourceごとに異なります。
これは、公式ドキュメントの各Resourceのページ(例: songs)からRelationshipsの項目を辿ることで確認できます。

- songs取得api: https://developer.apple.com/documentation/applemusicapi/get-a-catalog-song
- 返り値であるsongsリソース: https://developer.apple.com/documentation/applemusicapi/songs
- songsリソースのrelationshipsに含めることができる情報: https://developer.apple.com/documentation/applemusicapi/songs/relationships-data.dictionary
extendによる属性情報の追加
attributesオブジェクトに、デフォルトでは含まれない追加の属性情報を含めたい場合は、extendクエリパラメータを使用します。
extendで指定できる値は、公式ドキュメントの各ResourceのAttributesの項目で(Extended)と記載されているものが該当します。

- songsリソースのattributesで拡張できる情報: https://developer.apple.com/documentation/applemusicapi/songs/attributes-data.dictionary
recent/played/tracks エンドポイントの使い方
ここからは、本題である再生履歴取得APIの詳細を解説します。
エンドポイント定義
-
HTTP Method:
GET -
URL:
https://api.music.apple.com/v1/me/recent/played/tracks
このエンドポイントは、認証されたユーザーが直近に再生した楽曲の履歴を返します。
返り値の基本構造
返り値の基本構造は { "data": [...] } となっており、data配列の中に再生されたトラックの情報がResourceオブジェクトとして格納されます。
このdataの中に含まれるResourceの候補としては、以下の4種類があります。
- library-music-videos
- library-songs
- music-videos
- songs
それぞれのResourceオブジェクトが持つ属性(attributes)や関連情報(relationships)の詳しい定義は、以下の公式ドキュメントで確認できます。
- songs https://developer.apple.com/documentation/applemusicapi/songs
- library-songs https://developer.apple.com/documentation/applemusicapi/librarysongs
- music-videos https://developer.apple.com/documentation/applemusicapi/musicvideos
- library-music-videos https://developer.apple.com/documentation/applemusicapi/librarymusicvideos
クエリパラメータ
リクエストURLの末尾に?を付けて、以下のパラメータを組み合わせることで、取得するデータを細かく制御できます。
| パラメータ | 型 | 説明 | 例 |
|---|---|---|---|
| types | string | (必須) 取得するトラックの種類。 | ?types=songs |
| limit | integer | 1回のリクエストで取得する最大件数。(最大値: 30、デフォルト30) | ?limit=10 |
| offset | string | データの取得開始位置をずらすための値。ページネーションに利用。 | ?offset=20 |
| include | string | レスポンスに追加で含める関連情報。 | ?include=station |
| extend | string | attributesに追加で取得する属性情報。 | ?extend=artistUrl |
| l | string | 表示言語を指定する言語タグ。 | ?l=ja |
limitとoffsetによるページネーション
limitとoffsetを組み合わせることで、再生履歴を遡って取得できます。
-
limit=10&offset=0(1〜10件目) -
limit=10&offset=10(11〜20件目) -
limit=10&offset=20(21〜30件目)
パラメータ詳細解説
types (必須パラメータ)
typesは、レスポンスのdata配列に含めるResourceオブジェクトの種類を決定する必須のクエリです。
例えば types=songs と指定すると、data配列にはtypeがsongsのオブジェクトのみが含まれるようになります。
実際にdataの中に格納される各Resourceの具体的なデータ構造は、先ほど記載した各種Resourceのドキュメントページで確認できます。
- songs https://developer.apple.com/documentation/applemusicapi/songs
- library-songs https://developer.apple.com/documentation/applemusicapi/librarysongs
- music-videos https://developer.apple.com/documentation/applemusicapi/musicvideos
- library-music-videos https://developer.apple.com/documentation/applemusicapi/librarymusicvideos
include の挙動
先ほどの基本構造の説明で察した方もいると思いますが、includeで指定できる値はAPIのエンドポイントごとにサポート範囲が異なります。
公式ドキュメントでは、/v1/me/recent/played/tracksエンドポイントでincludeが利用可能であることは示されていますが、具体的にどのrelationshipがサポートされているかのリストは明記されていません。
そこで実際にAPIを呼び出して検証した結果、このエンドポイントでは include=stationのみが使用可能 でした。
(ただし、これは単に私の再生履歴に他の関連データが含まれていなかっただけの可能性はあります。)
この結果は、APIの基本構造から考えると直感に反する内容でした。
このAPIの返り値は以下のような構造になっています。
{
  data: [
    resource(library-music-videos または library-songs, music-videos, songs),
    resource(library-music-videos または library-songs, music-videos, songs),
    resource(library-music-videos または library-songs, music-videos, songs)
  ]
}
そのため、例えばdata配列にsongsオブジェクトが含まれる場合、そのsongsオブジェクトが本来持つrelationshipsであるartistsが、include=artistsで取得できると期待されます。
しかし、実際には取得できませんでした。
もしかしたら他の方法で取得できるのかもしれませんが、現状では見つけられません。
extend の挙動
次に解説するのが extend オプション です。
これを使うと、attributes に含まれる情報を追加できます。
たとえば songsResourceが持つ artistUrl という拡張属性を取得したい場合は、クエリに ?extend=artistUrl を指定することでレスポンスに含めることができます。
extendで拡張できる値は各リソースのオブジェクトページで確認することができます。
- songs https://developer.apple.com/documentation/applemusicapi/songs
- library-songs https://developer.apple.com/documentation/applemusicapi/librarysongs
- music-videos https://developer.apple.com/documentation/applemusicapi/musicvideos
- library-music-videos https://developer.apple.com/documentation/applemusicapi/librarymusicvideos
以上でこのAPIの使用まとめは終わりです。ここからは、実際にAPIを叩くために必要なトークンの発行方法等を解説します・
APIテスト方法
最終的に、2つのトークンとクエリパラメータを組み合わせた curl コマンドは以下のようになります。これを実行することでAPIをテスト実行することができます。
curl -v \
-H "Authorization: Bearer [ここにDeveloper Tokenを貼り付け]" \
-H "Music-User-Token: [ここにUser Tokenを貼り付け]" \
"https://api.music.apple.com/v1/me/recent/played/tracks?types=songs&include=artists&limit=10"
このコマンドを実行することで、ユーザーの最新再生履歴10件を詳細なアーティスト情報付きで取得できます。
認証情報の準備
このAPIを叩くためには、以下の 2種類のトークン が必要です。
- Developer Token
- Music User Token
これらのトークンの取得手順は以下の記事を参考に行いました。
https://arc.net/l/quote/kspwddnr
Developer Tokenの作成
Developer Tokenは下記三つの情報を元に作成される JWT(JSON Web Token) です。
- MusicKit Private Key(
.p8ファイル) - Key ID
- Apple Developerアカウントの Team ID
MusicKit Private KeyとKey IDの作成手順
- Apple Developerサイトにアクセス
https://developer.apple.com/account/resources/authkeys/list - 右上の「keys +」ボタンをクリック

-
Media Services にチェックを入れ、Key Nameを入力して「Continue」

- 「Register」をクリック

- 「Download」をクリックし、
.p8拡張子のファイルをダウンロード 。Key IDもこの画面で確認できます。
(これが MusicKit Private Key です)

Team IDは以下で確認できます。
https://developer.apple.com/account
JWTトークンの生成
取得した情報をもとに、以下のPythonスクリプトを使用してDeveloper Tokenを生成します。
https://github.com/pelauimagineering/apple-music-token-generator/blob/master/music_token.py
.p8 ファイルの内容を secret に、Key IDとTeam IDをそれぞれ keyId, teamId にセットして実行します。
実行例
(test) itohisahideki@itohisahidekinonotobukkukonpyuta CVERSE % /opt/anaconda3/envs/test/bin/python /Users/itohisahideki/CVERSE/music_token.py
----TOKEN----
eyJhbGciOiJxxxxx.xxxxxxxxxxxxxxxxxxxxxxxxxxxxxxxxxxxxxxxxxxxxxxxxxxxxxxxxxxxxxxxxxxxxxxxxxxxxxxxxxxxxxxxxxxxxxxxxxxxxxxxxxxxxxxxxxxxxxx
----CURL----
curl -v -H 'Authorization: Bearer eyJhbGciOiJxxxxx.xxxxxxxxxxxxxxxxxxxxxxxxxxxxxxxxxxxxxxxxxxxxxxxxxxxxxxxxxxxxxxxxxxxxxxxxxxxxxxxxxxxxxxxxxxxxxxxxxxxxxxxxxxxxxxxxxxxxxx' "https://api.music.apple.com/v1/catalog/us/artists/36954"
(test) itohisahideki@itohisahidekinonotobukkukonpyuta CVERSE %
-
----TOKEN----:生成されたDeveloper Token本体です(認証に使用されるJWT文字列) -
----CURL----:生成されたトークンを使ってAPIをテストするためのサンプルコマンドです。
上記の——CURL——で記載されてるAPIは
category系なので Developer Tokenのみ で認証可能です。
ユーザー個人の情報を取得する場合は、さらにMusic User Tokenが必要になります。
Music User Tokenの取得
User Tokenは以下のSwiftコードを使って取得しました(AIで生成)。
developerToken の部分を、自分で生成したトークンに置き換えてください。
import SwiftUI
import StoreKit
import MusicKit

@main
struct SwiftUiFirebaseApp: App {
    var body: some Scene {
        WindowGroup {
            UserTokenView()
                .preferredColorScheme(.dark)
        }
    }
}

struct UserTokenView: View {
    private let developerToken = "developer tokenをここに書いてください。"

    @State private var userToken: String = "まだ取得していません"
    @State private var statusMessage: String = "準備完了"
    @State private var isLoading: Bool = false

    private let controller = SKCloudServiceController()

    var body: some View {
        VStack(spacing: 20) {
            Text("Music User Token 取得ツール 👤")
                .font(.title).bold()

            if isLoading {
                ProgressView()
                Text(statusMessage)
                    .foregroundColor(.secondary)
            } else {
                Button("1. User Tokenを取得する") {
                    Task {
                        await getMusicUserToken()
                    }
                }
                .buttonStyle(.borderedProminent)
            }

            VStack(alignment: .leading) {
                Text("Status:")
                    .font(.headline)
                Text(statusMessage)
                    .foregroundColor(.secondary)

                Text("Music User Token:")
                    .font(.headline)
                    .padding(.top)

                TextEditor(text: .constant(userToken))
                    .frame(height: 200)
                    .border(Color.gray, width: 1)
                    .cornerRadius(8)
            }
        }
        .padding()
    }

    func getMusicUserToken() async {
        isLoading = true

        statusMessage = "アクセス許可をリクエスト中..."
        let status = await SKCloudServiceController.requestAuthorization()
        guard status == .authorized else {
            statusMessage = "❌ アクセスが許可されませんでした。"
            isLoading = false
            return
        }
        statusMessage = "✅ アクセス許可OK"

        do {
            let capabilities = try await controller.requestCapabilities()
            guard capabilities.contains(.musicCatalogPlayback) else {
                statusMessage = "❌ Apple Musicメンバーではありません。"
                isLoading = false
                return
            }
            statusMessage = "✅ メンバーシップ確認OK"
        } catch {
            statusMessage = "❌ メンバーシップ確認エラー: \(error.localizedDescription)"
            isLoading = false
            return
        }

        do {
            let token = try await controller.requestUserToken(forDeveloperToken: developerToken)
            self.userToken = token
            statusMessage = "🎉 User Tokenの取得に成功!"
        } catch {
            self.userToken = "取得失敗"
            statusMessage = "❌ User Token取得エラー: \(error.localizedDescription)"
        }

        isLoading = false
    }
}
実行画面
アプリを実行すると、以下のような画面が表示されます。
「User Tokenを取得する」ボタンを押すと、下部のテキストボックスにトークンが出力されます。

これで Developer Token と Music User Token の両方が揃いました。
あとは以下のcurlコマンドでAPIを実行することができます。
curl -v \
-H "Authorization: Bearer [ここにDeveloper Tokenを貼り付け]" \
-H "Music-User-Token: [ここにUser Tokenを貼り付け]" \
"https://api.music.apple.com/v1/me/recent/played/tracks?types=songs&include=artists&limit=10"