はじめに
シングルボードコンピュータの Raspberry Pi 5(8GBモデル) で、どこまで「生成AI」の実用的な運用が可能か。
本記事では、Hugging Face で公開されている 超軽量モデル をComfyUI上で動作させたのでその記録を残します。

ComfyUIとは
Stable Diffusionなどの画像生成AIモデルを、ブロック(ノード)を線でつなぐ「ノードベース」の操作画面で構築・実行できる高機能・軽量なGUIツールです。
1. 実行環境の構築
8GBという限られたメモリを最大限活用するため、GUIを排した構成 を採用しました。
Swapは適当に6GBほど割り当てています。
環境構成
- OS: Raspberry Pi OS (64-bit) Lite (Bookworm)(SSDブート)
-
冷却: 公式 Active Cooler
※ 推論中は CPU 使用率 100% が長時間続くため必須 - コンテナ基盤: Docker + docker-compose
※OSインストール、Dockerインストールなどはインターネットに記事がたくさんありますのでここでは説明しません。
Dockerfile のポイント
ARM64(aarch64)環境に対応するため、
PyTorch CPU 版ホイールを明示的に指定 します。
FROM python:3.10-slim-bookworm

RUN apt-get update && apt-get install -y \
    git curl build-essential \
    libgl1-mesa-glx libglib2.0-0 \
    && rm -rf /var/lib/apt/lists/*

WORKDIR /app
RUN git clone https://github.com/comfyanonymous/ComfyUI.git .

RUN pip install --no-cache-dir \
    torch torchvision torchaudio \
    --index-url https://download.pytorch.org/whl/cpu

RUN pip install --no-cache-dir -r requirements.txt

# 量子化モデル(GGUF)対応に必須
RUN pip install --no-cache-dir gguf sentencepiece protobuf

EXPOSE 8188

# ARM CPU 推論安定化のため --cpu と --force-fp32 を付与
CMD ["python3", "main.py", "--listen", "0.0.0.0", "--cpu", "--force-fp32"]
docker-compose.yml
ホスト側の storage ディレクトリをコンテナ内の models 等にマウントし、データを永続化します。
services:
  comfyui:
    build: .
    container_name: comfyui
    ports:
      - "8188:8188"
    volumes:
      - ./storage/models:/app/models
      - ./storage/custom_nodes:/app/custom_nodes
      - ./storage/output:/app/output
    restart: unless-stopped
2. モデル・関連ファイルの準備(重要)
- 8GB RAM 環境では GGUF形式(4-bit量子化)が必須
- モデル単体ではなくUNet / Text Encoder / VAE を正しいパスに配置する必要がある
① モデルファイルのダウンロードと配置
wget で Hugging Face から直接取得します。
| 種類 | 推奨ファイル | 推奨ディレクトリ (ComfyUI直下) |
|---|---|---|
| Text Encoder | umt5-xxl-encoder-q4_k_m.gguf |
models/text_encoders/ |
| VAE | vae-ft-mse-840000-ema-pruned.safetensors |
models/vae/ |
| SD1.5 (UNet) | stable-diffusion-v1-5-pruned-emaonly-Q4_0.gguf |
models/unet/ |
| CLIP | sd15_clip_vae_only.safetensors |
models/clip/ |
ダウンロード例
# UMT5 (多言語テキストエンコーダ)
cd ../text_encoders/
wget https://huggingface.co/calcuis/wan-1.3b-gguf/resolve/main/umt5-xxl-encoder-q4_k_m.gguf

# VAE(画像復元用)
cd ../vae/
wget https://huggingface.co/stabilityai/sd-vae-ft-mse-original/resolve/main/vae-ft-mse-840000-ema-pruned.safetensors

# Stable Diffusion 1.5
cd ../unet/
wget https://huggingface.co/second-state/stable-diffusion-v1-5-GGUF/resolve/main/stable-diffusion-v1-5-pruned-emaonly-Q4_0.gguf

# CLIP (テキスト解析用)
cd ../clip/
wget https://huggingface.co/runwayml/stable-diffusion-v1-5/resolve/main/v1-5-pruned-emaonly.safetensors -O sd15_clip_vae_only.safetensors
最終的なディレクトリ構造
Raspberry Pi 5の作業ディレクトリの構成は最終的に以下のようになります。
.
├── Dockerfile
├── docker-compose.yml
└── storage
    ├── custom_nodes
    ├── output
    └── models
        ├── clip
        │   └── sd15_clip_vae_only.safetensors
        ├── text_encoders
        │   └── umt5-xxl-encoder-q4_k_m.gguf
        ├── unet
        │   └── stable-diffusion-v1-5-pruned-emaonly-Q4_0.gguf
        └── vae
            └── vae-ft-mse-840000-ema-pruned.safetensors
3. 起動
全てのファイルがダウンロードできたら、docker-compose.ymlのあるフォルダで以下のコマンドを実行。
docker compose up -d --build
起動ログが流れます(docker compose logs -fで確認)
comfyui  | Checkpoint files will always be loaded safely.
comfyui  | Total VRAM 8063 MB, total RAM 8063 MB
comfyui  | pytorch version: 2.5.1
comfyui  | Forcing FP32, if this improves things please report it.
comfyui  | Set vram state to: DISABLED
comfyui  | Device: cpu
...
comfyui  | Context impl SQLiteImpl.
comfyui  | Will assume non-transactional DDL.
comfyui  | Assets scan(roots=['models']) completed in 0.030s (created=0, skipped_existing=5, total_seen=6)
comfyui  | Starting server
comfyui  |
comfyui  | To see the GUI go to: http://0.0.0.0:8188
Starting server〜が表示されたら、正常に起動しています。
アクセス確認
http://[Raspberry Pi 5のローカルIP]:8188へアクセスして以下のようなページが表示されたら起動は成功しています。

ワークフローの組み立て
さて、ComfyUIでは、ブロック(ノード)と言われるパーツを繋ぎ合わせることで処理手順を作成することができます。
手動で構築するには少し説明が長くなりますので今回は以下のJSONファイルを用意しました。
workflow.jsonというファイル名でPCに保存してください。
※長いので折りたたんであります。
workflow.json
{
  "id": "ce335748-c805-40dd-9844-634307d030cd",
  "revision": 0,
  "last_node_id": 9,
  "last_link_id": 9,
  "nodes": [
    {
      "id": 7,
      "type": "CLIPTextEncode",
      "pos": [
        413,
        389
      ],
      "size": [
        425.27801513671875,
        180.6060791015625
      ],
      "flags": {},
      "order": 3,
      "mode": 0,
      "inputs": [
        {
          "name": "clip",
          "type": "CLIP",
          "link": 5
        }
      ],
      "outputs": [
        {
          "name": "CONDITIONING",
          "type": "CONDITIONING",
          "slot_index": 0,
          "links": [
            6
          ]
        }
      ],
      "properties": {
        "Node name for S&R": "CLIPTextEncode"
      },
      "widgets_values": [
        "text, watermark"
      ]
    },
    {
      "id": 6,
      "type": "CLIPTextEncode",
      "pos": [
        415,
        186
      ],
      "size": [
        422.84503173828125,
        164.31304931640625
      ],
      "flags": {},
      "order": 2,
      "mode": 0,
      "inputs": [
        {
          "name": "clip",
          "type": "CLIP",
          "link": 3
        }
      ],
      "outputs": [
        {
          "name": "CONDITIONING",
          "type": "CONDITIONING",
          "slot_index": 0,
          "links": [
            4
          ]
        }
      ],
      "properties": {
        "Node name for S&R": "CLIPTextEncode"
      },
      "widgets_values": [
        "beautiful scenery nature glass bottle landscape, , purple galaxy bottle,"
      ]
    },
    {
      "id": 5,
      "type": "EmptyLatentImage",
      "pos": [
        473,
        609
      ],
      "size": [
        315,
        106
      ],
      "flags": {},
      "order": 0,
      "mode": 0,
      "inputs": [],
      "outputs": [
        {
          "name": "LATENT",
          "type": "LATENT",
          "slot_index": 0,
          "links": [
            2
          ]
        }
      ],
      "properties": {
        "Node name for S&R": "EmptyLatentImage"
      },
      "widgets_values": [
        512,
        512,
        1
      ]
    },
    {
      "id": 3,
      "type": "KSampler",
      "pos": [
        863,
        186
      ],
      "size": [
        315,
        262
      ],
      "flags": {},
      "order": 4,
      "mode": 0,
      "inputs": [
        {
          "name": "model",
          "type": "MODEL",
          "link": 1
        },
        {
          "name": "positive",
          "type": "CONDITIONING",
          "link": 4
        },
        {
          "name": "negative",
          "type": "CONDITIONING",
          "link": 6
        },
        {
          "name": "latent_image",
          "type": "LATENT",
          "link": 2
        }
      ],
      "outputs": [
        {
          "name": "LATENT",
          "type": "LATENT",
          "slot_index": 0,
          "links": [
            7
          ]
        }
      ],
      "properties": {
        "Node name for S&R": "KSampler"
      },
      "widgets_values": [
        156680208700286,
        "randomize",
        20,
        8,
        "euler",
        "normal",
        1
      ]
    },
    {
      "id": 8,
      "type": "VAEDecode",
      "pos": [
        1209,
        188
      ],
      "size": [
        210,
        46
      ],
      "flags": {},
      "order": 5,
      "mode": 0,
      "inputs": [
        {
          "name": "samples",
          "type": "LATENT",
          "link": 7
        },
        {
          "name": "vae",
          "type": "VAE",
          "link": 8
        }
      ],
      "outputs": [
        {
          "name": "IMAGE",
          "type": "IMAGE",
          "slot_index": 0,
          "links": [
            9
          ]
        }
      ],
      "properties": {
        "Node name for S&R": "VAEDecode"
      },
      "widgets_values": []
    },
    {
      "id": 9,
      "type": "SaveImage",
      "pos": [
        1451,
        189
      ],
      "size": [
        253.47265625,
        58
      ],
      "flags": {},
      "order": 6,
      "mode": 0,
      "inputs": [
        {
          "name": "images",
          "type": "IMAGE",
          "link": 9
        }
      ],
      "outputs": [],
      "properties": {},
      "widgets_values": [
        "ComfyUI"
      ]
    },
    {
      "id": 4,
      "type": "CheckpointLoaderSimple",
      "pos": [
        26,
        474
      ],
      "size": [
        315,
        98
      ],
      "flags": {},
      "order": 1,
      "mode": 0,
      "inputs": [],
      "outputs": [
        {
          "name": "MODEL",
          "type": "MODEL",
          "slot_index": 0,
          "links": [
            1
          ]
        },
        {
          "name": "CLIP",
          "type": "CLIP",
          "slot_index": 1,
          "links": [
            3,
            5
          ]
        },
        {
          "name": "VAE",
          "type": "VAE",
          "slot_index": 2,
          "links": [
            8
          ]
        }
      ],
      "properties": {
        "Node name for S&R": "CheckpointLoaderSimple"
      },
      "widgets_values": [
        "v1-5-pruned-emaonly-fp16.safetensors"
      ]
    }
  ],
  "links": [
    [
      1,
      4,
      0,
      3,
      0,
      "MODEL"
    ],
    [
      2,
      5,
      0,
      3,
      3,
      "LATENT"
    ],
    [
      3,
      4,
      1,
      6,
      0,
      "CLIP"
    ],
    [
      4,
      6,
      0,
      3,
      1,
      "CONDITIONING"
    ],
    [
      5,
      4,
      1,
      7,
      0,
      "CLIP"
    ],
    [
      6,
      7,
      0,
      3,
      2,
      "CONDITIONING"
    ],
    [
      7,
      3,
      0,
      8,
      0,
      "LATENT"
    ],
    [
      8,
      4,
      2,
      8,
      1,
      "VAE"
    ],
    [
      9,
      8,
      0,
      9,
      0,
      "IMAGE"
    ]
  ],
  "groups": [],
  "config": {},
  "extra": {
    "ds": {
      "scale": 1,
      "offset": [
        0,
        0
      ]
    },
    "workflowRendererVersion": "LG",
    "frontendVersion": "1.37.11"
  },
  "version": 0.4
}
JSONを読み込ませる
「メニュー」→「ファイル」→「開く」→先程作成したworkflow.jsonを選択
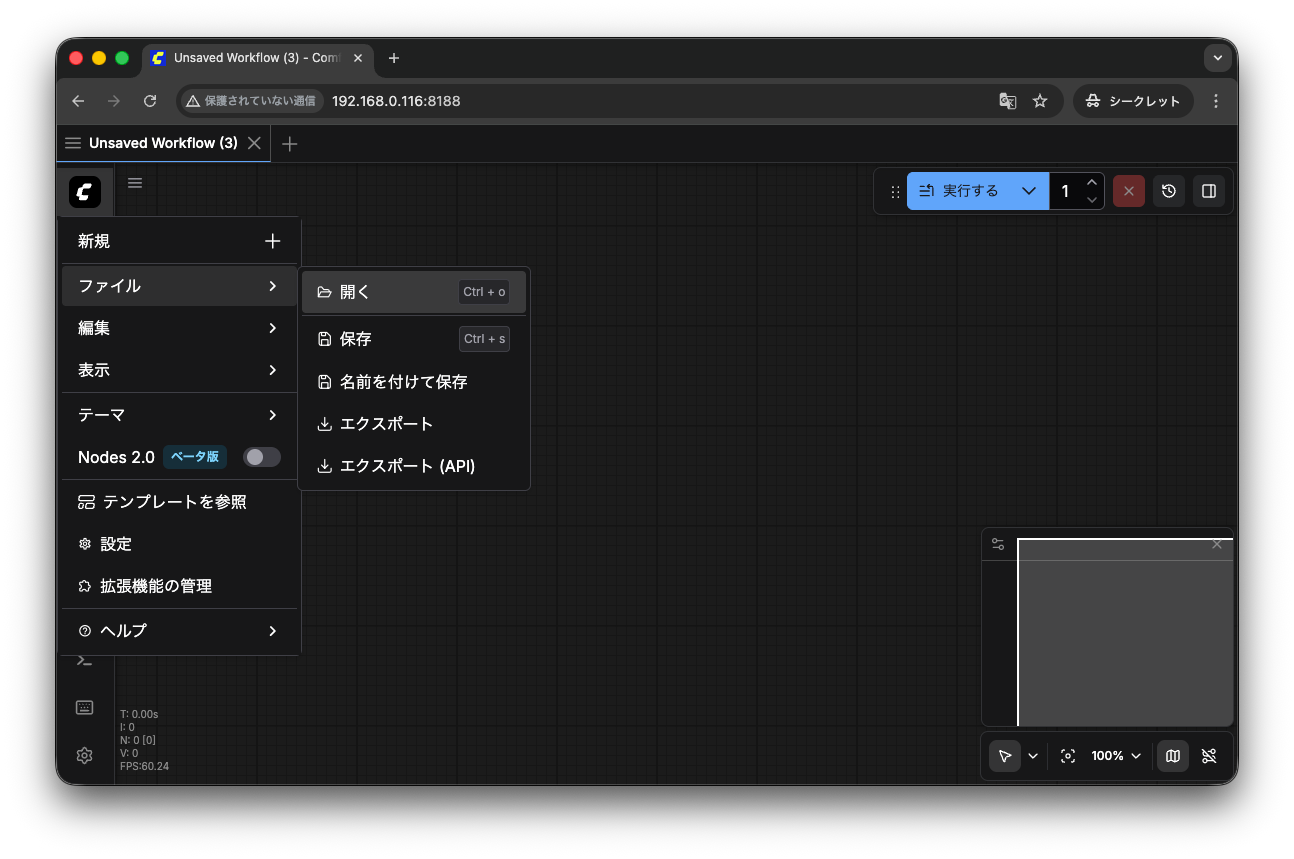

正しく、ワークフローが表示されればOKです。
4. 画像の生成
画像生成を実行
画面右上の「実行する」をクリック。
画像ではわかりやすいように「コンソール」を表示しています。(左ペインの下にある「コンソール」をクリックすると表示されます)
各ファイルの読み込みに結構時間がかかります。

画像の生成には15分ほどかかります。
画像生成に成功したら左ペインの「アセット」に表示されます。
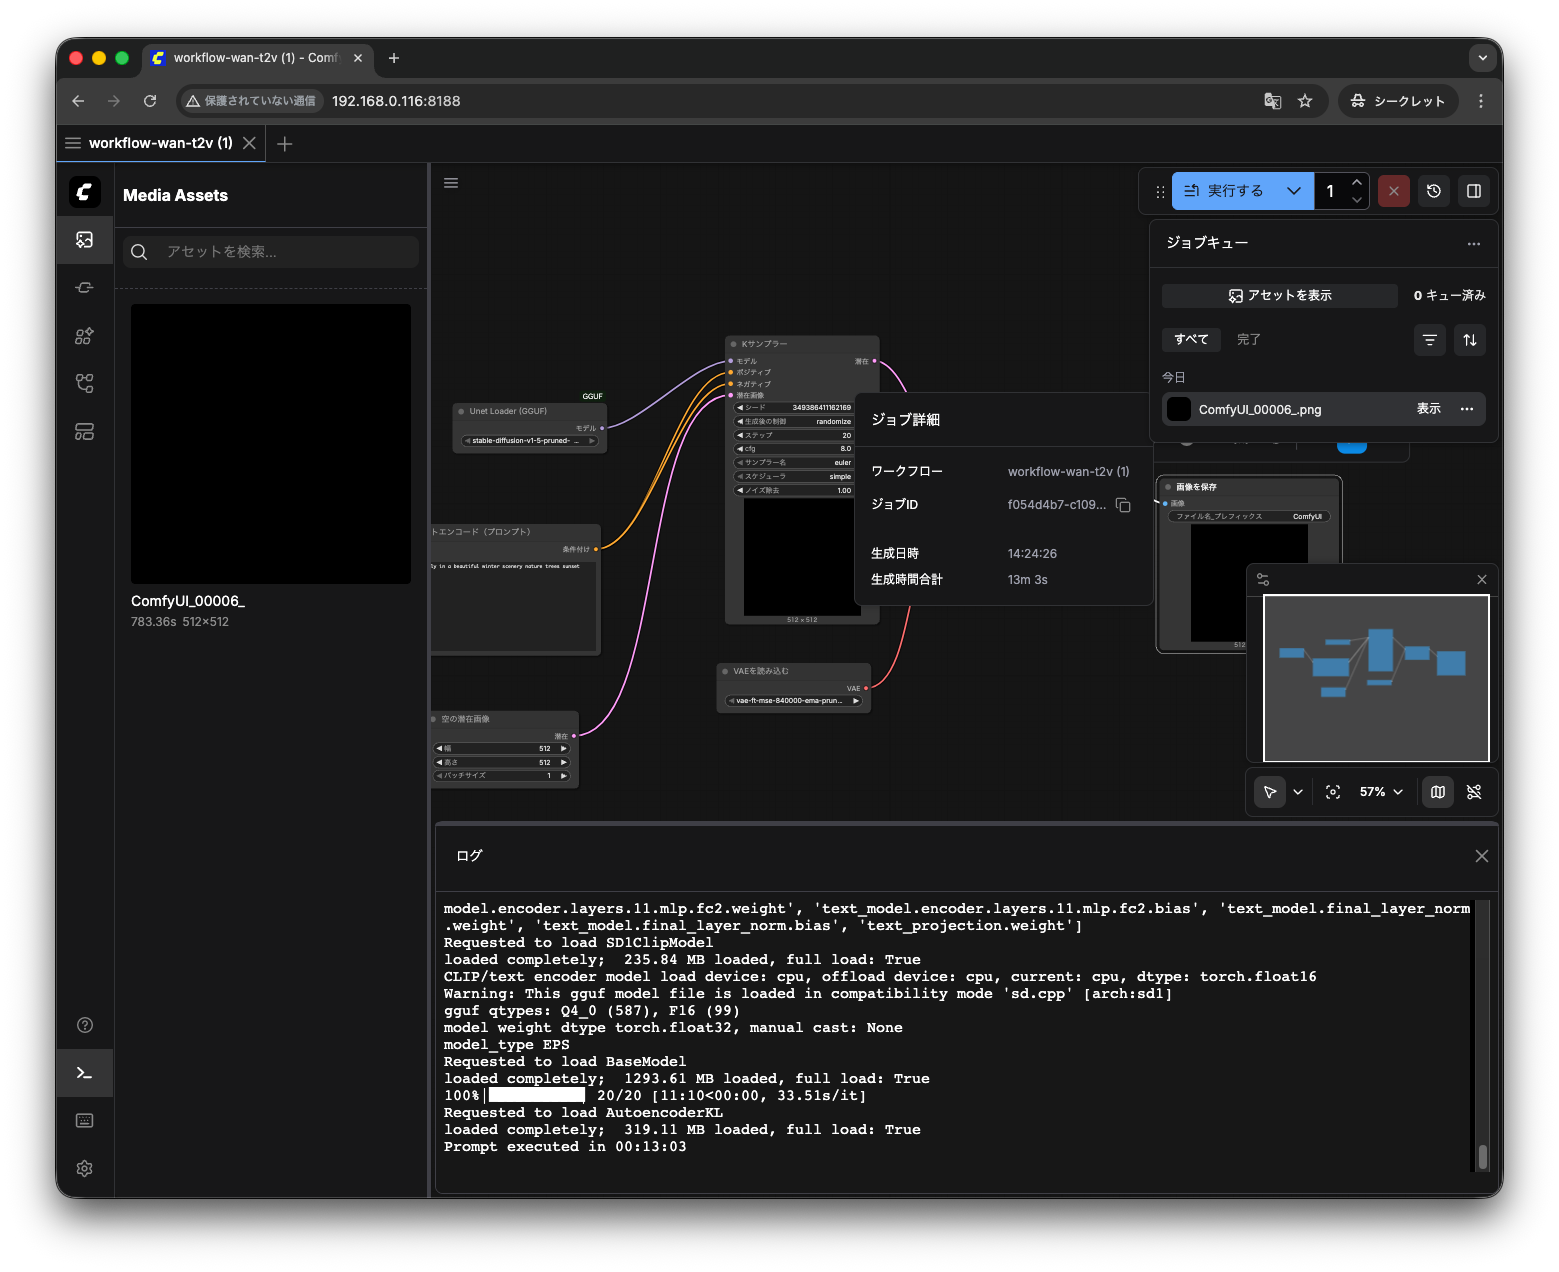
※今回、なぜか真っ黒な画面しか生成されませんでした。
スペックのせいなのか、モデルが悪いのか、フローが間違っているのか...は不明ですが一応画像は生成されました。
追って色々と修正していきたいと思います。
発生したトラブルと解決策
① cannot mmap an empty file
原因
- 404 エラー等により 0バイトのファイル が生成されていた
対策
-
ls -lhでダウンロードした各ファイルが1GB以上あるか確認 - 正しい URL から再ダウンロード
② 画像が真っ黒
原因
- 今のところ原因不明
対策
- 調査中です
まとめ:Raspberry Pi 5 × 生成AI の現在地
-
GGUF形式 により
8GB Raspberry Pi 5でも生成AIは「動く」 -
CPU推論では
FP32 + Tiled VAE が安定稼働の必須条件
今回試したモデルでは、Raspberry Pi 5単体での生成AI利用は可能ですが、実用には耐えないという結論です(笑)
画像もなぜか真っ黒な画像しか生成されないし、そもそも1枚の画像生成に15分もかかっているので実用には耐えないでしょう。
今後、機会があれば生成AIに特化したRaspberry Pi AI Hat + 2を使ってみたいと思います。
ちなみにAI HAT+は持っているのですが、残念ながらこちらは今回の用途には使えませんでした。

モデル選定からやり直すか〜