
はじめに
とある規則で動いている、「妖精が飛んでいるかのようなアニメーション」をHTML5 CanvasとJavaScriptで作ってみました。
どのような規則で動いているか、予想してみてください!!

予想で来ましたか?
種明かしをすると、こうなっています。
答えを見る(ここをクリック!)

六角形の上を、いくつかの点が行ったり来たりしていて、その点から伸ばした線同士の交点だけを軌跡として残しています。
ずっと見てられますよねw
今回は、このアニメーションの処理について説明していきます。
辺の上を往復する点
すべてのパターンに共通する土台は、「多角形の各辺の上を、0〜1の割合(t)で往復し続ける点」です。
t が1に到達したら折り返して0に向かい、0に到達したらまた1に向かう。ボールが壁に当たって跳ね返るようなイメージです。
/**
 * 往復移動の更新
 */
function updateBounce(point) {
  let newT = point.t + point.speed * point.dir;

  if (newT >= 1) {
    newT = 1;
    point.dir = -1;
  } else if (newT <= 0) {
    newT = 0;
    point.dir = 1;
  }

  point.t = newT;
}
それぞれの点は少しずつ違う速度(speed)で動かしています。速度を揃えないことで点同士の位置関係が毎フレーム変わり続け、動きが単調になりません。
この点から線を引き、線同士の交点を求めて、その交点の軌跡を残していく。これが今回のプログラムの基本方針です。ここから先は、六角形を例にして「線をどう引くか」を具体的に説明します。
六角形の線の引き方
プログラム上では、2つのバージョン作っています。
| バージョン | 内容 | 見た目 |
|---|---|---|
| v1 | 辺から垂直に伸びる線の交点が描く軌跡 | カクカクとした動きが特徴 |
| v2 | 6つの辺に独立した点を配置し、対角の辺にある点同士を結ぶ線の交点が描く軌跡 | 躍動感がある動きが特徴 |
v1:辺に垂直な線
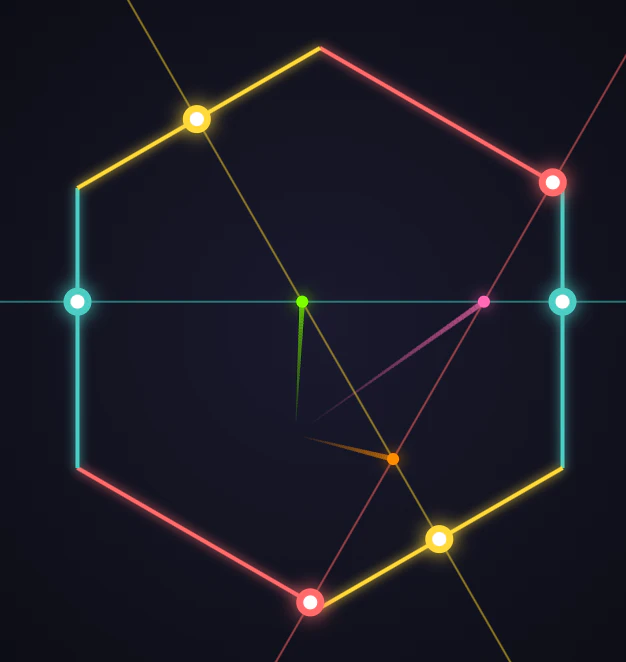
各辺に1つずつ点を置き、その点から辺に垂直な線を伸ばす方法です。6本の辺すべてから垂直線を引いて総当たりで交点を取ると $_6C_2=15$ 本にもなってしまうので、実際には隣接する半分の3辺だけを使い、その中で $_3C_2=3$ 本の交点を取っています。
// hexagon/v1 より(右側の3辺だけを使用)
const edges = [
  { start: hexagonVertices[0], end: hexagonVertices[1], color: '#ff6b6b' },
  { start: hexagonVertices[1], end: hexagonVertices[2], color: '#4ecdc4' },
  { start: hexagonVertices[2], end: hexagonVertices[3], color: '#ffd93d' }
];
辺上の位置と法線ベクトル、交点の計算は以下の通りです。
/**
 * 辺上の位置と法線ベクトルを取得
 */
function getPositionAndNormal(t, edgeIndex) {
  const edge = edges[edgeIndex];
  const p1 = edge.start;
  const p2 = edge.end;

  // 辺上の位置
  const x = p1.x + (p2.x - p1.x) * t;
  const y = p1.y + (p2.y - p1.y) * t;

  // 辺の方向ベクトル
  const dx = p2.x - p1.x;
  const dy = p2.y - p1.y;
  const len = Math.sqrt(dx * dx + dy * dy);

  // 法線ベクトル(内向き)
  const nx = dy / len;
  const ny = -dx / len;

  return { x, y, nx, ny };
}

/**
 * 2本の線の交点を計算
 */
function getIntersection(p1, n1, p2, n2) {
  const det = n1.nx * n2.ny - n1.ny * n2.nx;
  if (Math.abs(det) < 0.0001) return null;

  const dx = p2.x - p1.x;
  const dy = p2.y - p1.y;
  const t = (dx * n2.ny - dy * n2.nx) / det;

  return {
    x: p1.x + t * n1.nx,
    y: p1.y + t * n1.ny
  };
}
3辺それぞれから伸びる垂直線を2本ずつ組み合わせ、3つの交点をそれぞれ別の軌跡として残しています。
v2:対角の辺を結ぶ線
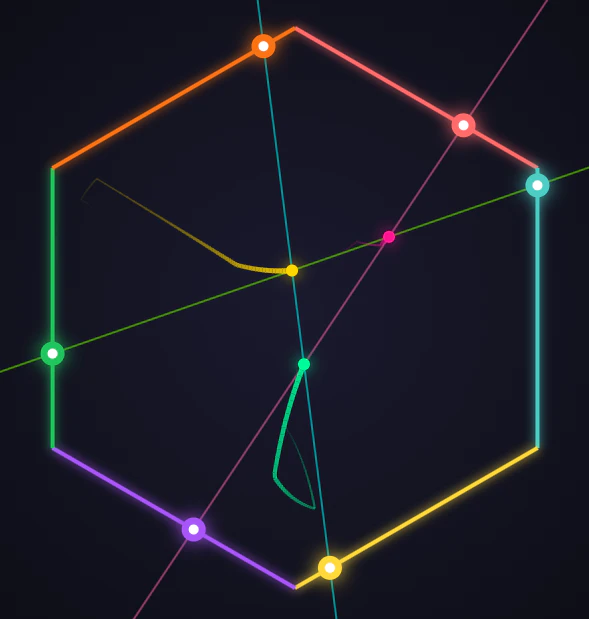
対角線パターンでは、辺は間引かずに6本すべてを使います。真向かいの辺同士をペアにして、そのペアの2点を結ぶ線を引きます。
// hexagon/v2 より
// 6つの辺を定義
const edges = [];
for (let i = 0; i < 6; i++) {
  edges.push({
    start: hexagonVertices[i],
    end: hexagonVertices[(i + 1) % 6],
    color: edgeColors[i]
  });
}

// 対角ペア
const diagonalPairs = [
  { edge1: 0, edge2: 3 },
  { edge1: 1, edge2: 4 },
  { edge1: 2, edge2: 5 }
];
線の向きは2点の位置関係で決まるので、垂直線と違って点同士が連動して動くのが特徴です。
/**
 * 2点を通る線の方向ベクトルを取得
 */
function getLineDirection(p1, p2) {
  const dx = p2.x - p1.x;
  const dy = p2.y - p1.y;
  const len = Math.sqrt(dx * dx + dy * dy);

  return { x: p1.x, y: p1.y, dx: dx / len, dy: dy / len };
}

/**
 * 2本の線の交点を計算
 */
function getIntersection(line1, line2) {
  const det = line1.dx * line2.dy - line1.dy * line2.dx;
  if (Math.abs(det) < 0.0001) return null;

  const dx = line2.x - line1.x;
  const dy = line2.y - line1.y;
  const t = (dx * line2.dy - dy * line2.dx) / det;

  return { x: line1.x + t * line1.dx, y: line1.y + t * line1.dy };
}
対角ペアが3組あるので対角線も3本引けます。ここまでは「点→対角線」の話でしたが、v2はもう一段階あって、この3本の対角線同士で、さらに総当たりの交点を取っています。
// 3本の対角線を作成
const lines = diagonalPairs.map(pair => {
  const p1 = edgePoints[pair.edge1];
  const p2 = edgePoints[pair.edge2];
  return getLineDirection(p1, p2);
});

// 3本の線同士の交点(線0-1, 線1-2, 線0-2)= 3C2 = 3個
const int01 = getIntersection(lines[0], lines[1]);
const int12 = getIntersection(lines[1], lines[2]);
const int02 = getIntersection(lines[0], lines[2]);
軌跡の演出
軌跡をただの線で描くと味気ないので、進行方向に向かって太く・濃くなるようにグラデーションをかけています。(一番こだわったポイントです!)
新しく計算した交点はtrailPoints.push()で配列の末尾に追加し、trailLengthで決めた保持数を超えたら古い点をshift()で先頭から捨てています。
/**
 * 軌跡を描画
 */
function drawTrail(trailPoints, color) {
  if (trailPoints.length < 2) return;

  for (let i = 1; i < trailPoints.length; i++) {
    const progress = i / trailPoints.length;
    const lineWidth = 0.5 + progress * 5;
    const alpha = 0.1 + progress * 0.8;

    ctx.beginPath();
    ctx.moveTo(trailPoints[i - 1].x, trailPoints[i - 1].y);
    ctx.lineTo(trailPoints[i].x, trailPoints[i].y);
    ctx.strokeStyle = color;
    ctx.lineWidth = lineWidth;
    ctx.globalAlpha = alpha;
    ctx.stroke();
  }
  ctx.globalAlpha = 1;
}
さいごに
今回は、六角形を例に幾何学模様の説明をしました。
説明はしませんでしたが、三角形・四角形・五角形・八角形も作成しており、辺の数や線の引き方が変わるだけで、また違った動きにになります。
ぜひ、画面の速度スライダーを動かしながら、色々なパターンを探してみてください。
また、興味のある方はGitHubのリポジトリも覗いてみてください。
ここまで読んで頂きありがとうございました。